- Знакомство с Windows 7: раздел Панели управления «Оборудование и звук»
- Audio Hardware Resource Management
- Specify Concurrency Resource Constraints
- Examples
- Registry Key Configuration
- Example XML Constraints File
- Control Panel — Hardware and Sound — Devices and Printers
- Fix Windows Hardware and Devices problems with Troubleshooter
- Hardware and Devices Troubleshooter
- Hardware and Devices Troubleshooter missing
- Windows: accessing the Windows Sound controls
- Contents
- Windows 10
- Accessing the Settings dialog
- Windows Settings
- Settings window
- Sound settings dialog
- Device settings
- Control Panel for older Windows versions
- Control Panel
- Hardware and Sound
- Sound
- Device settings
- Speaker icon in System Tray
- Direct access to the Control Panel Sound settings
- For the technically-minded
- Managing the settings
- Recording Settings
- Playback Settings
- Communications Settings adjustment (even if you do not make Internet calls)
- Alternative settings if crackly recording or playback occurs, or if recordings made while playing other tracks are not synchronized
- Audacity rescan/restart and settings
Знакомство с Windows 7: раздел Панели управления «Оборудование и звук»
Панель управления Windows 7 разбита на восемь основных категорий, третья из которых — «Оборудование и звук». В этом разделе содержатся все инструменты для добавления и удаления принтеров и других устройств, изменения системных звуков, настройки автозапуска, управления питанием, обновления драйверов и так далее.
Я описываю группировку апплетов по категориям, но в принципе, элементы Панели управления можно также просматривать в виде мелких или крупных значков. Всего в Панели управления представлено 45 апплетов.
В категории «Оборудование и звук» представлено пять разделов.
В разделе «Устройства и принтеры» (Devices and Printers) содержатся все устройства и принтеры, подключенные к компьютеру.
Чтобы добавить устройство вручную, нажмите кнопку «Добавить устройство» (Add a Device). Появится диалоговое окно мастера добавления устройства в Windows 7.
Чтобы добавить принтер вручную, нажмите кнопку «Добавить принтер» (Add a Printer). Появится диалоговое окно мастера добавления устройства в Windows 7.
В разделе «Устройства и Принтеры» можно также изменить параметры мыши. Диалоговое окно настройки параметров осталось прежним.
Audio Hardware Resource Management
WindowsВ 10 includes the ability to express concurrency constraints using an XML file. On resource constrained mobile devices the ability to specify priority for specific audio streams can enhance the customer experience.
This mechanism is only available in phones and tablets.
One challenge with creating a good audio experience on a low cost mobile device, is that some devices have various concurrency constraints. For example, it is possible that the device can only play up to 6 audio streams concurrently and supports only 2 offload streams. When there is an active phone call on a mobile device, it is possible that the device supports only 2 audio streams. When the device is capturing audio, the device can only play up to 4 audio streams.
WindowsВ 10 includes a mechanism to express concurrency constraints to insure that high-priority audio streams and cellular phone calls will be able to play. If the system does not have enough resources, then low priority streams are terminated. This mechanism is only available in phones and tablets not on desktops or laptops.
To specify constraints complete these two steps.
- Create a concurrency constraints XML file as described in Specify Concurrency Constraints.
- Configure a registry entry to use the custom concurrency constraints XML file as described in Registry_Key_Configuration.
Specify Concurrency Resource Constraints
The XML constraints file is made up of three sections. The first required section is defined by . This section can be used to define up to fifteen resource restraints. For example you could define constraints for the maximum number of rendering stream and the maximum number of streams that can be offloaded.
The next section of the XML file defines one or more lists of exclusive endpoints, with each list containing two or more endpoints. These are endpoints that, that cannot be active at the same time. This section is optional.
For example, if the audio hardware has both HandsetSpeaker and WiredHeadsetSpeaker wired to the same DAC, that cannot be active at the same time, these should be in the same ExclusiveEndpoints list.
This section can have multiple nodes. Each ExclusiveEndpoints node contains two or more Endpoint nodes. Each Endpoint node contains HWID, TopologyName, and PinId.
The last required section of the XML file defines various resource consumers. This section of the file contains multiple entries. Each entry identifies information about a resource consumer and their associated resources use. Each resource that is used, must be previously defined in the
section.
As audio resources are used, the audio service tracks the resources. When insufficient resources are available, either lower priority streams are terminated or the current resource request fails if existing resource consumers are higher priority.
These are the valid entries.
node contains a with CallState child node, that can be «Active» or «Hold».
— Audio streams. The node contains the following child nodes.
— The topology filter reference string of the resource consumer.
— The pin ID of the resource consumer.
— The GUID of the associated mode. For more information, see Audio Signal Processing Modes.
— The connector type of the resource consumer. Valid values are: Host, Loopback, or Offload.
— Keyword detector used to support Cortana voice interactions.
The following table summarizes the render audio stream priorities, listed from highest to lowest priority.
| Render audio stream | Priority |
|---|---|
| Communications | 1 |
| Game Chat | 2 |
| Screen Reader | 3 |
| Camera Shutter | 4 |
| Push To Talk | 5 |
| In Call Notification | 6 |
| Personal Assistant | 6 |
| Speech | 7 |
| Ringtone | 8 |
| Alarm | 9 |
| Movie | 10 |
| Foreground Only Media | 10 |
| Background Capable Media | 11 |
| Media | 11 |
| Sound Effects | 12 |
| DTMF | 12 |
| Game Media | 12 |
| System | 12 |
| Game Effects | 12 |
| Other | 13 |
| Alerts | 14 |
The following table summarizes the capture audio stream priorities, listed from highest to lowest priority.
| Capture audio stream | Priority |
|---|---|
| Communications | 1 |
| Game Chat | 2 |
| Push To Talk | 4 |
| Personal Assistant | 6 |
| Speech | 7 |
| Background Capable Media | 8 |
| Media | 8 |
| Other | 13 |
| Game Media | 15 |
| Screen Reader | 15 |
| Alerts | 15 |
| Foreground Only Media | 15 |
| Game Effects | 15 |
| Sound Effects | 15 |
| DTMF | 15 |
| In Call Notification | 15 |
| Alarm | 15 |
| Camera Shutter | 15 |
| Movie | 15 |
| Ringtone | 15 |
| System | 15 |
Examples
Example 1: The user is talking over Skype, using Communications Render and Capture streams. They start a game, which attempts to create a Game Effects stream. If there aren’t enough resources available, the Game Effects stream creation will fail.
Example 2: The user is playing music. They start an application that creates a Speech stream. If there aren’t enough resources available, the music stream will be terminated and the Speech stream creation will succeed.
Registry Key Configuration
The full path to the concurrency constraints XML file needs to be specified in the following registry key.
The path is relative to the driver install. In the driver INF installation the constraint XML file needs to be copied and the following line would be added to register it with the system:
In this registry key, provide a value containing the path to the XML. It is recommended that the name of the XML file and regkey value name be unique since there is potential for other subsystems/audio devices providing their own set of constraints in XML files. The regkey can be set in the audio driver INF file.
Example XML Constraints File
This is an example XML constraints file from the SYSVAD virtual audio driver sample.
Control Panel — Hardware and Sound — Devices and Printers
I’d check Device Manager to see if there’s some problem showing up there. To do that, click Start and right-click Computer, then click Properties. From there click Device Manager and look for entries with ! or ? next to them. If there, it means you need to get the proper Windows 7 compatible driver fom your computer manufacturer’s web site.
If that’s not it, here’re some more things you can do.
Get your antivirus program up to date and boot into Safe Mode. Note that some viruses can hide themselves from your antivirus program in normal mode, so you really need to scan in Safe Mode. To get into Safe Mode when you first power up, hit F8 about once a second until you get the menu and select Safe Mode. Then run a full system scan.
Microsoft has suggestions and offerings at
Forum moderator Keith has some suggestions along this line at
If that fixes it, fine. If not, use System Restore to go back to a date prior to the beginning of the problem. To run System Restore, click Start -> Programs -> Accessories -> System Tools -> System Restore. Click the box that says Show more restore points.
You can check for corrupted system files. Open an administrator command prompt and run SFC if the above doesn’t help. Click START, then type CMD in the search box, right-click CMD.EXE and click Run as administrator. Then from the command prompt type sfc /scannow.
Finally if all else fails, you can check the rather cryptic system event log. To do so click Start -> Control Panel -> Administrative Tools -> Event Viewer. Once in Event Viewer click on the system log and scroll through the entries looking for those flagged «error» to see if you can find hints as to where the problem could be.
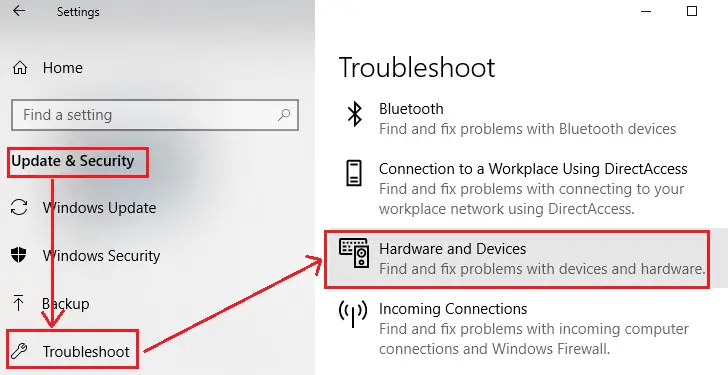
Fix Windows Hardware and Devices problems with Troubleshooter
If you find that your Windows 10/8/7 computer is facing some hardware or device issues or problems, you can run the Hardware and Devices Troubleshooter. This automated troubleshooter will try to identify and then resolve the issues that it finds.
Hardware and Devices Troubleshooter
Windows 10/8/7 comes with this troubleshooter in-built. If you recently installed a new driver or some hardware and find some things are not working as you’d like them to, use this troubleshooter.
On Windows 10, you can also open Settings > Update & Security > Troubleshoot and click on Hardware and Devices.
On Windows 8/7, open Control Panel > Hardware and Sound > Configure a device.
The Hardware Troubleshooter will open. You can set it to fix the detected problems automatically or select and opt to fix only the ones you want.
Click on Next to run the Hardware and Devices Troubleshooter. Once the scan is completed, it will present you with a report.
Choose the ones you want to fix and click on Next.
The Hardware and Devices Troubleshooter will try to fix the problems for you.
Hardware and Devices Troubleshooter missing
If the Hardware and Devices Troubleshooter is missing then you can also run the Troubleshooter using the command line. To invoke the troubleshooter, all you need do is to launch the command prompt, then type or copy and paste the command below and hit Enter.
You can also download and use our useful freeware FixWin to open the troubleshooter with a click.
Windows: accessing the Windows Sound controls
There are several ways to access the Windows sound controls — those available to you may depend upon your version of Windows and your PC.
Contents
Windows 10
Accessing the Settings dialog
Windows 10 has a new Settings dialog which can be accessed in a number of ways
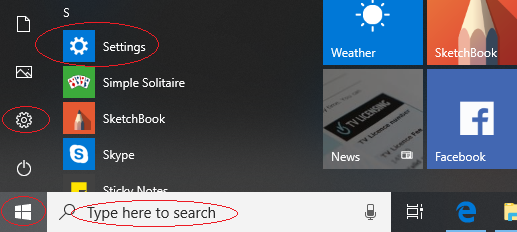 Click on the Windows icon at the bottom left of your Windows screen and clock on the Cog icon that appears above it, as in the above image.
Alternatively, at the bottom left of your Windows screen there is a search box. Where it says «Type here to search» simply type «Settings«.
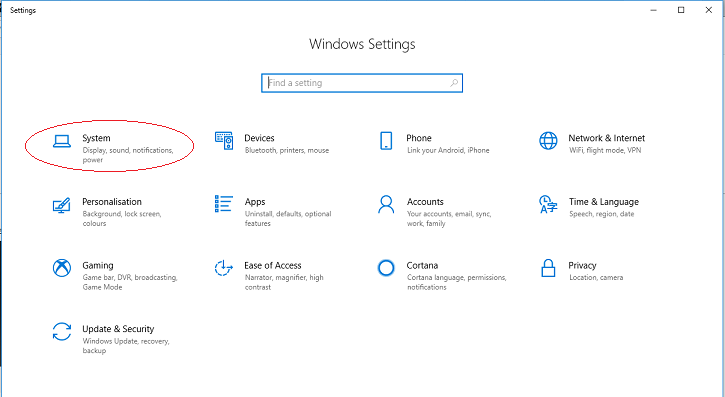
Windows Settings
Then click on the System entry to get the appropriate Settings dialog.
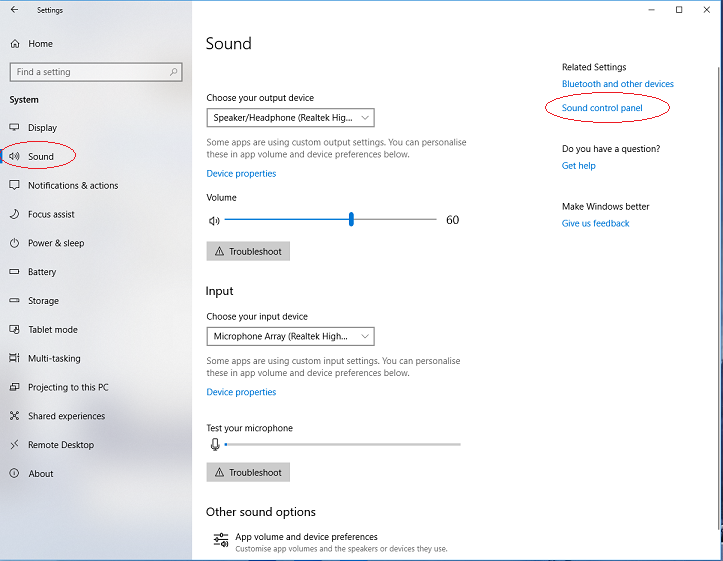
Settings window
Then click on «Sound» in the left column of the Settings window that appears.
 Windows 10 Settings window for sound
Sound settings dialog
Click on Sound control panel on the right and you will get the Sound settings window:
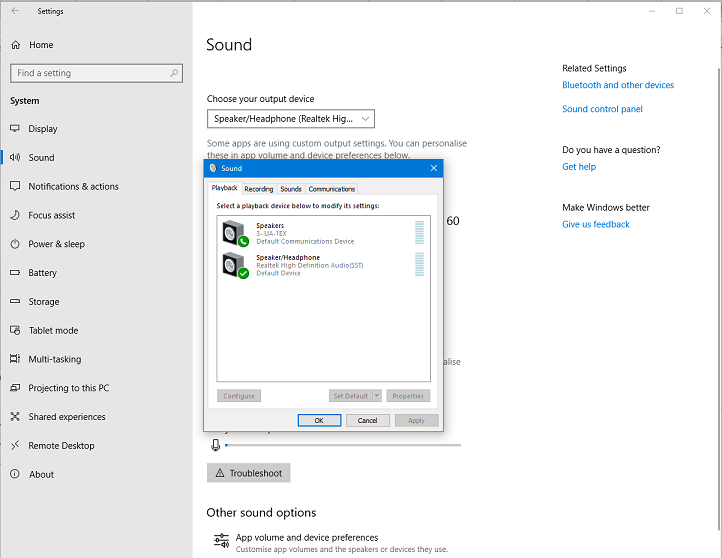 Sound settings window showing playback devices available — exact contents depend on your available devices
Device settings
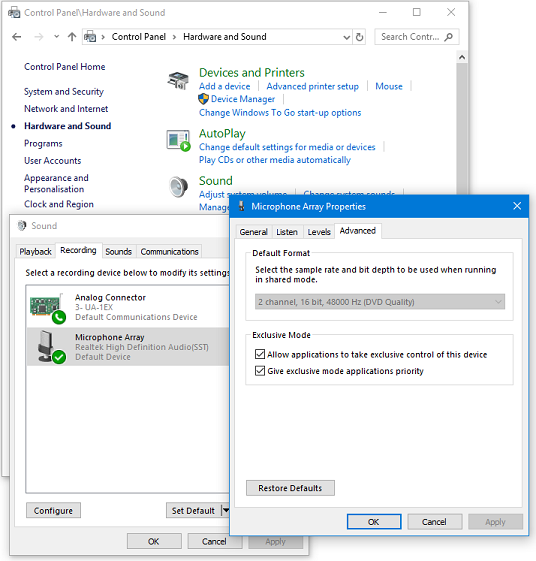
Click then on the required settings tab, in this example Advanced, (which is usually the one required):
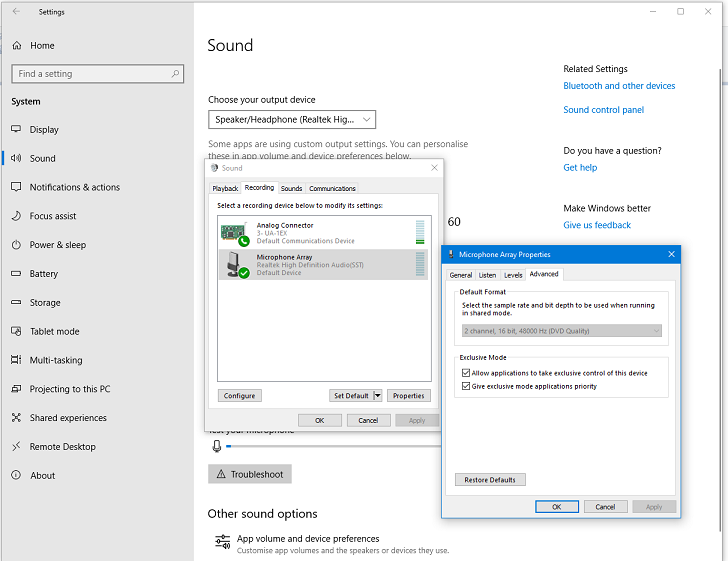 Sound settings showing the Advanced settings for Microphone input
| You can also access the sound controls via the output and input devices shown in the center of this window by clicking on their respective Device properties. |
The devices to be worked on can be selected from the dropdown menus.
Control Panel for older Windows versions
Control Panel
The older way (for earlier versions of Windows) of accessing controls was via the Sound Control Panel:
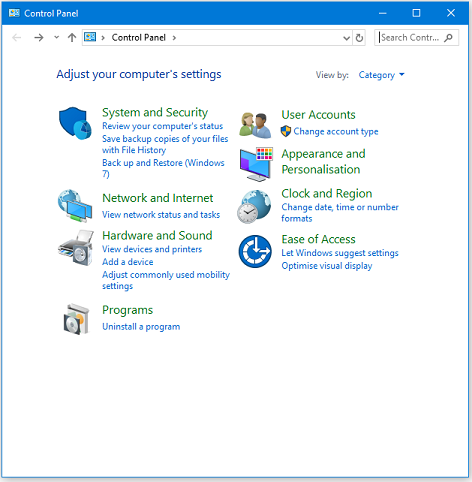 Windows Control Panel
Hardware and Sound
Click on Hardware and Sound and you will get:
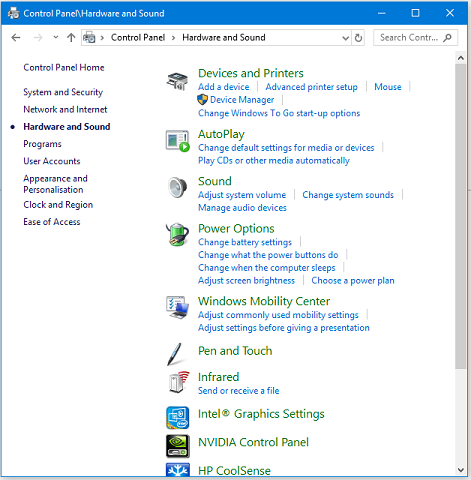 Windows Control Panel — Hardware and Sound
Sound
Click on Sound and you will get the Sound settings window:
 Sound settings window showing available playback devices
exact contents depend on your available devices
Device settings
Click then on the required settings tab, in this example Advanced, (which is usually the one required):
 Sound settings showing the Advanced settings for Microphone input
| See below for a method of direct access to the Control Panel Sound settings |
Speaker icon in System Tray
At the bottom right of you Windows screen there is the System tray.
Windows System Tray — Speaker icon highlighted.
Right-click on the Speaker icon to get a context menu, the exact contents of which may vary.
- If you have a Sounds entry, clicking on that will take you direct to the Sound settings dialog.
- If you have an Open Sound settings entry, clicking on that will take you to the Settings window for Sound.
Direct access to the Control Panel Sound settings
mmsys.cpl is a control panel file (.cpl) provided by Microsoft to manage Multi-Media Properties. .cpl files merely invoke functions that are otherwise available by clicking on sections of the Windows Control Panel.
The beauty of this approach is that it will work on all flavors of Windows systems using the Windows logo button on your keyboard:
- open the run dialog with Windows logo + R
- enter: mmsys.cpl
- press the OK button
This will open up directly the Windows Sound settings window at whatever tab was opne the last time you used the Sound settings.
For the technically-minded
On Windows 10 with a slightly longer command string you can control precisely which of the Sound settings tabs is opened:
- open the run dialog with Windows logo + R
- enter: control mmsys.cpl,,1
- press the OK button
This will open up directly the Windows Sound settings window at the Recording tab
Changing that final numerical parameter will open the different tabs
- 0 Playback
- 1 Recording
- 2 Sounds
- 3 Communications
Managing the settings
It is common on Windows that not all recording inputs are automatically enabled in the Recording tab. This means they are invisible in that tab, and also invisible to recording applications like Audacity. So you need to make them visible, then enable and make default the main one you want to use, following the steps below.
| All the settings below are specific to each recording or playback device. Therefore after enabling, making default and adjusting settings for your main recording and playback devices, it is best to enable and adjust settings for each other device you want to use. |
Recording Settings
Choose the Recording tab:
- Right-click anywhere inside the empty, white space, of the Recording tab and choose «Show disabled devices» then right-click again and check «Show Disconnected Devices».
- For a device having a physical input like line-in or microphone, connect the required cable and make sure it fits tightly — a physical device not connected may show as «currently unavailable».
- Right-click specifically over the input device you want to record with (for example, line-in or «Stereo Mix»), and if visible, choose «Enable».
- Right-click once again over the input device you want to record with, and choose «Set as Default Device», this will not show if you only have the one input device.
- Right-click once again over the input device you want to record with, click Properties then the Levels tab and ensure the volume slider is turned up.
- Right-click once again over the required input device, click Properties then click the Advanced tab and set the required format (channels and sample rate) using the dropdown menu for Default Format
- Set Default Format to mono or stereo to match with the number of «recording channels» in Audacity’s Device Toolbar or the Devices tab of Audacity Preferences.
- Set the sample rate in Default Format so that it is the same as the project rate bottom left of the Audacity screen. 44,100 Hz is a safe choice if you are unsure. Now click the OK button.
Playback Settings
Now choose the Playback tab:
- Right-click over your desired «Speakers» or «Headphones» sound device and if visible, choose «Set as Default Device». If the right-click menu also shows «Set as Default Communication Device», choose that as well, then by default all applications will use that device.
- Right-click over your desired device again, choose Properties then the Advanced tab, and set Default Format to a stereo choice with the same sample rate you chose in step 6.2 of the «Recording Settings» above.
- To ensure the soundcard does not add unwanted playback or recording sound effects like «Cathedral» or «Closet», look for Levels , Custom or Effects tabs and turn off all effects that are not required. Click the OK button to close Windows «Sound».
Communications Settings adjustment (even if you do not make Internet calls)
Windows sound settings are often optimized for VoIP (Internet calls or video conferencing) using applications such as Skype, but these settings can interfere with high quality microphone recordings of music.
- Look for and turn off all sound enhancements and any other sound effects unless you need them. To do this, right-click over «Microphone», choose Properties then look for an Effects or Enhancements tab where you can disable all effects.
- On Windows, also click the Communications tab, then under «When Windows detects communications activity:», choose «Do nothing». This should prevent unwanted playback volume changes when recording computer playback or when recording over playback of another track.
- If you do make Internet calls and require to use specific devices for calls, proceed as follows.
- To use a particular microphone only for calls, right-click over that device and choose «Set as Default Communication Device» (a green «telephone» icon will appear by the device).
- Similarly, to use for example headphones as playback device for calls and speakers or other devices for music, choose the Playback tab at the top of «Sound», right-click over the device to use for calls and choose «Set as Default Communication Device».
- If you want to use a headset for calls, choose «Set as Default Communication Device» for the headset on both the Recording and Playback tabs.
Alternative settings if crackly recording or playback occurs, or if recordings made while playing other tracks are not synchronized
- Open Windows «Sound», choose the Recording tab then right-click over your chosen recording device and choose «Properties». Click the «Advanced» tab, then put a checkmark (tick) in both Exclusive Mode boxes.
- Choose the Playback tab then right-click over your chosen playback device, choose «Properties,» click the «Advanced» tab and similarly enable both Exclusive Mode boxes.
- Restart Audacity or use Transport > Rescan Audio Devices then choose Windows DirectSound host in Device Toolbar or Devices Preferences.
- In Exclusive Mode, the sample rate selected in «Default Format» no longer applies, so be sure at bottom left of Audacity to choose a project rate that your device supports.>>
Audacity rescan/restart and settings
To make Audacity aware of all the changes in Sound, use Transport > Rescan Audio Devices or restart Audacity.


