- Music create: VST инструменты | Эффекты | Сэмплы | Скачать бесплатно программы для создания музыки
- Image Line — Harmor v1.0.2 VSTi (TEAM CHAOS) — синтезатор аналоговый
- Harmor vst mac os
- Harmor
- Synth by Image LineAlso available in a bundle
- System Requirements
- Harmor
- Harmor Key Features
- Additive Synthesis?
- Main Controls
- Timbre
- Blur Articulator
- Prism
- Prism articulation
- Harmonizer
- Harmonizer Articulation
- Unison
- Unison Articulators
- Left-side Buttons
- Pitch
- Filter
- Filter Articulation
- Pluck
- Pluck Articulation
- Phaser
- Phaser Articulation
- Visual Feedback
- Global Controls
- ENV — Envelopes
- Controls above the Envelope
- Controls on the Envelope
- Controls below the Envelope
- Control point context menu:
- Envelope options menu
- IMG — Image Synthesis / Resynthesis
- IMG Tab Controls
- About images and planes
- Resynthesis notes
- Image Synthesis Articulation envelopes
- FX — Effects
- ADV — Advanced Controls
- Formats
- Special note colors
- Learning Harmor
- Tutorials
- Making Presets
Music create: VST инструменты | Эффекты | Сэмплы | Скачать бесплатно программы для создания музыки
Image Line — Harmor v1.0.2 VSTi (TEAM CHAOS) — синтезатор аналоговый

Image-Line Harmor 1.0.2 — это мощный аддитивный / субстрактивный синтез, синтезатор изображения так же как аудио ре-синтезатор. Точно так же как его маленький брат Harmless, Harmor имеет более мощный движок синтеза. Его модули будут выглядеть знакомыми субстрактивным энтузиастам синтезатора: генераторы, фильтры и фазы, они показаны в Image-Line Harmor, но, потому что выполненный посредством аддитивного синтеза, предлогают больше свободы. Вы не просто выбираете типы фильтра, Вы тянете их.
Вы хотели больше, так также показанный многоточечный редактор конверта известный Sytrus, относился к более чем 40 параметрам, в 2 независимых частях. Через тот же самый конверт/картографии рандомизируйте любой параметр или свяжите это с ключом или скоростью, и даже точно настройте каждый голос унисона независимо.
Обработка единиц может быть перестроена полумодульным способом. Если Вы нуждаетесь в одной из 2 единиц фильтра, обработанных после единицы пятна, это не проблема.
Синтез изображения
Поскольку это как правило требует управление большим количеством (до 500 за голос) partials в течение долгого времени, с субстрактивным синтезом трудно управиться. Никакой человек не может (или даже хочет к), редактируют 500 конвертов, но редактирование 2-ых изображений, которые мы можем сделать легко. Заставьте доступ получать и передавать самолеты, которые Вы можете щипнуть в редакторе изображений Вашего выбора, и импортировать любой битовый массив, даже если бы это не было разработано, чтобы быть превращенным в аудио, то это могло бы все еще казаться интересным.
Аудио ре-синтез
Будучи субстрактивным синтезатором, Image-Line Harmor может повторно синтезировать аудио файлы также. Воспроизводство будет преданным, не неопределенное звуковое подобное как во многих совокупных синтезаторах. Ресинтез можно, конечно, щипнуть, обеспечивая время, простираясь, перемену подачи, или менее обычные манипуляции partials.
И конечно, результат анализа может все еще быть превращен в изображение для дальнейшего редактирования.
Эффективный
Субстрактивный синтез вообще очень нагружает центральный процессор, но не движок Image-Line Harmor. Его эффективность, фактически довольно сопоставимая с тем отнимающего синтезатора. Голоса могут производить сотни гармоники параллельно и все еще перегружать центральный процессор. Обрабатывая быть мультипронизывавшимся, дополнительные ядра центрального процессора пригождаются.
Источник
Harmor vst mac os
Forum rules
WE NEED DETAILS!
We appreciate it’s frustrating when things don’t work. However, please help us to help you by following these suggestions:
- Update — Before trying anything else. Download and install the latest version of FL Studio from here. Your bug may be fixed already!
- Update plugins — If you are using 3rd party plugins. Look at crash logs for their names. Install the latest version for any you spot. See also Plugins Behaving Badly
- Simple clear explanation — Explain what you are doing, or trying to do, and exactly what is happening.
- Specific information — a) FL Studio version & build number, b) what you are doing and what happens exactly, c) step-by-step instructions how reproduce the problem.
- Screenshots — Another great way to demonstrate issues. Get a free screenshot app here. Include images using the ‘Attachments’ tab, at the bottom of the post edit window.
- A video — The best way of demonstrating many issues. Windows 10 includes an integrated screen recorder, see here OR get a free free recorder here. Include mp4 videos to your post from the ‘Attachments’ tab, at the bottom of the post edit window.
- Use English — Google Translate your post. Short simple sentences in your original language translate best. We are happy to work this way, no need to worry.
NOTE: Technical Support is ONLY available Monday — Friday (9 am to 5 pm Central European Time), thank you.
ALL posts made in this forum are ‘ Private‘ so that only you and staff can see them. This allows sharing of personal data, projects and other information. Posts are generally made public after they are marked ‘Solved’ AND there was no personal data contained in them.
Источник
Harmor
Synth by Image LineAlso available in a bundle
Buy and get FREE
Note — This software is Windows compatible only and will not function on Mac computers!
Introducing a powerful additive / subtractive synthesizer, image synthesizer as well as audio resynthesizer, Harmor.
Additive / Subtractive..
Just like its little brother Harmless, Harmor is driven by a powerful additive synthesis engine. Its modules will look familiar to subtractive synthesizer enthusiasts: oscillators, filters & phasers, these are featured in Harmor but, because performed through additive synthesis, offer more freedom. You don’t just select filter types, you draw them.
You wanted more, so also featured is the multipoint envelope editor of Sytrus fame, applied to over 40 parameters, in 2 independent parts. Through the same envelope/mappings, randomize any parameter or link it to key or velocity, and even fine-tune each unison voice independently.Processing units can be rearranged in a semi-modular way. If you need one of the 2 filter units processed after the blur unit, that’s no problem.
Image Synthesis.
Because it typically requires manipulating large amounts (up to 500 per voice) of partials over time, additive synthesis is hard to handle. No human can (or even wants to) edit 500 envelopes, but editing 2D images, that we can do easily. Get access to gain & pitch planes which you can tweak in the image editor of your choice, and import any bitmap, even if it wasn’t designed to be turned into audio, it might still sound interesting.
Audio Resynthesis.
Being an additive synthesizer, Harmor can resynthesize audio files as well. The reproduction will be faithful, not a vague sound-alike as in many additive synthesizers. Resynthesis can of course be tweaked, providing time stretching, pitch shifting, or less conventional manipulations of partials.And of course, the result of the analysis can still be turned into an image for further editing.
Efficient.
Additive synthesis is generally very CPU-consuming, but not Harmor’s engine. Its efficency is in fact, comparable to that of subtractive synthesizers. Voices may be generating hundreds of harmonics in parallel and still not overload the CPU. Processing being multi-threaded, extra CPU cores come in handy.
Pixels!
Resynthesis or image-synthesis, Harmor features both. Import a piece of audio and time-stretch or pitch-shift it (with formant and transient preservation). Convert this to an image and edit each partial individually!
Two Parts.
Two independent parts (or “layers”) for even more complex sounds. Parts can be imported from other presets.
SFX.
In the effects section you will meet all the usual suspects: distortion, chorus, delay and reverb, as well as the mighty Soundgoodizer based on the Maximus engine. Just like processing units, effect slots can be re-ordered. Each part has its own effect mix amount.
Looks Pretty.
If you don’t understand it, visualize what it’s doing, best way to learn! Watch how each partial evolves in the built-in spectrogram, a picture is worth a thousand words.
System Requirements
- Windows XP (SP2), Vista, Win7, Win8, Win8.1, Win10 — (32 & 64 Bit)
- 2Ghz AMD or Intel Pentium 3 compatible CPU with full SSE1 support
- 512Mb RAM
- 30Mb free disc space
- DirectSound or ASIO compatible soundcard
Note — This software is Windows compatible only and will not function on Mac computers!
Any references to any brands on this site/page, including reference to brands and instruments, are provided for description purposes only. For example references to instrument brands are provided to describe the sound of the instrument and/or the instrument used in the sample. Plugin Boutique do not have (nor do they claim) any association with or endorsement by these brands. Any goodwill attached to those brands rest with the brand owner. Plugin Boutique or its Suppliers do not accept any liability in relation to the content of the product or the accuracy of the description. «RHODES» is a registered trademark of Joseph A Brandstetter.
Источник
Harmor 

Like its predecessor Harmless, Harmor is powered by a powerful additive synthesis engine. Its modules will look familiar to subtractive synthesizer enthusiasts: oscillators, filters & phasers. These are featured in Harmor but, because they are performed on additive synthesis data, rather than audio, offer more freedom.
Additive / subtractive synthesis — In Harmor no audio-stream exists, instead a table of frequency and amplitude data is manipulated efficiently, accurately and in ways not possible with traditional methods, that process an audio stream. Draw filter shapes and gain precise control over every aspect of the sound generation process. Image & Audio Resynthesis — Images and audio files (WAV, AIFF, WavPack, MP3, OGG, REX1&2) can be dragged and dropped on Harmor to provide ‘sampler-quality’ reproduction of sounds or work with image-based synthesis when used in conjunction with your favorite image editor. Just cut-and-paste between Harmor and your editor of choice.
Check the video series  Image-Line | Harmor (VST & Native Plugin Instrument), or the Harmor preset forum here.
TRIAL ONLY: Harmor is available as a demo in FL Studio and needs to be purchased separately so you can save projects containing Harmor channels.
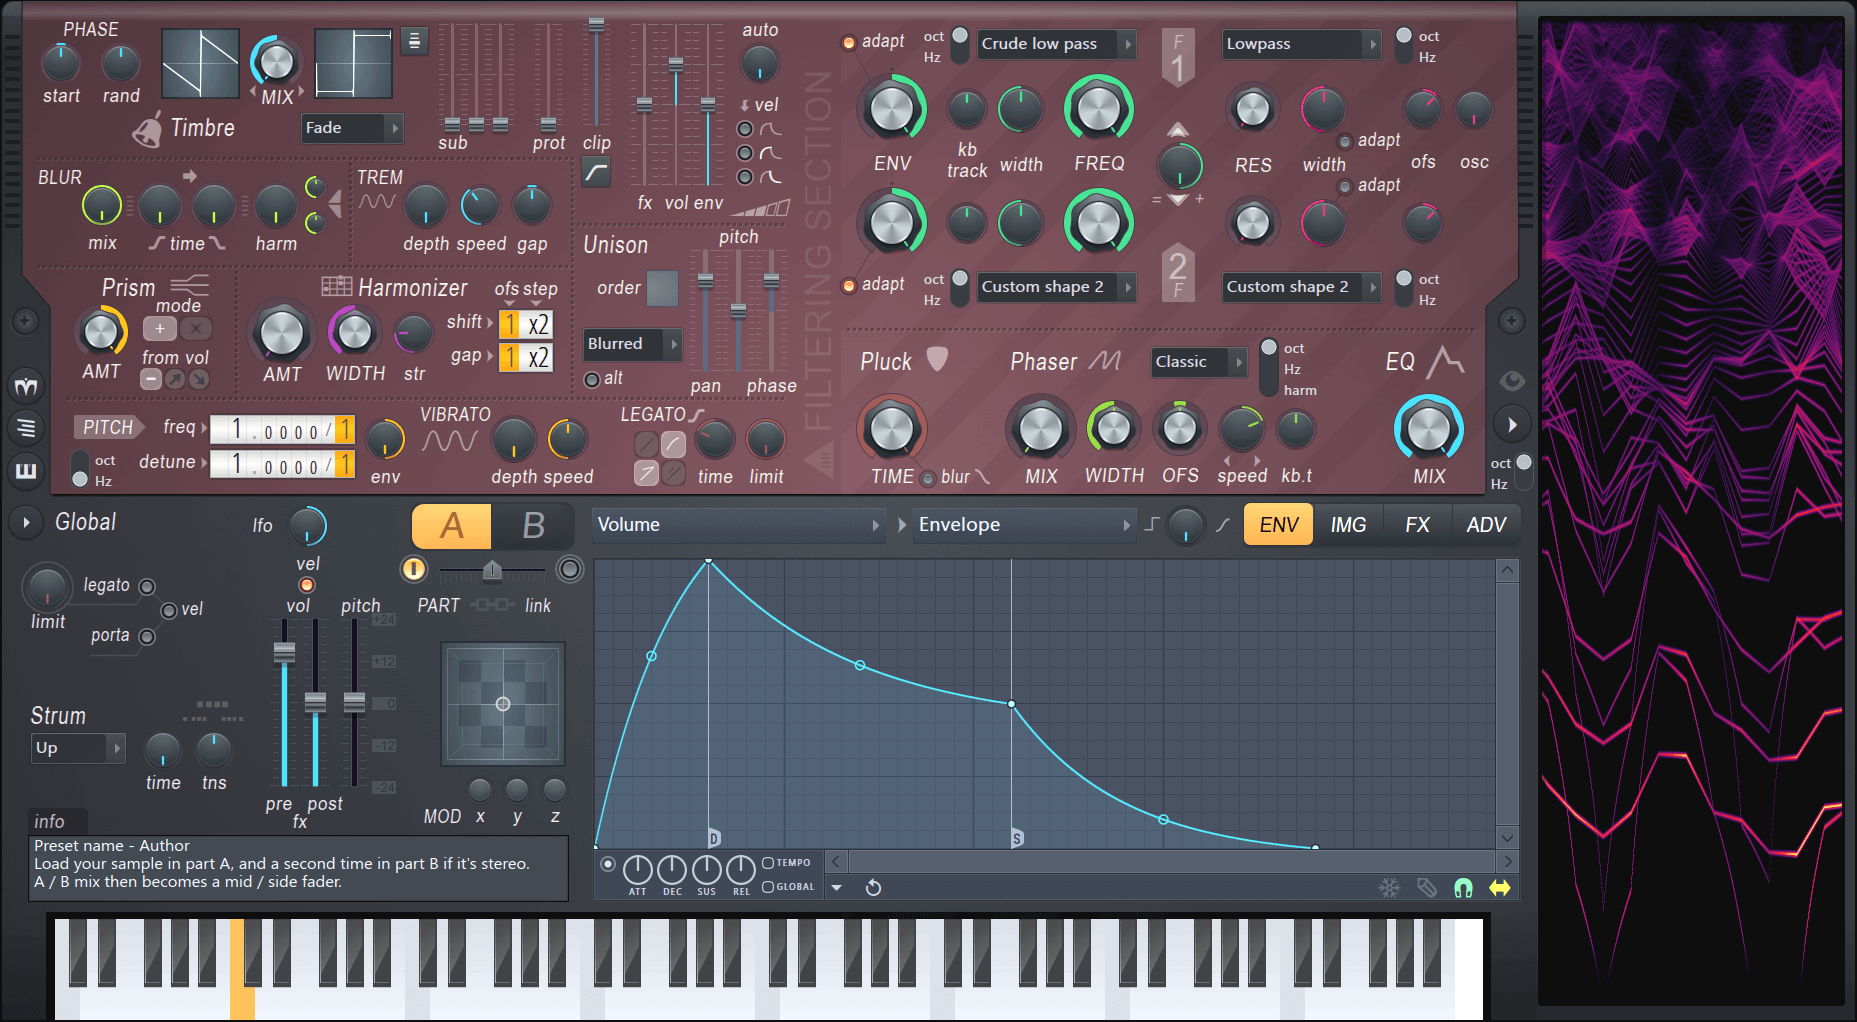
Click on the image above to jump to the help for that section
NOTES: The Harmor GUI color-codes knobs and sliders so related controls share the same color. We recommend opening the Visual Feedback panel while you are learning to program the plugin, a picture is worth 1000 words, so they say. You can also right-click most controls to open the associated Envelope ready for modulation.
Harmor Key Features
The Harmor design philosophy is ‘more is more’, every feature, control and harmonic function was carefully selected for maximum effectiveness.
- Additive engine — Performing additive / subtractive synthesis just as efficiently as traditional ‘subtractive’ synths.
- Multi-modal synthesis — Classic subtractive + audio resynthesis + image synthesis.
- Specialized processing units — Prism, pluck, blur, filters, phaser.
- Modulation — Advanced multi-part articulation envelopes.
Additive Synthesis?
Harmor can generate up to 516 sine wave (partials), per note, per unison voice AND modulate these in real-time to resynthesize ANY continuously evolving sound. So what is Additive Synthesis? This video is a great introduction to the topic — Overtones, harmonics and Additive synthesis.
In short, French mathematician, Joseph Fourier, showed that any waveform can be decomposed into a set of sine wave components. Each sine wave is referred to as a ‘partial’ as it is part of the complete series of sine waves that combine to produce the original waveform or sound. Partials can be harmonic, an exact (integer) multiple of the base frequency (notes pitch) or inharmonic, decimal multiples of the base frequency. Harmonic partials tend to reinforce the root note pitch adding complexity while maintaining a melodic tone. Inharmonic partials tend to confuse the root note pitch by add a metallic or noisy edge to the tone. There are three sets of data required to store and manipulate an additive waveform.
- Partial frequency — Frequency of each partial to play. This set of partials is scaled in frequency by the fundamental frequency (root note) played.
- Partial amplitude — Amplitude of each partial that plays. Not all partials play at the same level.
- Partial phase — The phase of each partial that plays. Is the sine wave increasing or decreasing in value from the start point?
Consequently, you will see references to ‘partials’, and ‘mappings’ throughout this manual and the Harmor interface. The good news is that you don’t need to understand Additive Synthesis to use Harmor, but having some idea of what it is will help you to come to grips with the synthesizer faster. The data relating to the mappings can be found in the Timbre 1 & 2 harmonic level Editor target > Shaping envelopes. These contain the frequency and amplitude data and the Harmonic phase Editor target > Shaping envelope, that contains the Phase data (shared by Timbre 1 and 2, set by Timbre 1).
Main Controls
Harmor is an additive-subtractive synthesizer making fast program changes simple and is perfect for live performances and experimentation. The main control categories are:
- Global — The Global controls relate to performance and synthesis ‘Part’ A/B selection.
- Part controls — For each Global Part (A & B) there is an identical set of synthesis options (as denoted by the upper purple section). Unit order can be quickly changed in the ADV (Advanced) settings.
- Articulators — Harmor features 2 part Global articulation (envelopes). Each target may be simultaneously modulated by multiple articulation parts.
- Image (per part) — The IMG (Image Resynthesis) section can work with images OR samples.
- effects (global) — The full suite of effects you would expect including Distortion, Chorus, Delay, Reverb & Compression.
- Advanced — Change the unit order of the A/B synthesis parts independently, effects and utilize more CPU power than the Starship Enterprise can deliver with ‘future proof’ performance & quality settings.
Timbre
By default, Timbre 1 and Timbre 2 generate a Saw and Square wave respectively. Mixing the timbres will morph between them. You can right-click the Timbre windows to load audio files, drop audio files on the windows or edit Timbre harmonic mappings (level & phase) to achieve custom waveforms. The output from the timbre section is combined with the image / resynthesis section (when active).
The waveform from the Timbre section is additively generated according to the following controls:

Timbre — The default timbres are a Saw and Square wave. See the Timbre option below for methods of changing the waveforms.
- PHASE
- start — Starting phase in the waveform from 0 to 359 degrees.
- Rand — Turning left randomizes the phase of each partial separately, useful for adding character with when using Pluck. Turning to the right sets the global waveshape phase to a ‘free-running’ mode, useful when using Unison as it avoids a retriggered ‘flangy’ sound and for adding some phase variation retriggered notes.
- Timbre
- Timbre windows — The Timbre window holds a single-cycle waveform and is used as an oscillator source. Timbre 1 and Timbre 2 are related in that they share the same harmonic phase information (that’s why there is only one Harmonic phase envelope per part). Phase is shared so the timbres won’t phase-cancel when mixed. In default mode, you can think of Timbre 1 and Timbre 2 as two different Harmonic level mappings of the same base ‘Saw oscillator’. Additionally there are several methods for making custom waveforms:.
- 1. Left-click to open the Timbre 1 or 2 Harmonic Level envelope and/or edit the Harmonic phase envelope.
- 2. Right-click to select from ‘Analyze single cycle waveform‘ browser and ‘Randomize‘ that randomizes the Harmonic level envelope.
- 3. Drop an audio file on Timbre window 1 (remember Timbre 2 uses the phase data from the Timbre 1). For the best results drop high quality, single cycle waveforms on the Timbre windows.
NOTES:
- When loading custom waveforms, where you are trying to achieve a specific shape, use Timbre 1 as it can set Harmonic level AND Harmonic phase mappings.
- The partial phase mapping data, set when analyzing waveforms in Timbre 1, is shared with Timbre 2.
- You can drag waveforms/samples/files from anything within FL Studio & Windows that supports ‘drag-&-drop’ onto the Timbre windows.
- See the section ‘Timbre harmonic mappings’ to learn more about manual programming of the waveforms.
- MIX — Mix between the two Timbre windows.
- Timbre blending mode (menu) — Select from several cross-fade options.
- Fade — Standard cross-fade from Timbre 1 to Timbre 2.
- Subtract — Timbre 1 is subtracted from Timbre 2.
- Multiply — Timbre 1 is multiplied by Timbre 2.
- Maximum — The maximum harmonic level is selected from Timbre 1 and 2.
- Minimum — The minimum harmonic level is selected from Timbre 1 and 2.
- Pluck — Blends the shape with the Pluck’s decay, that is, the harmonics are set to match Pluck’s EQ envelope.
- Timbre windows — The Timbre window holds a single-cycle waveform and is used as an oscillator source. Timbre 1 and Timbre 2 are related in that they share the same harmonic phase information (that’s why there is only one Harmonic phase envelope per part). Phase is shared so the timbres won’t phase-cancel when mixed. In default mode, you can think of Timbre 1 and Timbre 2 as two different Harmonic level mappings of the same base ‘Saw oscillator’. Additionally there are several methods for making custom waveforms:.
- Sub harmonic configuration (menu) — Set Sub harmonics 2 & 3 to be Around (Sub harmonics 2 & 3 are relative to and above Sub-harmonic 1. So straddle the fundamental) or Below (Sub harmonics 1, 2 & 3 all fall below the fundamental being 1, 2 and 3 octaves below respectively).
- Sub — These Sub Harmonics add bass, weight or depth to the sound. The first slider Sub-harmonic 1 is always an octave below the root note. The remaining two sub sliders depend on the Sub harmonic configuration (see above). When set to:
- Around — Sub-harmonic 2 is the 3rd harmonic and Sub-harmonic 4 is the 5th harmonic of Sub-harmonic 1. The 2nd harmonic is the root note.
- Below — Sub-harmonic 2 is two octaves below the fundamental and Sub-harmonic 3 three octaves below the fundamental.
- Prot — Low Harmonic Protection. Prevents filtering functions from removing the first few harmonics, that are essential for producing ‘weight’ to the tone of the patch. There is a related Harmonic protection shaping mapping for this control so you can set the specific partials to be protected. This can be useful when using heavy Phaser settings that often remove the fundamental.
- clip — Clipping threshold.
- Clipping mode (menu) — Each is a different threshold curve, similar to a compression curve, dictating at what amplitude level partials are ‘clipped’. This parameter has a corresponding Harmonic clipping shaping mapping.
- fx — Effects to dry mix.
- vol — Volume envelope multiplier
- env — Frequency domain envelope multiplier.
- auto — Automatic gain controls the audio levels as a function of velocity and number of notes being played (similar to an audio compressor that will protect the section output from clipping). You can set Absolute or Relative gain on the Advanced Tab.
- Velocity mapping switches:
- Velocity to volume envelope attack time — Maps the velocity to the attack time of the volume envelope.
- Velocity to volume envelope attack scale — Maps the velocity to the attack time scaling of the volume envelope.
- Release velocity to envelope release scale — Maps the release velocity to the release time scaling.
Blur smears the partials horizontally. Blur the left side (attack), right side (decay), top (harmonic frequencies) or bottom (fundamental frequency). Use this to create preverb and reverb type sounds.
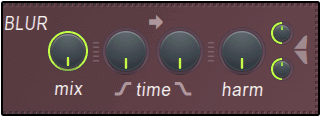
- Mix — Blur mix.
- Time — Blur Attack/Decay. Adjust the leading and trailing blur amount independently. High Attack values will soften transients in resynthesized audio, high Decay values will create ‘reverb’ style effects. NOTE: The Pluck control can replace the trailing blur when ‘blur‘ is selected.
- Harm — Harmonic blur amount, equivalent to a vertical smearing of partials.
- Harmonic blur top tension — Relative blurring of high vs low frequencies.
- Harmonic blur bottom tension — Relative blurring of high vs low frequencies.
Blur Articulator
- Harmonic blur amount — ‘Mix’ as above.
Tremolo Is a stereo effect with a left/right panning of the sound that simulates the rotary speaker effect used in some classic organ patches.
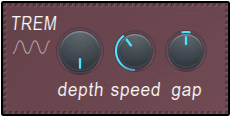
- Depth — Mix between tremolo effect and the dry signal.
- Speed — Tremolo speed.
- Gap — Extent of panning between left and right pan position. When set to 0, the effect will be monophonic affecting volume only.
Prism
Prism shifts the position of the partials from their original relationship to the fundamental frequency. If the partials were harmonics, prism will generally making them inharmonic. This adds a metallic (extreme prism) or detuned (mild prism) quality to the sound. NOTE: The ‘Harmonic prism’ articulator envelope allows you to customize the prism effect as a function of the partial frequency.
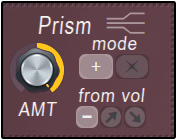
- AMT — Prism amount.
- Mode — Additive or multiplicative effect of the prism amount.
- from vol — The prism amount depends on the volume of the harmonic, the louder the harmonic, the higher the amount of prism applied. Inverted applies the opposite.
Prism articulation
- Prism amount — ‘Amt’ as above.
- Shaping — Harmonic prism (mapping of per-partial deviation amount). This is a bi-polar envelope so you can add positive or negative deviations as a function of frequency.
Harmonizer
The harmonizer clones and transposes the existing harmonics, using various methods (+/x octaves, or by an offset).
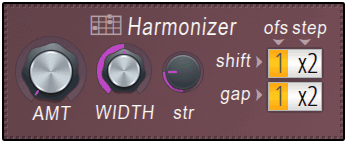
- amt — Harmonizing mix.
- width — Determines how far upward the harmonics are cloned.
- str — Strength places emphases on the upper harmonic clones.
- shift — Shifts the harmonics relative to the fundamental frequency (ofs = offset in octaves, step = offset in harmonics). Drag up for additive offsets and down for multiplier offsets.
- gap — Gap between the 1st harmonic and higher harmonics (ofs = offset in octaves, step = offset in harmonics). Drag up for additive offsets and down for multiplier offsets.
Harmonizer Articulation
- Harmonizer mix — ‘amt’ as above.
- Harmonizer width — ‘width’ as above.
Unison
Unison is a thickening / stereoizing effect, similar to chorusing. Unlike chorus, that is applied to the final output, unison is a per-note effect where each note is given a user-defined number of ‘subvoices’ (from the order setting). Subvoices are then given user-defined variations of panning, volume, pitch and phasing relative to the root note, as per the following controls:
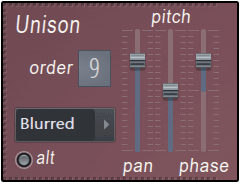
- Order — Number of unison voices. NOTE: Limit use of high unison orders where CPU load is a concern.
- Unison type menu — Select from variations of pitch and panning spread (Classic, Uniform, Blurred, Random & Special). Set by ear.
- alt — Alternates gain polarity.
- pan — Panning variation across the unison voices.
- pitch — Pitch variation (detune) across the unison voices
- phase — Timbre starting phase variation across the unison voices.
NOTE: Set unison phase to 100% (full blur) for a smooth unison on high pitch notes, lower notes may sound noisy however.
Unison Articulators
- Unison pitch thickness — ‘Pitch’ control as above can be mapped according to a number of Mapping envelopes.
- Unison phase — ‘Phase’ control as above can be mapped according to a number of Mapping envelopes.
- Unison index mapping — Independent unison voice mapping, can be found for most Editor targets including Pitch, Prism, Pluck etc. Worthy of mention is the ‘Pitch > Unison index mapping’ that allows the pitch of each Unison voice to be set independently.
Left-side Buttons
From top to bottom:
- About Harmor — Information about the plugin. Harmor chan by Uruido.
- Browse envelopes / images — When used in FL Studio opens the Browser to content relevant to Harmor. Drag content onto targets in the plugin including envelopes and the image-resynthesis area.
- Preview keyboard — Show and hide the piano keyboard along the bottom of the plugin.
Pitch

- oct/Hz (switch) — Pitch distribution in octaves (unweighted) or Hertz (weighted).
- freq — Frequency multiplier/divider.
- detune — Offset/detune of the partials relative to the fundamental frequency.
- env — The effect of any Pitch related envelopes are moderated by this bi-directional (-1 to +1) control.
- Vibrato — A fast pitch modulation. TIP: It can be useful to link the aftertouch to this knob. In FL Studio, press & hold a note, Right-click the knob to open the remote control settings and then press the note harder and you are done.
- Depth — Extent of the deviation around the correct pitch.
- Speed — Frequency of the pitch deviation.
- Legato controls relate to the attack of notes and the way consecutive notes are joined.
- Portamento time curve (switches) — Linear vs logarithmic portamento (pitch slide) curve.
- Portamento / Legato time (switches) — Choose a fixed glide time or variable, depending on pitch distance and speed knob (positive or negative) setting.
- time — Controls the porta and legato slide times. NOTE: The Global portamentoporta or legato switches must be activated for time to become active.
- limit — Portamento pitch limit. Restricts the pitch range over which the portamento effect will apply. NOTE: The Global portamento, ‘porta‘ switch must be activated for this limit to become active.
Filter
The filter functions control the type of filtering and cutoff frequency.
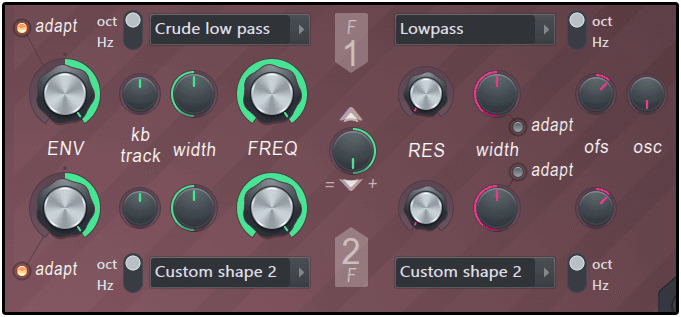
- ENV — Envelope modulation amount. The knob is bi-directional from -100 to +100%.
- adapt — Adaptive envelope mode. The bandwidth of the filter changes width as a function of the notes frequency, so that the duration of envelopes applied to low vs high notes sound similar in duration. Set by ear.
- oct / Hz — Sets the shape of the resonance frequency peak to an Octave or Hertz scale. Set by ear.
- kb track — Keyboard tracking. Applies an offset to the filter cutoff value depending on pitch. The offset-value can be positive or negative depending on the direction of the knob. For example, keyboard tracking is useful to make a sound brighter, by raising the cutoff frequency of a low-pass filter, as higher keys are played.
- width — Filter bandwidth, equivalent to ‘dB/Octave’ setting on traditional filters. Narrower widths create a more clearly defined ‘center frequency’ or ‘cut’ frequency.
- FREQ — Filter cutoff frequency. This is the target for all controls in green to the left of the knob.
- Filter type menu — Choose from cutoff slope variations, Crude & Hill being the steepest:
- Low pass — Filters frequencies above the cutoff frequency.
- Band pass — Filters frequencies either side of a central band.
- Band stop — Filters frequencies inside a central band.
- High pass — Filters frequencies below the cutoff frequency.
- Phaser — ‘Comb filtering’, a series of stacked band-stop filers.
- Custom shape 1 & 2 — Define your own filter shape with ENV ‘Filter shape 1 & 2’ envelopes.
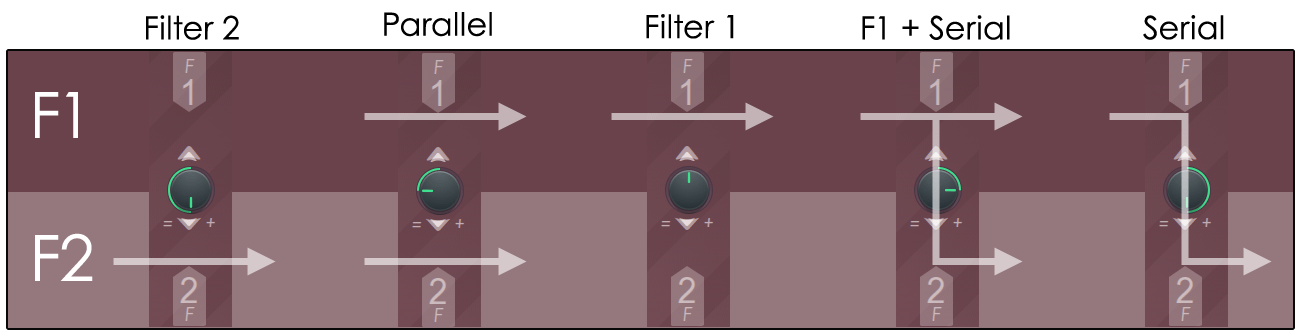
- Filter 1 & 2 mix — Filter resonance sections can operate in parallel or series depending on the position of the knob (see below). Consider the percentage like the mix between Filter 1 and 2. When parallel it’s the mix of both filters to the output. When serial its the mix of Filter 1 directly to the output or into Filter 2.
- Left of 12 O’Clock = (1-Mix) * F1 + Mix * F2
- Right of 12 O’Clock = (1-Mix) * F1 + Mix * (F1⇒F2)
Where:
- F1 is the output of Filter 1
- F2 is the output of Filter 2
- F1⇒F2 is the output of F1 processed by F2
- Mix is the value of the Filter 1 & 2 mix knob
TIP: If Units are placed after F1, then F1 becomes F1 + following units.
- Classic — Single narrow resonance peak.
- Cuberdon, Pedestal, Sedge hat, Wide bump, Double cone — Various resonance peak shapes, named according to their approximate shape.
- Well & Wormhole — Cut frequencies at the cutoff frequency with resonant peaks either side of the hole. These settings are designed to be used with the self-oscillation, to avoid annoying interferences and overly loud ringing when the resonance peak passes harmonic frequencies.
- Noise — Special effect. Harmonics are sounded randomly. Use the RES to control the amount of randomness, width controls the length/duration of changes in harmonics.
- Custom shape 1 & 2 — Define your own resonance filter shape with ‘Filter (resonance) shape 1 & 2’ envelopes.
- Low pass — Provides a resonance peak followed by a dip, this makes it an ‘extra lowpass’, so that the slope of the lowpass filter effectively becomes steeper as the resonance increases.
- adapt — Adaptive envelope mode. The bandwidth of the filter changes width as a function of the notes frequency, so that the resonance sounds similar regardless of the note pitch. Set by ear.
Filter Articulation
- Filter 1 & 2 frequency — ‘FREQ’ as above.
- Filter 1 & 2 width — ‘width’ as above.
- Filter 1 & 2 resonance amount — ‘RES’ as above.
- Filter 1 & 2 resonance offset — ‘ofs’ as above.
- Filter 1 & 2 Mix — As above.
Pluck
Pluck is a specialized decay-related filter. To change the filter shape select ‘Pluck shape‘ from the Editor target shaping. The mapping represents decay time (vertical) as a function of frequency (horizontal). The default shape decays the high frequencies first, progressing down to the low frequencies. This simulates a plucked string where the pluck is bright and quickly dulls. At high settings the default pluck shape imparts a ‘damped’ quality to the tone.
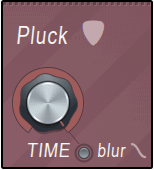
- TIME — Decay time (‘Pluck shape’ envelope multiplier).
- blur — The pluck setting replaces the blur decay in the BLUR section.
Pluck Articulation
Phaser
Phasing is the process of creating, constantly moving, frequency cancellation/s in a sound. The Harmor phaser allows individual harmonics to be phased rather than it being applied to the entire output or ‘cancellation patterns’ (cut templates) to be applied to the timbre making a range of interesting phasing and harmonic effects possible.
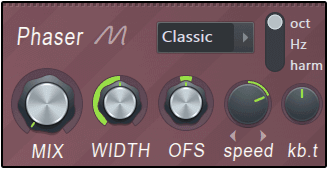
- MIX — Amount of phasing.
- Phaser type menu — Select phaser type. There are three broad categories as follows:
- Classic, Triangle, Eggs — In this group you will find settings similar to traditional phaser sounds.
- Deep, Deeper, Condom, Twins, Cascade & Box — Are special phasing effects that fully exploit the Harmor additive architecture.
- freq — Extra special! Modulates the frequency of all the partials in the timbre according to a user defined envelope.
- custom — User defined phaser envelope.
- Phaser scale — Set the scale to octave, Hz or harmonics. Set by ear. Use the phaser in harmonic scale mode to achieve pulse-width modulation (PWM) oscillator sync or FM type sounds.
- WIDTH — Wider settings cause a more aggressive phase cancellation.
- lfo — Subjects the width setting to LFO modulation. The lfo characteristics are set at the main LFO (lower right on the interface).
- OFS — Offsets the phase mask (cancellation) position.
- speed — Speed with which the phase cancellations are swept across the spectrum. The control is bipolar, turn left for downward sloping phasing and right for upward phasing.
- kb.t — Keyboard tracking adds an offset to the phase depending on note pitch note.
Phaser Articulation
- Phaser mix — ‘MIX’ as above.
- Phaser width — ‘WIDTH’ as above.
- Phaser offset — ‘OFS’ as above.
EQ or equalization adjusts the tonal balance of the sound. The MIX knob controls the EQ as set by the ENV > Shaping > Global EQ envelope. By default the EQ curve is flat so no EQ will be applied when tweaking the knob. There are two EQ envelopes available.
- Global EQ — The equalization curve is the same regardless of the notes played.
- Local EQ — The equalization curve follows the notes played. That is, the EQ frequencies will be relative to the root note played.
The EQ knob on the UI controls the Global EQ mix. The Local EQ mix is always 100%.
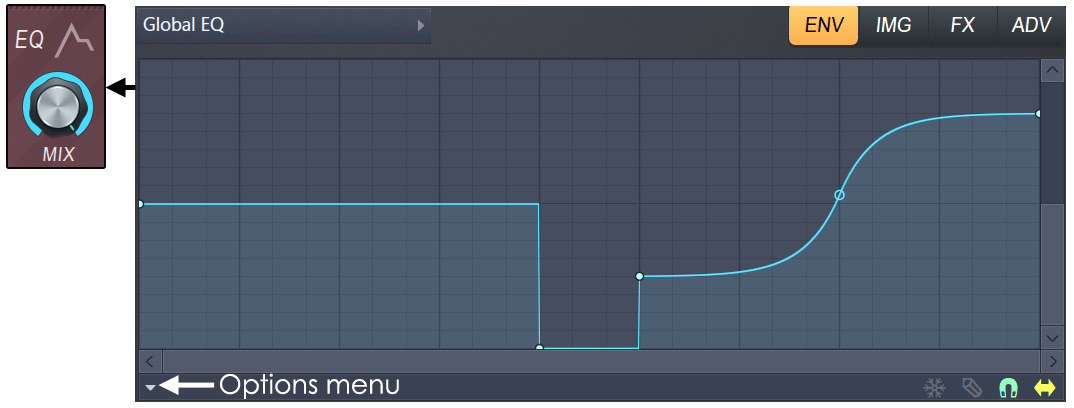
NOTE: there are a number of predefined shapes available from the Options menu.
- MIX — Wet/dry mix for the EQ curve.
- Equalization curve — Set from the ENV (envelopes) > Shaping (section) > Global EQ
Visual Feedback
The visual feedback panel shows partials sent to the synthesis engine and is perfect for learning how features and functions in Harmor work. Leave it open during patch creation. It also looks cool and impresses onlookers.
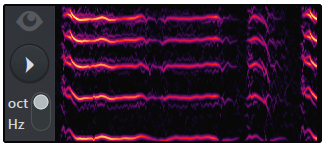
- Visual feedback (switch) — Click once to open, again to expand and again to close. For an extra large view mode type (or cut and paste) «can i haz moar view» into the Preset Name area.
- Oct / Hz (switch) — Sets the vertical scale to octaves or Hz. See here for a tutorials on Log (Octave) vs Linear (Hz) scaling.
NOTES: Visual feedback shows a monophonic harmonic series related to the last note played. Visual feedback is quite CPU intensive, so close the panel if you experience high CPU loads with Harmor-intensive tracks. The display may appear over the Harmor GUI in some VST hosts, because those hosts don’t allow the plugin to resize.
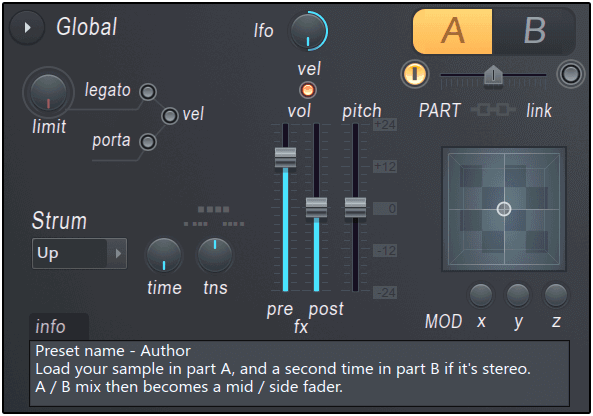
Global Controls
These parameters control performance related effects including portamento, strumming and modulation. The A/B (Part) switch is used to access the two separate and identical synthesis banks.
- Options — Options menu (next to the Global label).
- Copy preset — Copies the currently selected preset. You can use this to transfer presets between instances of Harmor.
- Copy part — Harmor has two parts A and B. Each is an identical and independent synthesis section. Copy part A or B with this option.
- Paste preset/part — Paste the preset or part. You can also paste between instances of Harmor.
- Lock part — Locks the currently selected part.
- Chorus — Select chorus presets. These are also accessible from the FX panel.
- Reverb — Select reverb presets. These are also accessible from the FX panel.
- About Harmor — Version number, credits etc.
- lfo — Scales all active LFO envelopes. The value can be positive or negative depending on the direction of the lfo knob.
- vel — Links note velocity to volume.
- Part controls — Harmor has two parts A and B. Each is an identical and independent synthesis section.
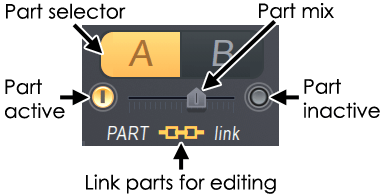
- A/B (switch) — Select to edit Part A or Part B. To use parts in stereo use the ENV > Panning > Envelope control to pan parts A and B in the stereo field.
- Part mix — Control the balance of Parts A and B. This is not automatable. Rather, use the volume envelopes of parts A and B to create mix changes.
- Activate switches — Select the switches on either end of the mix slider to activate or deactivate parts.
- Link parts — Links parts for editing, so changes made on one parts controls will be applied to the same controls on the other. You can activate and deactivate this as you are programming patches to make related and independent changes to controls on each part. NOTE: When controls are linked and one is automated by an external controller the other will not respond, you need to link each part control separately to the same external controller knob or slider. Internal automation will maintain these linked relationships.
- Limit — Pitch range over which legato effects will occur. Exceed the limit and normal polyphony will apply.
- Legato (switch) — Legato is a monophonic mode that slides pitch between overlapping notes. NOTE: This control interacts with the Part A/B LEGATO ‘time‘, ‘Portamento / Legato time (switches)‘ & ‘legato curve (switches)‘.
- porta(switch) — Portamento is a polyphonic mode that slides between overlapping notes. NOTE: This control interacts with the Part A/B LEGATO ‘time‘, ‘Portamento / Legato time (switches)‘ and ‘limit‘ knob.
- vel (switch) — Links note-on velocity to portamento or legato attack time, and note-off velocity to legato release time.
- Strum — Delays the onset of notes in a chord. Play a chord and set the time knob to a higher time value to create ‘strum’ effects such as playing a guitar. Set the direction of the strum to:
- Up — Lowest note in the chord is played first up to the highest, last.
- Down — Highest note in the chord is played first down to the lowest, last.
- Alt — The direction alternates between Up and Down on alternating chords.
- Random — The strum direction is randomized.
- time — Time taken to strum the chord.
- tns (tension) — Acceleration / deceleration through the chord. Left = strum accelerating. Right = strum decelerating.
- MOD X, Y, Z — The XYZ values are freely assignable to Modulation targets in Harmor via the ‘Articulation part’ >Modulation X/Y or Z mapping envelopes. Simply edit the X, Y or Z Modulation mapping envelope from the default (flat) state and it will control the selected Editor target. NOTE: X (left-right) & Y (up-down) can be controlled by left-clicking in the X/Y/Z area and dragging. Z can be controlled by mouse wheel OR clicking the middle mouse button and dragging vertically. NOTE: X and Y also correspond to FL Studio Piano roll per-note parameters.
- pre fx — Pre FX (effects section) volume.
- post fx — Post FX (effects section) volume.
- Pitch — Playback pitch. NOTE: In Image synthesis / resynthesis mode you can set the playback speed to zero, right-click in the image window and right-click and scrub horizontally (time) and vertically (pitch).
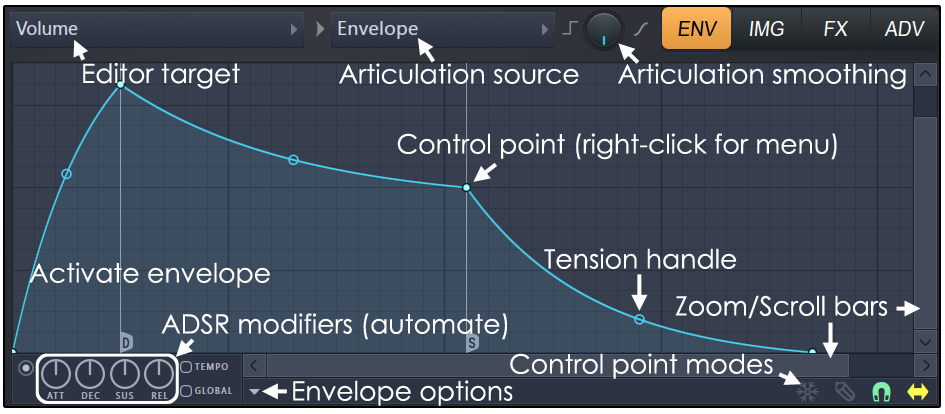
ENV — Envelopes
The ENV panel provides access to the full suite of modulation parameters in Harmor. The ENV editor shows Editor Targets (usually a synthesis control), for each target there can be a number of Articulation parts (modulation sources).
TIP: Finding the right envelope:
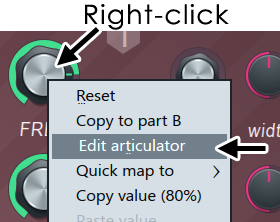
A quick way to find the articulation envelopes for any parameter is to Right-click the target control and select ‘Edit articulator‘ from the pop-up menu. The Editor target will be automatically selected in the Envelope editor.
Controls above the Envelope
- Editor targets — Choose the editor target. ‘Shaping’ category targets have only one part (envelope).
- Articulator part — Edit & or activate any number of Articulator Parts so that the target is modulated by multiple inputs, if desired.
- Articulator Smoothing (knob) — Time based smoothing of the output of the envelope. Envelope values are averaged over an integration window. The width of the window is set by the knob.
Controls on the Envelope
There are several basic operations for editing the envelope/mapping shape:
- Add a new Control Point — Position your cursor over the line, or envelope background, and right-click.
- Reposition a Control Point — Left-click and drag control points. Hold SHIFT while dragging to lock the vertical position, or CTRL to lock the horizontal position.
- Delete a Control Point — Right-click a control point and select Delete. Alternatively, hold ALT and Left-click.
- Change a Segment Type — Right-click a control point and select a curve type (the selection applies to the preceding segment), see the control point context menu for more details.
- Change Segment Tension (Acceleration) — To change the amount of tension, Left-click on the tension handle (the circle located half way between the control points) and move your mouse up/down. Right-click the handle to reset to a straight line. Hold CTRL during adjustments to fine-tune.
NOTE: The ATT, DEC, SUS and REL knobs make RELATIVE changes to the ADSR envelope, snapping back after release. While the envelope will appear as it did prior to the change, the envelope will sound according to the relative changes made (as seen in the Hint Bar while the knob is adjusted). Right-clicking the knobs will give options, in particular Create automation clip & Link to controller so automation of envelopes (and LFO parameters) is possible. Similarly, Right-clicking points gives options such as Sustain loop start & Sustain loop end points can be set to loop the envelope during the sustain action.
Envelope tips:
- Many envelopes need to be activated with the switch in the lower-left corner before articulating the target.
- Use the horizontal and vertical zoom/scroll bars for more accurate editing. Click and drag on the ends to zoom or hover your mouse pointer and roll your mouse-wheel.
- Make use of the SNAP switch (lower-right) to snap to envelope values.
- Notice the background shading, it will usually reflect bars, octaves or other useful divisions related to the Articulation target.
- If an envelope is frozen and won’t respond to editing, uncheck the FREEZE switch on the lower right.
- Envelopes can be synced to tempo using the TEMPO Switch.
- The Envelope options menu usually contains a list of useful pre-defined envelopes or can be used to save your own.
- Drop compatible file types on envelopes and they can be auto-analyzed. For example .fnv (envelope state files), .wav, .mp3, ,ogg etc audio files (volume envelope will be extracted and replicated).
Controls below the Envelope
- ADSR modifiers — These knobs are modifiers for the set envelope. That is, they are designed to be automated. After they are edited/moved, the envelope will snap back to its original appearance but the duration/value of the A, D, S or R target will be multiplied by the value of the knob. You can notice this by observing changes to the Envelope play-position marker as it moves across the envelope.
- ATT — Attack length modifier.
- DEC — Decay modifier.
- SUS — Sustain modifier.
- REL — Release modifier.
- Tempo — Locks the envelope grid to project tempo/beat. Changes in project tempo will affect envelope timings.
- Global — Retriggers the envelope, including those playing, with each new note played so all notes share the same envelope phase/timing.
- Envelope options — See the Envelope options menu section for more details.
- Freeze — Enable this switch to lock the envelope curve to its current setup. This feature is useful if you have finished changing the spline structure of an envelope and want to protect it from accidental edits (it also hides the handles to provide a clear view of the shape).
- Step — Enable this option to set the Editor to step editing mode. Drag within the editor to create a ‘free hand’ curve in which a new control point is defined for every step in the timeline. Hold SHIFT while dragging to draw ‘pulse’ lines (straight vertical/horizontal lines only). Note that each new segment created in this mode uses the same tension as the previous segment.
- Snap — Enable this option if you want the control points to snap to the nearest step in the timeline while dragging.
- Slide — Enable this option to preserve the relative distance between a dragged control point and all control points after it (this option is enabled by default).
Control point context menu:
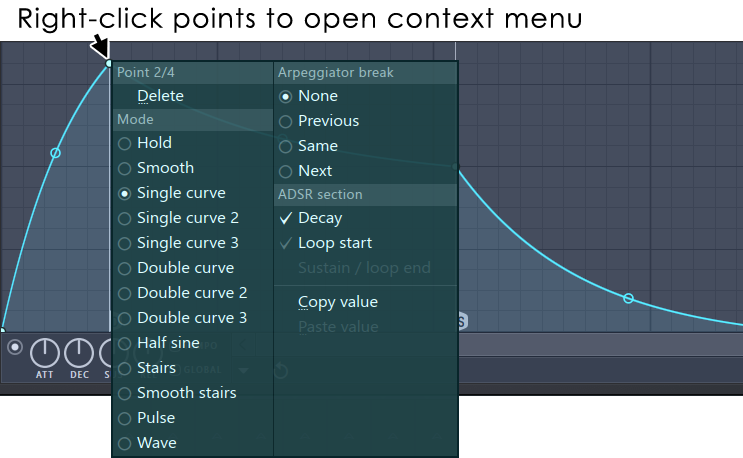
- Delete — Delete point.
- Change curve type — Right-click the right-most control point of the segment to be changed, this will open the Curve Type Menu with the following options:
- Single curve — Default mode for creating straight or curved segments (depending on the tension).
- Double curve — Smooth ‘S’ curves, useful for scratching effects.
- Alt single curve — Linear or asymmetrical accelerating / decelerating curve (depending on the tension).
- Alt double curve — Linear or asymmetrical smooth ‘S’ curves(depending on the tension), useful for scratching effects.
- Hold — Single steps between points, useful for creating jumps in position.
- Stairs — Multiple steps between the control points. Left-click on the tension handle and move your mouse up/down to change the step frequency. Useful for glitch / decimation effects. Step size controls the ‘graininess’.
- Smooth stairs — Multiple smooth steps between the control points. Left-click on the tension handle and move your mouse up/down to change the step frequency. Useful for changes in pitch and granular effects.
- Pulse — Square wave pulse, adjust the frequency with the tension handle.
- Wave — Sine wave pulse, adjust the frequency with the tension handle.
- Half sine — One half of a sine wave. Useful for creating start, stop and scratch effects.
- Smooth — Allows for smoothly joining points with an ‘S’ curve.
- Arpeggiator break — Harmor uses special arpeggiator envelope markers active when playing chords (see also the Envelope Sequencer accessed from the Envelope Options Menu):
- None — Use this to clear an unwanted break point.
- Previous () — At the break-point applies the following segment to the note below the previous note in the chord modulated.
- Same () — At the break-point applies the following segment to the same note as last modulated by the envelope.
- Next () — At the break-point applies the following segment to the note above the last note in the chord modulated.
- Special ADSR markers: — Harmor uses special ADSR envelope markers:
- S (sustain / loop end): Marks the end of the decay/loop section and the start of the release section.
- L (loop start): Marks the start of a sustain/loop section.
- D (decay): Marks the start of the decay section.
 ) — At the break-point applies the following segment to the note below the previous note in the chord modulated.
 ) — At the break-point applies the following segment to the same note as last modulated by the envelope.
 ) — At the break-point applies the following segment to the note above the last note in the chord modulated.
Envelope options menu
The Envelope options menu contains a range of useful tools including:
 Options — Click the forward-arrow to select:
- Open state file. — Opens pre-saved Editor state files (envelopes, etc).
- Save state file. — Save an Editor state.
- Copy state — Copies the current Editor settings to be copied to another location.
- Paste state — Paste the Editor state data in the clipboard.
- Copy to Part B / A — Copies the current articulation to the same target in the matching synthesis part.
- Undo change xyz — There will be an item in the menu which shows the last action performed, clicking it will undo the action. The last action before the screenshot was ‘enabling’ of the envelope, hence ‘Undo change enabled’.
- Undo history — Shows the editing history since the last reset.
- Bipolar LFO tension — Changes the tension knob effect (below the envelope) . Selected: tension adjustments are made symmetrically around the zero line (bipolar). Deselected: tension adjustments are made relative to the waveform maxima and minima (unipolar).
- Flip vertically — Inverts the current envelope.
- Scale levels — Opens the Scale Level tool.
- Normalize levels — Scales the envelope so the highest and/or lowest levels reach +/- 100%.
- Decimate points — Opens a simple tool that allows manipulation of the number of control points in the envelope (useful in conjunction with Analyze audio file).
- Filter — Opens the Envelope Filter tool (useful in conjunction with Analyze audio file).
- Smooth up — Opens the Smooth Up tool that allows smoothing of the envelope shape (useful in conjunction with Analyze audio file).
- Smooth up abrupt changes — Quick removal of ‘spikey’ or sudden changes in the envelope.
- Turn all points smooth — Preset filter to quickly filter the envelope.
- Create sequence — Opens the Envelope sequencer.
- Analyze audio file. — Creates an envelope that mirrors the volume amplitude profile of the analyzed sound. You can also drop audio files on the envelope and they will be analyzed
- Background gradient — Turn the background gradient on/off.
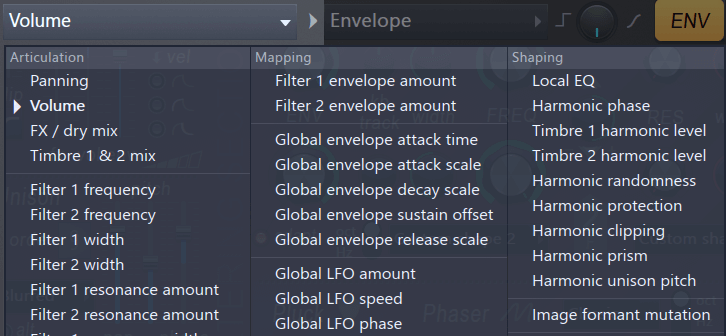
Targets are divided into Articulation (modulation destinations), Mapping (keyboard/articulator to target modifier relationships) and Shaping (harmonic filter shaping).
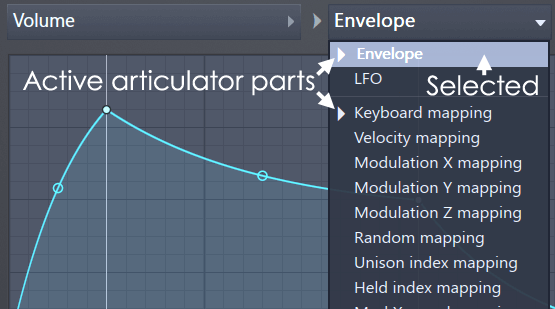
Each Editor Target can respond to multiple Articulator Parts. Active parts & articulators show with an indicator next to them.
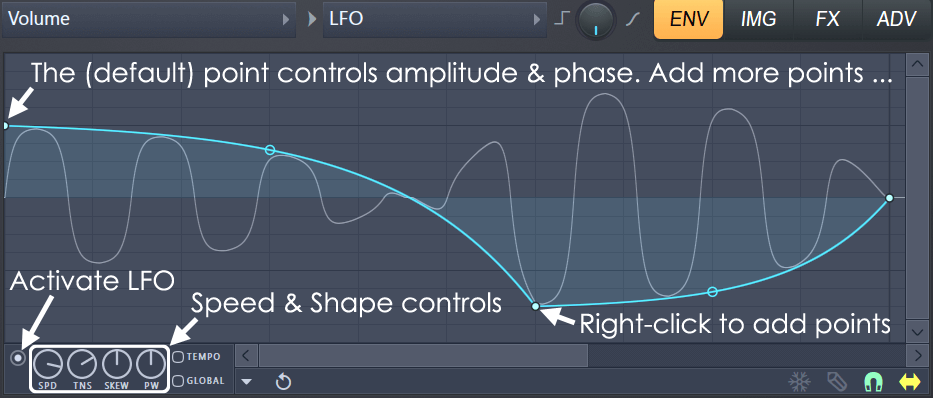
For LFO articulation the initial state shows one point (noted below) which can be used to change the amplitude, phase & start-time of the LFO.
 NOTE: All active LFO’s can be scaled/modulated according to the Global LFO control which has independent Amount, Speed and Phase articulation mappings.
To change:
- LFO Amplitude — Drag the ‘Amplitude handle’ vertically.
- LFO phase — Drag ‘Amplitude handle’ the handle below the center zero-line.
- LFO start time — Drag the ‘Amplitude handle’ to the right.
- LFO shape — Manipulate the TENS (Tension), SK (Skew) & PW (Pulse Width) knobs. A sine-wave shape, for example, can be achieved by tweaking Tension alone.
- Tempo lock — Select Tempo-based time to the right of the knobs.
- LFO note-on sync — Select Global / retriggered LFO phase at note-on. Global sync, retriggers the envelope, including those playing, when a new note is played. This means all notes will share the same envelope phase/timing.
- LFO full envelope control — Add more points (as shown above) to allow changes to Amplitude & Phase over time. The position of the blue envelope above and below the center zero-line determines LFO phase.
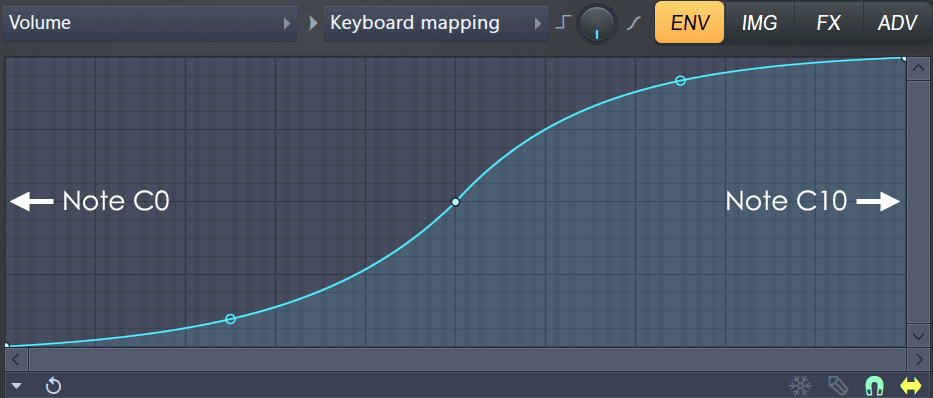
Keyboard mappings — represent the piano keyboard from C0 to C10. As you move your mouse cursor around the editor the exact notes will show in the FL Studio Hint Bar (or VST Hint Bar).
One related and special Articulator part is the Held index mapping that generates ‘index’ values for successively held notes. When the notes of a chord are added in secession (rather than simultaneously) each additional note after the first will have an ‘index’ value 1 unit greater than the last. In practice, the mapping steps 1 grid unit per note. It’s useful with:
- Chords — Where you only want the first note to be bright and later ones to use a lower filter cutoff frequency for example.
- Legato — If you want the note to which you are sliding to have different values/properties for the Editor target compared to the first.
- Arpeggiator — Giving control over the values of each note if they are added in secession to create an arpeggiator chord.
Unison Index Mapping — Another particularly useful mapping is the Unison index mapping. This mapping part allows you to pan, pitch, set levels, etc., for each unison voice independently, opening up many powerful synthesis techniques.
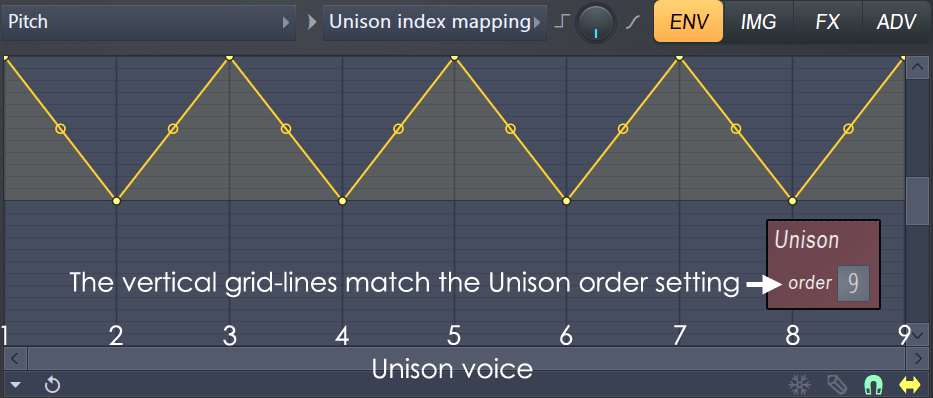
The horizontal grid changes to reflect the number of unison voices active. When two voices are active the extreme ends are Unison voice 1 (left) and Unison voice 2 (right) respectively.
Unison index mapping examples:
- Multi-voice parts — Set the unison number to set voices active and then use the Pitch > Unison index mapping to independently tune the unison voices to any pitch desired. Dual-voice mode — With a Unison of 2 (with the Pitch > Unison index mapping setting the second voice set an octave below the first) and the Timbre 1 & 2 mix > Unison index mapping set to play a square wave on voice 2, you now have a Saw with a Square 1 octave below at the same time, with only one part.
- Leslie effect — Use Global LFO phase > Unison index mapping and Panning > Unison index mapping to make a stereo-panning effect.
Random mapping — Outputs a random value under envelope control. Each time a note is triggered a random value between 0 and 1 (along the horizontal axis) is generated. A corresponding output modulation value is selected according to the envelope value at that point. In this way the vertical range of the envelope sets randomization range and area under the envelope probability that an output value will be generated.
As this is the same system used in Fruity Envelope Controller,
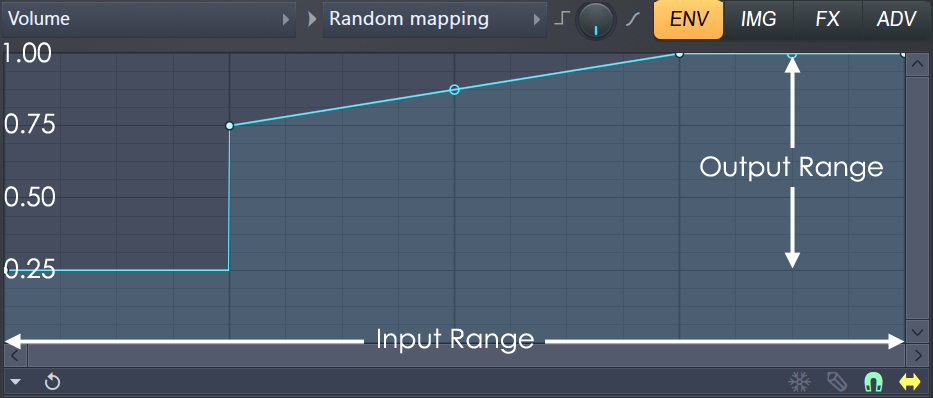
EXAMPLE: The envelope above will generate random output values between 0.25 and 1.0, notice the output values on the left side. 25% of the time the output value will be 0.25 as 1/4 of the envelope is fixed at 0.25. 50% of the time the value will be between 0.75 and 1.0 and the remaining 25% of the time the value will be 1.0 as 1/4 of the envelope is fixed at 1.0. Mathematically probability comes down to areas under the curve, for each output value. If you want simple random numbers between 0 and 1 then create a straight-line envelope from the bottom left corner to the top right.
Harmonic mapping — See also Additive Synthesis in addition to this section since the following envelopes control the level and phase of partials sent to Harmor’s ‘additive synthesis’ engine.
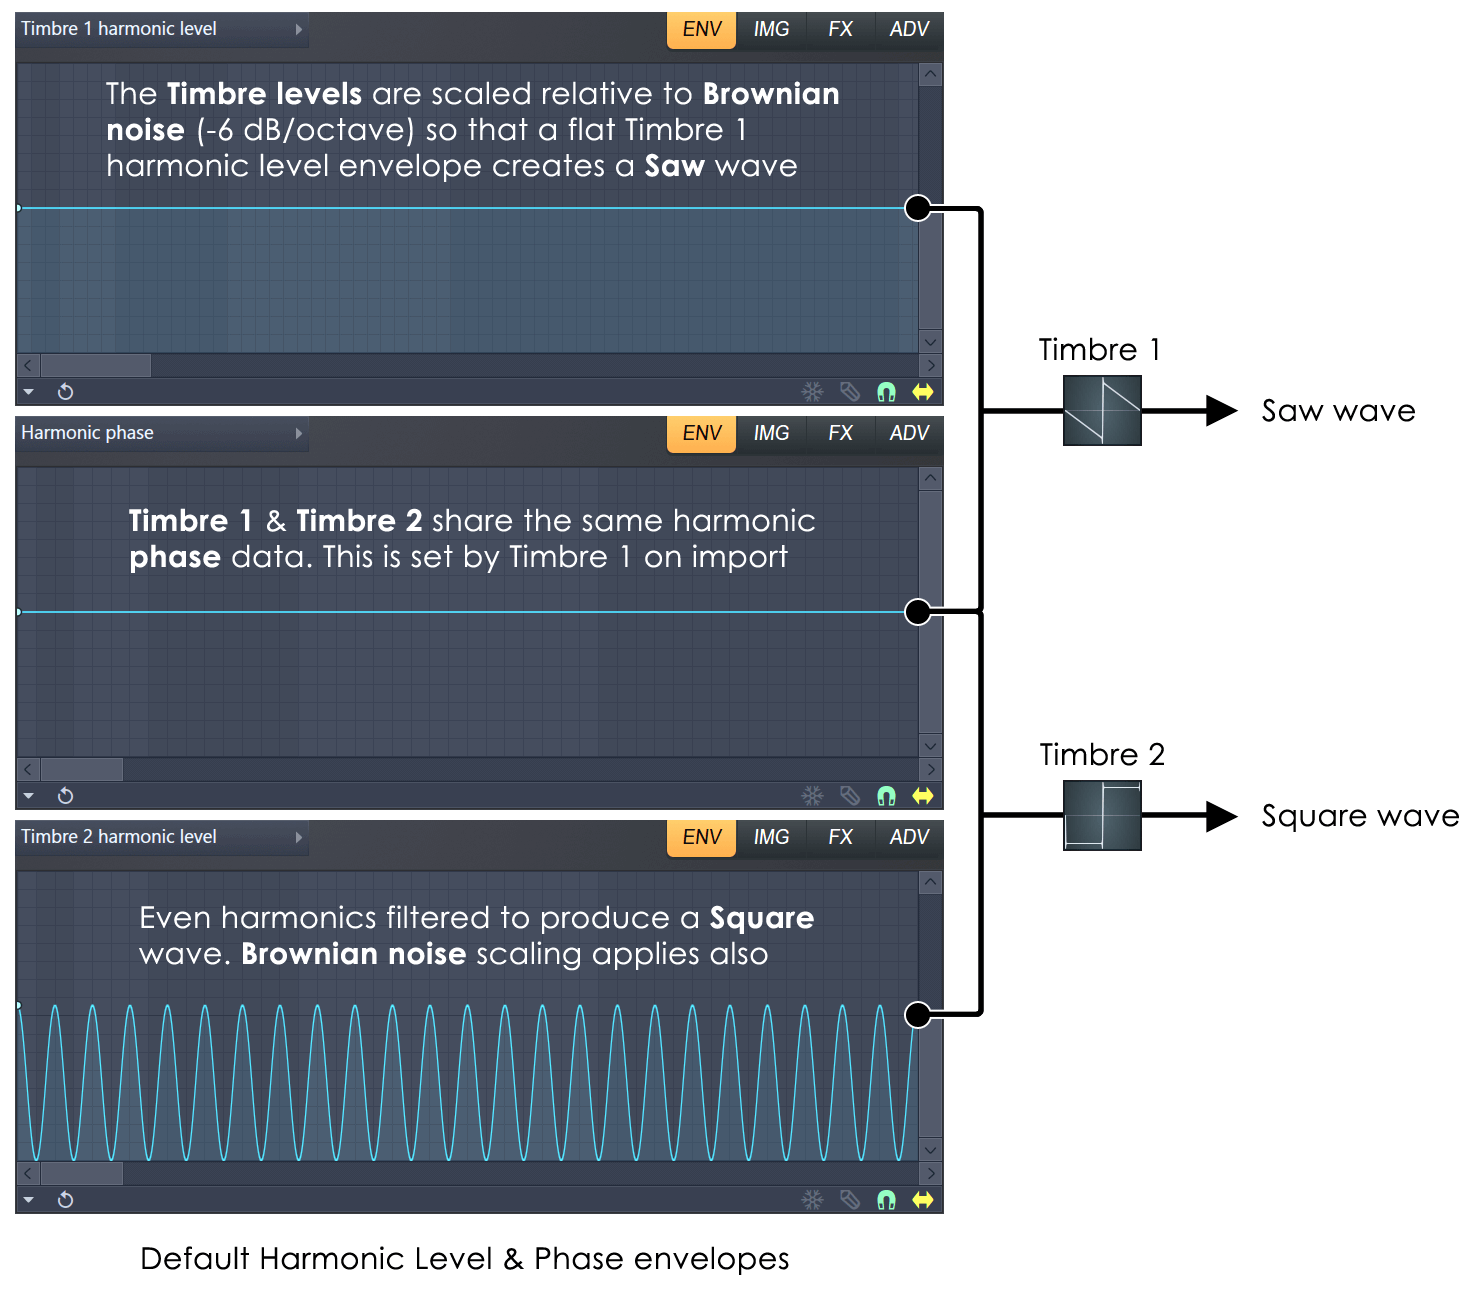
Timbre harmonic level calibration — The default (flat) Timbre 1 harmonic level & Timbre 2 harmonic level envelopes generate a Saw and Square wave shape due to a special per-harmonic level calibration. Envelope values are scaled relative to the slope of the Brownian noise spectrum. This allows Harmor to generate the useful Saw waveform using an, easy to draw, flat envelope. Brownian noise is simply a frequency response curve that decreases the amplitude of frequencies in the audio spectrum by -6 dB per octave (in other words a continuous drop of 50% per octave). For example, a frequency of 1000 Hz at 1 unit amplitude will be 0.5 units and by 2000 Hz, 0.25 units at 4000 Hz and 0.125 units at 8000 Hz, etc. This means each partial in the Timbre harmonic level envelope, that is an octave above the last (2, 4, 8, 16, 32, 64 etc), will be 1/2 the amplitude of the partial an octave below it. But why?
It turns out that a decrease in harmonic amplitude, at the rate of 50% per octave (the Brownian noise profile), is the exact recipe to additively synthesize a Saw wave. Eg. Saw wave = Partial 1 (the fundamental) + Partial 2 * 0.5 + Partial 3 * 0.333 + Partial 4 * 0.250 + Partial 5 * 0.200 + Partial 6 * 0.166 + Partial 7 * 0.142 + Partial 8 * 0.125 + etc. Notice how for each octave (bold partials), the level drops by 50%. It also transpires that filtering the even harmonics (2, 4, 6, 8, etc.) and leaving the odd harmonics (3, 5, 7, 9 etc.), in addition to the 50% per octave Brownian amplitude profile, is the additive synthesis recipe to create a Square wave. This is what the Timbre 2 harmonic level mapping (above) is doing, filtering even harmonics. This envelope is achieved with the (Right-mouse) ‘wave‘ control-point menu option set on the right-most control point in the envelope. So now you know how the default Timbre 1 and 2 waveforms are generated. Timbre 1 & 2 harmonic Brownian level scaling avoids the need to program complex level envelope curves in order to synthesize a ‘standard’ Square and Saw wave.
If all that is confusing, just remember that Harmor’s Timbre harmonic level envelope has been pre-scaled to make it easier to get good sounds from the plugin using simple (to draw) partial level mapping envelopes.
TIPS: While the Timbre harmonic level and phase envelopes can be used to create any waveform, it’s simpler to load single-cycle waveforms on Timbre window 1 by right-clicking it and importing a waveform OR dropping an audio file on it. The file will be analyzed and all the mappings created for you. Remember that Timbre 1 and Timbre 2 share the same phase data (set by Timbre 1 during audio import). Phase is shared as it avoids phase cancellation problems when mixing the Timbre sources.
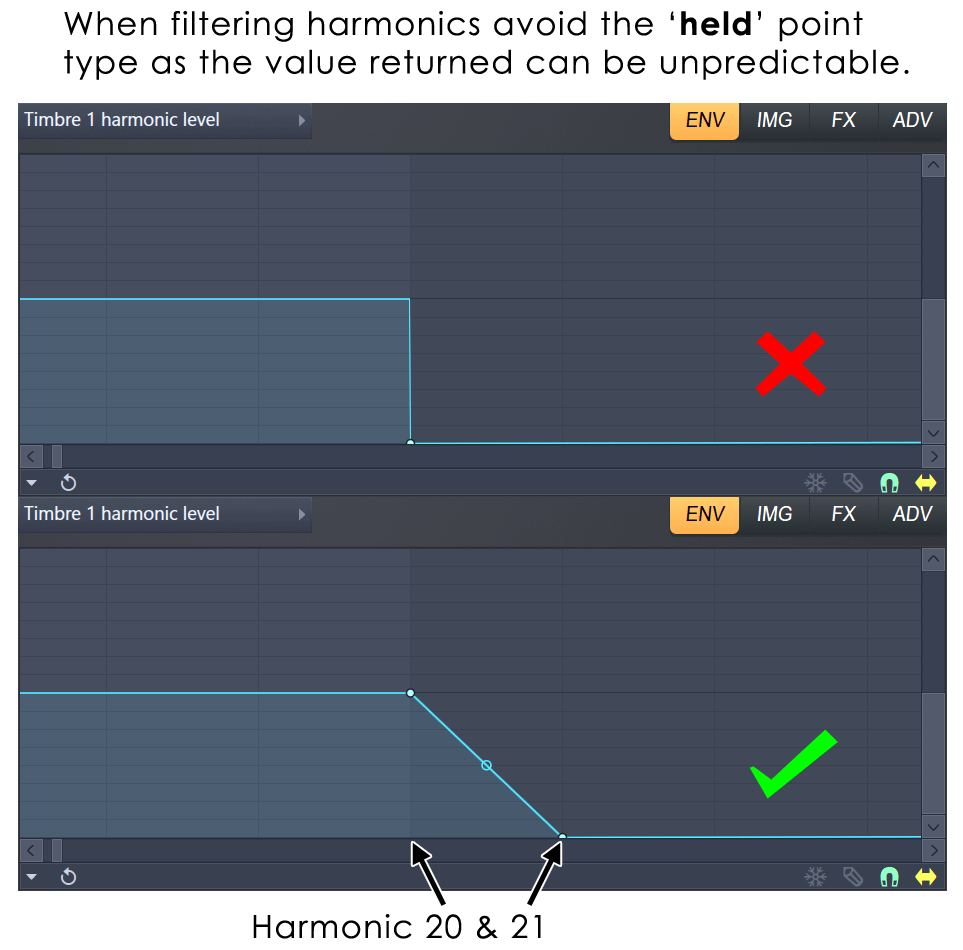
Envelope point-transitions — Generally the Held point type should be avoided when working with envelopes where you need to be precise about the exact harmonics active or inactive at a given point. Better to zoom in on the horizontal axis and use a Single-curve type point. In the example below, Harmonic 20 may not be active in the top panel but definitely will be in the lower panel. In both cases Harmonics 19 and lower will be active while Harmonics 21 and higher will be inactive.
IMG — Image Synthesis / Resynthesis
The IMG (Image Resynthesis) section can load images OR samples:
- Resynthesis mode — All post-processing and patch changes are referenced to the original sample data. That is, the original sample data is re-analyzed and processed according to the new settings. Maximum detail is used for the frequency & gain planes. As a reminder, Additive synthesis views audio as an evolving frequency spectrum vs amplitude on a moment-by-moment basis. NOTE: Resynthesis mode modulates the phases of partials depending on the source audio and references the original source audio every time the patch is edited. In ‘Image’ mode ‘Harmonic phase mapping’ is calculated across the sound, then fixed and is not changed by subsequent editing. This means resynthesis will maintain a more natural sound with complex post-editing.
- Image synthesis mode — Sample data is analyzed and converted to image files, with the advantage you can edit these 2D images in any image editor. There are independent image planes for gain & pitch. You can also import any bitmap. Even if it wasn’t designed to be turned into audio, it might still sound interesting. NOTE: Once a patch has been converted to ‘Image Synthesis’ mode, you can’t revert back to resynthesis mode, the link to the original sample data is lost and the sound is converted to image planes.
Working with raw images — Harmor has 516 partials so an image 516 pixels high can play all partials (1 to 516). Pixel brightness is interpreted as partial level. Black means no partial, white is 100%. A horizontal white line at the bottom of an otherwise black the image, 1 pixel high, will play the first (lowest) partial. A horizontal white line at the top of the image, 1 pixel high, will play the 516th (highest partial). Time is represented by the image-width, although you can change the speed and scaling via the resynthesis controls as shown below. An image less than 516 pixels high is assumed to start from the bottom partial up. An image 20 pixels high will play the first 20 partials.
In short, the difference between the two modes is quality (resynthesis) vs image editing flexibility (image synthesis).
IMG Tab Controls
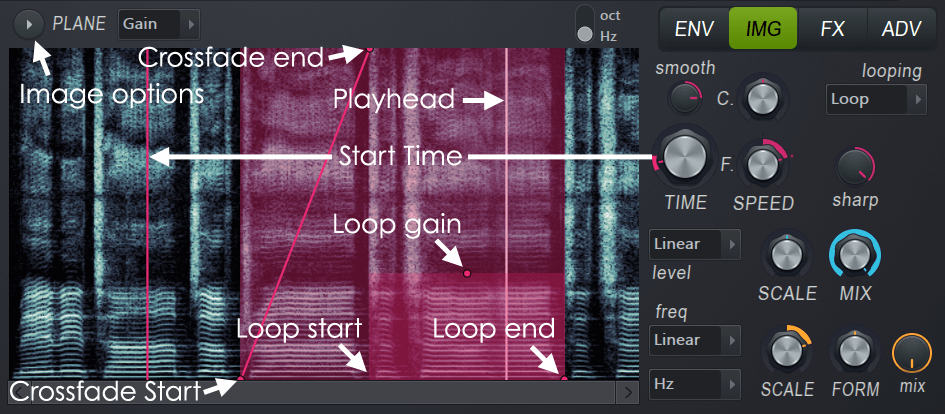
Scrubbing — Left or right-click the image editor and drag to scrub-play the sound. You can record this movement from FL Studio 10.0.5 onward using the FL Studio native version (just set FL Studio to record and start scrubbing). NOTE: The VSTi specifications don’t support this. Right-click the image editor to scrub in both pitch (vertical) and time (horizontal), set the speed to 0% first.
- Image options
- Tools
- Clear all — Clears all image planes
- Prepare time envelope — Prepares an ENV > Image time offset > Envelope ready for scratching and time warping.
- Create bouncing loop time envelope — Prepares an ENV > Image time offset > Envelope with a bouncing loop envelope enabled, using loop points embedded in the sample.
- Slow down within loop region — Slows down the speed within the set loop.
- Tune pitch for time offset — Changes ENV > Pitch > Envelope as a function of start time.
- Set viewed zone as loop region — Sets the section visible in the window as the Loop Region.
- Set last played zone as loop region — Sets the last section played as the Loop Region
- Map time offset to last hit key — Sets the ENV > Image time offset > Keyboard mapping so the last key played. To use set the time to the desired part of the image and play a key and use the function. This way you can build up a unique set of MIDI keys to playback (time) positions.
- Audio
- Analyze audio file — Opens a file browser to load an audio file (.wav, .mp3, .ogg).
- Convert to image synthesis mode — There are two modes, resynthesis and image synthesis. When you drop a sample on Harmor it is processed in ‘resynthesis’ mode which references the original sample data for the highest fidelity. When converted to ‘image synthesis’ mode editing flexibility is increased at the expense of fidelity. Trade-offs, don’t you love ’em?
- Map audio markers to keys — Samples with embedded time markers will be mapped to keys using the ENV > Image time offset > Keyboard mapping envelope. Useful for creating ‘slicing/stuttering‘ effects in Harmor. NOTE: Playback will continue to the end of the sample starting from each marker triggered if a key is held. To confine playback to the marker regions use the next option:
- Map audio regions to keys — Similar to ‘Map audio markers to keys’ except playback is limited to the regions defined by markers in the audio file. NOTE: For ‘play to end’ of the sample type behavior use the previous option.
- Image
- Generate random cloud — Creates a random ‘cloud’ image.
- Degrade horizontally — Reduce horizontal resolution
- Degrade vertically — Reduce vertical resolution
- Crossfade 10%, 25%, 50% — Create a cross-fade on the entire image using 10%, 25% and 50% of the width respectively.
- Selected image plane
- Open image file — Opens a file browser to load an image file (.bmp, .jpg, .png, .gif). The image is embedded in the patch, not linked to.
- Save as image file — Saves the current image.
- Edit image — Opens the default Image Editor on your PC.
- Copy to image clipboard — Copies the current image to the clipboard.
- Paste from image clipboard — Pastes the current image from the clipboard.
- Clear — Clears the image.
- Invert — Inverts the image polarity (creating a negative) so light areas become dark and dark light.
- Flip vertically — Flips the image so the top becomes bottom and vice versa.
- Tools
- Plane — Image plane. Select the Frequency, Amplitude or Combined (All) image planes.
- Copy/Pase — Copy/Paste images from the image clipboard. Only available when you have used the ‘Convert to image synthesis mode’ from the ‘Image options’ menu.
- Oct/Hz — Vertical image scale.
- C (course speed) — Playback speed (course).
- F (fine speed) — Playback speed (fine).
- sharp — Image sharpening. Sharper images will have shaper transients. Left is transient sharpening, right is transient sharpening + phasing.
- looping (menu) — To set a loop hold Ctrl + Left-click and drag on the region to loop. The start time will be made coincident with the Loop Start, use the Image time offset knob to disassociate them. Alternatively, use the Image options > Tools ‘Set viewed zone as loop region’ & ‘Set last played zone as loop region’ OR include a loop in your imported sample and it will be autodetected and used.
- One shot — Image plays once.
- Loop — Image loops between the loop-points.
- Ping pong — Image bounced back and forth between the loop-points.
- smooth — Image time offset smoothing sets the time taken to relocate between Image Time Offset positions. The smoothing knob has different behaviors when turned left and right of 12 O’Clock. Left (Always): Smoothing is applied according to the time-constant set, Right (With threshold): Smoothing is only applied for small distances, when the offset is moved over large distances smoothing is ignored. This is useful to smooth out small movements but allows larger ‘quick’ jumps.
- TIME — Image start time offset. Use this to relocate the start point in the image. NOTE: Left or right-click the image editor and drag to scrub-play the sound. You can record scrubbing in FL Studio 10.0.5 onward using the FL native version of Harmor (just set FL Studio to record and start scrubbing). Pitch = vertical and time = horizontal, set the speed to 0% first.
- LEVEL Section — These controls affect the volume mapping (brightness) of the resynthesis or image. The frequency image plane at 50% grey = 1, no change to the original level.
- Image gain (menu) — Sets how the gain level is interpolated between pixels. Check the preset,’Tutorials and tricks > Image synthesis > Interpolation to learn how the various modes affect the sound.
Choose from:
- Block, Cap Bell — Various interpolation shapes, set by ear.
- Linear, Cubic — Various interpolation shapes, set by ear.
- Rise, Fall — Special interpolations that only allow rising or falling levels.
- Image gain pixel scale — Image brightness to gain scaling.
- Image gain mix — There are separate gain and frequency image planes. This knob blends in the gain information. When set to 0%, all active frequencies active are equally loud.
- Image gain (menu) — Sets how the gain level is interpolated between pixels. Check the preset,’Tutorials and tricks > Image synthesis > Interpolation to learn how the various modes affect the sound.
- FREQ section — These controls affect the frequency mapping (vertical scaling) of the image or resynthesis.
- Image frequency interpolation curve (menu) — Choose from:
- Block, Cap Bell — Various interpolation shapes, set by ear.
- Linear, Cubic — Various interpolation shapes, set by ear.
- Rise, Fall — Special interpolations that only allow rising or falling levels.
- Image frequency mode (menu) — Choose from:
- Octave, Hz, Wide Hz — Relationship between vertical pixel position and frequency. Hz mode will have the effect of ‘fattening’ harmonics.
- Unison — Image controls Unison detuning.
- SCALE — Image frequency pixel scale controls the amount of frequency offset applied to the image/resynthesis, according to (its own envelope, Right-click and select ‘edit articulator’ and) the Interpolation and Mode settings (discussed above). By default turning this to zero will rescale lower frequencies toward the fundamental harmonic relationship with decreasing scaling applied as a function of increasing frequency.
- Image frequency interpolation curve (menu) — Choose from:
- FORM — Formant shifting. Formants are frequency peaks/resonances associated with the size of noise-making objects (the human voice, piano, guitar etc). Formant preservation retains the natural sound of transposed samples over a limited range (+/- 600 cents) and so is particularly useful for avoiding the ‘chipmunk’ effect on vocals.
- mix — Formant mix.
About images and planes
There are independent images that control the Pitch/Frequency and Gain of partials. Together these can create any sound, just as sampler can. In the image window the vertical dimension is frequency (each line of pixels is a single partial), while the horizontal dimension is time.
Resynthesis notes
To resynthesize a sample:
- From the presets select Template > Resynthesis.
- From the Image options menu select ‘Analyze audio file‘ OR drop an audio file on the window.
- Optional: Convert to image-synthesis mode for more editing freedom (see below).
To load stereo samples:
- From the presets select Template > Resynthesis. This has the ‘side‘ switch on the ADV (advanced) tab selected. Important for loading stereo samples.
- Load a stereo sample in Part A
- Reload the same stereo sample in Part B
- The A/B fader now acts as a Mid/Side mix control and the stereo sample will play as originally recorded with 50% mix settings.
- Optional, link parts A and B so playback relocation etc is synchronized
To use image synthesis:
- To edit the sound visually after loading it as shown above, from the Image options menu select ‘Convert to image synthesis mode‘ OR
- Drag an image file from a file browser and drop it on the image window.
- Click copy above the Image window.
- Open your favorite image editor and select Paste from its options. The image can now be edited in your editor.
- Select copy from in your image editor and Paste it back into Harmor. Now just continue to edit and select copy in your image editor and paste into Harmor. Watch which plane you’re editing as you copy and paste. Frequency or Gain.
NOTE: Images are calibrated to a brown noise profile, the same profile used in Harmor to create a sawtooth wave (i.e a sawtooth is created by a flat line in the Harmonics Editor, the purpose of which is to make it much easier to create traditional and good-sounding waveforms).
Image Synthesis Articulation envelopes
- Image time offset — ‘Start’ as above.
- Image fine speed — ‘Fine’ as above.
- Image formant shift — ‘Form’ as above.
- Image frequency pixel scale — ‘SCALE’ as above.
FX — Effects
It’s important to remember that while the engine is additive, operating in the frequency domain, the FX section acts on the output of that process and operates in the time domain.
NOTE: The effects unit order can be set on the ADV tab.
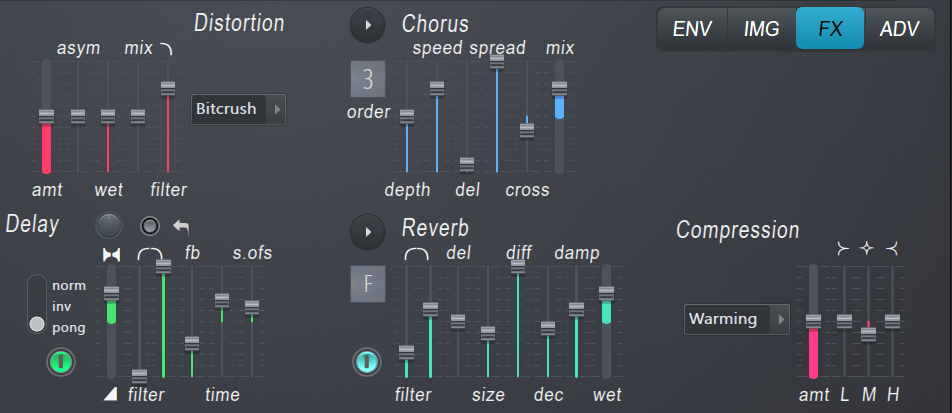
- Distortion — Distortion simulates over-driven analog sounds. When this occurs the shape of the input waveform is distorted and this leads to a pleasing (to some) tone.
- amt — Amount of distortion.
- asym — Asymmetry of the positive and negative waveform oscillation.
- wet — Wet (effect) to dry mix.
- filter — Low pass filter.
- Type (menu) — Choose from: Classic, Flat hat, Cube, Softsat(uration), Rubber, Ribbon & Sincrush. Set by ear.
- Chorus — The Chorus effect results from the interaction of delayed copies of the input sound, that are detuned by a small and continuously varied amount. It is called ‘Chorus’ because it can make a single voice sound like that of a chorus of singers (all slightly out of tune relative to each other) and creates a thick and lush texture. The effect is similar to Unison but operates across all voices rather than per-voice and is much less CPU intensive. Select from
- Chorus options (menu) — Select from a range of different Chorus styles. Set by ear.
- Order — Sets the number of chorus voices, choose from 1 to 9. NOTE: Chorus and Unison have a similar sound but Unison is added per note, so uses more CPU. Where possible use Chorus to achieve the effect.
- depth — Controls the chorus delay modulation. The chorus delay will be swept between delay and delay+depth. If this value is zero, the chorus will remain ‘static’ as the delay modulation will stay constant. Setting the ‘Depth’ to higher values will create heavier modulation. .
- speed — Frequency sweep-speed. NOTE: The ‘beating’ sound of the chorus depends on the interaction between speed, depth & order.
- del — Sets the minimum delay between the chorus voices. The chorus delay will be swept between delay and delay+depth
- Spread — Stereo spread
- Cross — Cutoff frequency of the cross-over filter
- Mix — Controls the balance between the dry (middle) and chorused signal (top) and inverted phase chorus (bottom).
- Delay — Delay is an echo-based effect. Very short values of the delay time controls can produce a ‘reverb’ like sound while longer time settings are great for left-right ‘ping-pong’ effects.
- Delay feedback mode (switches) — Choose from:
- norm — Delay echoes appear in the same location as the input.
- inv — Inverted switches the left and right channels in the echoes
- pong — Ping pong delay bounces L and R channel audio between the speakers. Works in conjunction with the s.ofs (Stereo Offset) control.
- Delay input panning — Pans the input into the delay. Useful where a Ping-pong mode has been selected and you want the echoes to bounce from one side to the other.
- Delay input volume — Input level to the delay.
- fb (switch) — Delay feedback damping switch.
- filter — There is a high-pass (left) and low-pass (right) slider. When fb is selected they progressively filter the delay echoes.
- feed back level — Sets the amount of echo delay fed back into the system.
- time — The bi-directional slider sets delay time in measures (top half) and milliseconds (bottom half).
- vol — Controls the level of the delay echoes.
- fb — Feedback controls the number of delay echoes.
- time — Spacing between the delay echoes. The control is tempo synced, watch the Hint Bar while you adjust the time setting (delay values display in beats and beat fractions).
- s.ofs (Stereo Offset) — Left/Right ping-pong amount. Move up for right-first, down for left-first bounces.
- Delay feedback mode (switches) — Choose from:
- Reverb — Reverberation, simulates acoustic spaces. If you clap your hands in a bathroom and in a concert hall, the two sounds will be quite different. In enclosed spaces reflections overlap one another to create a ‘reverberant’ sound. Consider using delay to create the sense of space rather than reverb in a dense musical mix.
- Reverb preset (menu) — Select from a range classic reverb presets.
- Reverb color (menu) — Select from a range of brightness.
- filter low-pass — Changes the high cut-off frequency. Use this to remove high frequencies from the input to the reverb, or to make the room sound duller.
- filter high-pass — Adjusts the low cut-off frequency. Use this to remove low frequencies from the input to the reverb.
- size — Set the size of the virtual room being simulated.
- diff — Diffusion, simulates the complexity of the room. Low diffusion simulates an empty rectangular room. High diffusion simulates irregular shaped and/or rooms with many objects.
- dec — Reverb decay time. NOTE: For realistic effects, the Room Size should be adjusted according to the decay time. Small rooms sound better with a short decay time, large rooms sound better with longer reverb times.
- damp — Damping is the rate of decay of high frequencies in the room. In real spaces soft furnishings, drapes/curtains carpeting all create higher damping.
- Vol — Volume controls the strength of the reverberant sound.
- Comp — Select from compression, limiting and distortion effects. Harmor uses the Maximus compression engine.
- Compression type (menu) — Compression increases the low-level signals in the sound reducing the dynamic range, and so, making it sound louder or according to the type selector. The Limiting preset prevents the output from Harmor exceeding 0 dB (assuming its Mixer track and Channel setting volumes are at the defaults). When Limiting the Amt control is disabled. The remaining presets offer various compression ‘flavors’ as described by their names. Set by ear.
- amt — Control the mix between the dry and effected signal. Top = 100% effected.
- L, M, H — Compression level for the Low, Medium and High frequency bands respectively.
NOTE: If the effects chain Harmor feeds into already has compression/limiting then don’t use the internal effect.
ADV — Advanced Controls
These controls are under the ‘Advanced’ tab as they generally don’t need to be messed about with by amateurs. Since you are reading the manual to see what it all means, that means you! If you do decide to fiddle with stuff on this tab, don’t complain to tech support when Harmor explodes in an orange ball of flame.
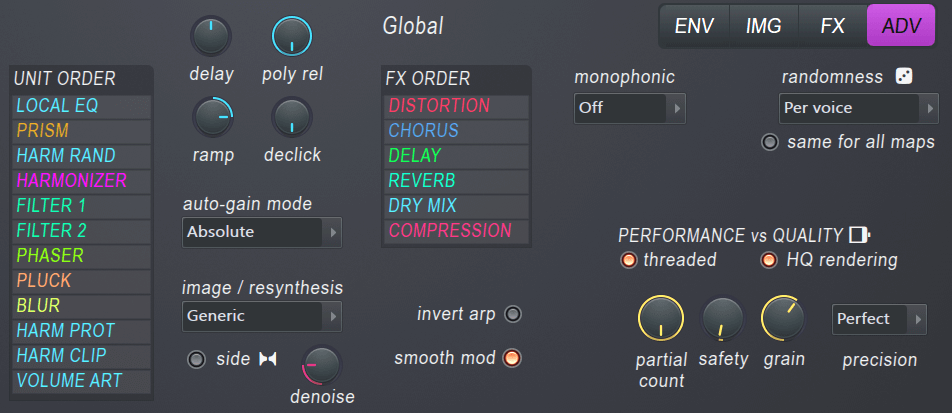
- Current part — Harmor has identical synthesis parts A and B, the options here relate to the selected (current) part.
- UNIT ORDER — This shows the order (data flow) for processing the units as shown (top is processed first). Left-click on a synthesis unit to move it down the list or right-click to move it up OR hover your mouse cursor over a unit and roll the mouse-wheel.
- delay — Note on to play delay. Left in milliseconds, right in measures (tempo based).
- poly rel — Polyphonic release scaling. Useful for patches that have a long release, that would normally overlap with following notes too much or use too much CPU.
- ramp — Partial onset relationship. Left is absolute where partials onset from lowest to highest. Right is relative, delaying the lower partials relative to the upper partials.
- declick — Transient declicking. Effects the attack portion of notes, useful with fast gated envelopes that are causing unwanted clicking.
- auto-gain mode (menu) — This sets the mode for the Automatic Gain control on the Timbre Section. The Automatic gain control acts similar to an audio compressor preventing clipping caused by high-level partials. Relative vs Absolute levels.
- image / resynthesis — Select between Generic (255 partials) and High precision (516 partials) used in the audio-to-image resynthesis process. Generic is usually good enough. Image resynthesis allocates 1 pixel per partial vertically and any number required horizontally to represent time at about 174 pixels per second.
- side — Used when importing stereo samples. Use the ‘Templates > Resynthesis‘ patch then drop or import a STEREO sample on Part A then again on Part B. Part B has the switch engaged and the sample is now used in MID/SIDE stereo mode. Part A contains MID and part B SIDE information. When remixed during playback the original stereo sound is heard. Use the Part A/B slider can be used to change the stereo separation. 0% = Mid sound [mono]. 50% = original stereo sound. 75% = maximum stereo separation. 100% = Side sound [mono].
- denoise — Removes noise from the image (useful for removing noise from a sample).
- Global
- FX ORDER — Change the order of FX units (the top FX unit is processed first). Left-click on a FX unit to move it down the list or right-click to move it up OR hover your mouse cursor over a unit and roll the mouse-wheel.
- Monophonic (menu) — Determines how notes interact. Choose from:
- off — You are not seriously looking at the manual wondering what ‘off’ does are you?
- kill same — New notes will only kill the same note.
- kill all — New notes kill any other playing notes.
- release all — New notes set all notes to the release phase of their envelopes.
- Randomness (menu) — Harmor can add subtle random variation to parameters on a voice-by-voice basis. This is useful for simulating analog gear or human inaccuracies. Choose from:
- Per voice — Each note has randomizations applied.
- Per part — Each part (A and B) each part has randomizations applied.
- Per unison voice — Each voice in the unison effect has randomizations applied.
- same for all maps (switch) — The same randomizations are applied to all mappings (envelopes).
- Performance vs Quality
- threaded (switch) — Allows multi-threading for improved multi-core CPU performance. Switching threading off may, in some cases, improve performance if the host’s multithreading is more efficient than the plugins own.
- HQ rendering (switch) — The highest possible quality is applied to all relevant controls when rendering.
- partial count — Setting the knob to the left progressively removes high-frequency partials from the synthesis processing and so reduces CPU load at the expense of fidelity or ‘brightness’. Choose between 12 to 516 partials (harmonics) per voice.
- safety — Partial safety ceiling. This determines how many partials above the root note are played. 0 Cents and FULL are off.
- grain — Envelope granularity. This is how finely envelopes are processed. Finer granularity means smoother changes to sounds at the cost of higher CPU.
- Precision — Computation precision. Select from:
- Average — Where all computations are made by a team of college-level mathematicians. They like to play ‘Hunt the wumpus’ in their spare time so don’t have much impact on your CPU load.
- High — All calculations are completed by university level mathematicians. This team have special needs and consume large amounts of pizza, cola and CPU for various special interest projects.
- Perfect — All calculations are done by Isaac Newton, Pierre de Fermat, Carl Gauss & Albert Einstein. This team of ‘prima donna’ mathematicians require vast amounts of CPU (mainly to be resurrected via simulation) and partially because Einstein and Newton are endlessly arguing about space-time. Newton just can’t accept that it’s useful to travel faster than the speed of a horse so Einstein’s mathematics are silly and not relevant. Use of this setting should only be attempted if you have access to CPUs not yet invented.
Formats
Drag & Drop audio Files (WAV, AIFF, WavPack, MP3, OGG, REX1&2):
- Onto the oscillator shapes: converts wav to oscillator (1 or 2).
- Onto the image editor: import wav for resynthesis. Original file IS linked to, & not embedded in FLPs.
- Anywhere or onto the channel button: Harmor will detect whether it’s a single-cycle or long wav (>50ms), & import as an oscillator (the one ‘selected’) or the image.
Drag & drop Images:
- Bitmap file (bmp/jpg): imports the image (in image mode, obviously). Original file is NOT linked to, it’s embedded.
Drag & drop scala tuning files:
- Scalar files are supported, drop .scl files onto Harmor. .scl Scala tuning file: imports the tuning file into the pitch envelope. There is also a «just intonation» pitch kb mapping that can be loaded.
Special note colors
The native FL Studio version of Harmor responds to MIDI note colors in the Piano roll as follows:
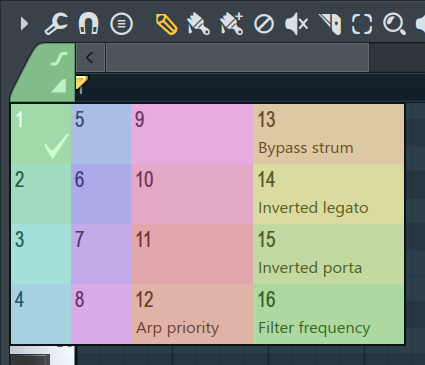
MIDI channel:
- 12. Arp priority — Sets the starting note in an arpeggiation.
- 13. Bypass strum — Notes in this color are not included in the strum but played immediately.
- 14. Inverted legato — Invert legato state, mono (slide) override, use in conjunction with MIDI Channel color 1.
- 15. Inverted porta — Invert portamento state, use in conjunction with MIDI Channel color 1.
- 16. Filter frequency — Filter cutoff frequency. The absolute frequency is based on a defaulted (middle) filter freq knob setting. The note does not play on its own.
Learning Harmor
Tutorials
- Start with the video seriesImage-Line | Harmor (VST & Native Plugin Instrument).
- Also review the Harmless tutorial page. This explains some of the basics of additive synthesis in a less complex environment. Harmor was based on Harmless.
- We recommend downloading the free Harmor Synthesis Manual — by Jens Malmgren.
Making Presets
There are tricks to lowering CPU usage, although most of the CPU-saving settings are on by default.
- Images (embedded) or samples (linked to audio files) — will bloat your preset size, so be aware of this when using resynthesis. If you only use a section of a wave, resave the cropped .wav file and use that instead. Remember to share samples (link to the same wavs) with other presets where possible.
- Voicing — Harmor the voice ends when the volume envelope has ended. But of course this means that if you want a release part in another envelope, your volume envelope has to have a release as well. NOTE: If the volume envelope has time smoothing, the voice will end once the smoothing has ended, but only if the end point is set to zero (which is generally the case).
- Freebies — Some controls don’t eat more CPU if you use it. Local and Global EQ plus Timbre mixing are free.
- Blur — One of the biggest CPU eaters is the harmonic blur (vertical), time blur (horizontal) is ok.
- Root note — As with Harmless the lower notes generate more partials, and so use more CPU power.
- Pitch bend — Also uses more CPU so patches that include pitch vibrato & automation of grittiness. However, if pitch bending is already required by an effect, then it won’t eat more CPU (for the bend that is) to use other effects that require it too.
- Mappings (envelopes) — A lot of the mappings are cached, for those the complexity of the map doesn’t matter (it won’t eat more CPU). Cached mappings include — Mod XYZ, Held index, and everything in the (third) «shaping» column in the list.
- Templates — Used the saved template presets, one for normal synthesis & one for resynthesis. Resynthesis normally doesn’t need cubic interpolation like image resynthesis does.
- Harmonic limiting — You can tell Harmor to reduce the amount of Harmonics using the knob in the quality section, but you can also lower the «ceiling» by using the global EQ map. Example, load «EQ — CPU saver for bass» into the global EQ, it will make Harmor produce less harmonics.
- Disable filters — If you don’t use a filter at all, set «custom shape» in both its filter & resonance type (as in filter 2), this bypasses its processing.
- Don’t be a noob — Don’t activate something if it’s not really audible. For example, don’t move the harmonizer mix to 1%, if it’s inaudible, it will just waste the CPU.
- Long release settings — For strings with a long release, «poly rel» (ADV) is a great CPU-saver. It’s like a soft voice-stealing, it shortens the release of previous voices, quite often the difference won’t be heard at 50%. It will be heard if the older voices are much louder than the new ones, though.
- Prism maps — There are several hard-coded and useful prism mappings for various effects.
- Find things — The browse button makes the browser jump to envelopes if you’re editing envelopes, or images (or where the loaded sample is) if you’re in the image section.
Источник


