- What filesystem to use when using both Windows and Linux? [duplicate]
- 4 Answers 4
- How to dual-boot Linux and Windows
- Set up your computer to boot into Windows 10 or Ubuntu 18.04 as needed.
- Subscribe now
- Prerequisites
- 1. Two USB flash drives (or DVD-Rs)
- 2. A Windows 10 license
- 3. Windows 10 Media Creation Tool
- 4. Ubuntu installation media
- 5. Etcher software (for making a bootable Ubuntu USB drive)
- etcher-ubuntu-520px.png
- Install Windows and Ubuntu
- Installing Windows
- linux-dual-boot_01.png
- linux-dual-boot_02a.png
- linux-dual-boot_03.png
- linux-dual-boot_04.png
- linux-dual-boot_05.png
- linux-dual-boot_06.png
- linux-dual-boot_07.png
- linux-dual-boot_08.png
- linux-dual-boot_09.png
- linux-dual-boot_10.png
- Install Ubuntu
- linux-dual-boot_12.png
- desktop-ubuntu-20.jpg
- desktop-ubuntu-install-00.jpg
- desktop-ubuntu-install-03.png
- desktop-ubuntu-install-04.png
- desktop-ubuntu-install-04-folder.png
- desktop-ubuntu-install-05.jpg
- desktop-ubuntu-install-06.jpg
- linux-dual-boot_23.png
What filesystem to use when using both Windows and Linux? [duplicate]
I will be buying a 2TB hard drive soon, and would like to use it as media storage. I would like to be able to read/write from both Windows (version 7, 64bit) and Ubuntu Linux, and I need support for files greater than 4GB in size (so I think this rules out FAT32).
I’m using IFS drives at the moment to access my linux ext4 partitions, and I find it unstable. Does this mean NTFS? Is there something else I’m missing?
4 Answers 4
There are tools for using ext* under windows. but I would recommend NTFS as the *x-driver is quite stable nowadays.
First off, there will be some problems with NTFS if you use it in Linux:
NTFS doesn’t support file permission mode very well, so you’ll lose the executable bit, setuid bit, etc.
The ACL system in NTFS is not so comfortable with Linux, and you can’t disable it like you can with FAT32.
Currently, the performance of the NTFS implementation in Linux is not very good. For example, I found if I build a Maven project with NTFS, it is 3 more times slower than ext4.
Personally, I run Windows OS in VirtualBox, and make the virtual disk a raw NTFS image (see here). Since the NTFS image is now in raw format rather than.VDI, you can access the NTFS by mounting it directly, without loading the VM instance.
By using VirtualBox instead of Dual boots, there are several advantages:
You don’t have to convert your Linux partition to the NTFS file system. In VirtualBox, you can use Share Folder to access the host OS’s file system. And it’s very fast. Map it to a drive letter if necessary.
You can work with both OSes concurrently, without needing to restart in order to switch from one to the other.
Your GRUB loader will never be overwritten by Windows. Windows always overwrites your boot record and never prompts you with a yes or no.
You will pay more attention to Linux, and then you’ll learn the Linux way to do most of your work. In fact, I found it’s rarely needed to turn on the Windows VM. Because people are lazy about learning new things if you install a dual system, and Windows is enough, why would you bother to boot into another OS?
I found this is the best way to make both Linux and Windows coexist. I have built several Windows VM instances for different usages, and because I don’t install too many applications in each VM, they run fast and it doesn’t feel too different from non-virtual machines.
How to dual-boot Linux and Windows
Set up your computer to boot into Windows 10 or Ubuntu 18.04 as needed.
Subscribe now
Get the highlights in your inbox every week.
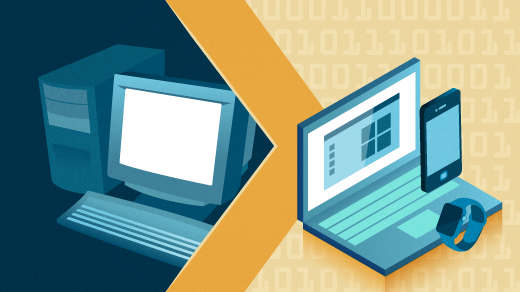
Linux is a great operating system with widespread hardware and software support, but the reality is that sometimes you have to use Windows, perhaps due to key apps that won’t run on Linux. Thankfully, dual-booting Windows and Linux is very straightforward—and I’ll show you how to set it up, with Windows 10 and Ubuntu, in this article.
Before you get started, make sure you’ve backed up your computer. Although the dual-boot setup process is not very involved, accidents can still happen. So take the time to back up your important files in case chaos theory comes into play. In addition to backing up your files, consider taking an image backup of the disk as well, though that’s not required and can be a more advanced process.
Prerequisites
To get started, you will need the following five items:
1. Two USB flash drives (or DVD-Rs)
I recommend installing Windows and Ubuntu via flash drives since they’re faster than DVDs. It probably goes without saying, but creating bootable media erases everything on the flash drive. Therefore, make sure the flash drives are empty or contain data you don’t care about losing.
If your machine doesn’t support booting from USB, you can create DVD media instead. Unfortunately, because no two computers seem to have the same DVD-burning software, I can’t walk you through that process. However, if your DVD-burning application has an option to burn from an ISO image, that’s the option you need.
2. A Windows 10 license
If Windows 10 came with your PC, the license will be built into the computer, so you don’t need to worry about entering it during installation. If you bought the retail edition, you should have a product key, which you will need to enter during the installation process.
3. Windows 10 Media Creation Tool
Download and launch the Windows 10 Media Creation Tool. Once you launch the tool, it will walk you through the steps required to create the Windows media on a USB or DVD-R. Note: Even if you already have Windows 10 installed, it’s a good idea to create bootable media anyway, just in case something goes wrong and you need to reinstall it.
4. Ubuntu installation media
5. Etcher software (for making a bootable Ubuntu USB drive)
For creating bootable media for any Linux distribution, I recommend Etcher. Etcher works on all three major operating systems (Linux, MacOS, and Windows) and is careful not to let you overwrite your current operating system partition.
etcher-ubuntu-520px.png
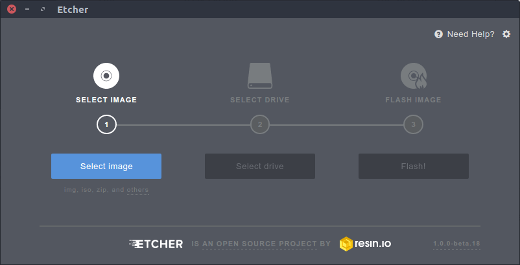
Les Pounder, CC-BY-SA 4.0
Once you have downloaded and launched Etcher, click Select image, and point it to the Ubuntu ISO you downloaded in step 4. Next, click Select drive to choose your flash drive, and click Flash! to start the process of turning a flash drive into an Ubuntu installer. (If you’re using a DVD-R, use your computer’s DVD-burning software instead.)
Install Windows and Ubuntu
You should be ready to begin. At this point, you should have accomplished the following:
- Backed up your important files
- Created Windows installation media
- Created Ubuntu installation media
There are two ways of going about the installation. First, if you already have Windows 10 installed, you can have the Ubuntu installer resize the partition, and the installation will proceed in the empty space. Or, if you haven’t installed Windows 10, install it on a smaller partition you can set up during the installation process. (I’ll describe how to do that below.) The second way is preferred and less error-prone. There’s a good chance you won’t have any issues either way, but installing Windows manually and giving it a smaller partition, then installing Ubuntu, is the easiest way to go.
If you already have Windows 10 on your computer, skip the following Windows installation instructions and proceed to Installing Ubuntu.
Installing Windows
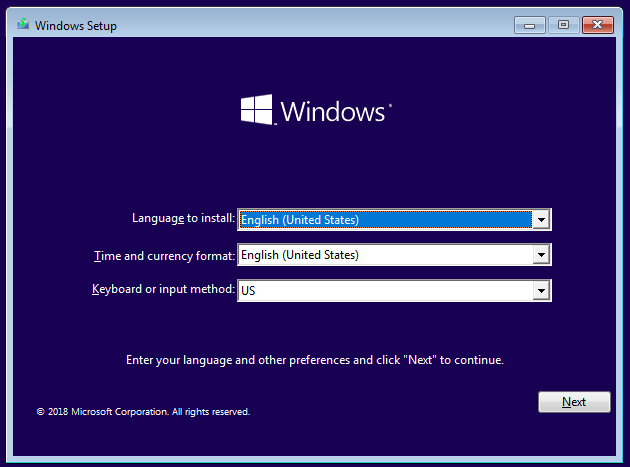
Insert the Windows installation media you created into your computer and boot from it. How you do this depends on your computer, but most have a key you can press to initiate the boot menu. On a Dell PC for example, that key is F12. If the flash drive doesn’t show up as an option, you may need to restart the computer. Sometimes it will show up only if you’ve inserted the media before turning on the computer. If you see a message like, «press any key to boot from the installation media,» press a key. You should see the following screen. Select your language and keyboard style and click Next.
linux-dual-boot_01.png
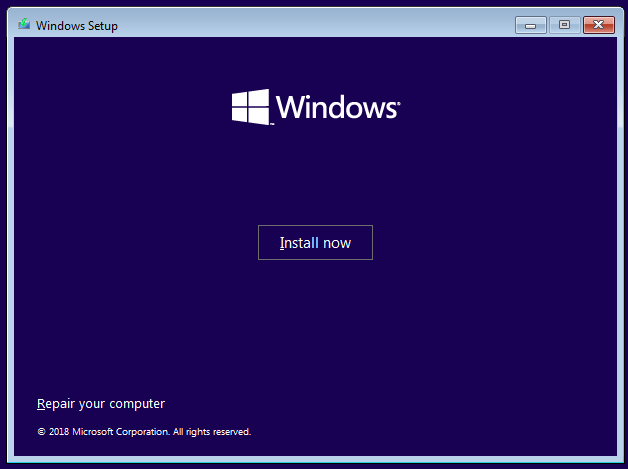
Click on Install now to start the Windows installer.
linux-dual-boot_02a.png
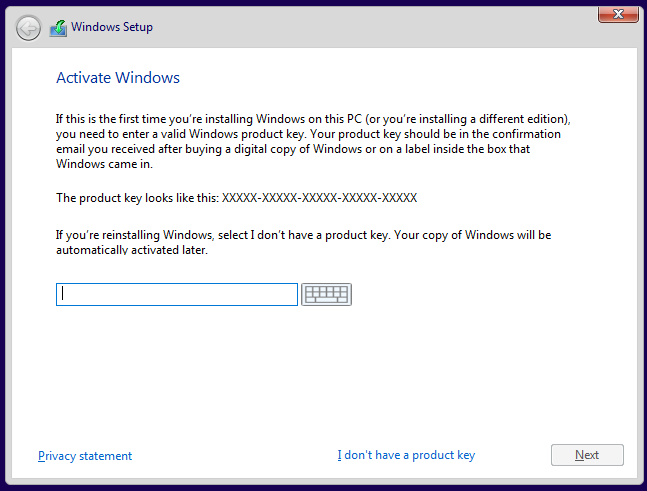
On the next screen, it asks for your product key. If you don’t have one because Windows 10 came with your PC, select «I don’t have a product key.» It should automatically activate after the installation once it catches up with updates. If you do have a product key, type that in and click Next.
linux-dual-boot_03.png
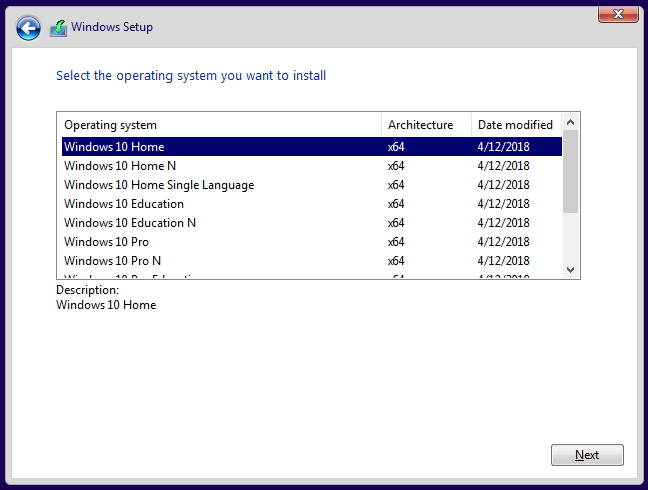
Select which version of Windows you want to install. If you have a retail copy, the label will tell you what version you have. Otherwise, it is typically located with the documentation that came with your computer. In most cases, it’s going to be either Windows 10 Home or Windows 10 Pro. Most PCs that come with the Home edition have a label that simply reads «Windows 10,» while Pro is clearly marked.
linux-dual-boot_04.png
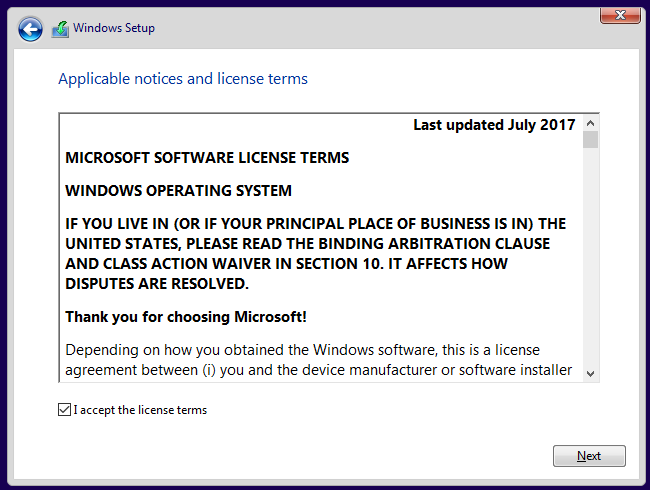
Accept the license agreement by checking the box, then click Next.
linux-dual-boot_05.png
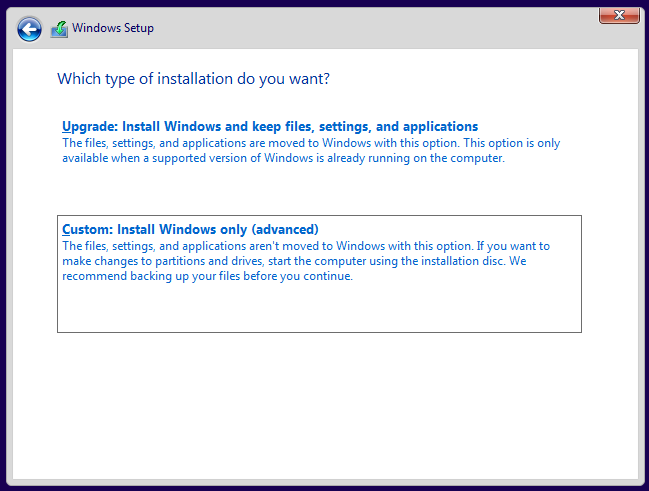
After accepting the agreement, you have two installation options available. Choose the second option, Custom: Install Windows only (advanced).
linux-dual-boot_06.png
The next screen should show your current hard disk configuration.
linux-dual-boot_07.png

Your results will probably look different than mine. I have never used this hard disk before, so it’s completely unallocated. You will probably see one or more partitions for your current operating system. Highlight each partition and remove it.
At this point, your screen will show your entire disk as unallocated. To continue, create a new partition.
linux-dual-boot_08.png
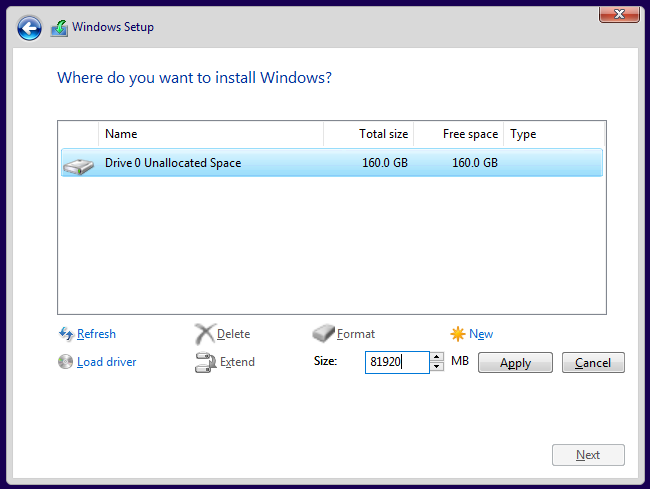
Here you can see that I divided the drive in half (or close enough) by creating a partition of 81,920MB (which is close to half of 160GB). Give Windows at least 40GB, preferably 64GB or more. Leave the rest of the drive unallocated, as that’s where you’ll install Ubuntu later.
Your results will look similar to this:
linux-dual-boot_09.png
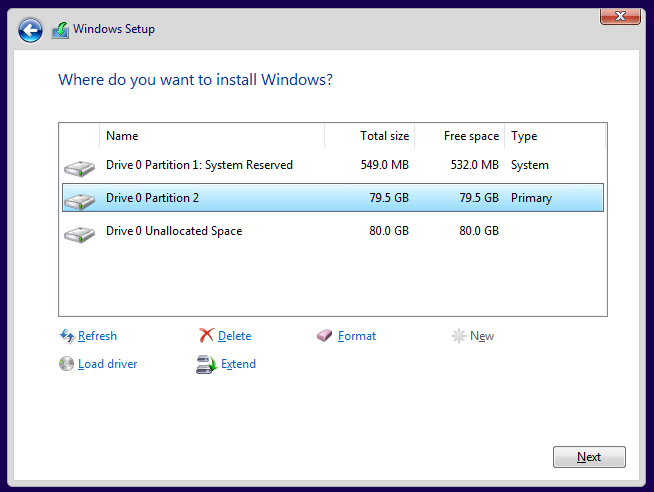
Confirm the partitioning looks good to you and click Next. Windows will begin installing.
linux-dual-boot_10.png
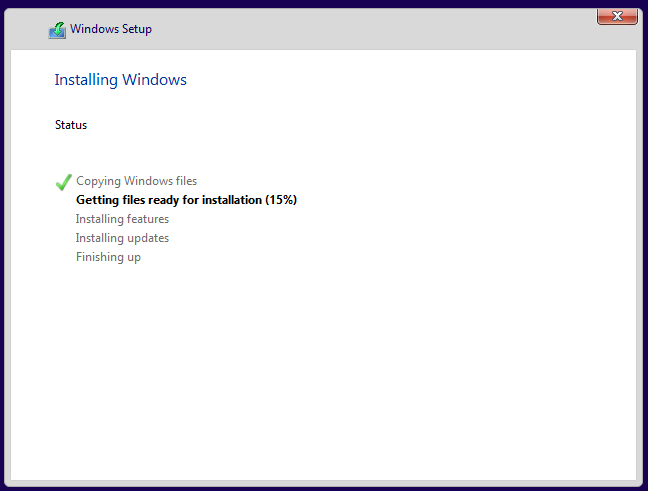
If your computer successfully boots into Windows, you’re all set to move on to the next step.
Install Ubuntu
Whether it was already there or you worked through the steps above, at this point you have Windows installed. Now use the Ubuntu installation media you created earlier to boot into Ubuntu. Insert the media and boot your computer from it. Again, the exact sequence of keys to access the boot menu varies from one computer to another, so check your documentation if you’re not sure. If all goes well, you see the following screen once the media finishes loading:
linux-dual-boot_12.png

Here, you can select between Try Ubuntu or Install Ubuntu. Don’t install just yet; instead, click Try Ubuntu. After it finishes loading, you should see the Ubuntu desktop.
desktop-ubuntu-20.jpg
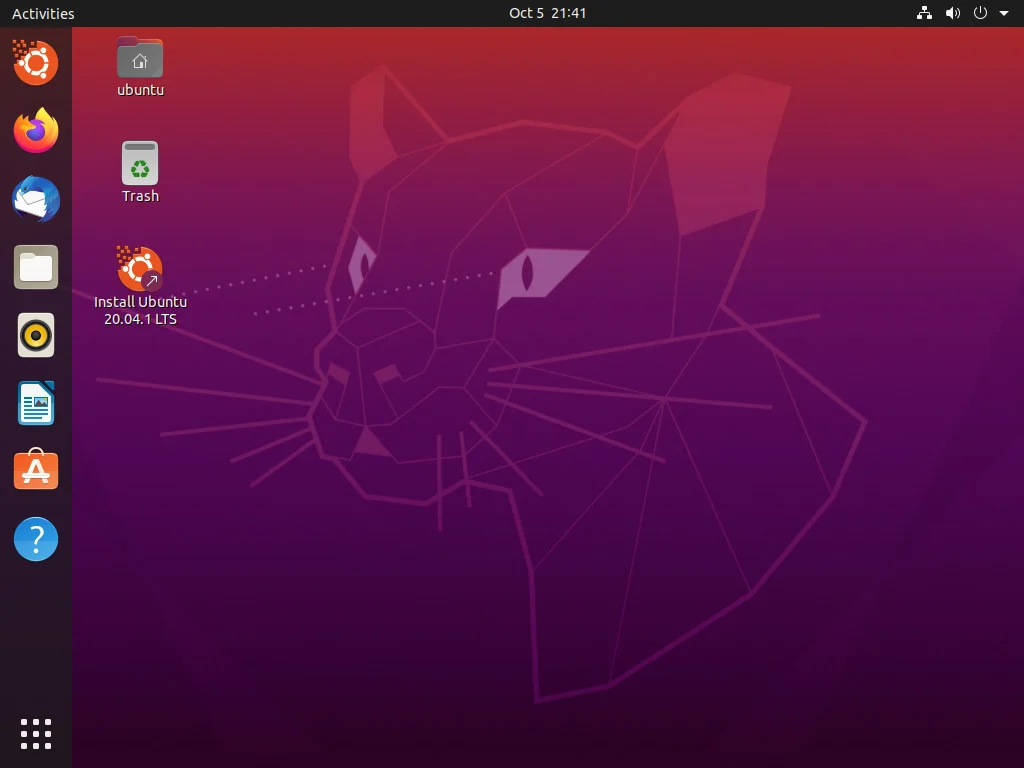
By clicking Try Ubuntu, you opt to try out Ubuntu before you install it. Here, in Live mode, you can play around with Ubuntu and make sure everything works before you commit to the installation. Ubuntu works with most PC hardware, but it’s always better to test it out beforehand. Make sure you can access the internet and get audio and video playback. Going to YouTube and playing a video is a good way of doing all of that at once. If you need to connect to a wireless network, click on the networking icon at the top-right of the screen. There, you can find a list of wireless networks and connect to yours.
Once you’re ready to go, double-click on the Install Ubuntu 20.04 LTS icon on the desktop to launch the installer.
Choose the language you want to use for the installation process, then click Continue.
desktop-ubuntu-install-00.jpg
Next, choose the keyboard layout. Once you’ve made your selection, click Continue.
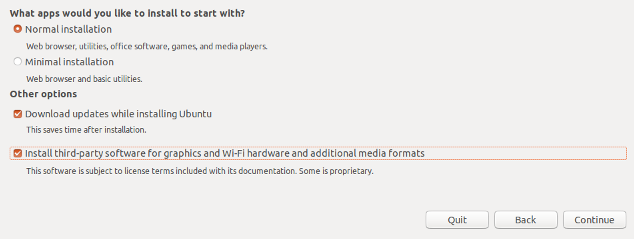
You have a few options on the next screen. You can choose a Normal or a Minimal installation. For most people, Normal installation is ideal. Advanced users may want to do a Minimal install instead, which has fewer software applications installed by default. In addition, you can choose to download updates and whether or not to include third-party software and drivers. I recommend checking both of those boxes. When done, click Continue.
desktop-ubuntu-install-03.png
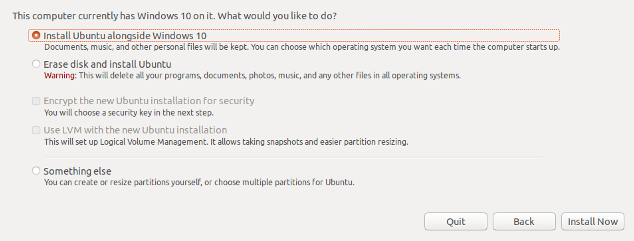
The next screen asks whether you want to erase the disk or set up a dual-boot. Since you’re dual-booting, choose Install Ubuntu alongside Windows 10. Click Install Now.
desktop-ubuntu-install-04.png
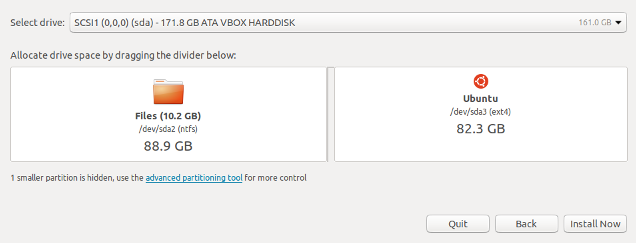
The following screen may appear. If you installed Windows from scratch and left unallocated space on the disk, Ubuntu will automatically set itself up in the empty space, so you won’t see this screen. If you already had Windows 10 installed and it’s taking up the entire drive, this screen will appear and give you an option to select a disk at the top. If you have just one disk, you can choose how much space to steal from Windows and apply to Ubuntu. You can drag the vertical line in the middle left and right with your mouse to take space away from one and gives it to the other. Adjust this exactly the way you want it, then click Install Now.
desktop-ubuntu-install-04-folder.png
You should see a confirmation screen indicating what Ubuntu plans on doing. If everything looks right, click Continue.
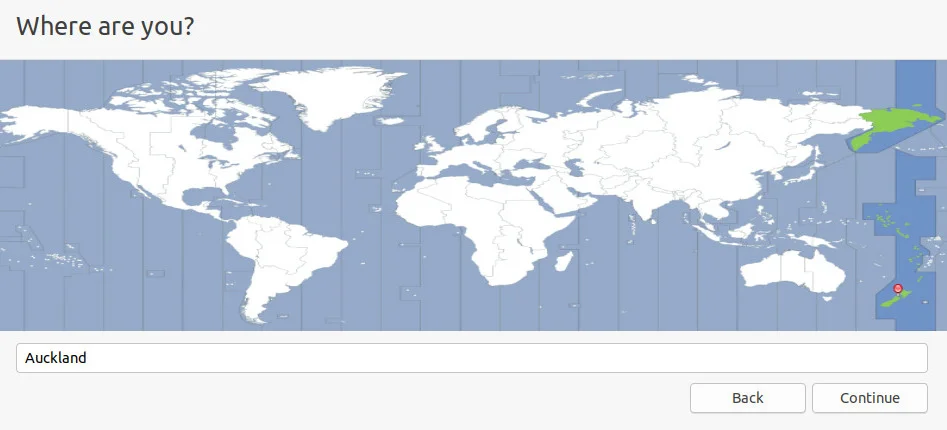
Ubuntu installs in the background, but you still have some configuration to do. While Ubuntu tries its best to figure out your location, you can click on the map to narrow it down to ensure your time zone and other things are set correctly.
desktop-ubuntu-install-05.jpg
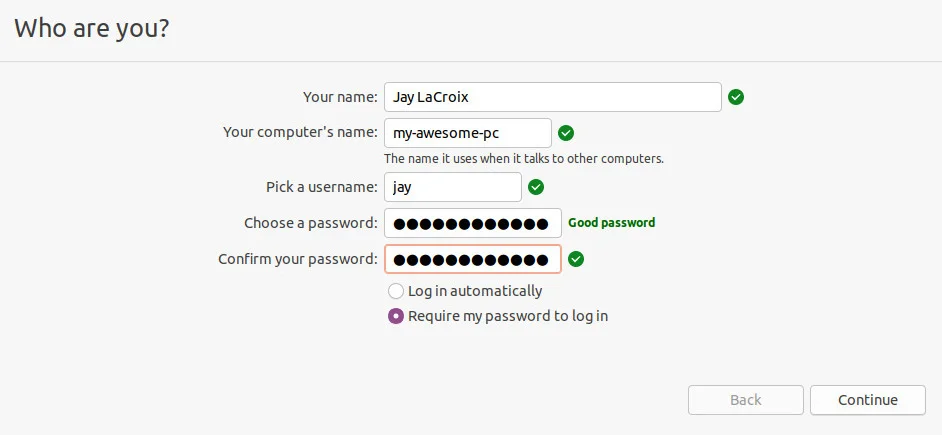
Next, fill in the user account information: your name, computer name, username, and password. Click Continue when you’re done.
desktop-ubuntu-install-06.jpg
Once the installation finishes, reboot your PC.
If all went according to plan, you should see a screen similar to this when your computer restarts. Choose Ubuntu or Windows 10; the other options are for troubleshooting, so I won’t go into them.
linux-dual-boot_23.png
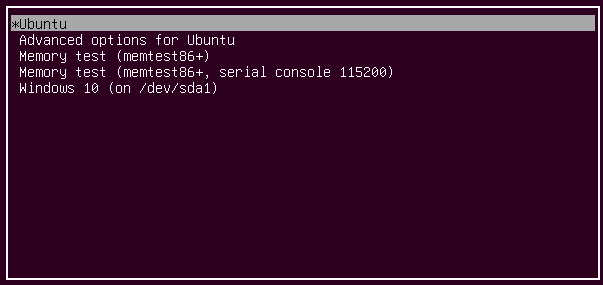
Try booting into both Ubuntu and Windows to test them out and make sure everything works as expected. If it does, you now have both Windows and Ubuntu installed on your computer.
This article was originally published in 2018 and has been updated by Seth Kenlon.


