- Setting up a wireless network
- Get the right equipment
- Setting up the modem and Internet connection
- Positioning the wireless router
- Securing your wireless network
- Connect a PC to your wireless network
- Understanding Windows 10 Wireless Projection
- The Windows 10 Wireless Projection User Interface
- Wireless Projection using Miracast
- Wireless Projection over an existing Wi-Fi network
- How to manage wireless networks with Command Prompt on Windows 10
- How to view Wi-Fi network profiles stored on Windows 10
- How to view Wi-Fi network driver info on Windows 10
- How to view Wi-Fi network adapter settings on Windows 10
- How to view Wi-Fi network security key on Windows 10
- How to stop Wi-Fi network automatic connection on Windows 10
- How to delete Wi-Fi network profile on Windows 10
- How to export and import Wi-Fi network profiles on Windows 10
- Export wireless settings
- Import wireless settings
- How to create Wi-Fi network adapter report on Windows 10
- More Windows 10 resources
- Microsoft’s Surface Duo is not ‘failing up’
- Here’s what you can do if Windows 10 update KB5001330 is causing issues
- Review: NZXT made its first AMD motherboard and it’s brilliant
- These are the best PC sticks when you’re on the move
Setting up a wireless network
A wireless network at home lets you get online from more places in your house. This article describes the basic steps for setting up a wireless network and starting to use it.
Get the right equipment
Before you can set up your wireless network, here’s what you’ll need:
Broadband Internet connection and modem. A broadband Internet connection is a high-speed Internet connection. Digital Subscriber Line (DSL) and cable are two of the most common broadband connections. You can get a broadband connection by contacting an Internet service provider (ISP). Typically, ISPs that provide DSL are telephone companies and ISPs that provide cable are cable TV companies. ISPs frequently offer broadband modems. Some ISPs also offer combination modem/wireless routers. You can also find these at computer or electronics stores, and online.
Wireless router. A router sends info between your network and the Internet. With a wireless router, you can connect PCs to your network using radio signals instead of wires. There are several different kinds of wireless network technologies, which include 802.11a, 802.11b, 802.11g, 802.11n, and 802.11ac.
Wireless network adapter. A wireless network adapter is a device that connects your PC to a wireless network. To connect your portable or desktop PC to your wireless network, the PC must have a wireless network adapter. Most laptops and tablets—and some desktop PCs—come with a wireless network adapter already installed.
To check whether your PC has a wireless network adapter:
Select the Start button, type device manager in the search box, and then select Device Manager.
Expand Network adapters.
Look for a network adapter that might have wireless in the name.
Setting up the modem and Internet connection
After you have all the equipment, you’ll need to set up your modem and Internet connection. If your modem wasn’t set up for you by your Internet service provider (ISP), follow the instructions that came with your modem to connect it to your PC and the Internet. If you’re using Digital Subscriber Line (DSL), connect your modem to a phone jack. If you’re using cable, connect your modem to a cable jack.
Positioning the wireless router
Put your wireless router somewhere where it will receive the strongest signal with the least amount of interference. For better results, follow these tips:
Place your wireless router in a central location. Place the router as close to the center of your home as possible to increase the strength of the wireless signal throughout your home.
Position the wireless router off the floor and away from walls and metal objects, such as metal file cabinets. The fewer physical obstructions between your PC and the router’s signal, the more likely that you’ll be using the router’s full signal strength.
Reduce interference. Some networking equipment uses a 2.4 gigahertz (GHz) radio frequency. This is the same frequency as most microwaves and many cordless phones. If you turn on the microwave or get a call on a cordless phone, your wireless signal might be temporarily interrupted. You can avoid most of these issues by using a cordless phone with a higher frequency, such as 5.8 GHz.
Securing your wireless network
Security is always important; with a wireless network, it’s even more important because your network’s signal could be broadcast outside your home. If you don’t help secure your network, people with PCs nearby could access info stored on your network PCs and use your Internet connection.
To help make your network more secure:
Change the default user name and password. This helps protect your router. Most router manufacturers have a default user name and password on the router and a default network name (also known as the SSID). Someone could use this info to access your router without you knowing it. To help avoid that, change the default user name and password for your router. See the documentation for your device for instructions.
Set up a security key (password) for your network. Wireless networks have a network security key to help protect them from unauthorized access. We recommend using Wi-Fi Protected Access 2 (WPA2) security if your router supports it. See the documentation for your router for more detailed info, including what type of security is supported and how to set it up.
Some routers support Wi-Fi Protected Setup (WPS). If your router supports WPS and it’s connected to the network, follow these steps to set up a network security key:
Do one of the following, depending on which version of Windows is running on your PC:
In Windows 7 or Windows 8.1, select Start, start typing Network and Sharing Center, and then choose it in the list.
In Windows 10, select Start , then select Settings > Network & Internet > Status > Network and Sharing Center.
Select Set up a new connection or network.
Select Set up a new network, then choose Next.
The wizard will walk you through creating a network name and a security key. If your router supports it, the wizard will default to Wi‑Fi Protected Access (WPA or WPA2) security. We recommend that you use WPA2, because it offers better security than WPA or Wired Equivalent Privacy (WEP) security. With WPA2 or WPA you can also use a passphrase, so you don’t have to remember a cryptic sequence of letters and numbers.
Write down your security key and keep it in a safe place. You can also save your security key on a USB flash drive by following the instructions in the wizard. (Saving your security key to a USB flash drive is available in Windows 8 and Windows 7, but not in Windows 10.)
Use a firewall. A firewall is hardware or software that can help protect your PC from unauthorized users or malicious software (malware). Running a firewall on each PC on your network can help control the spread of malicious software on your network, and help protect your PCs when you’re accessing the Internet. Windows Firewall is included with this version of Windows.
Connect a PC to your wireless network
Select the Network or icon in the notification area.
In the list of networks, choose the network that you want to connect to, and then select Connect.
Type the security key (often called the password).
Follow additional instructions if there are any.
If you have problems with your Wi-Fi network when using Windows 10, see Fix Wi-Fi problems in Windows 10 for advanced troubleshooting info.
Understanding Windows 10 Wireless Projection
Windows 10 provides a seamless wireless projection experience. As you are building your part of the wireless projection solution it is important to understand what that functionality includes.
The Windows 10 Wireless Projection User Interface
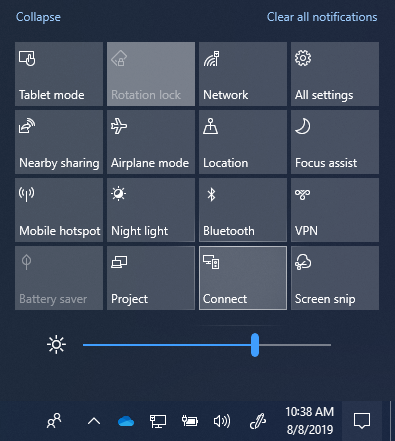
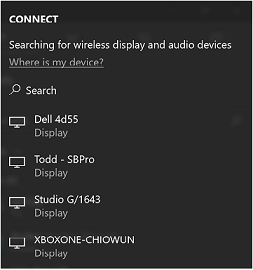
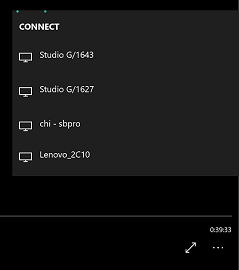
First and foremost, Windows provides a native connection experience that allows a user to connect to a wireless receiver. A connection to a wireless receiver can be made in several ways:
Through the Action Center. In the Action Center (Figure 1), click the Connect Quick Action.
Using a hotkey. Select the Windows logo key+ K (Figure 2).
With the Device Picker UI. Windows Apps that support casting contain a device picker UI, such as the Cast to device feature in the Windows Movie & TV App (Figure 3) or the Edge browser.
| В | В | В |
|---|---|---|
 |  |  |
| Figure 1: Connect Quick Action | Figure 2: Connect UI | Figure 3: Device Picker UI |
Windows 10 supports and manages two different methods for creating a wireless projection stream. Both methods are handled behind the scenes by Windows and leverage the exact same UI shown above.
Wireless Projection using Miracast
Support for Miracast has been present since the first Windows 10 version, and since that time Windows investments in Miracast as a projection experience have only increased.
Wireless Projection over Miracast offers several benefits:
A simple connection experience that allows a user to find and connect to Miracast receivers.
Implementation of the Miracast standard to ensure interoperability with hundreds of millions of Miracast devices.
A native RTSP stack fine-tuned to work for Miracast, requiring no additional software is required outside the Windows 10 OS.
Support for UIBC (User Input Back Channel), which allows inputs from the Miracast receiver (touch, stylus, mouse, keyboard and gamepad) to control the Miracast sender, if—and only if—the user explicitly allows this.
High quality interoperability with industry leading Microsoft Miracast receivers (Microsoft Wireless Display Adapter) as well as leading 3rd party Miracast receivers.
Support for the projection of Protected Content (if HDCP keys are present).
Support for the use of a PIN based pairing when connecting to a Miracast receiver.
Persistent profiles, remembering if you have connected to a specific Miracast receiver in the past. The ability to remember a profile for reconnecting to a Miracast receiver reduces the time it takes to connect on subsequent connections.
Support for Miracast extensions that enable additional capabilities, dramatically improving the Miracast experience.
Wireless Projection over an existing Wi-Fi network
It has been observed that in 90% of cases, when a User starts a Wireless Projection stream, the device they are using is already connected to an existing Wi-Fi network, either in a home or a business. In response to this, Microsoft has extended the ability to send a Miracast stream over a local network rather than over a direct wireless link in the Windows 10 Creators Update.
Wireless Projection over an existing Wi-Fi network offers several benefits:
This solution leverages an existing connection which can significantly reduce the time it takes to project content.
The PC does not need to manage two simultaneous connections (a Wi-Fi connection and a Wi-Fi Direct connection to the receiver), each of which would only get half the maximum bandwidth.
Using an existing connection simplifies the work that the wireless device needs to perform, which both increases reliability and provides a very stable stream.
The user does not have to change how they connect to a receiver because they use the same UX (as is shown in Figures 2-4).
Windows will only choose to project over an existing connection if the connection is trusted, either over an Ethernet or a secure Wi-Fi network.
There are no required changes to the wireless drivers or hardware on a PC.
This also works well with older wireless hardware that is not optimized for Miracast over Wi-Fi Direct.
Windows automatically detects when a receiver supports this functionality and will send the video stream over the existing network path when applicable.
How to manage wireless networks with Command Prompt on Windows 10
 Source: Windows Central
Although you can manage many aspects of wireless networks using the Settings app (and Control Panel), sometimes, you may still need to perform more advanced tasks. For instance, recover the wireless password for a particular profile, view detailed information about saved profiles, or create a report to troubleshoot issues, which are not common tasks available with other graphical tools.
Whatever the reason it might be, if you have to complete more advanced networking tasks, Windows 10 includes the netsh (network shell) command-line tool that you can use to view, troubleshoot, and configure virtually every network adapter on the device.
In this Windows 10 guide, we will walk you through the steps to manage wireless networks with the netsh command-line tool.
How to view Wi-Fi network profiles stored on Windows 10
To view the wireless network profiles, use these steps:
- Open Start.
- Search for Command Prompt, right-click the top result, and select the Run as administrator option.
Type the following command to view the wireless network profiles saved on your PC and press Enter:
netsh wlan show profiles
 Source: Windows Central
(Optional) Type the following command to view the saved profiles for a specific interface and press Enter:
netsh wlan show profiles interface=»WLAN-INTERFACE-NAME»
In the command, replace the WLAN-INTERFACE-NAME for the actual name of the interface. You can use the netsh interface show interface command to find out the exact name.
For example, this command shows the profiles saved for the «Wi-Fi» interface:
netsh wlan show profiles interface=»wi-fi»
Source: Windows Central
Once you complete the steps, the command will output the profiles from all the wireless networks you connected in the past on every adapter installed on the computer.
How to view Wi-Fi network driver info on Windows 10
To view the wireless adapter driver information, use these steps:
- Open Start.
- Search for Command Prompt, right-click the top result, and select the Run as administrator option.
Type the following command to view the wireless network profiles saved on your PC and press Enter:
netsh wlan show drivers
 Source: Windows Central
(Optional) Type the following command to view the adapter capabilities and press Enter:
netsh wlan show wirelesscapabilities
Source: Windows Central
After you complete the steps, the command will provide relevant information about the driver, including vendor, version, radio type (for example, 802.11ax, 802.11a, 802.11n, etc.) and wireless authentication support, and more.
If you use the command to view the capabilities, you will see a list of all the wireless features available and those supported for the adapter.
How to view Wi-Fi network adapter settings on Windows 10
To check the wireless adapter settings, use these steps:
- Open Start.
- Search for Command Prompt, right-click the top result, and select the Run as administrator option.
Type the following command to view wireless settings and press Enter:
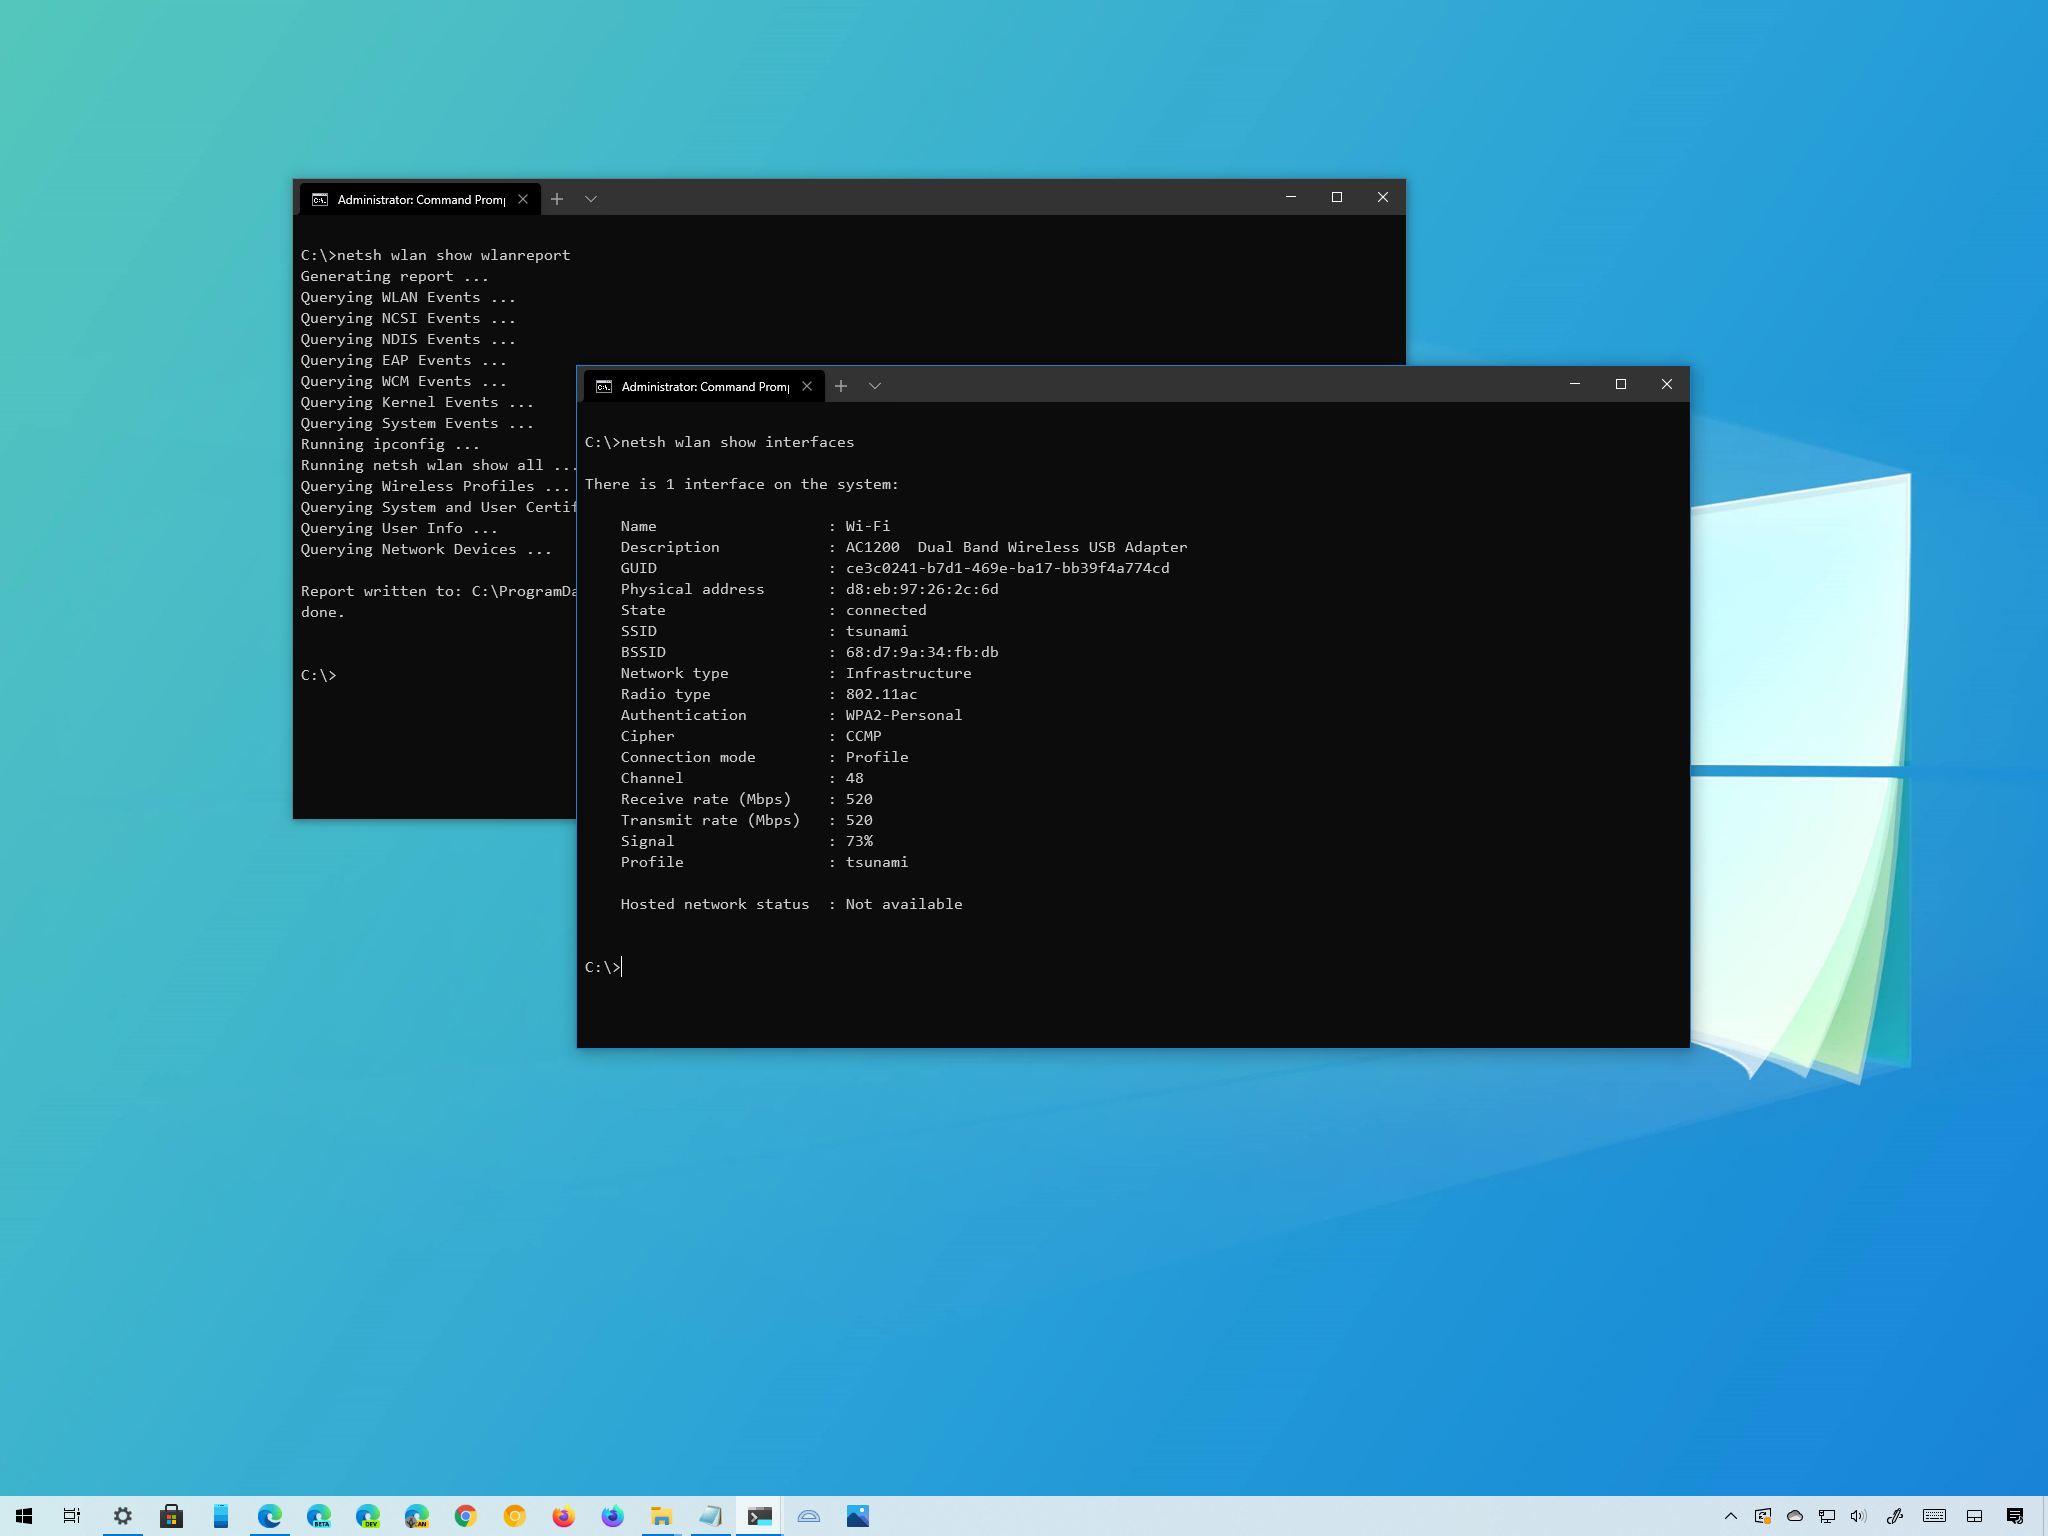
netsh wlan show interfaces
Source: Windows Central
(Optional) Type the following command to view the settings for a specific interface and press Enter:
netsh wlan show interface name=»WLAN-INTERFACE-NAME»
In the command, replace the WLAN-INTERFACE-NAME for the actual name of the interface. You can use the netsh interface show interface command to find out the exact name.
For example, this command shows the profiles saved for the «Wi-Fi» interface:
netsh wlan show interface name=»wi-fi»
Once you complete the steps, the netsh tool will display the current wireless settings for one or all the adapters, including name, description, physical address, SSID, radio type (for example, 802.11ac), security authentication method, and the current receive and transmit rates, and signal strength.
How to view Wi-Fi network security key on Windows 10
To find out the wireless security key (also known as the Wi-Fi password), use these steps:
- Open Start.
- Search for Command Prompt, right-click the top result, and select the Run as administrator option.
Type the following command to view wireless password and press Enter:
netsh wlan show profile name=»WLAN-PROFILE-NAME» key=clear
In the command, replace the WLAN-PROFILE-NAME with the name of the profile you want to see its security key.
For example, this command shows the password for the tsunami network:
netsh wlan show profile name=»tsunami» key=clear
Source: Windows Central
After you complete the steps, you will know the network security key for the profile you specified.
Although you can view the current network password through the wireless adapter properties in Control Panel, you can use this command to recover any network security key of any profile stored on the device.
How to stop Wi-Fi network automatic connection on Windows 10
Sometimes, you may have a device configured to connect to different wireless networks automatically, but then, you realize that it always connects to the access point even when it offers poor connectivity or the network is out of range. For those cases, you can run a command to stop connecting to known networks automatically.
To prevent a device from connecting to a Wi-Fi network automatically, use these steps:
- Open Start.
- Search for Command Prompt, right-click the top result, and select the Run as administrator option.
Type the following command to disable auto-connect and press Enter:
netsh wlan set profileparameter name=»WLAN-PROFILE-NAME» connectionmode=manual
In the command, replace WLAN-PROFILE-NAME with the name of the wireless profile.
For example, this command disables automatic connections for the tsunami network:
netsh wlan set profileparameter name=»tsunami» connectionmode=manual
(Optional) Type the following command to change the network priority and press Enter:
netsh wlan set profileparameter name=»WLAN-PROFILE-NAME» connectionmode=auto
In the command, replace WLAN-PROFILE-NAME with the wireless profile name you are trying to change its priority.
For example, this command makes the tsunami profile a priority:
netsh wlan set profileparameter name=»tsunami» connectionmode=auto
 Source: Windows Central
Quick note: Windows 10 will always make a priority those networks you choose to connect automatically. If you want to move up a network in the list of precedence, you can use the above command.
Once you complete the steps, Windows 10 will no longer try to connect to wireless networks automatically.
How to delete Wi-Fi network profile on Windows 10
When you no longer need to connect to a particular wireless network, the access point is no longer available, or you need to reset the network profile settings, you can use the netsh command-line tool to delete any profile stored on your computer.
To delete a Wi-Fi profile on Windows 10, use these steps:
- Open Start.
- Search for Command Prompt, right-click the top result, and select the Run as administrator option.
Type the following command to delete a network profile and press Enter:
netsh wlan delete profile name=»WLAN-PROFILE-NAME»
In the command, replace WLAN-PROFILE-NAME with the name of the wireless profile.
For example, this command deletes the tsunami profile:
netsh wlan delete profile name=»tsunami»
Source: Windows Central
After you complete the steps, the wireless profiled will be deleted from the device. If you need to reconnect, you will need to go through the connection process again, and you will have to provide the network password as necessary.
How to export and import Wi-Fi network profiles on Windows 10
There was an option in Control Panel in previous versions of Windows to export and import wireless network profiles. However, the feature was then removed on Windows 8.1 and Windows 10 in favor of the new feature to sync these settings using a Microsoft account. But it is still possible to export and import the Wi-Fi settings using the netsh command-line tool.
Export wireless settings
To export the wireless settings, use these steps:
- Open Start.
- Search for Command Prompt, right-click the top result, and select the Run as administrator option.
Type the following command to export the wireless profiles stored on the device and press Enter:
netsh wlan export profile key=clear folder=»FOLDER-PATH»
In the command, replace FOLDER-PATH with the path to the export destination folder.
For example, this command export the profiles to the «wireless-backup» folder:
netsh wlan export profile key=clear folder=»C:\Users\username\Documents\wireless-backup»
Source: Windows Central
(Optional) Type the following command to export a specific profile and press Enter:
netsh wlan export profile name=»WLAN-PROFILE-NAME» key=clear folder=»FOLDER-PATH»
In the command, replace the WLAN-PROFILE-NAME with the profile name you want to export and the FOLDER-PATH with the folder location to export the information.
For example, this command exports the only tsunami profile to the «wireless-backup» folder:
netsh wlan export profile name=»tsunami» key=clear folder=»C:\Users\username\Documents\wireless-backup»
Source: Windows Central
Once you complete the steps, all the profiles will be exported to the location you specified. The output will also show the name and path for each XML file backup.
The export command will create an XML file for each wireless network profile stored on the device. Also, we are using the key=clear option, which will request to store the network security key for each network in the XML file. As a result, make sure to keep these records in a secure place, as they can easily be viewed or edited using any text editor.
Import wireless settings
To import the wireless settings on Windows 10 with command lines, use these steps:
- Open Start.
- Search for Command Prompt, right-click the top result, and select the Run as administrator option.
Type the following command to import the wireless profiles and press Enter:
netsh wlan add profile filename=»FOLDER-PATH\WLAN-EXPORTED-FILE»
In the command, replace FOLDER-PATH\WLAN-EXPORTED-FILE with the path and file name for the exported file.
For example, this command imports a specific profile stored in the «wireless-backup» folder:
netsh wlan add profile filename=»C:\Users\username\Documents\wireless-backup\Wi-Fi-tsunami.xml»
Source: Windows Central
Quick tip: If you have multiple profiles, then repeat the steps and make sure to update the file path and filename of the exported profile.
(Optional) Type the following command to import a profile to a particular wireless interface and current user and press Enter:
netsh wlan add profile filename=»FOLDER-PATH\WLAN-EXPORTED-FILE» Interface=»WLAN-INTERFACE-NAME» user=current
In the command, make sure to change FOLDER-PATH\WLAN-EXPORTED-FILE for the exported file’s path and name containing the profile information and WLAN-INTERFACE-NAME with the name of the interface you want to import the settings.
For example, this command imports the settings to the Wi-Fi interface:
netsh wlan add profile filename=»C:\Users\username\Documents\wireless-backup\Wi-Fi-tsunami.xml» Interface=»Wi-Fi» user=current
Source: Windows Central
After you complete the steps, the profile will be imported, allowing the device to connect to the wireless network without additional configuration.
How to create Wi-Fi network adapter report on Windows 10
If you need to troubleshoot the wireless connectivity to an access point, netsh also includes a command to create a detailed report with many important details.
To create a wireless report, use these steps:
- Open Start.
- Search for Command Prompt, right-click the top result, and select the Run as administrator option.
Type the following command to create a wireless adapter report and press Enter:
netsh wlan show wlanreport
Source: Windows Central
Type the following command to open the report and press Enter:
Source: Windows Central
Once you complete the steps, the report will open with the default web browser.
The wlan reports contain a graph with details of the connectivity status, including information, such as when the connection started, when it got disconnected, errors, and more. The report also summarizes the network adapters’ information configured on your system, success and failed session, disconnect reasons, and more. It is a very detailed report that can help you ping point many Wi-Fi connectivity issues.
While you can manage many wireless settings through the Settings app, the netsh command-line tool gives you more advanced tools to view, configure, and troubleshoot Wi-Fi and Ethernet connections.
We only focus on the most common commands, but you can always use the netsh wlan command to view all the available options.
More Windows 10 resources
For more helpful articles, coverage, and answers to common questions about Windows 10, visit the following resources:
![]()
Microsoft’s Surface Duo is not ‘failing up’
Microsoft announced this week that it was expanding Surface Duo availability to nine new commercial markets. While Surface Duo is undoubtedly a work in progress, this is not a sign of a disaster. It’s also doesn’t mean that Surface Duo is selling a ton either. Instead, the reason for the expansion is a lot more straightforward.
![]()
Here’s what you can do if Windows 10 update KB5001330 is causing issues
In this guide, we’ll show you the steps to get rid of the update KB5001330 to fix profile, gaming, and BSoD problems with the Windows 10 October 2020 Update and May 2020 Update.
![]()
Review: NZXT made its first AMD motherboard and it’s brilliant
NZXT made its first motherboard with an AMD chipset. The N7 B550 supports the latest AMD Ryzen processors and there’s plenty to love about this platform. To differentiate the N7 B550, NZXT made notable changes to the layout of the motherboard to make it easy to create a clean PC build.
![]()
These are the best PC sticks when you’re on the move
Instant computer — just add a screen. That’s the general idea behind the ultra-portable PC, but it can be hard to know which one you want. Relax, we have you covered!


