Hd 7850 mac os
 Apple added support for the 7000 series of AMD Radeon HD graphics cards last week, in version 10.8.3 of OS X Mountain Lion. Prior to this, 7000-series graphics cards did not work properly in Mac OS X; while you could still boot a Hackintosh with these cards, you couldn’t view your computer screen in full resolution or run any applications that required graphics acceleration. With this new support in Mac OS X, however, 7000-series graphics cards have finally become a practical option for your Hackintosh.
Don’t like this method? Check out tonymacx86’s alternative EFI partition method.
LATEST UPDATE (January 6, 2013): This method also works with newly-released Radeon R9 270, 270X, and 280X, all of which are really just rebranded 7000-series models.
Computer Requirements
Graphics cards in the AMD Radeon HD 7000 series can now display Mac OS X at full resolution with graphics acceleration. That being said, graphics support for the 7000 series still isn’t perfect. For starters, Chameleon and Chimera bootloader don’t support booting Mac OS X with these graphics cards, which use larger video BIOSes than previous generations of cards. As a result, you have to rely on your computer’s integrated graphics card card to boot your computer (more on that later). Here are the full requirements for enabling 7000-series support:
- A Hackintosh running OS X 10.8.3: Only version 10.8.3 of Mountain Lion (and newer) includes the new graphics drivers for the AMD Radeon HD 7000 series, so you will have to update your Hackintosh.
- AMD Radeon HD 7000-series card: Currently, most desktop graphics cards in the 7000 series are supported. As of March 24, 2013, the AMD Radeon HD 7970, 7950, 7870, 7770, and 7750 have been confirmed to work without the need for additional drivers. The AMD Radeon HD 7850 only works with specially edited kext files. Check out this forum thread for a list of specific graphics card models that have been confirmed to work.
- Integrated graphics card: You will have to set your integrated graphics card (located on your computer processor) as the primary graphics card. Most desktop processors include integrated graphics, though there are a few rare exceptions. Nowadays, all new motherboards include support for integrated graphics cards, but older motherboards using chipsets like P67 and P55 don’t work (e.g. the Gigabyte GA-P67A-D3-B3 or GA-P55-UD3). Alternatively, if you own a second graphics card that works with Mac OS X, you can add it to your computer and set it as the primary graphics card instead.
If you do not have an integrated graphics card or second graphics card available, this guide will not work. Instead, you will have to follow this alternative guide to installing your bootloader on an EFI partition.
1. Set your integrated graphics card as the primary graphics device
Since Chimera and Chameleon bootloader don’t work with 7000-series graphics cards yet, you’ll have to go to the BIOS of your motherboard and set your integrated graphics card as the primary graphics card instead. This way, Chimera/Chameleon can rely on your integrated graphics card to start Mac OS X.
Boot your computer, and enter the BIOS. To enter the BIOS on a Gigabyte motherboard, you have to press the delete key when it boots (before the operating system starts). Different manufacturers set different keys for opening the BIOS.

On the newest Gigabyte motherboards that use the UEFI standard for their BIOS, you need to set «Init Display First» as «IGFX» (which stands for integrated graphics), and set «Internal Graphics» as «Disabled».

On older Gigabyte motherboards, set «Init Display First» as «Onboard». On motherboards from other brands, this setting will be called something similar, such as «Primary Display».
2. Plug your monitor into your 7000-series card
This part is self-explanatory. Connect your computer monitor to your 7000-series graphics card. This way, your monitors will use your 7000-series card in Mac OS X, even though you set your integrated graphics card as the primary graphics card in the previous step.

From now on, your computer to boot with a black screen. Basically, you won’t be able to see anything on your computer screen until Mac OS X actually starts (once Mac OS X starts, everything will work as normal). Your computer is using your integrated graphics card card to run the boot process, but your monitors are connected to your 7000-series card, so the screen is blank.
3. Boot your Hackintosh
Once you’ve set up your BIOS, reboot your computer. Wait for Mac OS X to boot; your screen will be black for a while. Of course, if you do not have Chimera bootloader set to automatically boot Mac OS X, you will have to press the «Enter» key to start the boot process. If Mac OS X does not boot within a few minutes, you may have to enter the boot flag «GraphicsEnabler=No» (without quotation marks). You won’t be able to see what you’re typing, but the normal method for entering boot flags will still work.
Eventually, Mac OS X will start. If you reach the desktop, congratulations— you’re done!
NOTE 1: If you reach a white screen instead of the Mac OS X desktop, you will have to apply the «sleep fix». Put your computer to sleep. You can usually do this by quickly pressing the power button of your computer. Then, wake your computer up from sleep by pressing the power button again. You will now be able to view the Mac OS X desktop. You need to apply this fix every time you boot Mac OS X.
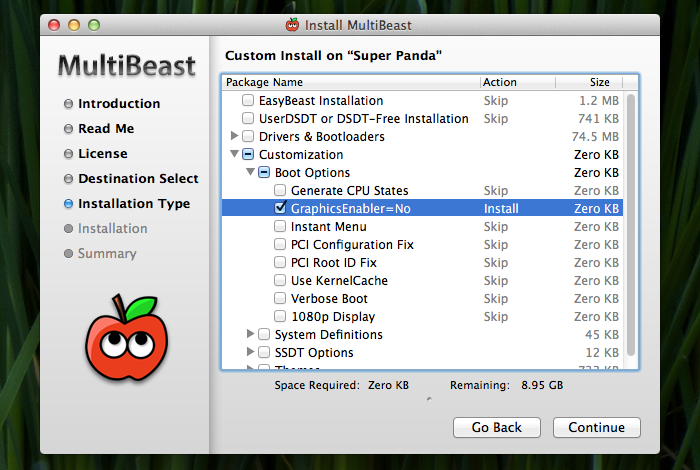
NOTE 2: If you needed to use the «GraphicsEnabler=No» boot flag to start Mac OS X, you can apply this boot flag permanently by installing the «GraphicsEnabler=No» option in Multibeast.
Источник
Ati HD 7850 acceleration Mojave september release

poppicu

Kaotomut
poppicu
Can you share your config.plist. I tried so far with other cards but the ID is not changed in ATI Controller.
Anyway my card has same ID:
Chipset Model: AMD Radeon HD 7850 Series
PCIe Lane Width: x16
VRAM (Total): 1024 MB
Vendor: ATI (0x1002)
Device ID: 0x6819
Revision ID: 0x0000
EFI Driver Version: 01.00.3180
poppicu
Kaotomut

Coquin
I also have a HD 7850 but I can get monitors working only when I use mDP adapters to HDMI and to DVI. If I connect a monitor directly to the DVI port of the HD 7850 I can get a picture only during the initial boot process(showing the verbose stuff) but when it gets to the actual Mojave window where I should enter my password, the screens turns black. I am using ATI inject, boot Fake ID:0x68191200 and Futomaki.
Any idea how I could get all the ports working: 2 mDP, one HDMI and one DVI.

Adrian B
Moderator

Gigamaxx
Moderator
I also have a HD 7850 but I can get monitors working only when I use mDP adapters to HDMI and to DVI. If I connect a monitor directly to the DVI port of the HD 7850 I can get a picture only during the initial boot process(showing the verbose stuff) but when it gets to the actual Mojave window where I should enter my password, the screens turns black. I am using ATI inject, boot Fake ID:0x68191200 and Futomaki.
Any idea how I could get all the ports working: 2 mDP, one HDMI and one DVI.
Mojave still supports 7xxx cards and their derivatives R9 2xx, 3xx cards. I have a R7 265 (aka R9 270) that works great in Mojave. They left the AMDRadeon7000Controllerkext in Mojave so these card still have support.
DVI support in Mojave is tricky at best. You will probably have to adjust or edit the Framebuffer. Have you tried with lilukext and whatevergreenkext? You could test with these in Clover/kexts/other folder. Note: WEG kext sets RadeonFramebuffer as default so you may try not injecting ATI, or Futomaki. Just let it inject on its own.
If that doesn’t work you may want to try messaging @Pavo he has helped a lot of people with Framebuffer/porting issues.
Источник
[NOT SOLVED] Help needed with HD7850 GFX & Sierra

Razva
I’ve successfully installed Sierra by following the official guide. Everything is nice and smooth, except the fact that at step #5, when booting, the screen turns «white» for a split second and the PC reboots.
This occurs with the integrated graphics card as well.
Configuration is:
- Gigabyte Z87M-HD3
- Sapphire Radeon HD7850 2GB 256bit
- Kingston 8GB DDR3 1600MHz HyperX Blu Dual Channel
- Intel Core i7-4770S 3.4GHz Socket 1150 BOX
Any hints please?

Jithin.C.V
I’ve successfully installed Sierra by following the official guide. Everything is nice and smooth, except the fact that at step #5, when booting, the screen turns «white» for a split second and the PC reboots.
This occurs with the integrated graphics card as well.
Configuration is:
- Gigabyte Z87M-HD3
- Sapphire Radeon HD7850 2GB 256bit
- Kingston 8GB DDR3 1600MHz HyperX Blu Dual Channel
- Intel Core i7-4770S 3.4GHz Socket 1150 BOX
Any hints please?
Step 5 is post installation with MultiBeast.
What are the options you had selected on MultiBeast?? Do not assume.
Razva
Step 5 is post installation with MultiBeast.
What are the options you had selected on MultiBeast?? Do not assume.
I’m after step 5.4: «At the Boot Screen, choose your new Sierra installation.». I choose «Sierra» and after that I get the loading screen which, almost a the end, posts the «white flicker» then reboots.
So at this point I cannot open MultiBeast as the PC cannot successfully boot to desktop.
Jithin.C.V
I’m after step 5.4: «At the Boot Screen, choose your new Sierra installation.». I choose «Sierra» and after that I get the loading screen which, almost a the end, posts the «white flicker» then reboots.
So at this point I cannot open MultiBeast as the PC cannot successfully boot to desktop.
Which means you are still booting with USB. Right?
What flags you used to install OS X, use the same flags for booting from HDD too.
Razva
Which means you are still booting with USB. Right?
What flags you used to install OS X, use the same flags for booting from HDD too.
Jithin.C.V
Razva
Yup, that did the trick, wooohoo!
Next, any hints on how to install the Radeon HD7850 drivers? I cannot find anything «interesting» in MultiBeast.
Later edit: here’s the result after setting up MultiBeast with these instructions.

I can boot via Unibeast but not without the USB stick.
Later edit 2: I might have forgot to uncheck the «Kext Dev Mode» boot option when installing MultiBeast, so I restarted MultiBeast with «Kext Dev Mode» unchecked. Should I delete the old kexts? If yes, how? Or should I make a full reinstall?
Thank you so much!
Jithin.C.V
Yup, that did the trick, wooohoo!
Next, any hints on how to install the Radeon HD7850 drivers? I cannot find anything «interesting» in MultiBeast.
Later edit: here’s the result after setting up MultiBeast with these instructions.
I can boot via Unibeast but not without the USB stick.
Later edit 2: I might have forgot to uncheck the «Kext Dev Mode» boot option when installing MultiBeast, so I restarted MultiBeast with «Kext Dev Mode» unchecked. Should I delete the old kexts? If yes, how? Or should I make a full reinstall?
Thank you so much!
Which mode you selected on MultiBeast?? Legacy or UEFI
Boot with USB and mount you HDD/SSD’s EFI partition.
Источник
Hd 7850 mac os
FAQ по AMD Radeon HD 7850/7870 (Pitcairn)
Вопрос: Когда анонсированы видеокарты HD7800 серии?
Ответ: Анонс видеокарт HD7800 серии произошёл 05.03.2012, поступление в продажу 19.03.2012.
Вопрос: Где можно найти официальную информацию о видеокартах HD7800 серии?
Ответ: На официальнос сайте  . 7870 и 7850
Вопрос: Где можно найти схему ядра Picairin?
Ответ: Схема ядра Pitcairn
Вопрос: Какие технологии поддерживают видеокарты HD7800 серии?
Ответ: Radeon HD7800 совместимs с DirectX 11.1 Shader Model 5.0, OpenGL 4.1, AMD Eyefinity Multi-display Technology, AMD App Acceleration, AMD HD3D, AMD CrossFireX™ multi-GPU, AMD PowerPlay™, AMD PowerTune, AMD ZeroCore Power.
Вопрос: Какими возможностями обладает встроенная звуковая карта в видеокартах HD7800 серии и какие форматы поддерживает ?
Ответ: Звуковая карточка поддерживает защищенный поток данных, количество каналов — 7.1, поддерживаемые форматы AC-3, AAC, Dolby TrueHD и DTS Master Audio.
Вопрос: Какими разъемами могут обладать видеокарты HD7800 серии?
Ответ: На их задние панели могут быть выведены порты DVI, HDMI 1.4 и DisplayPort 1.2 (возможны различные комбинации).
POWERCOLOR HD7870 Eyefinity 6
Вопрос: Каковы технические характеристики карт HD7800 серии?
ВНИМАНИЕ
В Германии встретилась ОЕМ партия AFOX 7850 с 768SP (вместо 1024). тыц
Источник


