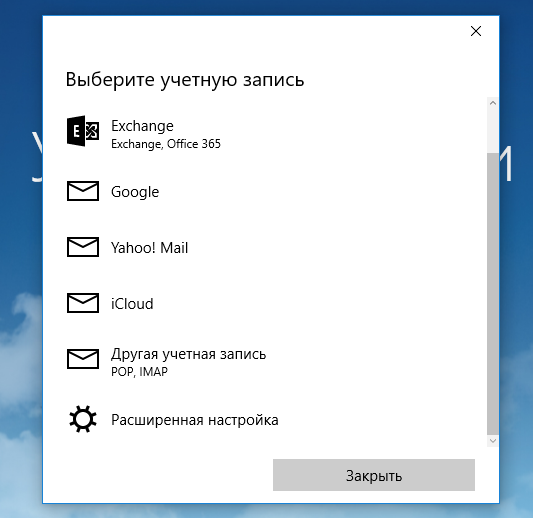
2. Выберите тип учетной записи — «Другая учетная запись POP, IMAP».
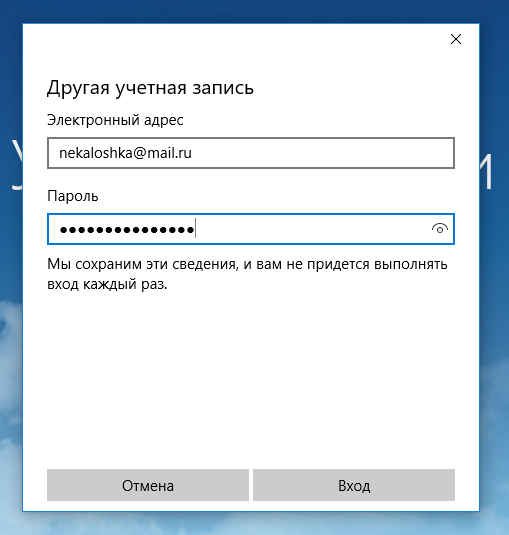
3. Введите необходимые данные:
Электронный адрес
Полное имя вашего аккаунта
Пароль
Пароль для внешнего приложения. Что это?
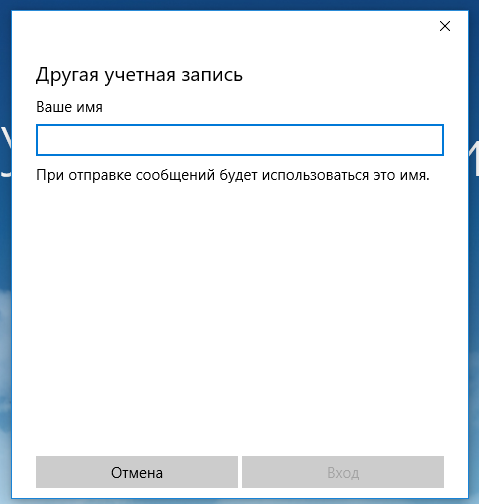
5. Укажите ваше имя, которое будет отображаться в поле «От:» для всех отправляемых сообщений.
6. Нажмите «Вход», затем — «Готово».
Если добавить учетную запись автоматически не удастся, добавьте ее вручную:
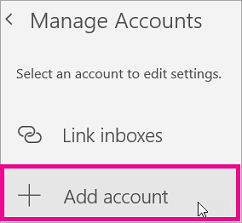
1. Нажмите «Добавить учетную запись».
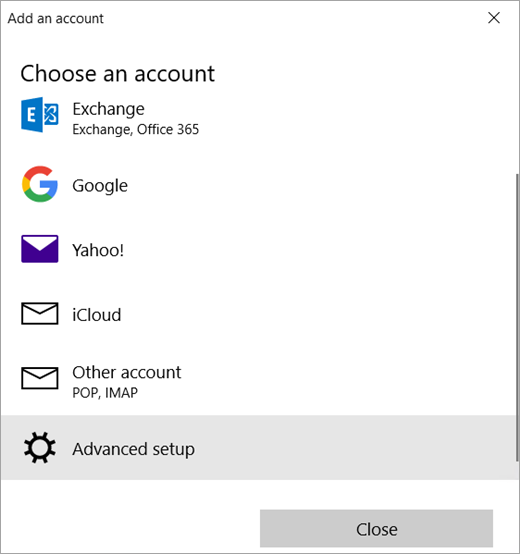
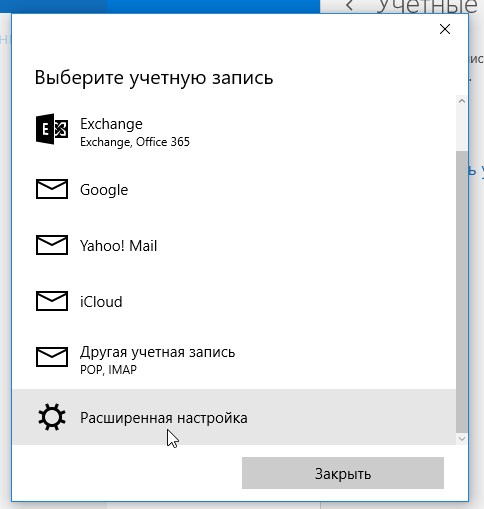
2. Нажмите «Расширенная настройка» .
3. Выберите «Интернет-почта» .
4. В открывшемся окне укажите следующие данные:
Имя учетной записи — название вашей учетной записи;
Ваше имя — имя, которое будет отображаться в поле «От:» для всех отправляемых сообщений
Сервер входящей почты — imap.mail.ru;
Тип учетной записи — IMAP4;
Имя пользователя — полное имя вашего почтового ящика;
Пароль — Пароль для внешнего приложения. Что это?
Сервер исходящей почты (SMTP) — smtp.mail.ru;
Установите галочки: «Сервер исходящей почты требует выполнения проверки подлинности», «Используйте те же самые имя пользователя и пароль для отправки электронной почты», «Запрашивать SSL для входящей почты».
5. Нажмите «Вход» и дождитесь сообщения об успешном создании учетной записи.
Настроить по протоколу POP3
Чтобы настроить программу Почта для Windows 10 по протоколу POP:
1. Нажмите «Добавить учетную запись».
2. Выберите тип учетной записи — «Другая учетная запись POP, IMAP».
3. Введите необходимые данные:
Электронный адрес — полное имя вашего почтового ящика;
Обратите внимание: в данном поле необходимо указать полное имя вашего почтового ящика, включая логин, значок «@» собачки и домен (например, vash_pomoshnik@mail.ru).
5. Укажите ваше имя, которое будет отображаться в поле «От:» для всех отправляемых сообщений.
6. Нажмите «Вход», затем — «Готово».
Если добавить учетную запись автоматически не удастся, добавьте ее вручную:
1. Нажмите «Добавить учетную запись».
2. Нажмите «Расширенная настройка» .
3. Выберите «Интернет-почта» .
4. В открывшемся окне укажите следующие данные:
Имя учетной записи — название вашей учетной записи;
Ваше имя — имя, которое будет отображаться в поле «От:» для всех отправляемых сообщений
Сервер входящей почты — pop.mail.ru;
Тип учетной записи — POP3;
Имя пользователя — полное имя вашего почтового ящика;
Пароль — Пароль для внешнего приложения. Что это?
Сервер исходящей почты (SMTP) — smtp.mail.ru;
Установите галочки: «Сервер исходящей почты требует выполнения проверки подлинности», «Используйте те же самые имя пользователя и пароль для отправки электронной почты», «Запрашивать SSL для входящей почты».
5. Нажмите «Вход» и дождитесь сообщения об успешном создании учетной записи.
HELP. WINDOWS MAIL
Replies (4)
Go to Control Panel > Uninstall Programs
Click on Windows Live Essentials
Select Repair All Windows Live Essentials Progams
Retry opening email
Start > Default Programs
Select Associate a File Type or Protocol with a Program
Look for these file formats associated with Windows Mail. Under Description it should list
Windows Mail . and Under Current Default it should list Windows Mail. If not, click on Change button and select Windows Mail. Click Ok
When finished, click close.
Was this reply helpful?
Sorry this didn’t help.
Great! Thanks for your feedback.
How satisfied are you with this reply?
Thanks for your feedback, it helps us improve the site.
How satisfied are you with this reply?
Thanks for your feedback.
If you are using Windows Mail in Vista, then just save the attachment to the Desktop. Then right click on the attachment and go to Properties and click on the Change button and select the program with which to open the attachment file type. Or you can go to Control Panel | Default Programs | Associate a file type or protocol with a program. Then page down to the appropriate file type for the attachment and select the program with which to open it.
There still may be problems in that WinMail may not be able to open it from clicking the attachment and in that case just save the attachment first. One should do this anyway to scan it for viruses and malware before just opening it and finding out.
Help with windows Mail
Just purchased a new laptop with Windows 8.1. A whole new learning experience. Got Microsoft Mail (is this the same as Outlook?). Don;t see any categories on the community for Microsoft Mail.
Installed my Gmail account and am receiving mail just fine, but none of the links I receive are active in the emails. On the Microsoft Mail help screen they list this topic but it says » If Windows Mail determines that a message might be a phishing e‑mail, it blocks access to all links in that message. If you’re certain that the message is legitimate and you want to enable links in the message, open the message, and then, on the Information bar, click Unblock to enable links in the message.»
Where is the information bar?. I have clicked all over and cannot find it on this version.
Any other assistance on how to get the links to activate would be appreciated. I use Gmail on my google phone and tablet and the links work fine on these
That touch-screen Mail app is very basic and doesn’t scan the words in your messages to look for anything that looks like a link for converting. If the original email was built as a link, you’ll see it as a link (such as the links in the notification you received for this reply). But emails that just have text that looks like a link but really isn’t, such as bing.com, won’t become a link (notice that one is not clickable).
You probably want a more full-featured email program. Because computer manufacturers bundle extra apps, many users are unaware that after Windows XP, Windows Vista was the last OS to come with a full email program. Windows 7 and 8 do not come with any successors to Windows Mail. Instead, you can get it as an optional download from the Windows Essentials page. Windows 8 did later come with a bare-bones basic email app that you’ve discovered, but it’s designed for tablets/phones and light finger-friendly use. If you want something that compares to the Mail program and Outlook Express before it, you’re going to want to get the free Essentials download at that link.
Set up email in the Mail app for Windows 10
Stay connected and on schedule
You can be organized, on time, and buttoned up with Outlook — your life organizer.
If you log on to Windows 10 using a Microsoft account with an Outlook.com, Live, Hotmail, or MSN address, that account is added to the Mail and Calendar apps. You can add that and many other email accounts to the Mail and Calendar apps to start sending and receiving email and creating and managing events.
Seeing a message that your account is out of date? You probably need to update your account settings. See Fixing an out-of-date account for more information.
Did you set up your email, but you don’t see your messages? Change your mailbox sync settings.
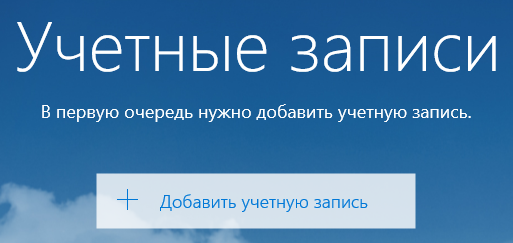
Add a new email account
Open the Mail app by clicking the Windows Start menu and choosing Mail.
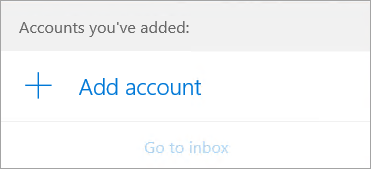
If this is the first time you’ve opened the Mail app, you’ll see a Welcome page. Select Add account to get started.
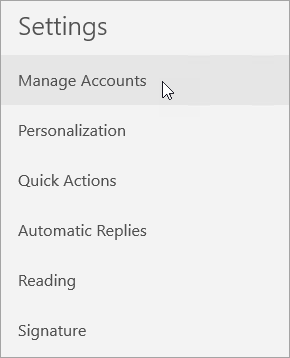
If you’ve used the Mail app before, at the bottom of the left navigation pane, select Settings , and then choose Manage Accounts.
Note: On a phone or tablet, tap the three dots at the bottom of the page to access Settings.
Select Add account.
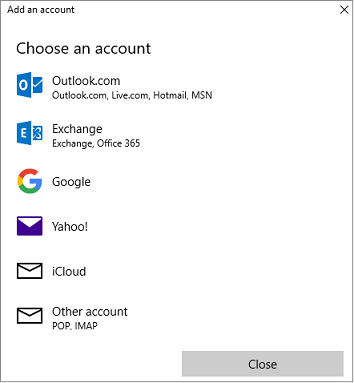
Choose the type of the account you want to add.
You may need to scroll down the Add an account dialog box to view all options.
If you choose Google, you’ll need to sign in to your Google account, enter your 2-step verification code if you’ve enabled that security feature, and give Windows permission to access your information. Click Allow and your account will be created.
If you choose another email account, you’ll need to follow the special instructions under Special instructions for other accounts below.
Enter the required information and click Sign in. For most accounts, this is your email address, password, and the account name. The account name is what you’ll see in both the left pane of Mail for Windows 10 as well as the Manage Accounts pane.
Note: If you receive the message “We couldn’t find info for that account. Make sure that the email address is correct and then try again,” you’ll need to click Try again three times before the button changes to Advanced. Click Advanced and follow the steps in the next section to add your account.
Click Done. Your data will start syncing as soon as your account is set up.
Note: It may take a few minutes for your account to synchronize. During this time, you may see «Not synced yet» in the message pane. If this message persists, see Resolve sync issues in Mail and Calendar apps in Windows 10.
Add an account using advanced setup
There are two ways you can access the Advanced setup options for your email account.
Click Advanced setup if your automatic email setup fails in Step 3 above.
Click Advanced setup from the Choose an account window in Step 2 above. The Advanced setup option is the last option on the list, and you may have to scroll to see it.
You can choose an Exchange ActiveSync account or an Internet email account. Unless your administrator has instructed you to use Exchange ActiveSync, click Internet email.
Enter the following information in the Advanced setup window.
Email address This is the name you’ll see in the left pane of the Mail app.
User name This is your full email address.
Password Enter your email account password.
Account name This is the name that you’ll see in the left pane of Mail for Windows 10, as well as in the Manage Accounts pane. You can choose any name you want.
Send your messages using this name Enter the name you want recipients to see when they receive your message.
Incoming email server You can get this information from your ISP or administrator. Usually, an incoming mail server address is in the format of mail.contoso.com or imap.google.com . For many email accounts, you can find this information in our POP and IMAP server name reference.
Account type Choose POP3 or IMAP4. Most email accounts use IMAP4. If you don’t know which one to choose, contact your ISP.
Outgoing (SMTP) email server You can get this information from your ISP or administrator. Usually, an outgoing email server address is in the format of mail.contoso.com or smtp.contoso.com .
By default, all four checkboxes at the bottom of the window will be selected. Most email accounts don’t require any changes to these options.
Your email provider can give you the settings you need to fill in the Advanced setup but you can also go to the POP and IMAP server name reference we’ve provided for the most popular email providers.
After you’ve entered the required information, click Sign in > Done.
Note: If you’re adding an account other than Gmail, see Special instructions for other accounts.
Troubleshooting
If you’re having problems setting up your account, try the following.
If you upgraded to Windows 10, you will need to re-add your accounts to Mail for Windows 10.
Make sure your email address and password are correct. Passwords are case-sensitive.
If you see your most recent messages but no older messages, you probably need to change your email sync duration.
If you see a message that your account is out-of-date, you probably need to either update your password, your incoming or outgoing servers, or your SSL settings. See Fixing an out-of-date account for more information.
Special instructions for other accounts
If you’ve enabled two-factor authentication on your iCloud account, you’ll need to generate an app-specific password to add your iCloud account to the Mail app.
Microsoft has added OAuth support for Yahoo! accounts in the Windows 10 Creators update. To install the Creators Update now, go to the software download site, and select Update now. For more information about the update, see Windows 10 Creators Update is here.
If you have a Japanese Yahoo! email account you will need to do the following:
You’ll need to add your Yahoo! account as an IMAP account. To do this, follow the steps in Add an account using advanced setup using imap.mail.yahoo.co.jp for your incoming mail server and smtp.mail.yahoo.co.jp for your outgoing mail server.
To sync your QQ mailbox with the Mail and Calendar apps, you need to enable IMAP on QQ.
Sign in to your QQ account.
Select Settings > Account > POP3/IMAP/SMTP/Exchange/CardDAV/CalDAV Service > Find IMAP/SMTP Service > Open.
You might need to send a text message to enable this service. After you select Open in step 2, a dialog might appear prompting you to use your phone to send a message to the displayed phone number.
After the text message is sent, QQ will open a new dialog with an authorization code. Copy the authorization code as you’ll need this to add your QQ mail account in the Mail and Calendar apps.
In the Mail and Calendar apps, remove your QQ account and add it again using the authorization code.
Your QQ account should now sync automatically.
When you try to connect your GMX.de or WEB.de account to the Mail and Calendar apps, you’ll receive an email in your GMX.de or WEB.de mailbox with instructions about how to enable access.
In a web browser, sign in to your GMX.de or WEB.de account.
Find the email message with instructions about how to connect your account to the Mail and Calendar apps, and follow the instructions.
Your account should now sync with the Mail and Calendar apps automatically.


 , and then choose Manage Accounts.