- Установка Windows Server 2016 на выделенный сервер Hetzner с помощью Remote Console (LARA)
- 1. Заказываем консоль из панели Robot
- 2. Загружаем образ ISO на Backup Space
- 3. Монтируем ISO-образ
- 4. Выбираем загрузочное устройство
- 5. Стандартный процесс установки
- Windows on Cloud
- Windows Server 2019 Standard Edition
- Windows Server 2019 Standard Edition
- Установка Windows 10 на Hetzner vServer
- Hetzner Cloud Networks Configuration
Установка Windows Server 2016 на выделенный сервер Hetzner с помощью Remote Console (LARA)
Задача: установить на выделенный сервер Hetzner PX61-NVMe лицензионную ОС Windows Server 2016 Standart.
Для решения нашей задачи ДЦ Hetzner предлагает консоль управления Remote Console (KVM). Он предоставляет доступ к клавиатуре/мыши/монитору через IP и даёт полный контроль сервера на уровне BIOS. KVM может быть полезнен для выявления проблем с сервером, особенно когда нет возможности использовать SSH.

На момент установки KVM предоставляется бесплатно на 3 часа. Этого вполне достаточно для установки ОС.
1. Заказываем консоль из панели Robot
В панели управления Robot на нужном сервере во вкладке Support нужно выбрать пункт «Remote Console (KVM)» и указать желаемое время и продожительность использования.

2. Загружаем образ ISO на Backup Space
К серверу PX61-NVMe прилагается 100 Гб Backup Space. Консоль KVM позволяет подключать внешние ISO-образы с их хранилища download.hetzner.de, но и с Backup Space. Мы воспользуемся этим вариантом и предварительно загрузим соответствующий образ с помощью FTP.
3. Монтируем ISO-образ
После того, как мы получили E-mail с параметрами доступа к консоли KVM, необходимо подмонтировать образ на вкладке «Interfaces» -> «Virtual media».

4. Выбираем загрузочное устройство
В зависимости от модели материнской платы, boot menu может быть вызвано разными комбинациями клавиш. В материнской плате Fujitsu — F12. Подмонтированный ISO-образ в загрузочном меню носит название «PepperC Virtual Disc 1 0.01«.

5. Стандартный процесс установки
Запускается стандартная установка Windows, которая отличается тем, что занимает более продолжительное время (этап копирования установочных файлов Windows Server Standart 2016 Desktop занял
Windows on Cloud
Is it possible to install Windows with my own license?
Yes, but it must be done manually. For this, the CD/DVD images can be used.
What versions are available?
- Windows Server 2019 (DE/EN)
- Windows Server 2016 (DE/EN/RU/Language Pack)
- Windows Server 2012 R2 (DE/EN/RU/Language Pack)
Other versions can also be provided. Please send a support request if this is desired.
Why is the time on my server not correct?
All CX virtual server hosts use UTC as the system time, which is why Windows often has a problem with the system time within the vServers.
To fix this problem permanently, it is necessary to create an entry in the Windows registry, which tells Windows that the hardware clock (RTC — emulated by the host system) is not the local time zone, but UTC.
The following command must be entered in the command prompt (cmd.exe):
It is then necessary to restart Windows.
After the restart the following command can be used to check if the setting was successfully applied:
If the changes were successfully applied, a line with the wording RealTimeIsUniversal and the value 0x1 should be shown.
By default, Windows uses temporary addresses for IPv6 connections. This can prevent you that you can use your /64 network. To be able to use the IPv6 network, you should disable the use of temporary addresses by default.
Windows Server 2012, 2012R2, 2016
Run the following commands in a powershell with administration rights:
Run the following commands in a cmd.exe with administration rights:
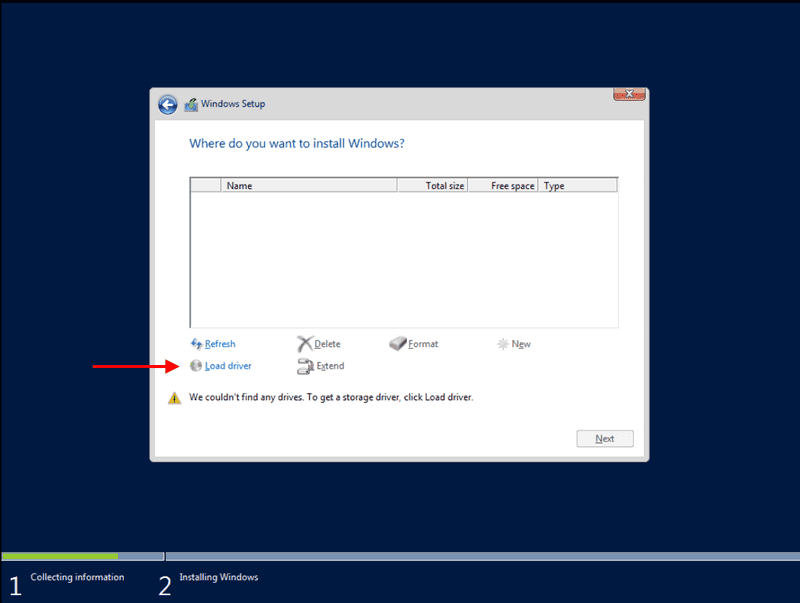
What should be kept in mind during a manual installation?
To install Windows, it is necessary that the VirtIO drivers are installed. The driver can, for example, be mounted and installed via an ISO image (virtio-win-latest[…].iso).
The folders of the necessary drivers are named as follows:
Each of them will usually have a folder with the architecture (amd64). This must be selected to install the drivers.
To get to the selection of the available CD/DVD images, you must select your server in the Cloud Console and switch to the «ISO IMAGES» tab. You must then select the ISO and mount it with a click on „MOUNT“


Now you can start your server and perform the installation normally up to the point where the installation asks for the installation type. Please select the custom installation and continue with the installation. If you get a blue screen, please switch your server off and on with the ON/OFF switch.

Now proceed up to the point where the installation searches for the drive. At this point, you have to switch the image to the latest available VirtIO driver CD.

Subsequently, the below mentioned drivers need to be installed.
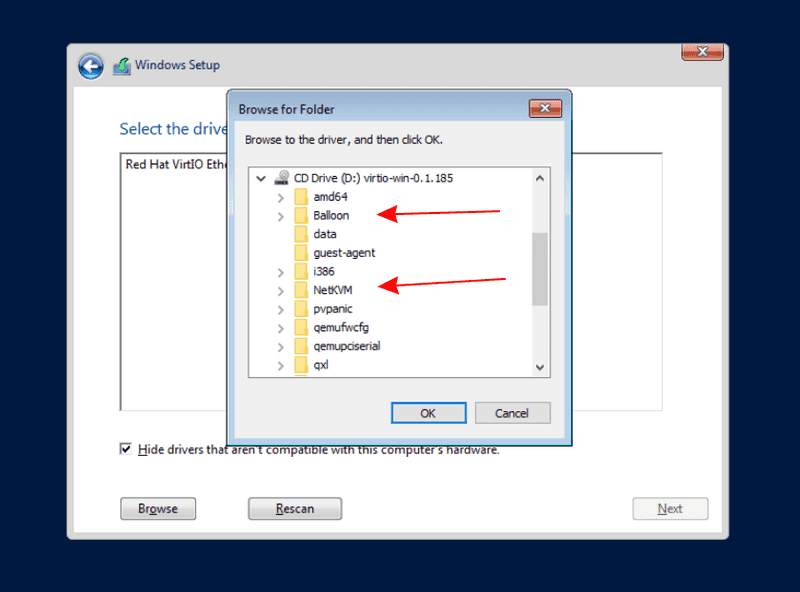
Each of the folders will usually have a subfolder with the architecture (amd64). This must be selected to install the drivers.
After installing the driver you need to switch back to the previously used Windows Image.
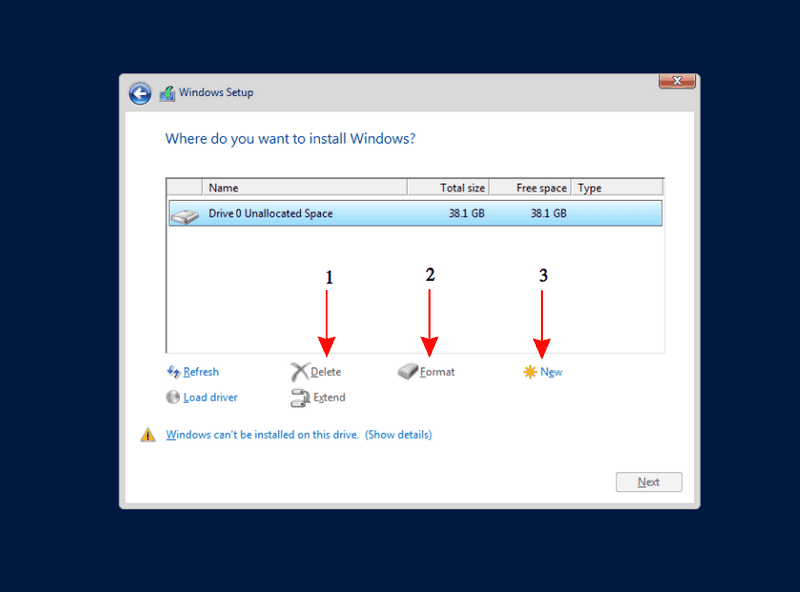
Now, you have to delete and format the drives. Finally, you can resume the installation as normal.
Windows Server 2019 Standard Edition
Windows Server 2019 Standard Edition
С передовыми возможностям виртуализации и web Windows Server 2019 Standard Edition разработан для повышения надёжности и гибкости вашей серверной инфраструктуры. Мощные инструменты дают вам больший контроль над сервером, рационализируют конфигурацию и управление. Усовершенствованные функции безопасности усиливают защиту операционной системы и помогают защитить ваши данные и сеть.
Windows Server 2019 Standard Edition включает в себя все функции сервера Windows и возможность запуска одной виртуальной машины.
Основные роли сервера:
- Службы сертификатов Active Directory
- Доменные службы Active Directory
- Службы федерации Active Directory
- Службы облегченного доступа к каталогам Active Directory
- Службы управления правами Active Directory
- Сервер приложений
- DHCP-сервер
- DNS-сервер
- Факс-сервер
- Файловые службы
- Hyper-V
- Службы сетевой политики и доступа
- Службы печати и документов
- Службы удаленных рабочих столов
- Удаленный доступ
- Службы удаленных рабочих столов
- Службы UDDI
- Веб-службы
- Службы развертывания Windows
- Windows Server Update Services (WSUS)
- BranchCache
- Вариант установки (Server Core)
- Диспетчер серверов
- Windows PowerShell
Система может быть установлена после оплаты через Robot. Предоставляется версия 64-бит.
Установка Windows 10 на Hetzner vServer
В данной статье будет описание установки Windows 10 на дешевый виртуальный Hetzner vServer
vps:
Windows 10
2 Core CPU
2GB RAM
50 GB SSD
1. Заказываем из панели robot.your-server.de свой виртуальный сервер, например vServer CX10 (но лучше хотя бы vServer CX20 с 2ГБ ОЗУ и 2 процессорами)
2. После создания сервера, вам придет оповещение на емейл, и еще через 5 минут прийдет оповещение с данными для доступа к вашему vps, после чего заходим в настройки нашего сервера https://robot.your-server.de/server Вкладка vServer нашего сервера
Спускаемся вниз и открываем Settings из Remote console
в Settings указываем:
NIC model*: VirtIO
VNC keymap*: en-us
Mount CD/DVD image*: Win10_1703_EnglishInternationsl_x62.iso
Нажимаем Save
Ожидаем 1-2 минуты и снова заходим на вкладку Settings
и внизу нажимаем Start remote console (обязательно перед этим должна быть установлена Java)
Почле чего открывается окошко удаленного управления сервером через VNC
Запускается Windows Setup
Доходим до шага выбора диска на который необходимо произвести установку и видим, что драйвера для диска не видно. Исправляем ситуацию, добавляя драйвера для диска, сетевухи и др:
Переходим в hetzner робот в vServer -> Settings и монтируем диск virtio-win-stable*.iso -> Save
Вовращаемся к установке Windows Setup
Load Driver -> Выбираем наш примонтированный диск и в нем папку:
\Baloon\w10\amd64
Next
будет найден и отображен следующий драйвер:
VirtIO Balloon Driver (D:\NetKVM\w10\amd64\balloon.inf)
Next
опять жмем
Load Driver -> \NetKVM\w10\amd64
Next
будет найден и отображен следующий драйвер:
Red Hat VirtIO Ethernet Adapter (D:\NetKVM\w10\amd64\netkvm.inf)
Next
И снова жмем
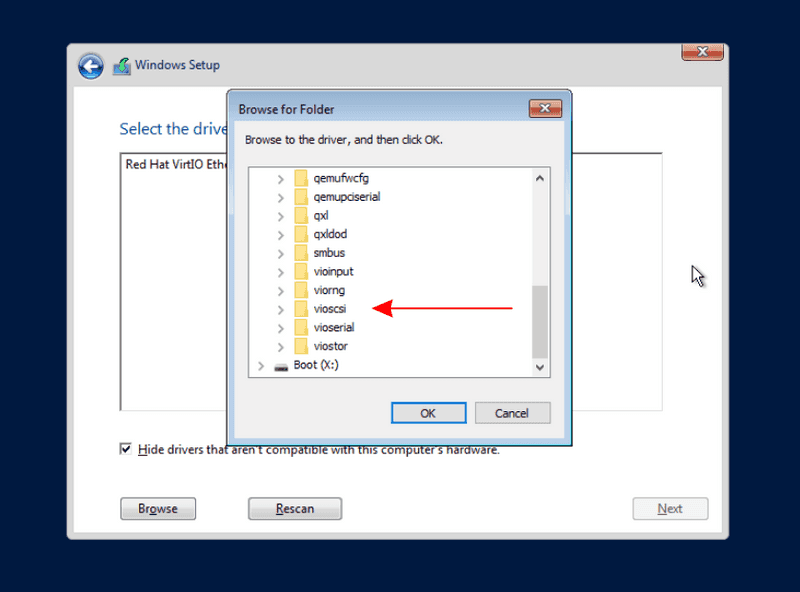
Load Driver -> \vioscsi\w10\amd64
Next
будет найден и отображен следующий драйвер:
Red Hat VirtIO SCSI pass-through controller (D:\vioscsi\w10\amd64\vioscsi.inf)
Next
Переходим в hetzner робот в vServer -> Settings и монтируем прежний диск Win10_1703_EnglishInternationsl_x62.iso -> Save
Вовращаемся к установке Windows Setup
Refresh — Next
Далее проходит стандартная установка Windows.
—
Для других редакций Windows папки с драйверами будут соответсвтующими:
Windows Server 2012 R2:
\Baloon\2k12R2\amd64
\NetKVM\2k12R2\amd64
\vioscsi\2k12R2\amd64
Hetzner Cloud Networks Configuration
Installation of the auto-configuration package
Download the latest version of hc-utils for your OS and your architecture on: https://packages.hetzner.com/hcloud/
On Debian based distributions (Ubuntu, Debian):
On RHEL based distributions:
Uninstall auto-configuration package
On Debian based distributions (Ubuntu, Debian):
On RHEL based distributions (Fedora, CentOS):
Manual configuration via DHCP
The interface for the first attached network will be named ens10 (for CX, CCX) or enp7s0 (for CPX). Additional interfaces will be named ens11 (CX, CCX) or enp8s0 (CPX) for the second, and ens12 (CX, CCX) or enp9s0 (CPX) for the third.
- Access the server via SSH2.
Create the configuration file and open an editor:
Now you should restart your network. Caution: This will reset your network connection.
The first interface will be named like Debian/Ubuntu ( ens10 for CX, CCX and enp7s0 for CPX), except on CentOS, where the interfaces use the traditional naming ( eth1 , eth2 and eth3 ).
Create the configuration file and open an editor:
Paste the following configuration into the editor:
Now you should restart your network. Caution: This will reset your network connection.
Manual configuration of alias IPs
On Debian based distributions (Ubuntu, Debian):
Create the configuration file and open an editor:
Paste the following configuration into the editor and replace your.ali.as.IP with one of the alias IPs. Keep in mind to increase the identifier by one when using more alias IPs.
Now you should restart your network. Caution: This will reset your network connection.
On RHEL based distributions: The interfaces will be named eth1 and up to eth3 .
Create the configuration file and open an editor:
Paste the following configuration into the editor and replace your.ali.as.IP with one of the alias IPs. Keep in mind to increase the identifier by one when using more alias IPs.
Now you should restart your network. Caution: This will reset your network connection.
Manual static configuration
On Debian based distributions (Ubuntu, Debian):
The interface for the network will be named ens10 for the first attached network, ens11 for the second and ens12 for the third.
- Access the server via SSH.
Create the configuration file and open an editor:
Paste the following configuration into the editor and replace private.address.ofThe.CloudServer , gateway.of.the.network and net.work.ip.range with the values of your network.
Now you should restart your network. Caution: This will reset your network connection.
On RHEL based distributions (Fedora, CentOS):
The interfaces will be named ens10 , ens11 and ens12 . CentOS is still using eth0, eth1 and eth2.
Create the configuration file and open an editor:
Paste the following configuration into the editor and replace the private.address.ofThe.CloudServer with the private network IP of your server.
Create the route configuration file and open an editor:
Paste the following configuration into the editor and replace private.address.ofThe.CloudServer , gateway.of.the.network and net.work.ip.range with the values of your network.
Now you should restart your network. Caution: This will reset your network connection.
Manual Configuration for Windows based systems
Print the interface list and get the interface ID of interface «Red Hat VirtIO Ethernet Adapter #2».
It should look like this:
Add the static routes to interface by replacing mask.of.network.range , gateway.of.the.network and net.work.ip.range with the values of your network.
Check the interface name for the static configuration:
The output should look something like this:


