- Windows Server 2016
- Установка Windows Server 2016 на выделенный сервер Hetzner с помощью Remote Console (LARA)
- 1. Заказываем консоль из панели Robot
- 2. Загружаем образ ISO на Backup Space
- 3. Монтируем ISO-образ
- 4. Выбираем загрузочное устройство
- 5. Стандартный процесс установки
- Windows Server Software RAID
- Установка дополнительной лицензии Hyper-V Windows Server 2016 в Hetzner
- 1. Заказываем дополнительный IP-адрес и получаем виртуальный MAC
- 2. Создаем виртуальную машину
- Установка Windows Server
- Результат
Windows Server 2016
DEPRECATED We no longer offer Windows Server 2016 for new orders.
We offer Microsoft Windows Server 2016 as an add-on to your dedicated server at favorable rates.
Ordering the Windows add-on
To install Windows Server 2016 on your server, please order the corresponding Add-on via the Robot. Here you will also find the terms and conditions.
Following the order, installation is carried out on your server automatically. You will receive notification by email once this has been successfully completed.
Remote Desktop access
Subsequently, it is possible for you to connect to your server with full Administrator rights using a Remote Desktop client. Most Windows variants are delivered with a Remote Desktop (rdp) client, found under Start -> Program -> Accessories. On Linux, please install the rdesktop package or one of the many alternatives. Windows is delivered with the program mstsc though alternatives such as Terminals can be used.
To log in, please use the user name Administrator and the password you chose when ordering the add-on.
Additional RDP licenses (Per User) can be ordered via a Support Request: Windows Server Remotedesktopservices
Change password with first access
The first time you login, Windows will ask you to change your initial password. This is for server security reasons. Please choose a good password that is not easy to guess.
Please note that the first login does not allow network level authentication. For more information, please see Changing the Windows password during first login.
Software RAID 1 / drive mirroring
Windows 2016 enables you to join several installed drives into a Software RAID 1 (mirroring), so that in the event of one drive failing, all data are still stored on the second drive.
When you order a Windows server from us, it is automatically equipped with mirroring if there are two equal size drives.
Setting up a software RAID in Windows 2016 is similar to setting it up in Windows 2012 and 2008 R2. Instructions on how to set up a Software RAID in Windows Server 2016 can be found here: Windows Server software RAID
Install Internet Information Server (IIS)
We have compiled a short how-to guide to enable you to easily install the Internet Information Server (IIS). The configuration of IIS is also the same as with Windows Server 2012 and 2008 R2, and the guide can be found here: Windows Server IIS installation
Windows Recovery Environment / Recovery Console
Should the Boot loader or Boot sector need to be repaired or should, for example, a complete backup of a previously made backup be loaded from the backup space, the Windows Recovery Console (Recovery Environment / RE) is useful.
First, you should order a KVM Console remote console and ask to have the Windows Recovery Environment pre-loaded, so that you have direct access to your server monitor and keyboard. The technicians will restart the server and it will boot the Windows RE via the network. As soon as Windows has loaded, a graphical interface will appear with instructions for you to follow.
With an UEFI installation the Windows Recovery Environment can not be loaded via PXE. In this case, the techniciains provide a KVM Console with a USB stick with Windows RE.
Frequently asked questions / FAQ
If you have forgotten your Administrator password, you can have your password reset via a Support Request in the Robot.
The behavior of Windows is such that CTRL+ALT+DEL only triggers the Authentication Dialogue Box. Consequently, the Send CTRL+ALT+DEL function of our Reset Service is unfortunately not able to restart the server at this point. A hardware reset should, however, still work as intended.
Windows Update Service
For technical reasons, the Windows Update Service for our Windows Installations is set so that updates can only be downloaded and not installed.
In order to change this, you need to adjust the Registry. To start this, enter the command regedit in the Run dialogue.
Navigate to HKEY_LOCAL_MACHINE\\SOFTWARE\\Polices\\Microsoft\\Windows\\WindowsUpdate\\AU and set the AUOptions key to 5.
Now you can adjust the update function in the control panel.
Windows Backup Service
Should the Windows Backup Service (feature) need to be used together with the backup space, a user should be set up on the local system, which has the same name as the Backup Account. This user should then be entered as a member into the Backup Operators group.
Use of own licenses
We take part in the Microsoft SPLA Program. The Windows License made available to us is thus an SPLA License. The combining of clients´ own Microsoft licenses with the Hetzner SPLA License would have to be put in writing (contract), as the client would have to commission Hetzner to host the product. Furthermore, the deployment of an own Microsoft license would not be possible in every case (e.g. for terminal server licenses). Therefore, in view of the increased administrative time and effort that would be involved, we have chosen not to permit the combining of licenses. Hence, the use of own Microsoft licenses on a Windows operating system leased from us is not possible.
However, a client is able to install their own Windows version, using their own license. It is possible to install Windows via a KVM Console.
Included license for Hyper-V in the Standard Edition
As part of our SPLA license you have an additional license for use on a Hyper-V instance when using the Standard Edition. You can use this as follows:
- Order an additional single IP via Robot (for subnets see Windows Server Subnet)
- Make a note of the virtual MAC
- Create a new instance
- Add the Legacy Network Adapter and assign the MAC
Start the instance and let it boot via PXE
- If successful the Hetzner PXE Boot Menu will appear (blue logo)
Установка Windows Server 2016 на выделенный сервер Hetzner с помощью Remote Console (LARA)
Задача: установить на выделенный сервер Hetzner PX61-NVMe лицензионную ОС Windows Server 2016 Standart.
Для решения нашей задачи ДЦ Hetzner предлагает консоль управления Remote Console (KVM). Он предоставляет доступ к клавиатуре/мыши/монитору через IP и даёт полный контроль сервера на уровне BIOS. KVM может быть полезнен для выявления проблем с сервером, особенно когда нет возможности использовать SSH.

На момент установки KVM предоставляется бесплатно на 3 часа. Этого вполне достаточно для установки ОС.
1. Заказываем консоль из панели Robot
В панели управления Robot на нужном сервере во вкладке Support нужно выбрать пункт «Remote Console (KVM)» и указать желаемое время и продожительность использования.

2. Загружаем образ ISO на Backup Space
К серверу PX61-NVMe прилагается 100 Гб Backup Space. Консоль KVM позволяет подключать внешние ISO-образы с их хранилища download.hetzner.de, но и с Backup Space. Мы воспользуемся этим вариантом и предварительно загрузим соответствующий образ с помощью FTP.
3. Монтируем ISO-образ
После того, как мы получили E-mail с параметрами доступа к консоли KVM, необходимо подмонтировать образ на вкладке «Interfaces» -> «Virtual media».

4. Выбираем загрузочное устройство
В зависимости от модели материнской платы, boot menu может быть вызвано разными комбинациями клавиш. В материнской плате Fujitsu — F12. Подмонтированный ISO-образ в загрузочном меню носит название «PepperC Virtual Disc 1 0.01«.

5. Стандартный процесс установки
Запускается стандартная установка Windows, которая отличается тем, что занимает более продолжительное время (этап копирования установочных файлов Windows Server Standart 2016 Desktop занял
Windows Server Software RAID
The following guide describes how to manually setup a drive mirroring (RAID1) in a Windows operating system.
As servers, which have been installed using our automatic Windows installation (available via the Robot), or ordered with the Windows Addon, already have a RAID level 1 configured and running, this guide is intended for custom Windows installations.
- First, please click on the Windows symbol in the bottom left corner, or press the Windows or Super key.
Type diskmgmt.msc and press the Enter key to open the Disk Management Utility.
Please find a quick overview of the utility below: 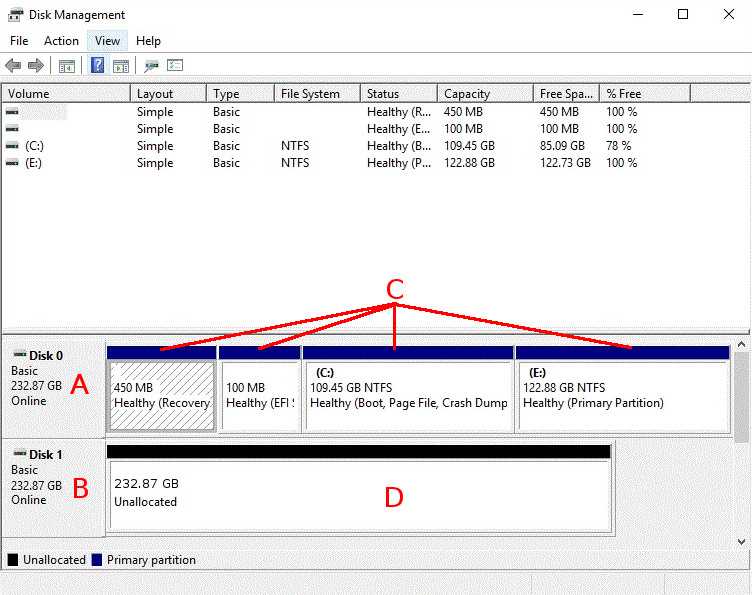
- A: Main disk, that contains the operating system
- B: Second disk, intended to be used for the RAID1 mirroring
- C: Volumes (means partitions under Windows) on the main disk
- D: Unallocated space on the second disk
If your system is running in Legacy mode, the following steps should be performed on all Volumes of the main disk, from left to right:
- Make a right click on the regarding Volume and choose Add mirroring from the context menu.
- In the appearing menu choose the preferred second drive for the RAID1 and confirm by clicking on Add mirroring .
Please ensure that all Volumes have been added to the mirroring and the synchronization is running, which is indicated by the reddish colored Volumes and their status information.
Every UEFI system has a so-called UEFI System Volume. This partition can not be mirrored automatically by Windows and must be manually copied and configured on the second drive. Like with Legacy, add the mirroring for the Volumes one by one, from left to right.
For all Volumes, that do not have the EFI label, follow those steps:
- Please make a right click on the regarding Volume and choose Add mirroring from the context menu.
- In the appearing menu choose the preferred second drive for the RAID1 and confirm this by clicking on Add mirroring .
For the UEFI System Volume, please use the following steps:
- Create an UEFI System Volume with the same size on the second drive and format it with FAT32. Therefore, just make a right click on the unallocated space of the second drive, select New Simple Volume and follow the dialog.
Copy the UEFI System Volume data from the first drive to the second. Therefore, we recommend to boot the server to the Rescue System and connect via SSH to it:
Locate the regarding partitions:
This command will list the partitions of all drives. There, please search for two UEFI partitions on both drives, which you might identify by their sizes and filesystem (FAT32) and combine the disk identifiers ( /dev/sdX ) with the regarding numbers of the partitions.
In this case, the partitions are /dev/sda1 and /dev/sdb1 .
Create mount point folders:
Mount the regarding UEFI System partitions (replace the partitions with your ones):
Next copy all files from the current UEFI System partition to the new one:
Once finished, boot the server back to the installed system:
Note that the UEFI System partition can’t be mirrored. The process as described above is therefore always required in case a drive is replaced or changes have been made to the bootloader configuration.
Please ensure that all other Volumes have been added to the mirroring and the synchronization is running, which is indicated by the reddish colored Volumes and their status information.
If you face any issues with certain Volumes, or the second Plex (means a part of a mirrored Microsoft Volume) is not bootable, please see the official Documentation.
Установка дополнительной лицензии Hyper-V Windows Server 2016 в Hetzner
Дано: выделенный сервер с арендованной лицензионной Windows Server 2016 Standart. Установить дополнительную ОС в виртуальную машину Hyper-V.
Арендованная ОС Windows Server 2016 в ДЦ Hetzner поставляется по лицензии SPLA. В нее входит одна дополнительная лицензия для установки Windows Server на виртуальную машину Hyper-V. Предположим что роль гипервизора уже установлена и настроена.
1. Заказываем дополнительный IP-адрес и получаем виртуальный MAC
С помощью кнопки «Order additional IP» заказываем дополнительный IP-адрес. После того как он появится в панели управления нужно нажать на синюю кнопку возле нового IP-адреса и заказать отдельный MAC-адрес.

2. Создаем виртуальную машину
Процедура установки доп. лицензии ОС Windows Server на Hyper-V имеет 2 тонкости:
- Потребуется загрузка с помощью PXE и, следовательно, «Устаревший сетевой адаптер» (Legacy Network Adapter). Значит, мы можем cоздать ВМ Hyper-V только 1-го поколения.
- Виртуальный жесткий диск необходимо подключать в IDE-контроллер. В случае его установки в SCSI-контроллер, вы увидите следующую ошибку:

Для сетевого адаптера присваиваем статический MAC-адрес и устанавливаем в BIOS загрузку с него:

Установка Windows Server
Если мы все сделали правильно, то при пуске виртуальной машины через несколько секунд появится Hetzner PXE Boot Menu:

Далее в панели Robot на вкладке Windows/Additional IP активируем установку Windows:

После чего будет выдан пароль для первого входа в Windows:

Перезагружаем нашу виртуальную машину не меняя настроек и наблюдаем загрузку образа по сети:

После ожидания 5-10 минут появляется Windows Boot Manager:


Результат
После ожидания примерно 20-30 минут Windows установлен, активирован и готов ко входу:


