- 8 Hidden Windows 10 Features You Didn’t Know About
- 1. Access a Start Menu for power users
- 2. Sniff out disk space-hoarding apps
- 3. Quickly minimize all windows except the active one
- 4. Stop background apps from running
- 5. Become a Start Menu power user
- 6. Print to PDF
- 7. Know these new useful keyboard shortcuts
- 8. New trackpad gestures
- Hidden Windows 10 Features
- Softonic review
- See what Windows can really do
- Beneath all those settings
- Easy configurations
- Windows 10 tricks and hidden features
- 1. Window snapping
- 2. Virtual desktops
- 3. Address toolbar
- 4. Taskbar
- 5. GodMode
- Hidden Tricks Inside Windows 10
- Secret Start Menu
- Show Desktop Button
- Enhanced Windows Search
- Shake Away the Mess
- Rotate Your Screen
- Enable Slide to Shutdown
- Enable ‘God Mode’
- Drag to Pin Windows
- Quickly Jump Between Virtual Desktops
- Customize the Command Prompt
- Silence Notifications With Focus Assist
- Nearby Sharing
- Stop Typing, Start Dictating
- Dark Mode and Light Mode
- Cloud Clipboard
- Revamped Screen Capture Tool
- Test Files and Apps in the Sandbox
- Hidden Game Bar
- Press Pause On Updates
- Cloud Reset
- Unlock Kaimoji and Symbols
- Take Measurements
- View File Extensions in File Explorer
8 Hidden Windows 10 Features You Didn’t Know About

Get more out of Windows 10 by learning these hidden tricks and shortcuts | Source: Microsoft
Many of us have had Windows 10 on our PCs for a while now, so we’re pretty used to the new features of the operating system from daily use. But whether you’re using the PC you’ve had for years or upgraded to a new device that was Windows 10-ready out of the box, you might find it useful to learn some of the tricks that Microsoft has hidden underneath the hood. Give these tips and tricks a try, and improve your Windows 10 experience.
1. Access a Start Menu for power users
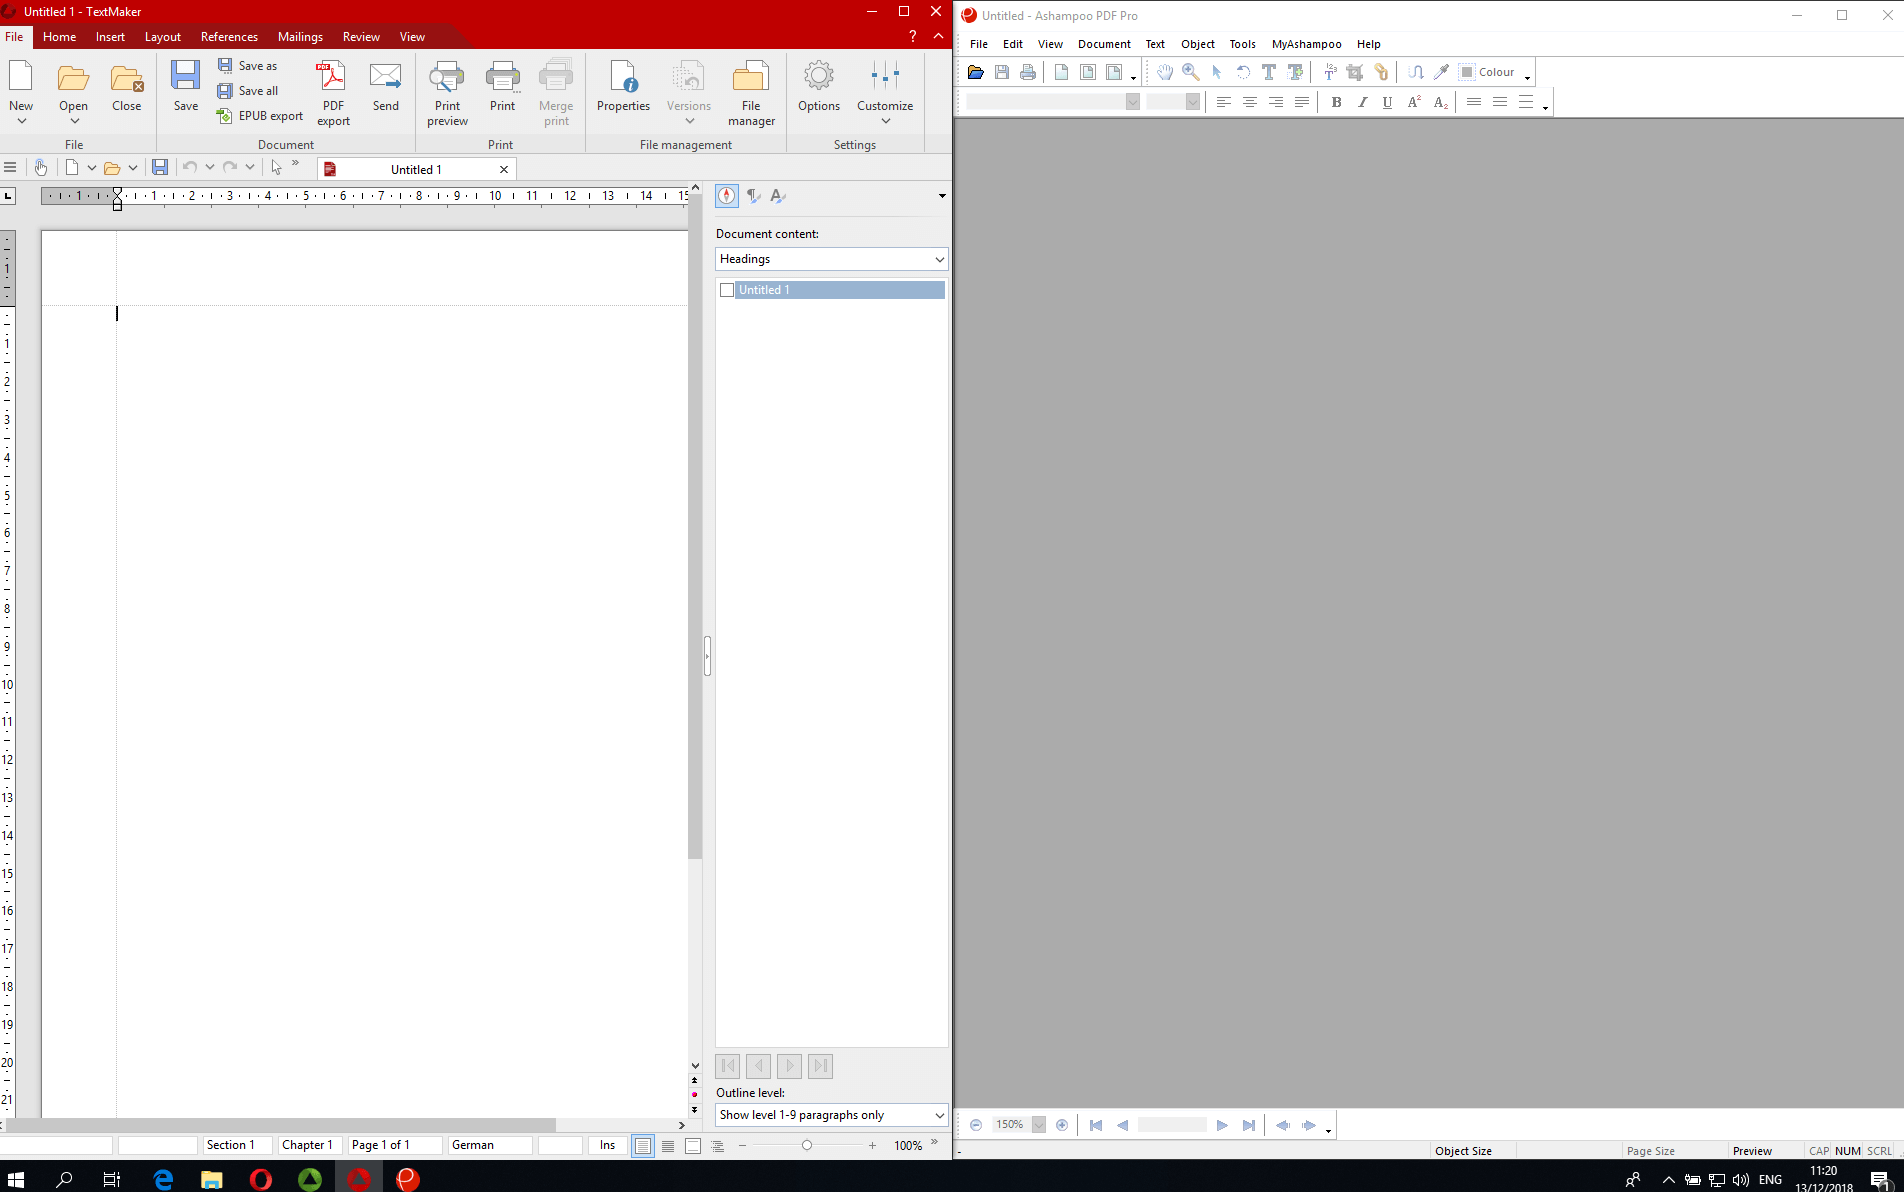
Windows 10 has a hidden Start Menu that contains some useful tools for Windows power users, such as the task manager, command prompt, device and disk management, and others. To get to this menu, you’ll need to either right click the Windows button or use the Windows key+X shortcut on your keyboard.
2. Sniff out disk space-hoarding apps
A useful feature of both iOS and Android is one within their settings apps that allows you to monitor the amount of disk space that your apps are taking up. Microsoft introduced a similar tool in the new Settings app in Windows 10. To find it, click Settings, then System, then Storage. You’ll be able to sort by drive and search for specific apps by file name so that you can figure out which apps are taking up the most space.
3. Quickly minimize all windows except the active one
The “Show Desktop” function has been around since Windows 95, but up until now, there was no way to just minimize all windows except the one you’re looking at. In Windows 10, all you’ll need to do is to grab the window by its title bar and give it a shake. All inactive windows will minimize.
4. Stop background apps from running
Another mobile OS-borrowed feature is options within Settings to control which apps can run in the background. That might not sound like a big deal, but if you’re tethering your laptop to a mobile hotspot with a data cap, it can save you a lot of headaches and wasted data — and possibly conserve a little battery life, too. To choose what apps you’d like to allow to run, go to the Settings app, then Privacy, then Background Apps. Then you’ll see a list of installed apps, and you can decide which ones can run in the background.
5. Become a Start Menu power user
Start Menus become bloated as we add more and more applications to our PCs, but that doesn’t mean that the process of finding and opening the app you want has to slow down. After opening the Start Menu, click “All Apps.” You’ll see letters that you can click on; click the first letter of the name of the app you’re looking for, and the app should appear in the tiles to the right. To be more specific, you can even search for apps from the search box, too.
6. Print to PDF
I personally have loved the print to PDF feature of Google Chrome, as it’s been a staple of Google’s alternative browser, and users of OS X have also enjoyed it natively across the operating system for quite some time. Now in Windows 10, “Print to PDF” is a native option across the entire operating system. You can access this from any print dialog.
7. Know these new useful keyboard shortcuts
ExtremeTech provides a list of new keyboard shortcuts which we think you should be aware of too. They’ll make navigating Windows 10 much easier, and each one uses the the Windows Key plus an additional key or two:
- Windows Key-Tab (Task View)
- Windows Key-Right-Up (moves app to top right quadrant; you can use different directions to position windows where desired)
- Windows Key-Up and Down (snap apps to top or bottom of screen or maximizes)
- Windows Key-Ctrl-Left or Right (scrolls between virtual desktops)
- Windows Key-Ctrl-D (creates a new virtual desktop)
- Windows Key-Ctrl-F4 (closes virtual desktop)
- Windows Key-Shift-C (Cortana listening)
- Windows Key-S (Daily Glance for weather, news, sports)
[Update 1/2/17: The “Cortana listening” shortcut has been changed from Windows Key-Ctrl-C to Windows Key-Shift-C]
8. New trackpad gestures
Microsoft has made a concerted effort in Windows 10 to bring the trackpad gestures that users have grown accustomed to with OS X. If you’re a Mac user, then all the gestures you’re used to — like pinching to zoom or using two fingers to scroll up and down — will work similarly in Windows 10.
In addition to those gestures, there are a few added gestures that are Windows 10-specific. Swipe three fingers up and you’ll see the task view; to the left acts like Alt-Tab, and down accesses the desktop. Tapping three fingers on the trackpad brings up Cortana, and tapping with four fingers brings up the Action Center.
Hidden Windows 10 Features
Softonic review
See what Windows can really do
Hidden Windows 10 Features is a free system utility program that enables you to access the hidden functions of the Windows 10 operating system. Developed by Theropods Ltd., this handy freeware tool brings out commonly-buried features of this particular OS within the reach. So, even non-tech-savvy users won’t have to fiddle with their registry too much. This software has two free versions and one premium version for commercial use.
Beneath all those settings
There are actually a lot of features hidden within operating systems that most users never become aware of due to how they’re locked away from easy access. This is to avoid people from accidentally enabling some of these settings and possibly creating errors with the OS’ script. However, most are actually pretty useful and should be at least available in just a few clicks to anyone who would like to have control over their settings.
Now, the registry is the main source of these tools and you will have to edit it in order to manually enable these features. Unfortunately, the process can take a while and is a tedious one wherein you should actually know what you’re doing—otherwise, you might break something actually important. This is where Hidden Windows 10 Features comes in. With this program, you can just simply enable and disable these features.
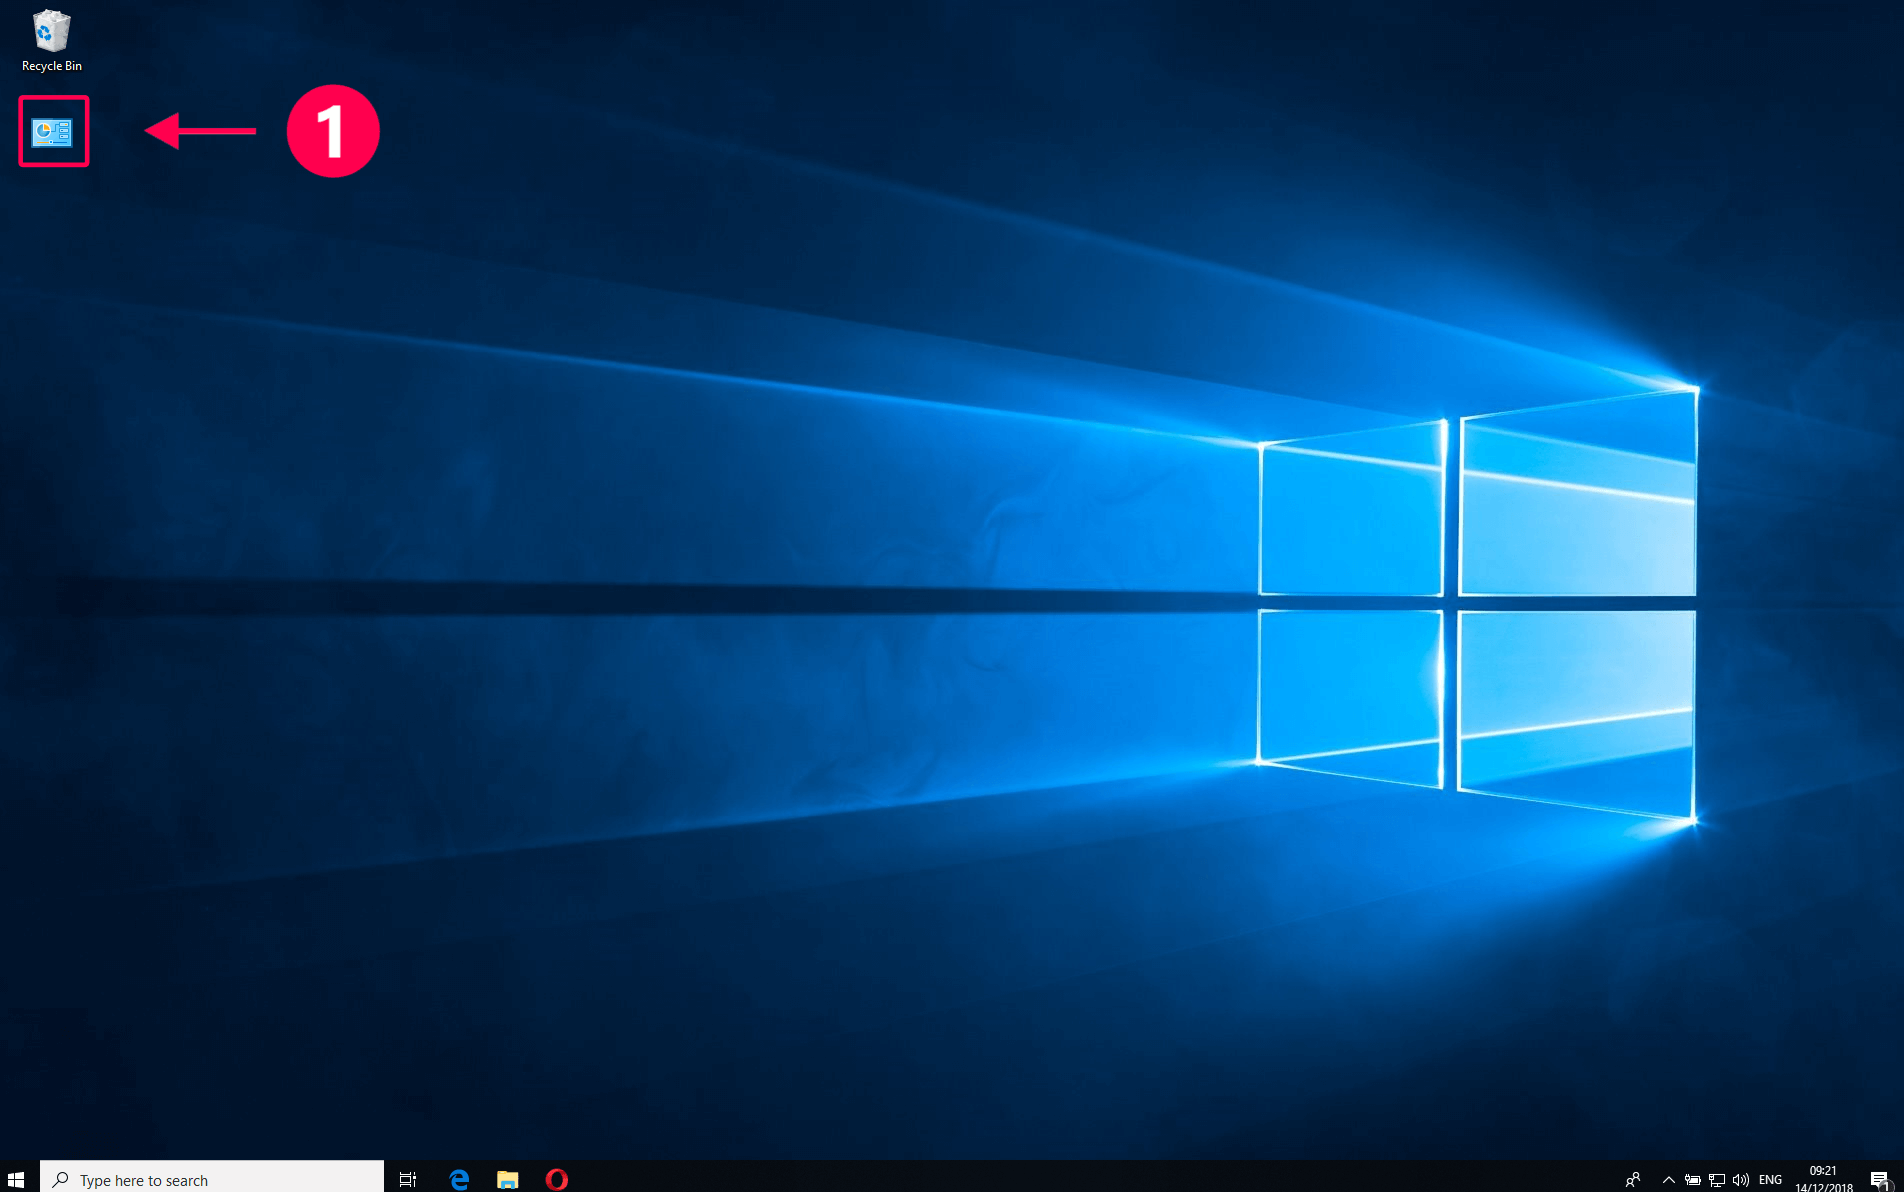
Although it looks a bit bland, the user interface is pretty simple and straightforward. It just displays different tabs containing checkboxes for the hidden features available. One of the most popular features here include the ability to add items such as the Recycle Bin and Control Panel to “This PC” for easy access within File Explorer. This software also lets you export your new settings to another computer and even use it as a backup.
Easy configurations
All in all, Hidden Windows 10 Features is a convenient tool for any type of user, as it can bypass the tedious job of edit your Windows registry just to activate some hidden features. Despite the main menu interface looking a bit bland, it’s highly user-friendly as you can simply enable these features with just a single click. If you’re interested in these hidden features, this is a recommended software to try out.
Windows 10 tricks and hidden features
Windows 10 has more features than you might guess. Here are the most important «hidden» features.
1. Window snapping
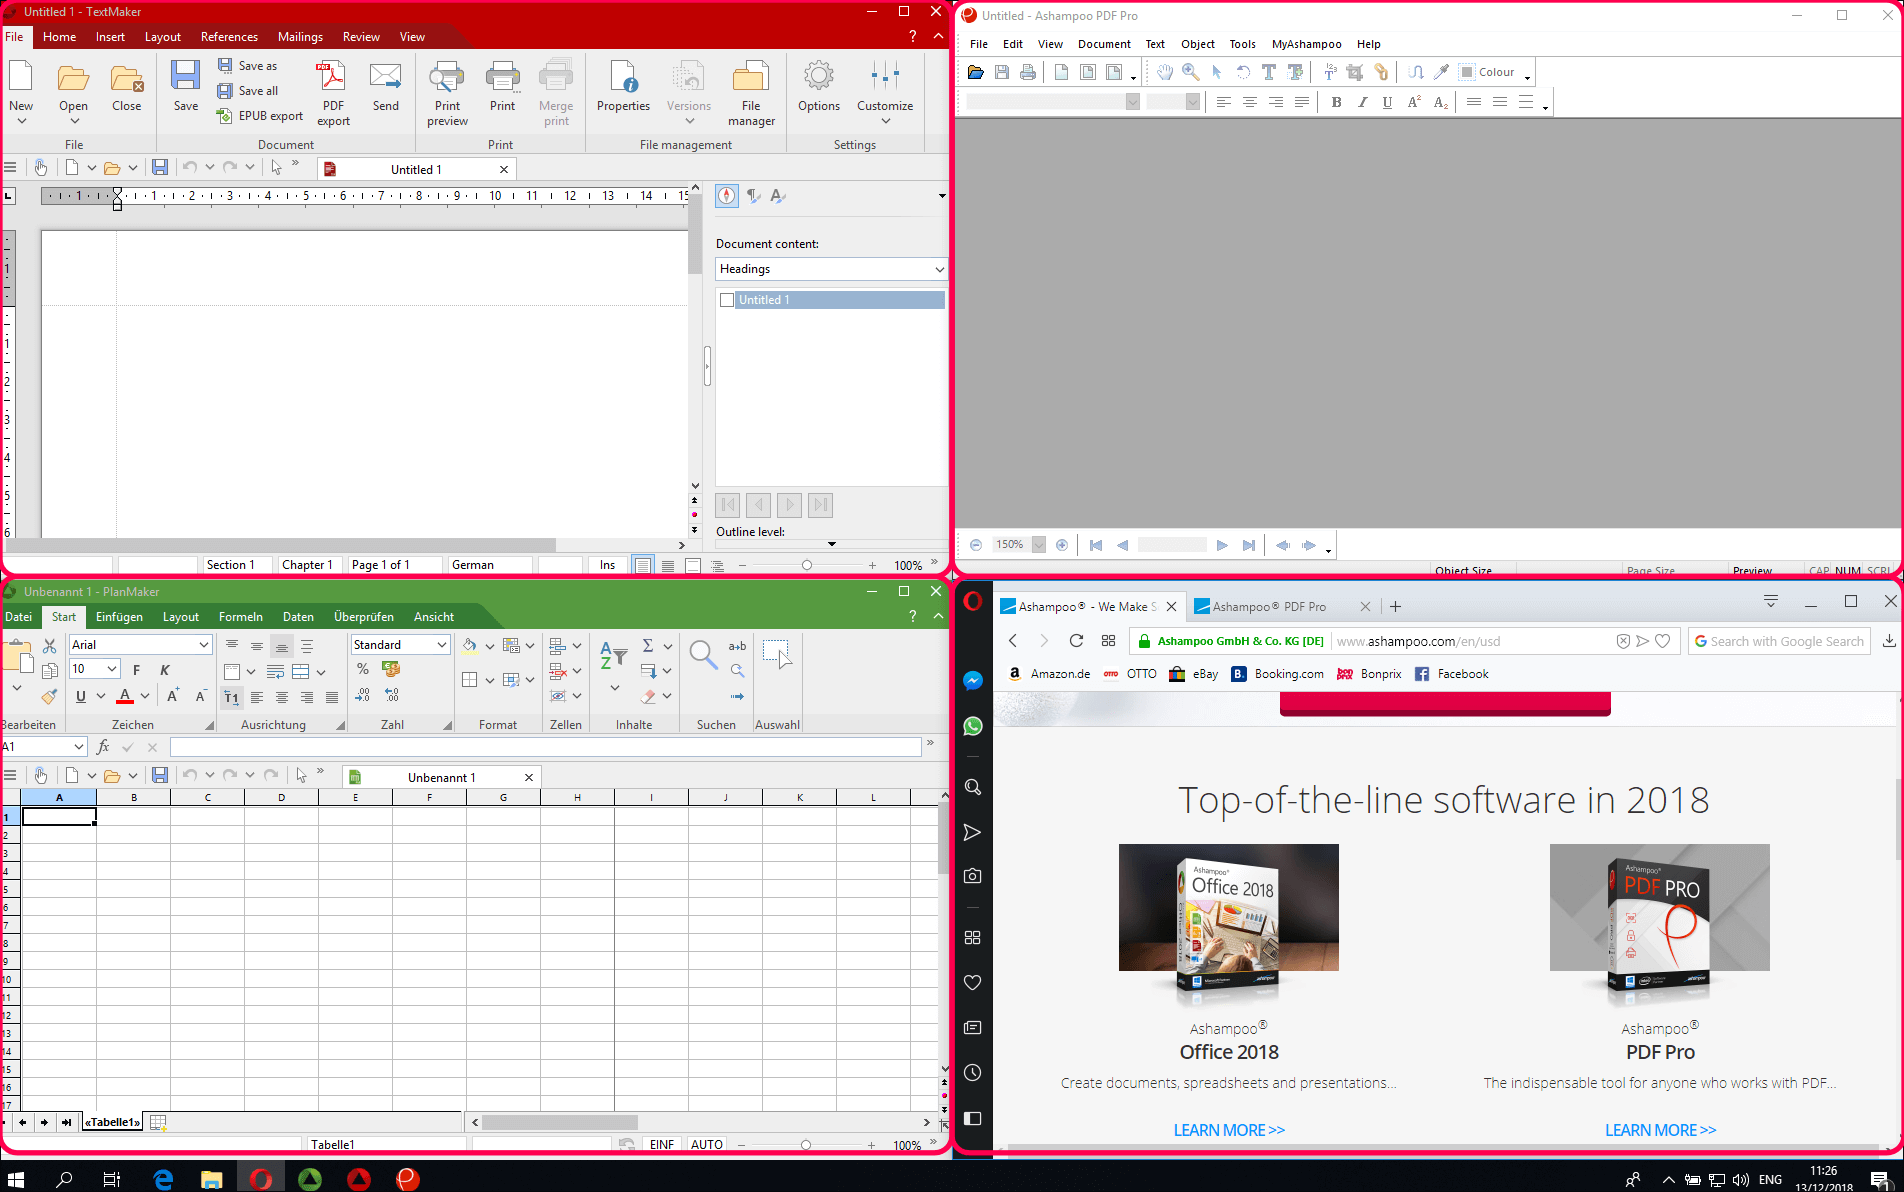
If you have more than one window open at the same time, it makes sense to arrange them in a manner that allows you to see all of them at once. Here’s how.
Activate one of the windows, hold down the Windows key and either hit the left or right arrow key to snap the window to the respective edge on your screen.

Example: [Windows] + [Arrow right]
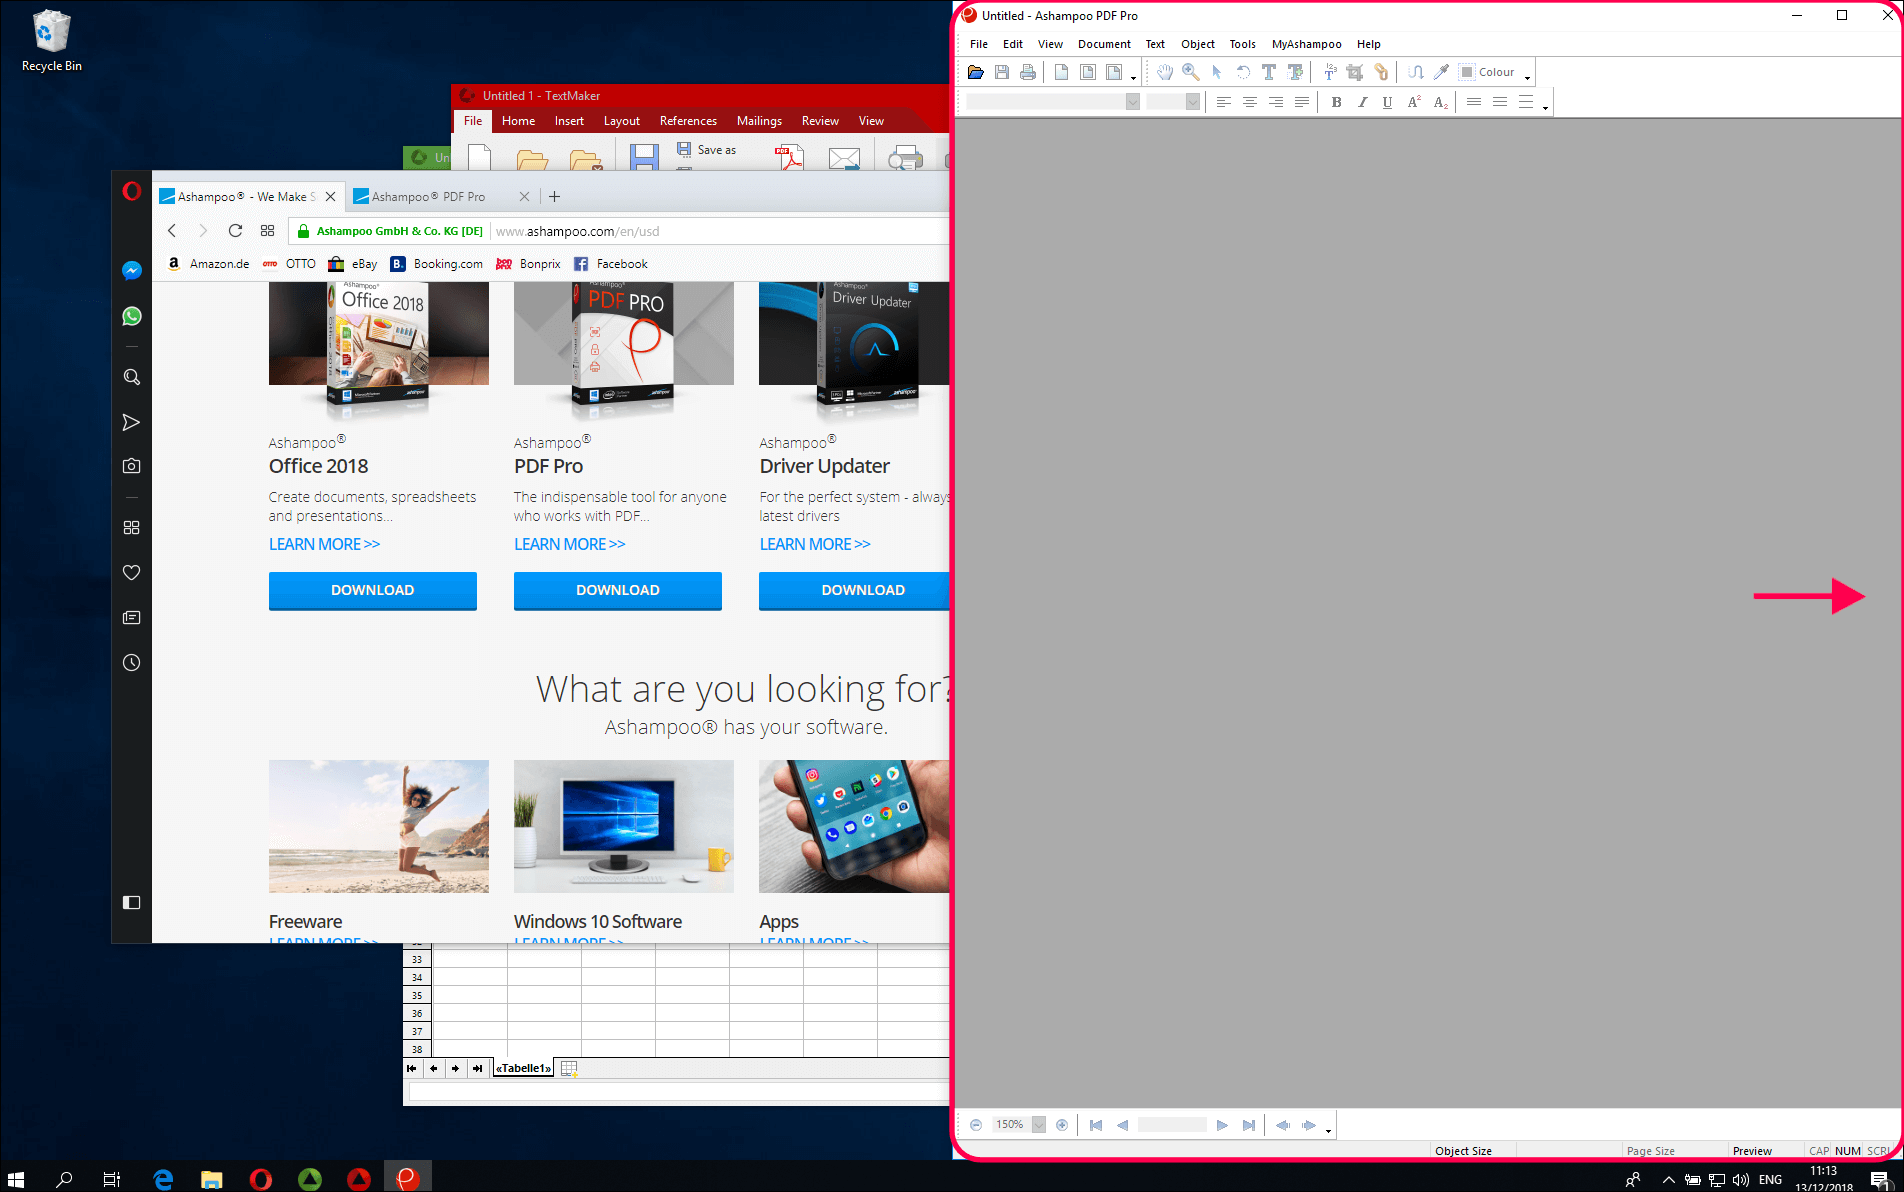
Once docked, Windows will show a preview of all remaining program windows on the opposite side. Left-click to dock one of them to that side.
Afterwards, each of the two windows will occupy half of the screen space.
This works for up to four programs. To dock a window to the top-left corner, hold down the Windows key and hit up followed by left. Repeat this process for the remaining corners.
2. Virtual desktops
Is your desktop cluttered with icons or do you have to many applications open to fit on one screen? Here’s how to create additional virtual desktops that can each hold their own number of icons and applications. Windows 10 doesn’t impose a limit on how many desktops you can create.
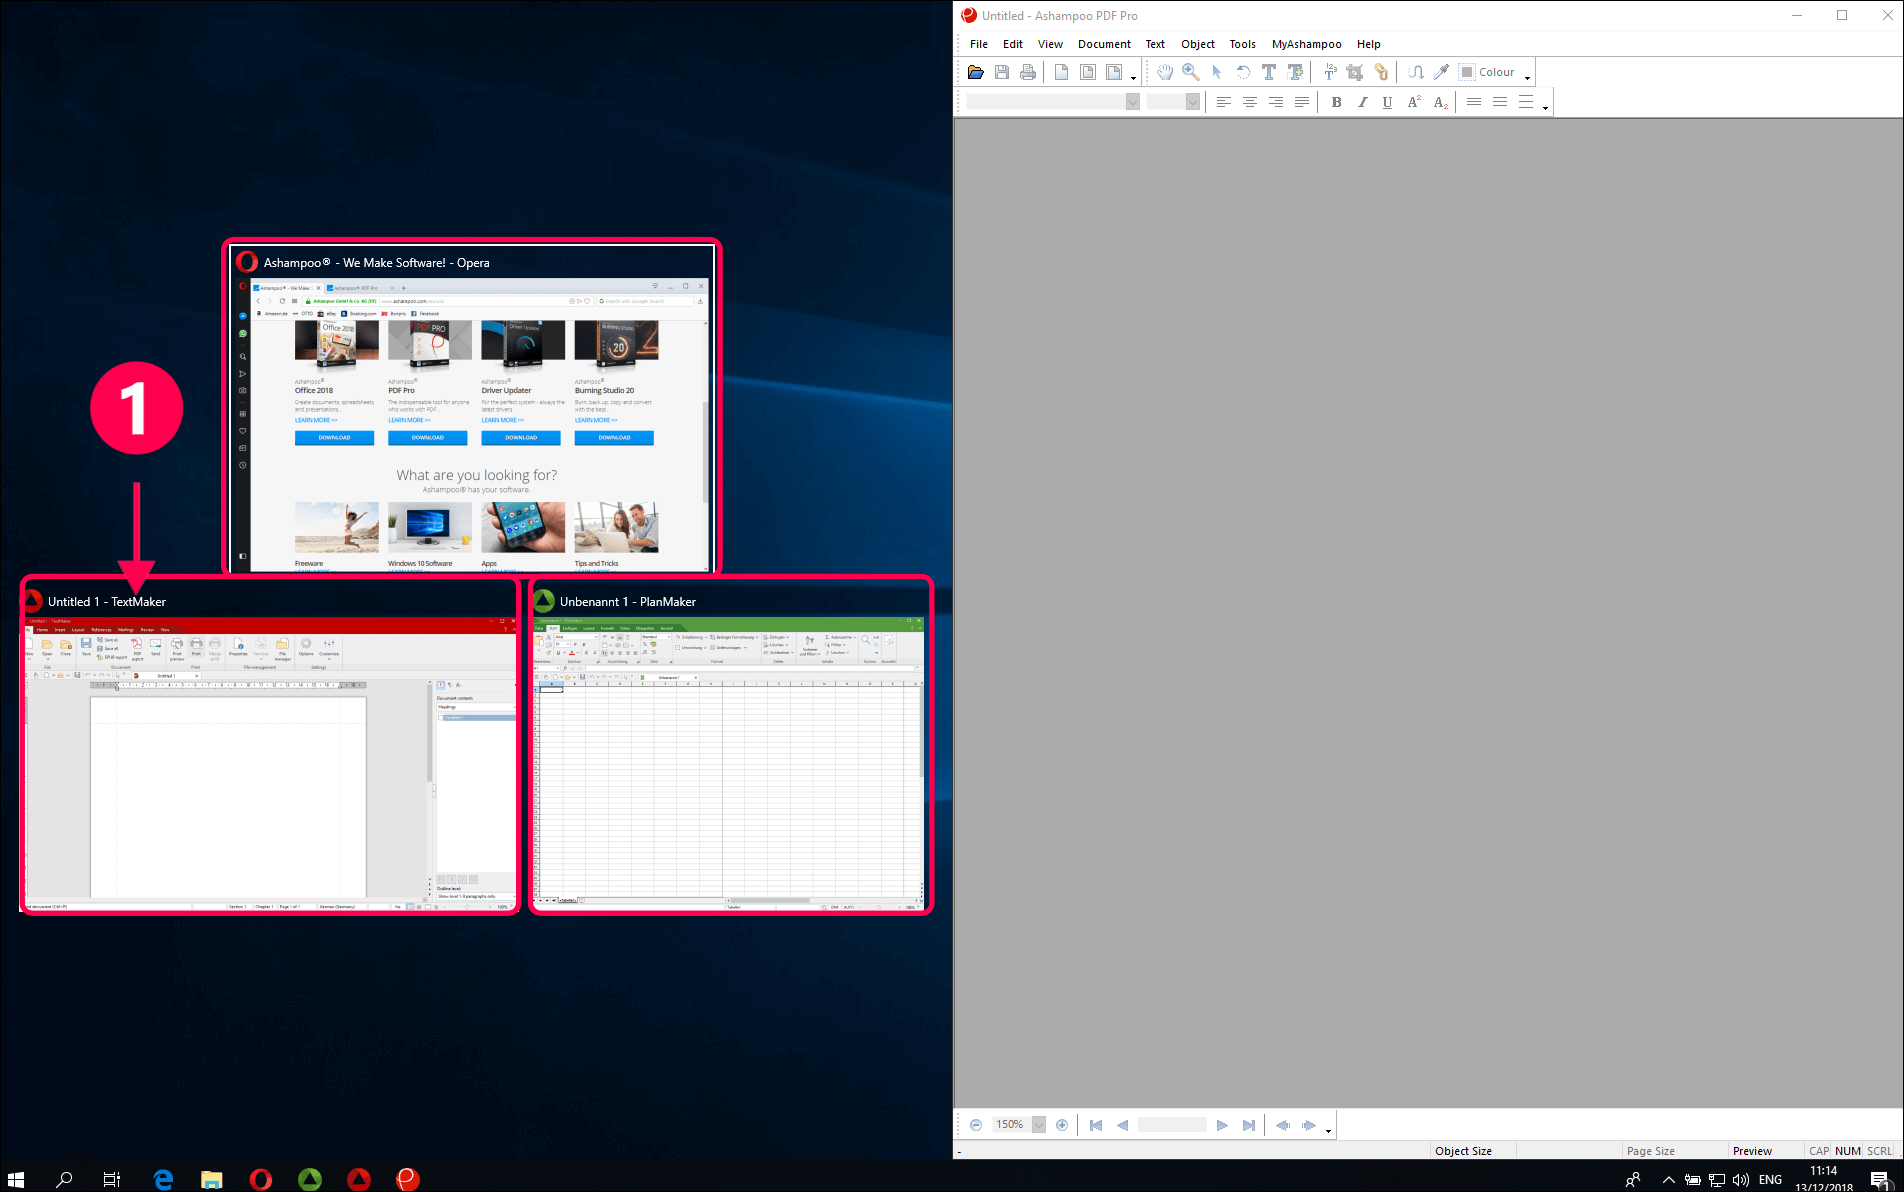
Hit [Windows] + [Tab] to open the application switcher. Then, click «New desktop» (1) to create a new virtual desktop. The application switcher displays all running applications for the currently selected desktop in the center (2).
Alternatively, you can also click the application switcher icon (3) to open the switcher.
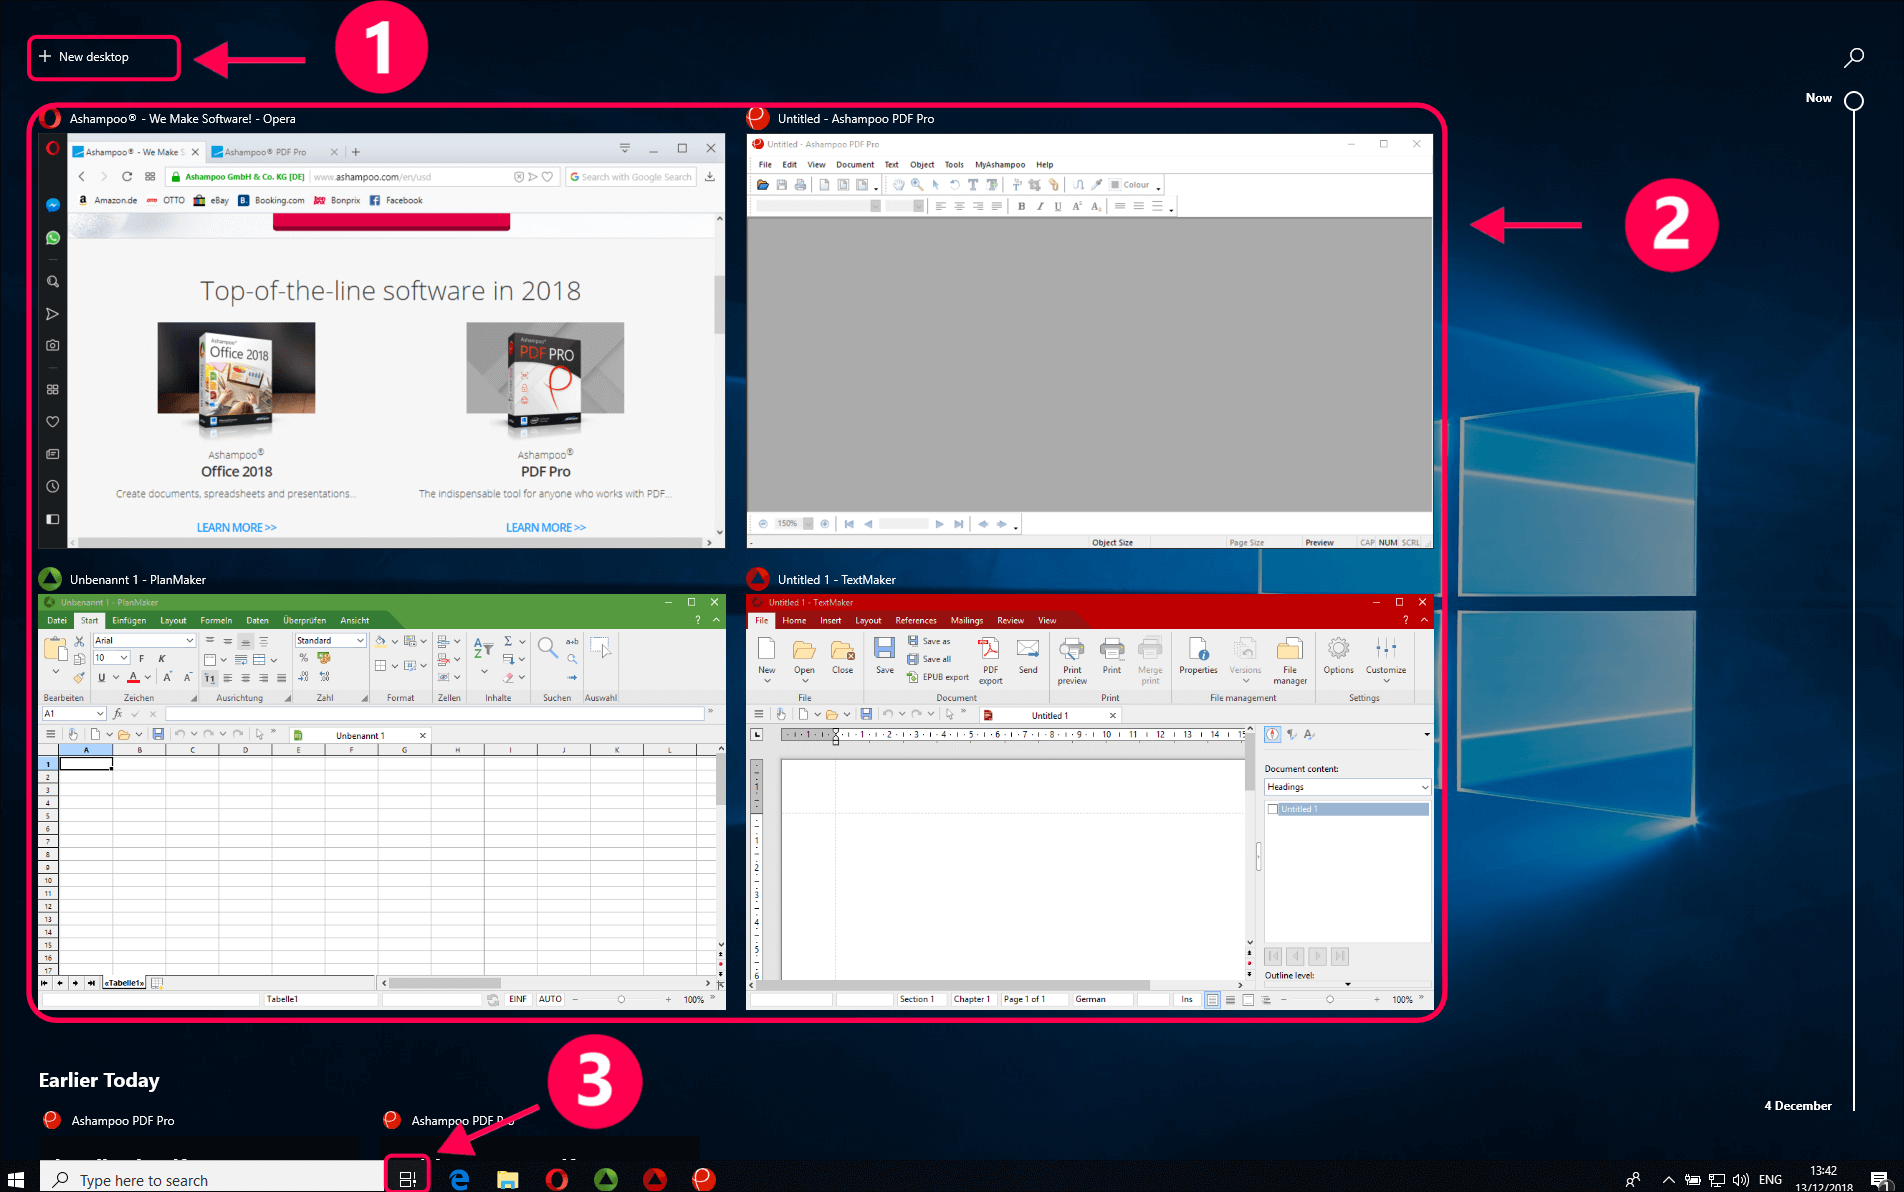
To quickly create a new virtual desktop without going through the application switcher, hit [Ctrl] + [Windows] + [D].
To move a program window to a virtual desktop, open the application switcher ([Windows] + [Tab]) and drag the affected window from the center into one of the desktops at the top. You can move windows between desktops in the same way.
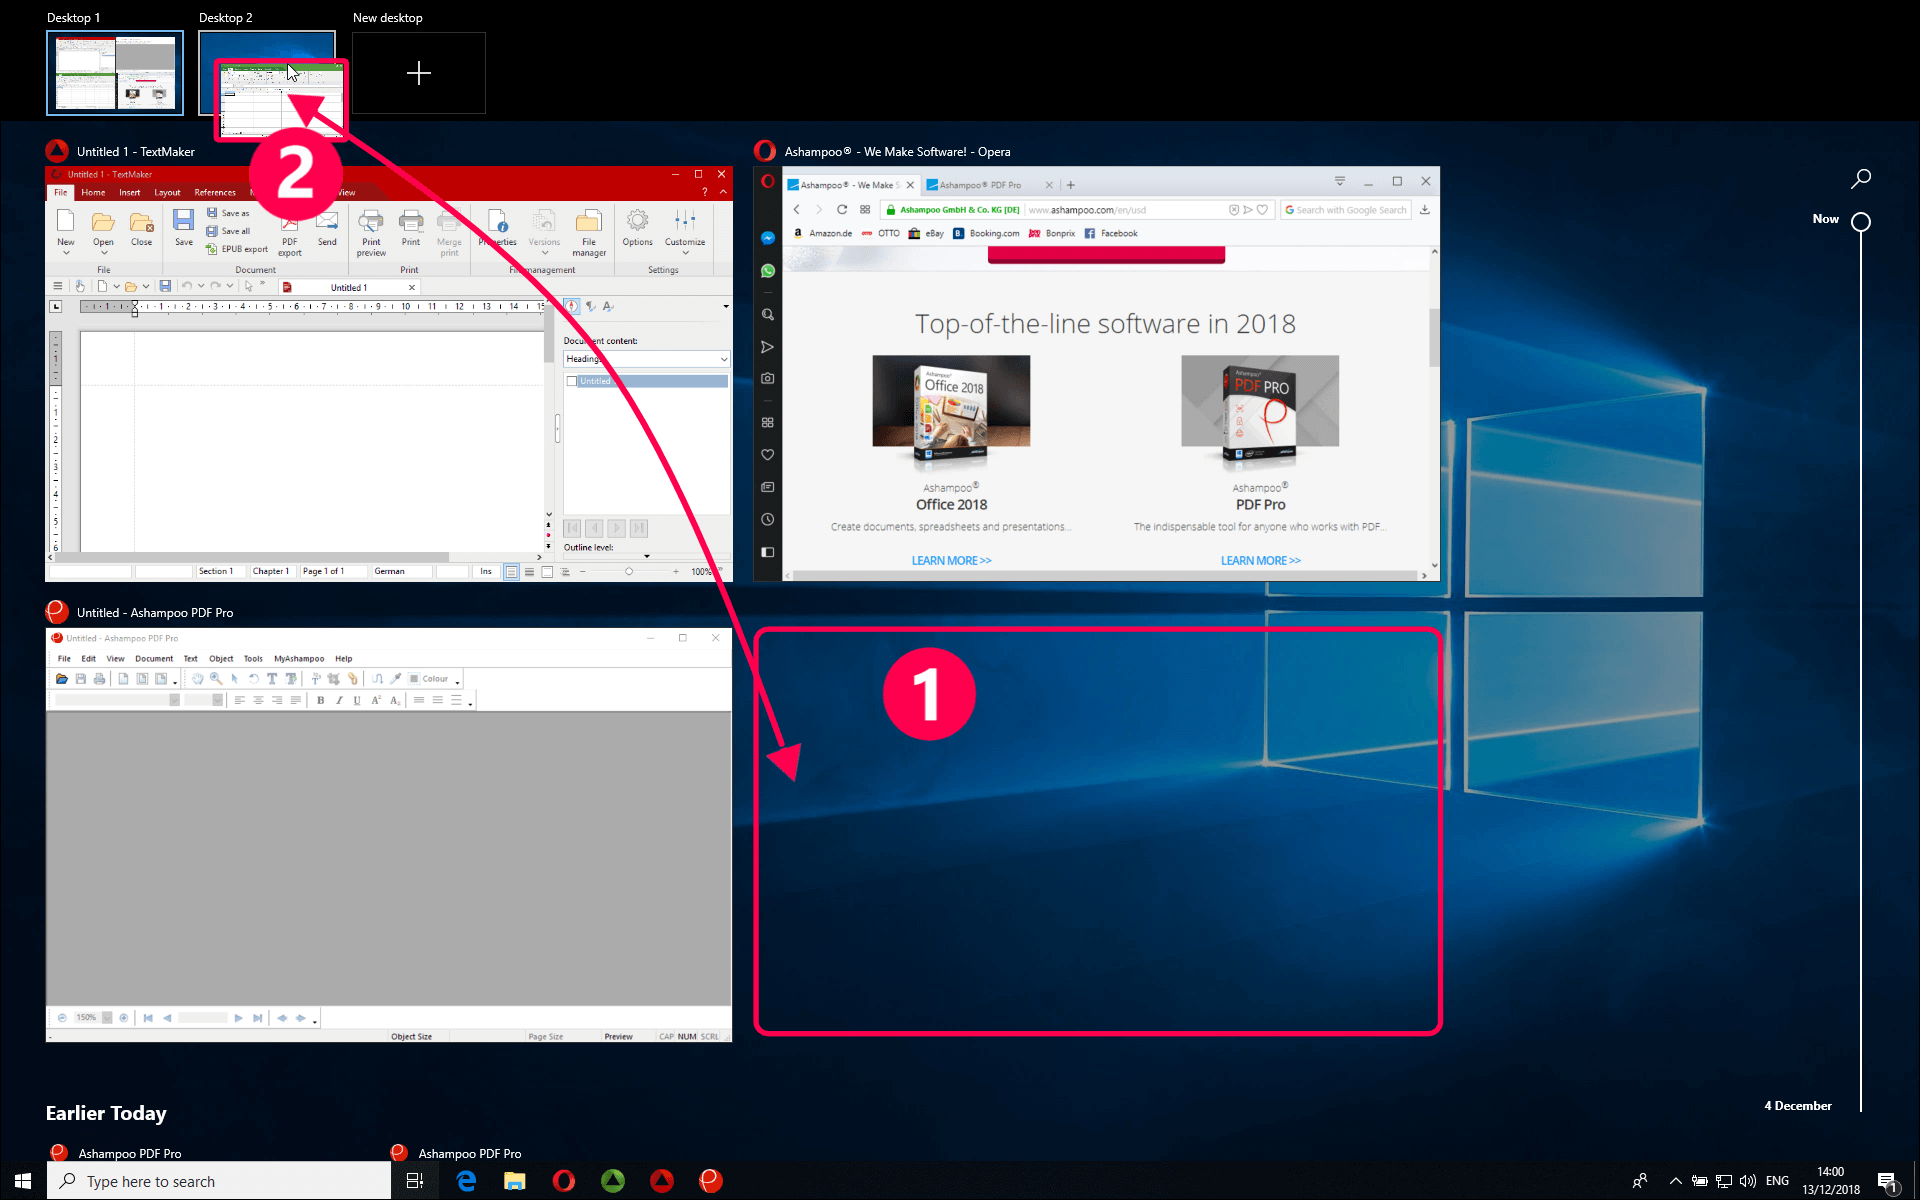
Press [Ctrl] + [Windows] + [Arrow left/right] to switch between the desktops or use the application switcher.
Once you close a desktop through the application switcher (move mouse pointer on the affected entry and click X), the contained program windows will automatically move back to the default desktop, so no document is lost in the process.
3. Address toolbar
The address toolbar is the quickest way to perform online searches or open websites. By default, it will appear behind any shortcuts and running applications. To enable this feature, right-click the taskbar (1) and select «Toolbars» (2) followed by «Address» (3).
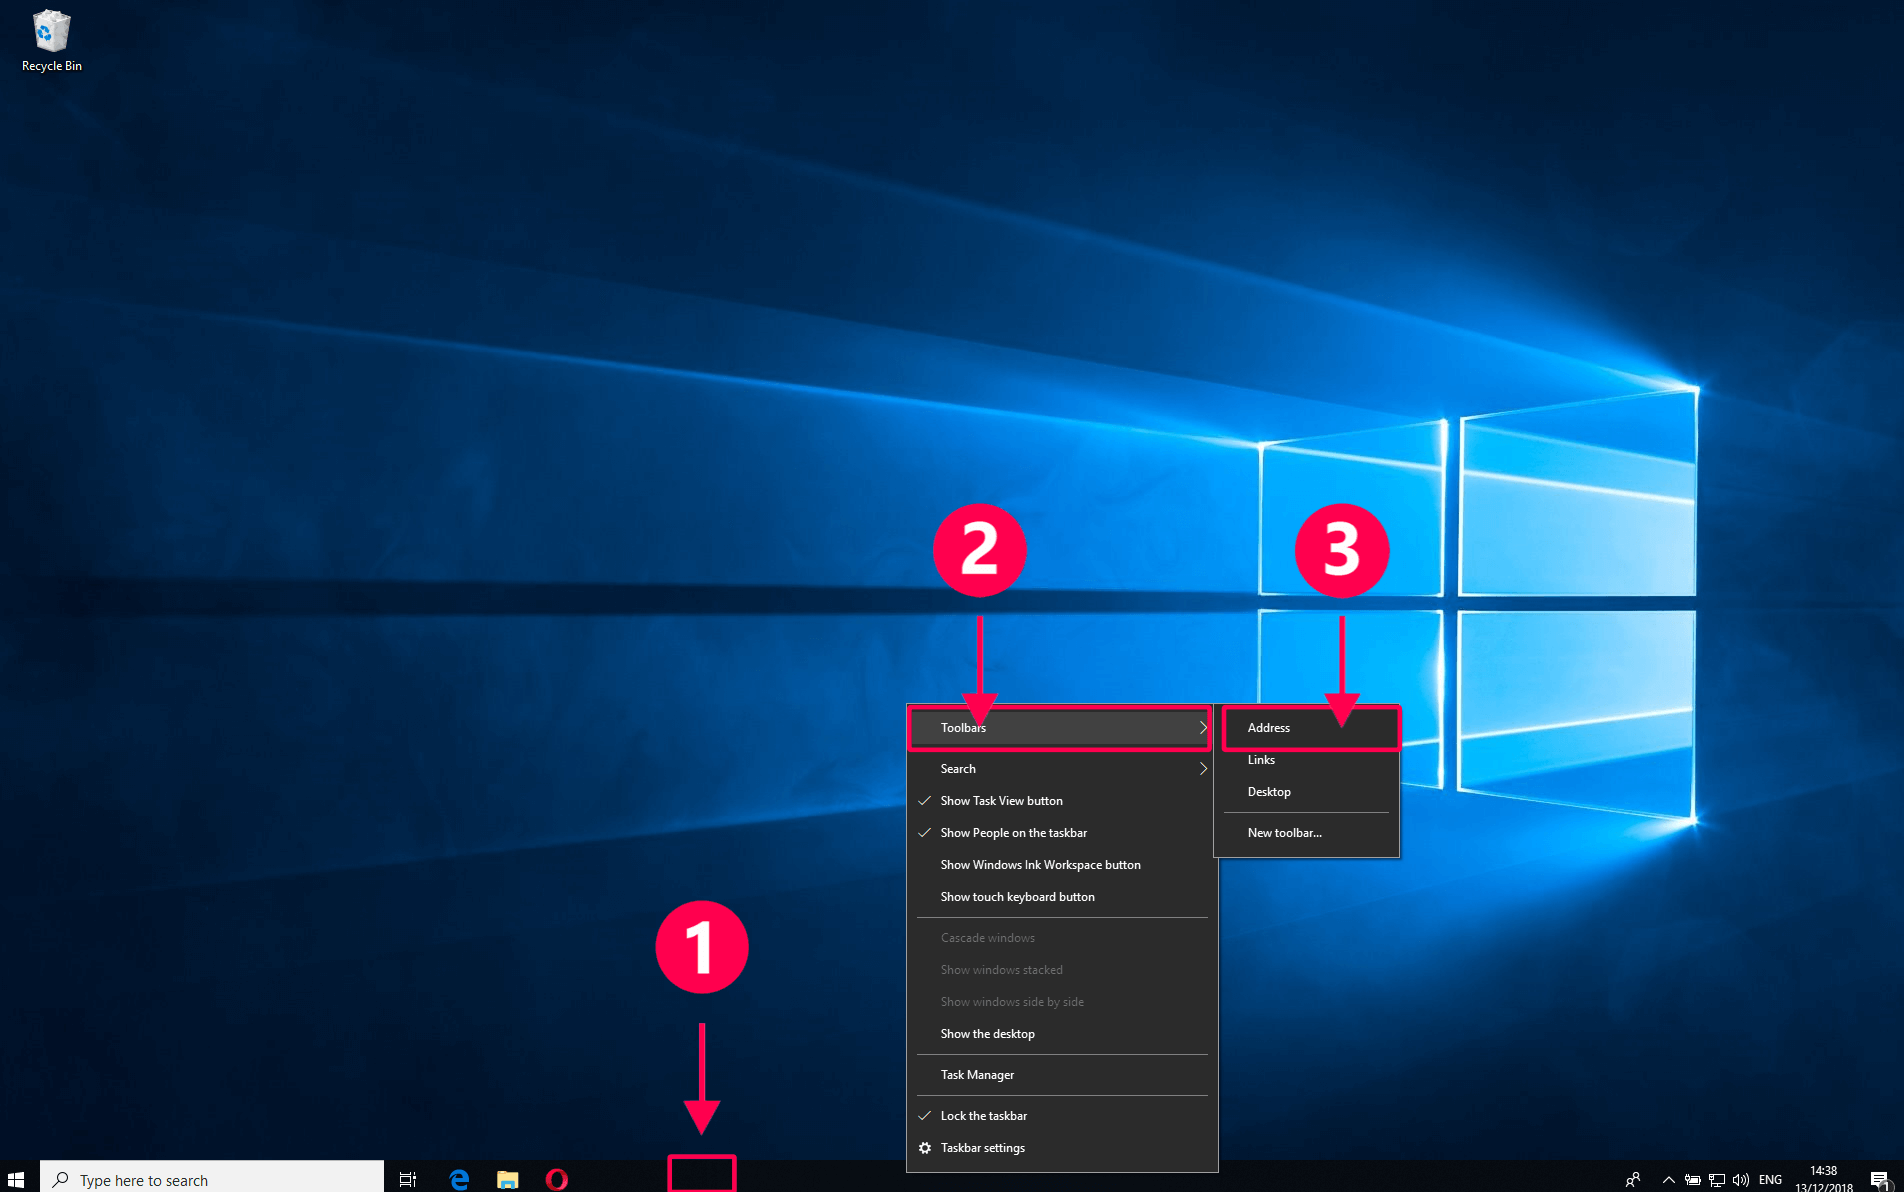
The toolbar not only accepts search queries or URLs but also commands such as «regedit» to open Windows Registry Editor. Note that URLs will always open in the system-default web browser.
As an example, I’ve entered the URL for Ashampoo’s website and enlarged the bar for better readability (1). As soon as I hit enter, the website will open in my default web browser (2).
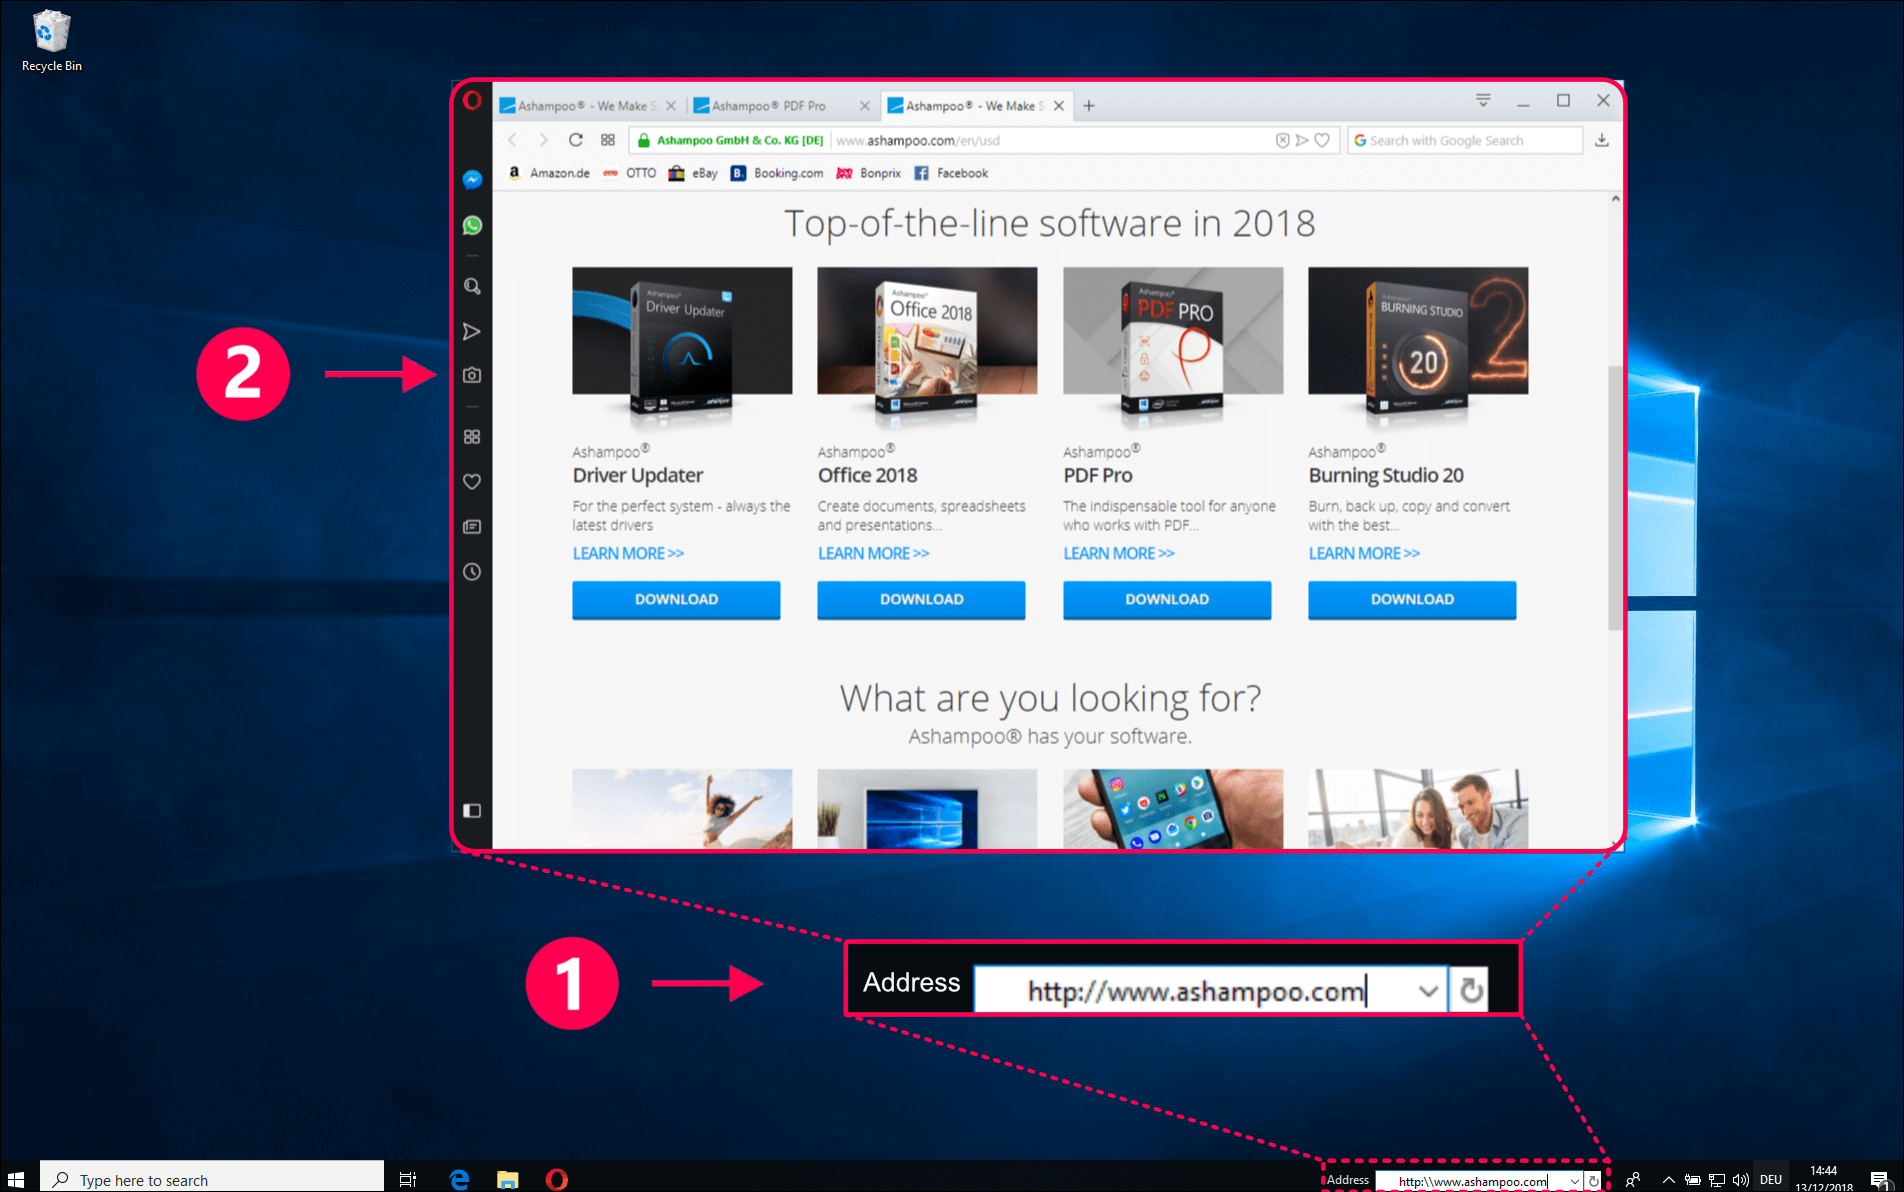
Entering «C:\» (1) will open a directory preview for that drive. Once I select an entry (2), the folder will open in Windows Explorer (3).

4. Taskbar
The Windows taskbar offers many customization options. One of them is the ability to only show the taskbar when the mouse pointer is at the bottom edge of the screen. This way, it won’t constantly take up screen estate.
To enable this feature, right-click the taskbar (1) and select «Taskbar settings» (2).
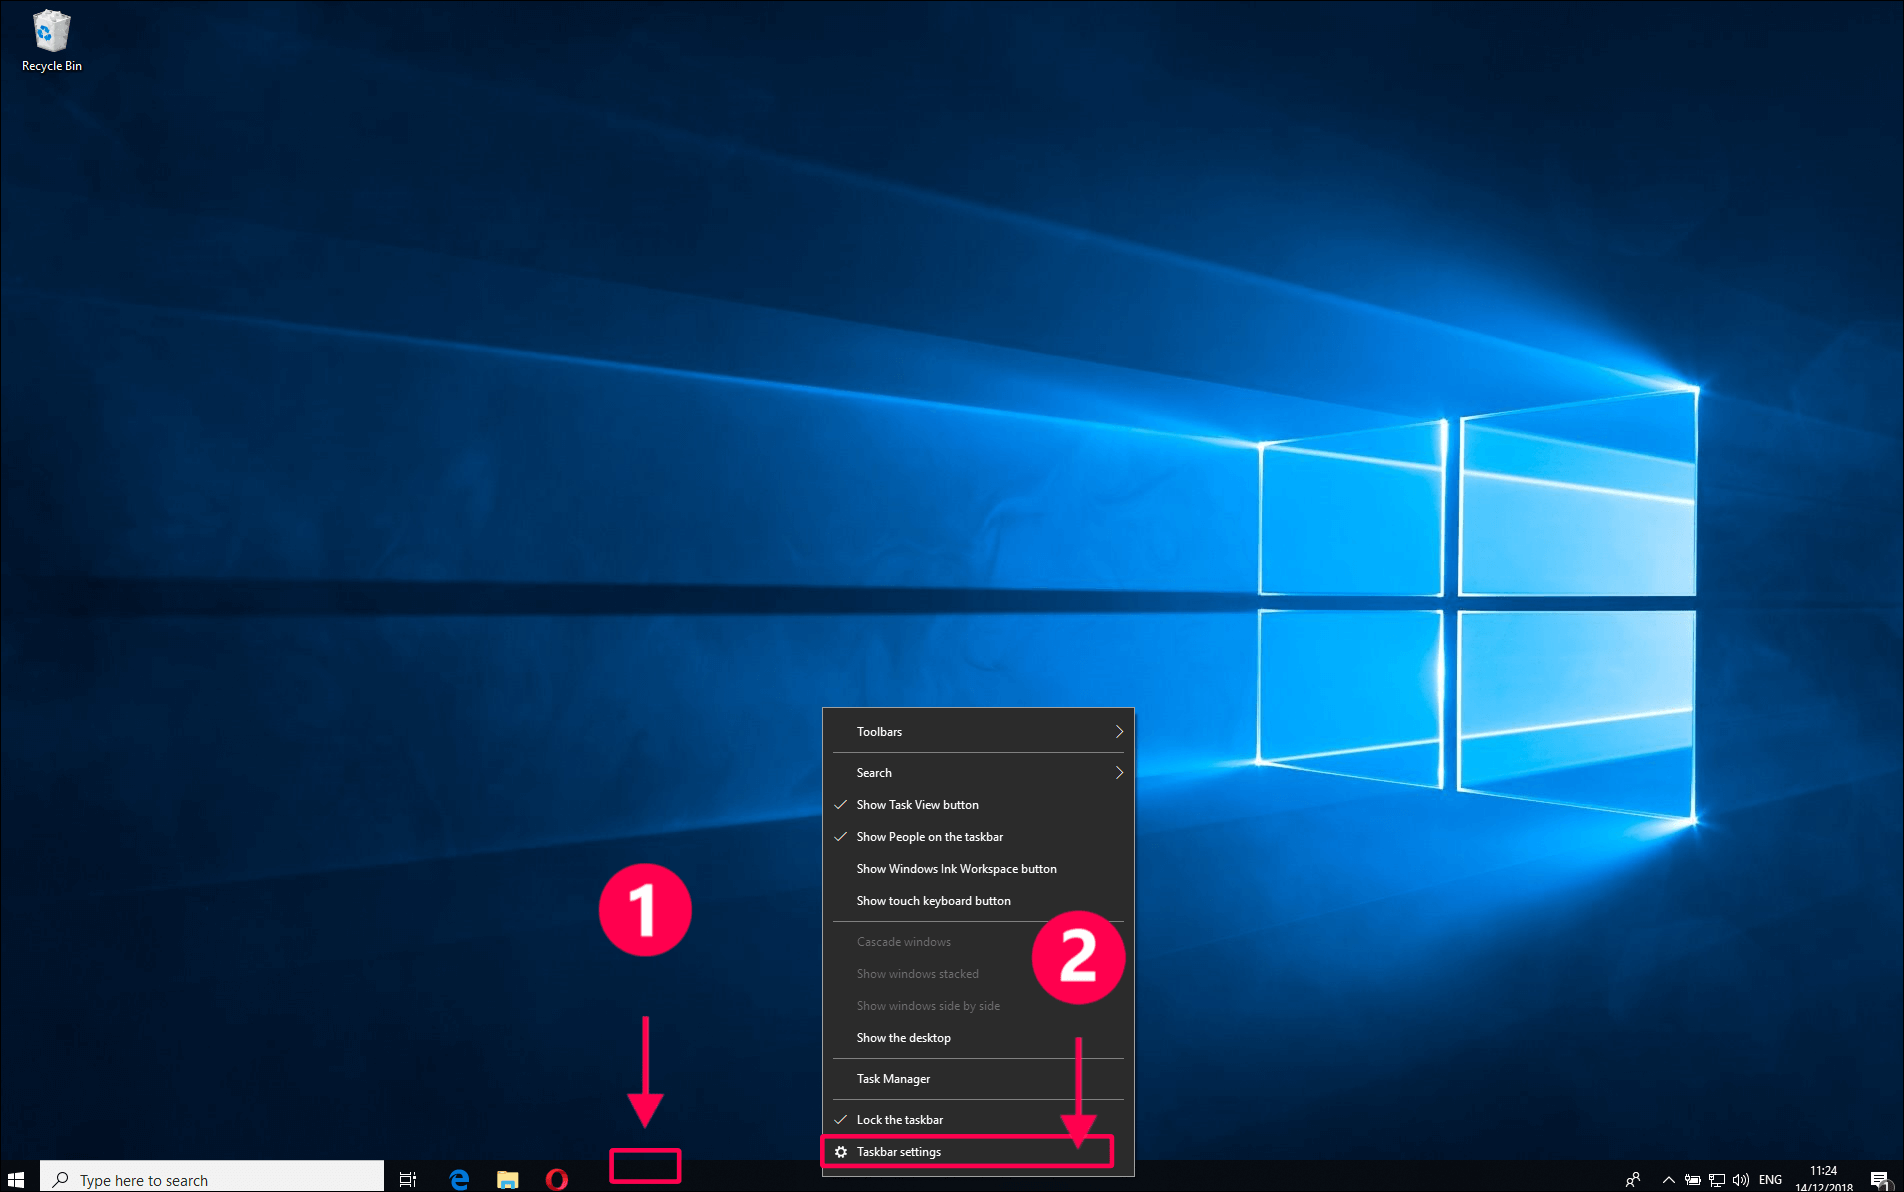
Then, enable «Automatically hide the taskbar in desktop mode» (1). The taskbar will now stay hidden until the mouse pointer approaches the bottom edge of your screen.

5. GodMode
Windows contains many powerful features not easily accessible. Enter GodMode. This mode has been around since WIndows 7 and provides quick access to multiple system features. Here’s how to activate it.
First, switch to your desktop by pressing [Windows] + [D]. To enable GodMode, the new folder must be named:
You can ideally select the name above and hit [Ctrl] + [C] to copy it to the system clipboard. Then right-click the desktop to open the context menu (1) and select «New» (2) followed by «Folder» (3).
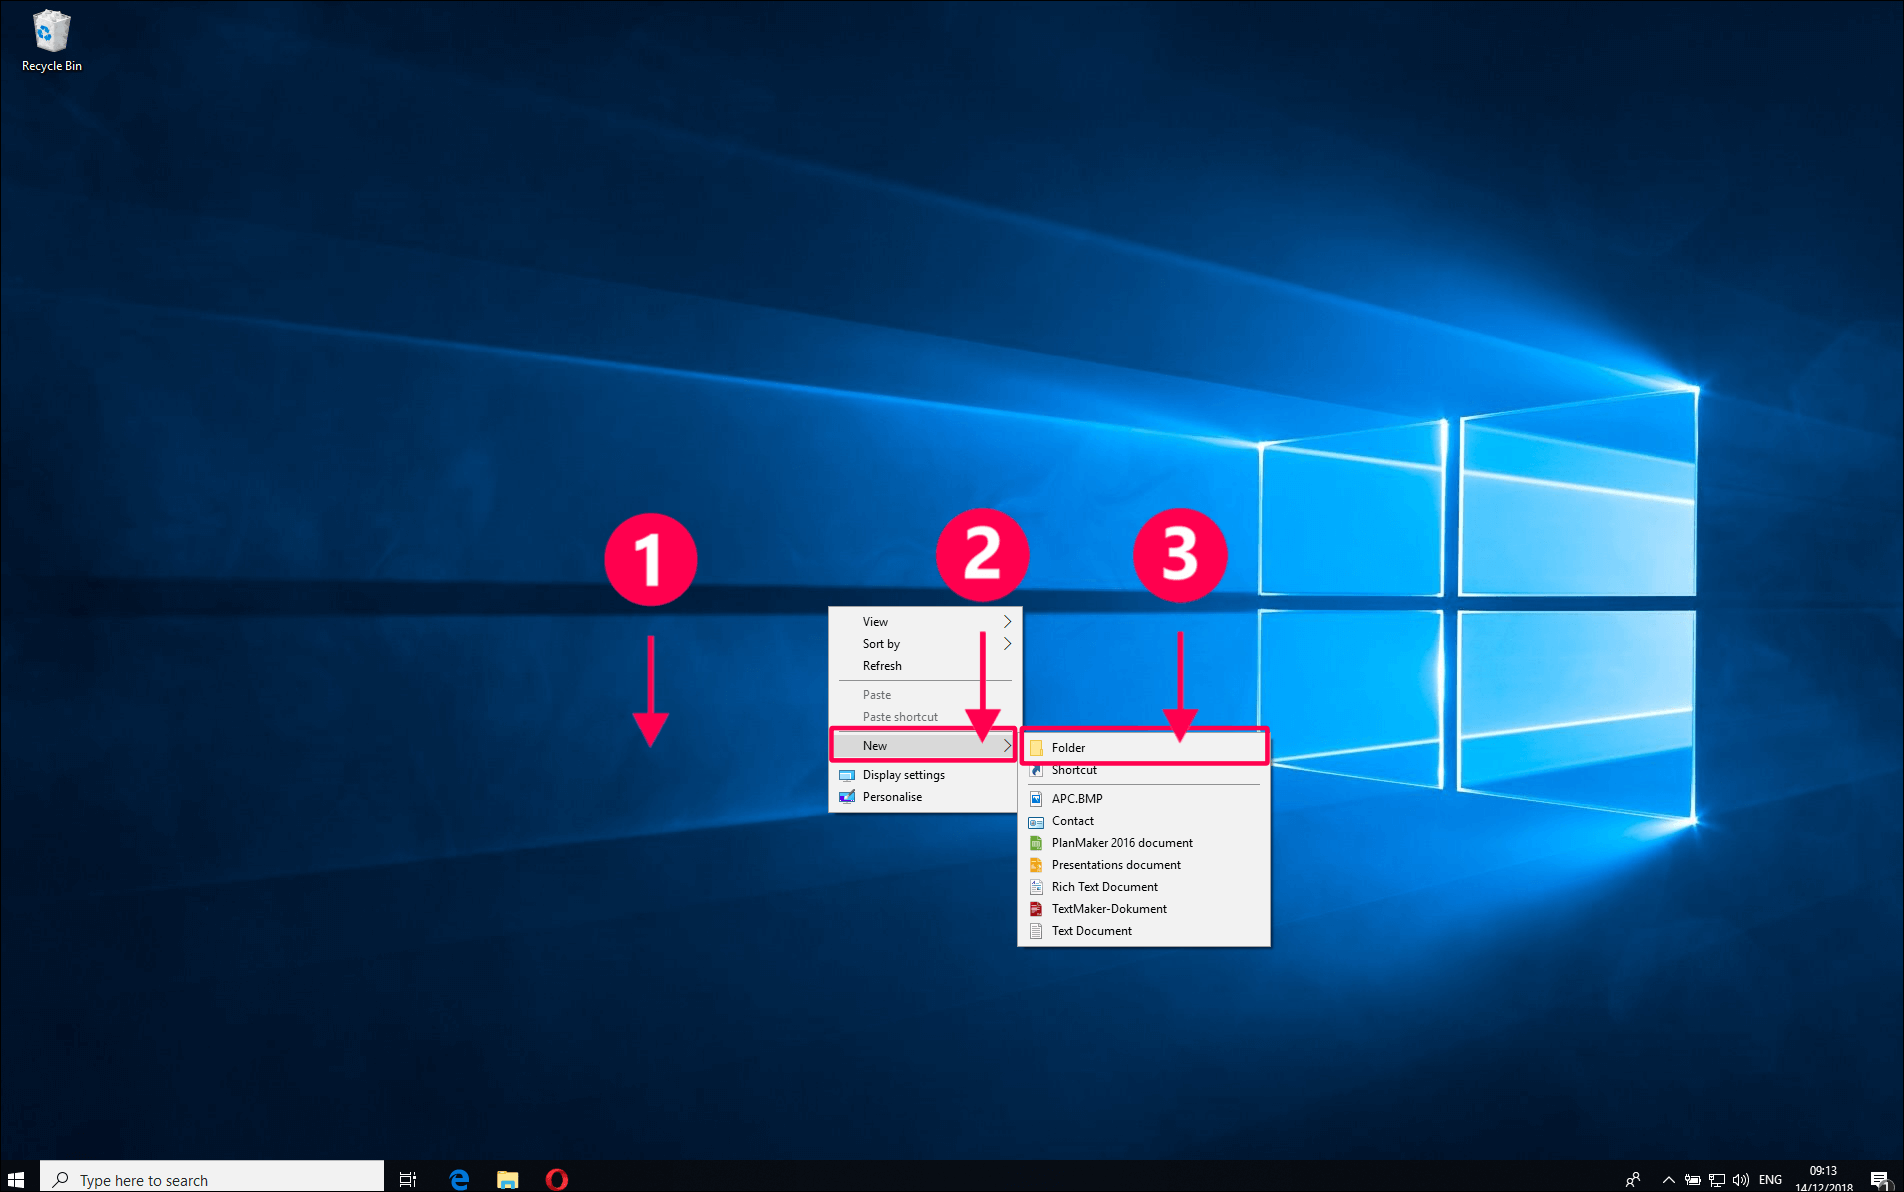
Hit [Ctrl] + [V] to use the name you just copied for the new folder.
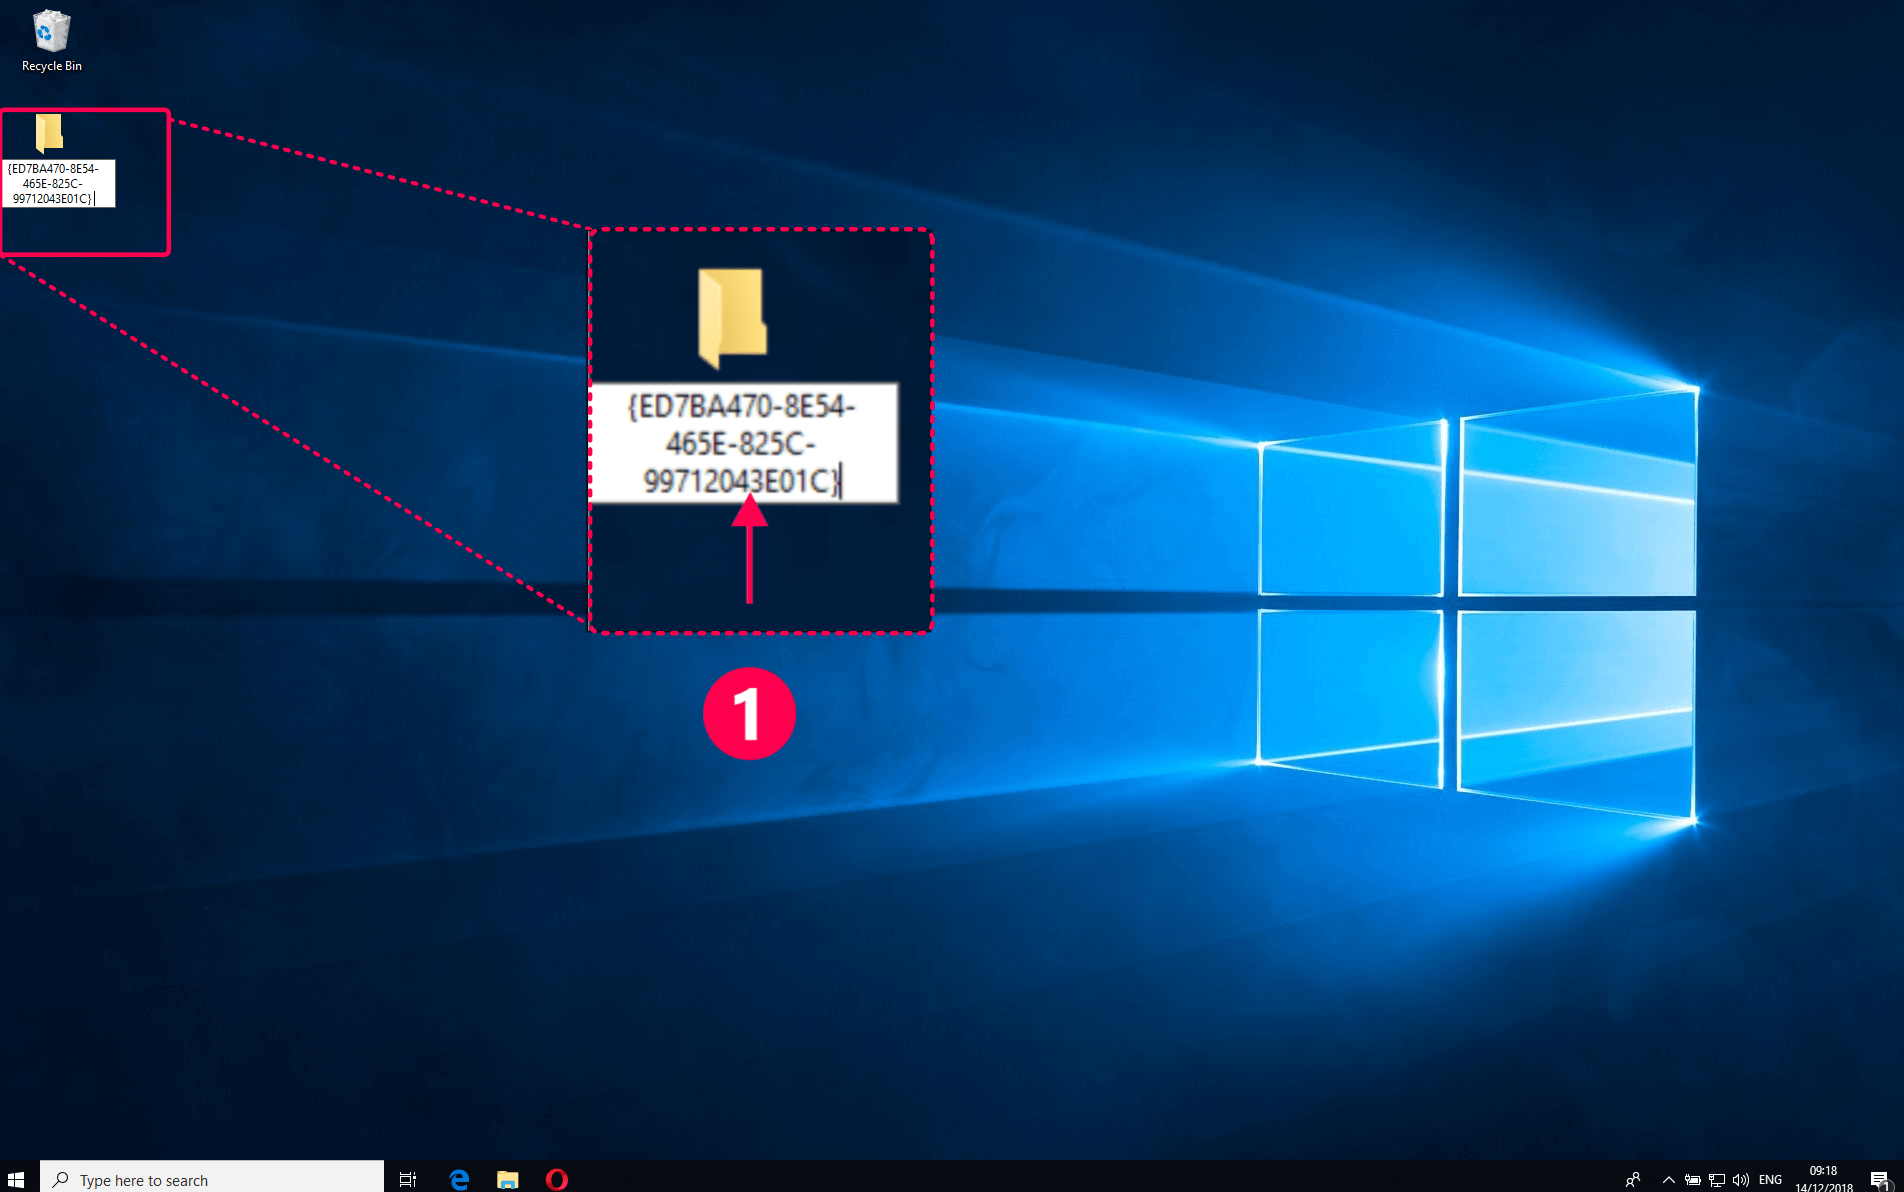
Press the Enter key to complete your input. If done correctly, Windows will then assign a new icon to the folder (1).
You can now double-click the folder to access a compilation of around 250 Windows 10 settings, neatly stored in one place.
Like any other folder, the new folder is searchable. Once open (1), you can use the text field to search for a setting. In this example, I’ve searched for «display» (2) to list all related settings.
Hidden Tricks Inside Windows 10
Windows is a vast operating system with plenty of features you might never stumble upon. Make the most of Windows 10 with these expert tips.


Microsoft Windows isn’t any one thing; it’s an interwoven patchwork of tools built atop features that trace back to the beginning of the time-tested operating system.
With such a complex piece of software, it makes sense that there are little tricks and UI flourishes most people don’t even know about. Maybe you haven’t poked around Windows 10 too much after coming over from Windows 7, or perhaps you recently made the switch from a Mac. Well, it’s time to understand all the secret Windows 10 has to offer.
We have compiled a list of useful tips that will help you get more out of your Windows 10 experience. Or, at least, teach you some things you may not have known about. Some have been available in Windows for a number of generations, while others are native to Windows 10.
Microsoft’s most recent update for the OS arrived in May, introducing a bunch of new features with Windows 10 version 2004. So there are plenty of ways to make the most of a constantly evolving Windows experience.
Secret Start Menu
If you’re a fan of that old-school (i.e. non-tiled) Start menu experience, you can still (sort of) have it. Right-click on the Windows icon in the bottom-left corner to prompt a textual jump menu with a number of familiar destinations, including Apps and Features, Search, and Run. All these options are available through the standard menu interface, but you’ll be able to access them quicker here.
Similarly, there’s a lot you can do with the Windows 10 taskbar. Right-click on the taskbar for a handy menu that will allow you to quickly access a number of presets for the toolbars, Cortana, and window schemes.
Want to personalize those Start menu tiles? Right-click on them to prompt a pop-up menu. This menu will give you various options, like the ability to un-pin from the Start menu, resize the windows, or turn that live tile off.
Show Desktop Button
Dating back to Windows 7, the Show Desktop button is a handy little feature. On the bottom-right corner of the desktop is a secret button. Don’t see it? Look all the way to the bottom and right, beyond the date and time. There you’ll find a small little sliver of an invisible button. Click it to minimize all your open windows at once.
There’s also the option to have windows minimize when you hover over this button versus clicking. Select your preference in Settings > Personalization > Taskbar, then flip the switch under «Use peek to preview the desktop.»
Enhanced Windows Search
If searches are taking too long in Windows, you can narrow things down a bit thanks to the May 2020 Update. Under Settings > Search > Searching Windows set search to Classic, which only applies to Libraries and Desktop, or choose Enhanced indexing to search the whole computer. A new algorithm also helps Windows adjust when it’s working, using less resources while gaming or when disk usage is over 80 percent.
Shake Away the Mess
This feature actually debuted in Windows 7, but many people don’t know about it or use it (but they should—it’s cool!). If you have a display full of windows, clear the clutter by grabbing the top of the window you do like and «shaking» it to minimize all the other windows. Suddenly having shaker’s remorse? Shake again and the windows will come back.
Rotate Your Screen
If you use multiple displays, this feature allows you to orient a particular monitor to fit your needs. The quickest way to do this is to simultaneously press and hold Ctrl + Alt together, then use a directional arrow to flip the screen. The right and left arrows turn the screen 90 degrees, while the down arrow will flip it upside down. Use the up arrow to bring the screen back to its normal position.
These key commands only work with certain computers, so if you can’t get them to work, you can go through Settings > System > Display, or right-click on the desktop and choose Display Settings to get there faster. Choose an option from the Display Orientation drop-down menu to turn your page around in all sorts of ways.
Enable Slide to Shutdown
This trick is complicated and probably not worth the effort for what you get out of it, but you can use it to slide your computer to the off position. Right-click on the desktop and select New > Shortcut. In the ensuing pop-up window, paste the following line of code:
This creates a clickable icon on your desktop, which you can rename. Right-click the file and enter Properties to add a shortcut key or double-click the file to tun the program. This prompts a pull-down shade to appear, which you can drag with the mouse down to the bottom of the screen. Keep in mind, this is shutdown, not sleep.
Enable ‘God Mode’
Are you a power user who wants access to your PC’s nitty gritty? «God mode» is for you. Right-click on the desktop and select New > Folder. Re-name the new folder with this bit of code:
To enter the «God Mode» window, double-click the folder and go nuts.
Drag to Pin Windows
This feature was available as far back as Windows 7 but has some extras in Windows 10. Grab any window and drag it to the side, where it will «fit» to half the screen. You also have the option of dragging the window to any corner to have the window take over a quarter of the screen instead of half.
If you’re using multiple screens, drag to a border corner and wait for a prompt signal to let you know if the window will open in that corner. You can prompt similar behavior by using the Windows key plus any of the directional arrow buttons.
Quickly Jump Between Virtual Desktops
Do you like to multitask on your PC? In Windows 10, Microsoft finally provided out-of-the-box access to virtual desktops. So now you can really multitask.
To try it out, click on Task View (the icon next to the search box). This will separate all your open windows and apps into icons. You can then drag any of them over to where it says «New desktop,» which creates a new virtual desktop. This would allow you to, say, separate your work apps, personal apps, and social media into different desktops.
Once you click out of Task View, you can toggle between virtual desktops by pressing the Windows key + Ctrl + right/left arrows. To remove the virtual desktops, just go back into task view and delete the individual virtual desktops—this will not close out the apps contained within that desktop, but rather just send them to the next lower desktop.
While you’re here, you should notice that Windows saves a timeline on all your app activity on this page. You can save up to 30 days of activity when signed in with a Microsoft Account. Click on an activity and open it back like just like the day you were using it.
Customize the Command Prompt
This feature will probably only be useful to a narrow niche of users, but if you like to dig your virtual fingers into the innards of Windows via the Command Prompt, Windows 10 provides a few customization options.
To access the Command Prompt interface in Windows 10, click on the Windows menu and type «Command Prompt» to bring up quick access to the desktop app. Click the icon to open the Command Prompt, then right-click at the top of the window and choose Properties.
This pop-up window allows you to personalize the experience by changing the font, layout, colors, and more of the Command Prompt. You can also turn the window transparent by opening the Colors tab and moving the Opacity slider. This feature lets you code away in the Command Prompt while simultaneously observing the desktop.
Silence Notifications With Focus Assist
Formerly known as Quiet Hours, Focus Assist is a redesigned April 2018 Update feature that gives you greater control over the notifications that pop up on your PC. Head to Settings > System > Focus Assist and then read our full how-to guide for customizing notifications for everything from contacts and apps to task-specific alarms.
Nearby Sharing
In an open document or photo, you can share the file directly with nearby devices the same way Apple’s AirDrop works. Click the Share icon atop your doc or photo toolbar to open the panel, and then click Turn On Nearby Sharing to see which nearby recipients are in range.
Control this feature by going into Settings > System > Shared Experiences to turn Nearby Sharing on and off. You can also set it to share with anyone or only your devices for easy file transfer.
Stop Typing, Start Dictating
Speech recognition has always been a strong suit for Microsoft, but recent Windows 10 releases have made it almost second nature. At any time you can use the Windows Key-H hotkey combination to pop up a box that records your voice through your Windows machine’s microphone and dictates the speech in your current text field. You’ll still need to type manual punctuation, but save yourself some typing by dictating emails, messages, and more.
Dark Mode and Light Mode
Windows 10 gives you a significant amount of control over color themes. Open Settings > Personalization > Colors and you can set the operating system to either dark mode or light mode. These themes change the color of the Start menu, taskbar, action center, File Explorer, settings menus, and any other programs that are compliant with these palette changes.
There is also a custom option that will let you set one theme for Windows menus and another for apps. Want a little more color? There are swatches of color themes available to choose from that can help your menus and taskbars really pop.
Cloud Clipboard
The Windows clipboard had not changed much until the Windows 10 October 2018 Update, allowing you to save multiple items at once and paste across devices. Open Settings > System > Clipboard and turn on Clipboard History to start doing more. Check out our full guide for how to use it.
Revamped Screen Capture Tool
Microsoft introduced a new screen capture tool with the October 2018 Update called Snip & Sketch. The app’s capabilities are far more robust than the simple Snipping Tool, with a screen capture tool to revival the one in recent versions of macOS. Use the shortcut Shift + Windows key + S to choose between rectangular, freeform, window, or full screen snip. You will then find the tool has a built-in image editor separate from Microsoft Paint.
Test Files and Apps in the Sandbox
Windows 10 Pro users have an extra asset to protect them against dangerous apps and files. If you enable Windows Sandbox inside the Control Panel, it will create a virtual instance of Windows inside Windows. You can then safely open anything you’re not sure about before introducing it to your actual Windows installation. Once you close out of Sandbox, everything inside it goes away without hurting your computer.
Hidden Game Bar
Using the Windows key + G command, you can pull up the new-and-improved Game Bar. This lets you switch your Windows PC into gaming mode (which pools system resources to the game, turns off notifications, and lets you record and broadcast your gaming), along with added panels for controlling your audio, monitoring FPS, and tracking achievements.
You can also go to Settings > Gaming and configure custom keyboard shortcuts for turning your microphone, screen capture, recording timer, and more on and off while gaming. And be sure to check out our roundup of the Best PC Games.
Press Pause On Updates
We all know updates are important. They give your OS the latest features, security patches, and more. But sometimes you just want Windows to leave you alone without those incessant pop-ups. With the May 2019 Update, go to Settings > Updates and Security > Windows Update and you can pause upcoming feature updates. Options vary based on which version of Windows 10 you have (Home vs. Pro), but here’s a rundown.
Cloud Reset
Microsoft introduced a new cloud-based reset feature that should help users when Windows crashes. If there’s no recovery drive or USB drive to reset the operating system, you can do it remotely. The option re-installs the same version of Windows previously running, but it will still require removing all your apps and personal files. You can find this option under Settings > Update & Security > Recovery.
Unlock Kaimoji and Symbols
Hit Windows Key-Period(.) to pop up an expanded bottom-right menu of emojis, «Kaimoji» characters built from unicode characters, and a wide array of miscellaneous symbols.
Take Measurements
Windows has several built-in apps that may look useless but offer helpful hidden features. For instance, the Calculator app can also calculate the difference between two dates and convert basically any unit of measure, including time, energy, temperature, mass, and even currency.
The Alarms & Clock app can calculate the time difference between two locations, even into the future. Open the app, click the Clock tab, and select the + icon at the bottom to add locations. Click the Compare icon to open a timeline. As you scroll across the timeline, the time changes on the map points, allowing you to keep track of time differences more easily.
View File Extensions in File Explorer
By default, Windows hides file extensions in File Explorer, requiring you to dig into the file’s properties to see if it’s a .jpg or .png file. If you’re someone who frequently needs to look this information up, it might be a good idea to set it so Windows shows you the file extension automatically.
The quickest way to do this is to search «File Explorer Options» in the Windows search bar, then select the Control Panel settings page in the results to open a new window. Select View, then scroll down to the option «Hide extension for known file types» and uncheck the box. Click Apply, and now file types will be listed at the end of all file names inside File Explorer.


