- How to Show Hidden Files in Windows 10
- Option 1 – From File Explorer
- Option 2 – From Control Panel
- Option 3 – Via Registry
- You Might Also Like
- Reader Interactions
- Comments
- Did this help? Let us know! Cancel reply
- Primary Sidebar
- Recent Posts
- Who’s Behind Technipages?
- Hidden and System Files in MS Windows Explorer and Quad-Explorer, (show, hide)!
- It is easy to show hidden and system files in the Explorer view, or optionally to hide them on Windows Desktop and Server OS!
- 1.) . Show hidden and system files or protected 2.) . Optionally, activate the extensions in the individual Explorer under Windows! 3.) . What should I watch out for with activated system files or protected files? 4.) . Activate hidden files and folders in Microsoft Windows Explorer!
- 1.) Show hidden and system files or / and protected!
- 2.) Optionally, activate the file extension and extensions in the Explorer column!
- 3.) What should I watch out for with activated system files or protected files?
- ►► Restore system files ►► Repair Windows 10 by upgrading to Windows 10
- To show or hide the hidden files and folders in Explorer View of Q-Dir, is also possible in the File Manager!
- 4.) . Activate hidden files and folders in Microsoft Windows Explorer!
- How to show File Extensions in Windows 10
- What are File Extensions & how are they useful
- Show File Extensions in Windows 10
- 1] Through Folder or File Explorer Options
- 2] Via Windows File Explorer
- 3] Using the Registry Editor
How to Show Hidden Files in Windows 10
By Mitch Bartlett 10 Comments
By default, Microsoft Windows 10 hides certain files from view when you explore them on your hard drive. This protects important files from being deleted so that the system isn’t damaged. If you’re the geeky type, you’ll want to be able to view all files all the time. Follow these steps to show hidden files.
Option 1 – From File Explorer
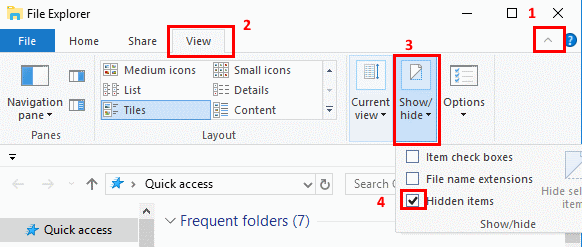
- Select the “Start” button, then choose “File Explorer“.

- Make sure the menu bar is expanded. You can toggle the menu bar by selecting the ^ at the upper right portion of the window.
- Select the “View” tab.
- Check the “Hidden items” check box to view hidden items.
- If you need more file viewing options, select “Options” > “View“.

Option 2 – From Control Panel
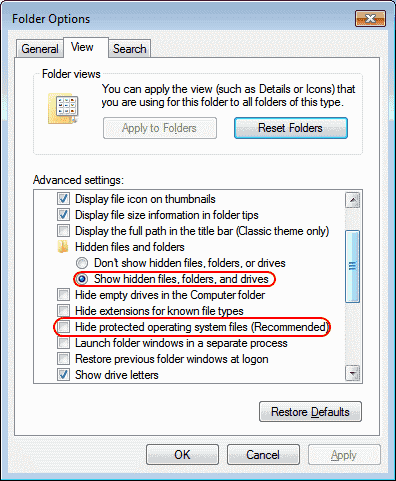
- Right-click the “Start” button, then select “Control Panel“.
- Go to “Appearance and Personalization“, then select “File Explorer Options“.
- Click the “View” tab.
- Scroll down a bit and change the “Hidden files and folders” setting to “Show hidden files, folders, and drives“. Optionally, you may wish to uncheck the “Hide protected operating system files” box as well.
Option 3 – Via Registry
- Hold the Windows Key and press “R” to bring up the Run dialog box.
- Type “regedit“, then press “Enter“.
- Navigate to the following location:
- HKEY_CURRENT_USER
- Software
- Microsoft
- Windows
- CurrentVersion
- Explorer
- Advanced
- Set the value for “Hidden” to “1” to show hidden files, folders, and drives. Set the value to “2” to not show hidden files, folders, and drives.
- Set the value for “ShowSuperHidden” to “1” to show protected operating system files. Set the value to “2” to not show protected operating system files.
You Might Also Like
Filed Under: Windows Tagged With: Windows 10
Reader Interactions
Comments
Kartik singh says
I have nokia lumia 520.
I want to convert it into android.I want to know that after installing the android. Will my sim card work and data connection.
Jan de Vos says
I have reinstalled the USB driver successfully. Though, Samsung dex did not recognize my device.
Neha Singh says
This one worked. Thanks for the guidance. It really helped me alot.
Ok, I just checked this out… here’s an example where the attrib method (below) will show files when the author’s method will not. To illustrate, configure Explorer to show all files as outlined in this article. Then,
1) Open a 2nd Windows Explore and navigate to C:\Users\\AppData\Roaming\Microsoft\Windows\Recent Items
2) Shift select and delete these files (or move them to a temp location; I think advanced “Disk Cleanup” tool will delete as well).
Also, note that all the advanced “show file” setting made earlier are still intact.
Next open a command prompt in the …\Recent Items folder. To do this:
1) Open a 3rd explorer window and navigate *in the left panel* to C:\Users\\AppData\Roaming\Microsoft\Windows
2) With your mouse over the “Windows” folder *still in the left panel*, hold down Left-Shift + Right Mouse Click to get the advanced context menu, click on “Open command window here”
3) In the …\Roaming\Microsoft\Windows> command prompt, key in: “cd recent”
4) Key in …\recent\> attrib *.*
You should see a bunch of files not shown in explorer.
Charles Davis says
The current version of Win 10 looks and works differently, so this just confused me.
I don`t have CurrentVersion in Windows from HKEY_CURRENT_USER, please help me!
No. Unable to change entry. Received notice “Cannot edit Hidden. Error writing the value’s new contents”.
This saved me so much time! Thank you!
This saved me so much time! Thank you!
Did this help? Let us know! Cancel reply
This site uses Akismet to reduce spam. Learn how your comment data is processed.
Primary Sidebar
Recent Posts
Who’s Behind Technipages?
 My name is Mitch Bartlett. I’ve been working in technology for over 20 years in a wide range of tech jobs from Tech Support to Software Testing. I started this site as a technical guide for myself and it has grown into what I hope is a useful reference for all.
Follow me on Twitter, or visit my personal blog.
Hidden and System Files in MS Windows Explorer and Quad-Explorer, (show, hide)!
It is easy to show hidden and system files in the Explorer view, or optionally to hide them on Windows Desktop and Server OS!
1.) . Show hidden and system files or protected
2.) . Optionally, activate the extensions in the individual Explorer under Windows!
3.) . What should I watch out for with activated system files or protected files?
4.) . Activate hidden files and folders in Microsoft Windows Explorer!
As in Microsoft Windows Explorer, so also in Quad Explorer, simply change the settings / options system files, protected folders or the file extensions to recognize this better under Windows 10, 8.1, . and also on MS Windows Server 2019, 2016, . possible!
1.) Show hidden and system files or / and protected!
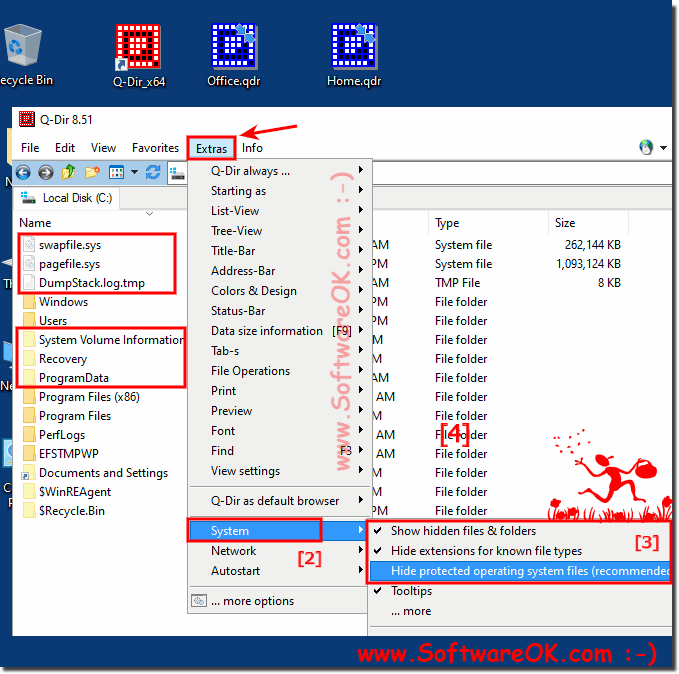
2. Open the main menu ► Extras ► System
3: Simply activate or deactivate:
| (Image-1) In Explorer Hidden and System Files show or hide! |
 |

The solution is, or the instruction is written for Windows 10, but you can also apply it to earlier versions of the Windows operating system, regardless of whether it is a Windows desktop, tablet, Surface GO / Pro, or server operating system.
2.) Optionally, activate the file extension and extensions in the Explorer column!
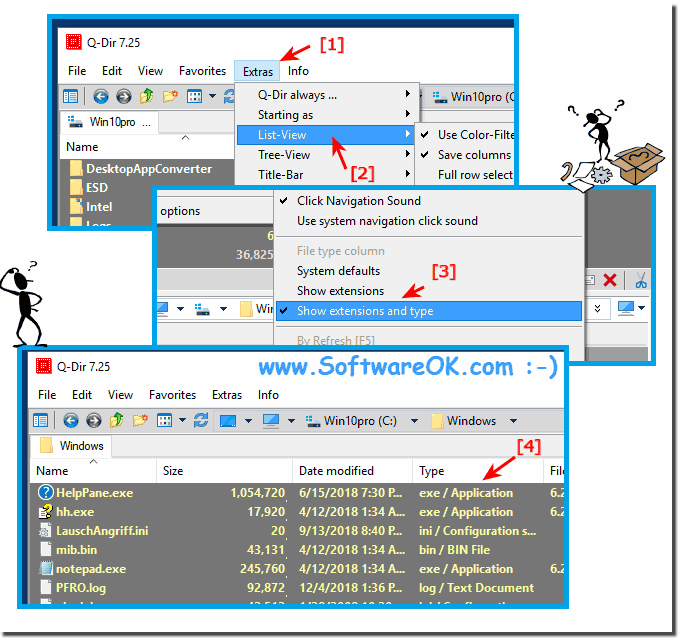
1. Open the «Tools» menu
2. Go to list view
3. Please activate the file extension in the type column
(. see Image-2 Point 1 to 4)
Show extension only or file extension + MS Windows file -Type
PS:
The file extension in the column in the Explorer view under Windows is a popular extension, you can see the file extension much better. As you can see here in the screenshot, even if the file extension under MS Windows 10 is less and less important, it is an important reference point and recognition feature for many users!
| (Image-2) Show the file extension in Explorer Type-Column! |
 |
3.) What should I watch out for with activated system files or protected files?
Please be careful with the hidden files under Windows 10, 8.1, . and other MS Server OS!
With all Windows operating systems, the protected system files can be displayed in no time at all. Please note, however, that some of these files are not
inherently hidden for no reason. If incorrect changes, deletions, renaming of system necessary files are made without knowledge of the Windows system, there may be problems with the system or execution of programs or system failures!
►► Restore system files ►► Repair Windows 10 by upgrading to Windows 10
To show or hide the hidden files and folders in Explorer View of Q-Dir, is also possible in the File Manager!
Like any operating system, Windows keeps some of its files hidden. The developers of Microsoft did this so that users could not accidentally delete or modify important system files, so be careful with the hidden files under windows also in Q-Dir Explorer.
However, there are occasional situations where access to hidden system folders and files is simply necessary. It’s also worth adding that Windows protects files from prying eyes and user folders with files to protect privacy. To hide and display hidden and system files in the Windows operating system.
4.) . Activate hidden files and folders in Microsoft Windows Explorer!
Please open via the Windows 10 Control Panel the Folder Options now File Explorer Options .
(. see Image-1 Arrow-1 to 3)
1. Click on the View tab (. see Image-1 Arrow-4)
2. And set the corresponding check mark the Show hidden files, folders and drives
Here, several options are available, see: Advanced Options files and folders!
How to show File Extensions in Windows 10
File Extension is that which identifies the file type. If you are a regular Windows user, then it is not at all a problem to identify the file type. For it is very important to see file extension to identify the type of file you are trying to open from a security point of view. So in this post, we will see how to hide or show File Extensions in Windows 10/8/7 and why you should show them.
Since file names allow you to use multiple full stops, the real name of a malware file could be realword .docx.exe . But because you have not set Windows to show file extensions, you would see only realword .docx . Thinking its a Word document, you could well end up clicking on it and infecting your computer. If you had, on the other hand, set your PC to show file extensions, you would see its full name – realword .docx.exe , which would help you to identify that it was actually an executable file and in all probability a malware file.
What are File Extensions & how are they useful
Different file types have different extensions. Audio files have .mp3, .wav, .wma, and more based on the program used to open that file. File extensions also help the operating system to identify the corresponding program to open that particular file. So, you should be able to see file extensions to be at the safer side, and we will let you know how to enable options to see file extensions in Windows.
As mentioned earlier, by default Windows does not show file extensions and they are hidden. But, you can toggle the option to see them.
Show File Extensions in Windows 10
There are five ways how you can go about accessing this setting:
- Through the File Explorer Options
- Through Windows Explorer Ribbon
- Using the Registry
- Using Command Prompt
- Using Group Policy Editor.
1] Through Folder or File Explorer Options
Open Control Panel > Appearance and Personalization. Now, click on Folder Options or File Explorer Option, as it is now called > View tab.
In this tab, under Advanced Settings, you will see the option Hide extensions for known file types. Uncheck this option and click on Apply and OK.
Windows 10 users may also search for File Explorer Options in Start search box and open this box.
Now, you can see file extensions for all files anywhere on your Windows system.
In Windows 10/8.1 Explorer, you can access File Explorer Options via Explorer.
Click View > Options > Change folder and search options.
Once here, you can do the needful as explained above.
In Windows 7, open Explorer, press Alt on your keyboard to make the Classic bar appear. Next, click on Tools > Folder Options. Now follow the steps mentioned above.
These are very simple steps to follow, and you do not need any third-party software to view file extensions. Windows provides us with everything which can be easily achieved, and the point lies in knowing and implementing them. This is the first way to see file extensions in Windows 7.
2] Via Windows File Explorer
Open Explorer and click on the View tab. Simply select the File name extensions checkbox, and you are all set.
3] Using the Registry Editor
Hit the WINKEY + R button combination to launch the Run utility, type in regedit and hit Enter. Once Registry Editor opens, navigate to the following key-
Look up for a DWORD entry labeled as HideFileExt.
Double click on the mentioned DWORD entry and set its value as 0. This will show up the hidden file extensions.
A value of 0 will hide the file extensions.
Exit the Registry Editor and then reboot your computer for the changes to take effect.
4] Use Windows Command Prompt
This fix can be used in both the scenarios mentioned above. Insert a bootable drive of Windows 10 installer.
Start by hitting the WINKEY + X combinations and select Command Prompt (Admin) to launch Command Prompt with Administrator Privileges.
Navigate to the root location of that bootable device inside the Command Prompt command line. Once you get there, type in the following to show the file extensions-
And then hit Enter.
You can also enter the following command to hide the file extensions,
5] Using Group Policy Editor
You can also use the Group Policy Editor and change the setting here:
User Configuration > Preferences > Control Panel Settings > Folder Options.
Set “Show hidden files and folders” and uncheck “Hide extensions for known file types”.
Thus, you can set your Windows to show file extensions in Windows 10/8. If you have anything to add, please do share it with us through comments.
Date: March 22, 2020 Tags: Explorer, Features


