- How to Show Hidden Files on Mac Running macOS 12 Monterey, Big Sur
- Different Ways to Show Hidden Files on Mac
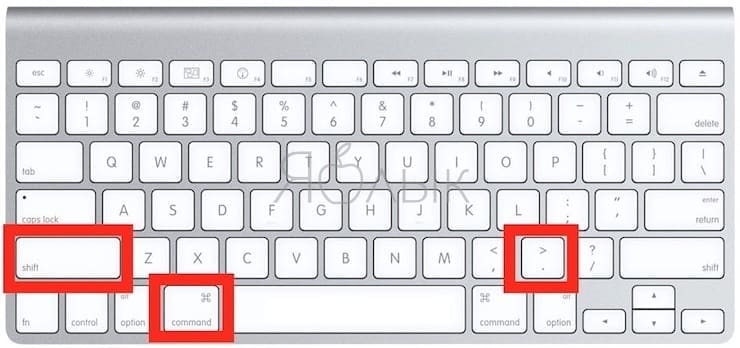
- How to show hidden files on Mac using Keyboard Shortcut
- How to show hidden files on Mac using Terminal
- How to Show Hidden files stored in External Drive on Mac
- jaysukh patel
- How to Show Hidden Files and Folders on Mac
- Critical system files may need to be revealed to fix virus damage
- What to Know
- How to Show Hidden Files in macOS
- How to Hide Files in macOS
- A Word About the Terminal App
- Скрытые файлы на Mac: как скрывать файлы и папки в macOS от посторонних: 3 способа
- Как отобразить скрытые файлы на Mac с помощью «горячих» клавиш
- Как спрятать скрытые файлы на Mac с помощью «горячих» клавиш
- Как скрывать любые файлы и папки на Mac при помощи приложения Funter
- Как присвоить файлу или папке атрибут «скрытый»
- Как выключить отображение скрытых файлов и папок
- Как показать скрытые файлы и папки на Mac
- Как удалить атрибут «скрытый» из файла или папки
- Как скрывать любые файлы и папки на Mac при помощи Терминала
- Quickly Show/Hide Hidden Files on macOS Sierra, OS X El Capitan & Yosemite
- Updates
- The Quickest Way to Show/Hide Hidden Files
- Show/Hide Hidden Files the Long Way
- Show/Hide Hidden Files using Terminal Aliases
- Conclusion
How to Show Hidden Files on Mac Running macOS 12 Monterey, Big Sur
Last Updated on Jun 25, 2021
The latest versions of macOS contain various methods to see the hidden files on Mac. The process is very simple and straightforward to see if any invisible file is stored in your Mac. Like, you can use Terminal or shortcut key to access the hidden files on Mac. Although, it is also possible to see the hidden files and folders of the external drive. We all are unaware of such files lurking in our Mac and consuming storage. However, they aren’t just garbage some are useful and support Mac to run some programs.
we are happy to help you, submit this Form, if your solution is not covered in this article.
All such files are kind of privileges and make your MacBook smooth. So if you are eager to see what are these files and folders in your Mac then read on this tutorial, how to show hidden files on Mac.
Different Ways to Show Hidden Files on Mac
How to show hidden files on Mac using Keyboard Shortcut
Step #1: Navigate to the folder or directory where might be hidden files are stored from the Finder.
Step #2: Press Command+Shift+Period. Once you press these keys, the hidden files will be visible.
Step #3: Now, you can see how many files are hidden.
How to show hidden files on Mac using Terminal
Step #1: Launch “Terminal” from the Spotlight.
Step #2: Type the command,
For macOS X 10.9 or later
defaults write com.apple.finder AppleShowAllFiles -boolean true; killall Finder
For macOS X 10.8 and earlier
defaults write com.apple.finder AppleShowAllFiles TRUE; killall Finder
How to Show Hidden files stored in External Drive on Mac
Step #1: Turn on the Mac and connect the External Drive to the Mac.
Step #2: Open” Finder”.
Step #3: Now launch “Terminal”. Simply press command+spacebar and type Terminal.
Step #4: Enter the following command and hit the return key,
Defaults write com.apple.Finder AppleShowAllFiles YES
Step #5: Hold down the Option or Alt key on the keyboard and then right click on the“Finder” on Dock. There select “Relaunch”.
Step #6: Next, click on the External Drive on the list and then you can see the hidden files and folders stored on the external drive.
Do you have any problems to Show Hidden Files on your Mac or getting error code? Don’t worry, let me know in the comments, we will try to kick out it! Thank you for Reading Us!
jaysukh patel
Jaysukh Patel is the founder of howtoisolve. Also self Professional Developer, Techno lover mainly for iPhone, iPad, iPod Touch and iOS, Jaysukh is one of responsible person in his family. Contact On: [email protected] [OR] [email protected]
Источник
How to Show Hidden Files and Folders on Mac
Critical system files may need to be revealed to fix virus damage
What to Know
- At the terminal command line prompt, enter defaults write com.apple.finder AppleShowAllFiles -boolean true ; killall Finder.
- By default, macOS hides critical system files and folders to prevent accidental deletion or alteration.
This article covers how to show those hidden files as well as how to hide them again.
Information in this article applies to Macs running macOS Catalina (10.15) through OS X Lion (10.7).
How to Show Hidden Files in macOS
To show hidden files on a Mac, use the Terminal application.
Most hidden files are operating system and configuration files. These should not be deleted or modified unless you are absolutely certain what they do.
Open the Terminal app. You can do this by opening Spotlight and entering the word «terminal» in the search field. You can also access Terminal by opening a Finder window and navigating to Applications > Utilities > Terminal.
Enter the following command into the terminal command line prompt:
If you use OS X 10.8 or earlier, enter this command instead:
The command lines accomplish two goals. The first part changes the file setting to show hidden files. The second part restarts the Finder so the files show up.
Most of the time, you want to keep these hidden files and folders out of view, but there are circumstances where you may want to see them. For example, malware and viruses can cause problems by altering system files or renaming important folders. In such cases, you need to manually change those files back, and you can’t do that if they are invisible.
Keep in mind there are lots of hidden files and folders. If you show hidden files and browse through your files in a Finder window, the file list landscape look quite different.
How to Hide Files in macOS
When you’re finished with the hidden files and folders, it is a good idea to return those files to their hidden state.
Open the Terminal app. You can do this by opening Spotlight and entering the word «terminal» in the search field or by opening a Finder window and navigating to Applications > Utilities > Terminal.
Enter the following command into the terminal command line prompt:
If you’re using OS X 10.8 or earlier, enter this command instead:
Reversing the process of revealing hidden files, returns the files to a hidden state, and the Finder restarts to reflect the change.
A Word About the Terminal App
Using Terminal is like peeking behind the windows and menus of the graphical user interface you’re accustomed to. When you open an application, format a USB flash drive, or search your computer using Spotlight, you are essentially executing Terminal commands; the difference is that the commands have been automated and given a graphical presentation to make their operation more user-friendly.
Источник
Скрытые файлы на Mac: как скрывать файлы и папки в macOS от посторонних: 3 способа
То, что файлы или папки на компьютере можно скрыть знают, наверное, все. В Windows для этого достаточно открыть свойства файла и сделать его скрытым. В macOS также можно скрыть файлы и папки, но делается это немного другим образом. Об этом и пойдет речь в сегодняшней статье.

Как отобразить скрытые файлы на Mac с помощью «горячих» клавиш
Современные версии macOS (macOS 10.12 и выше) предлагают быстрый и легкий способ отображения скрытых файлов и папок (как сделать их скрытыми, смотрите ниже) с помощью комбинации клавиш. Простое нажатие на клавиши позволит мгновенно отобразить скрытые файлы и снова спрятать их. В настоящее время это наиболее быстрый способ отобразить «невидимые» файлы на Mac.
Как правило, невидимыми на Mac являются системные файлы и папки, конфигурационные данные или другие файлы и папки, по какой-либо причине скрытые от рядовых пользователей. С такими папками обычно работают более продвинутые пользователи, которым требуется просмотреть, редактировать или изменить папку или ее содержимое.
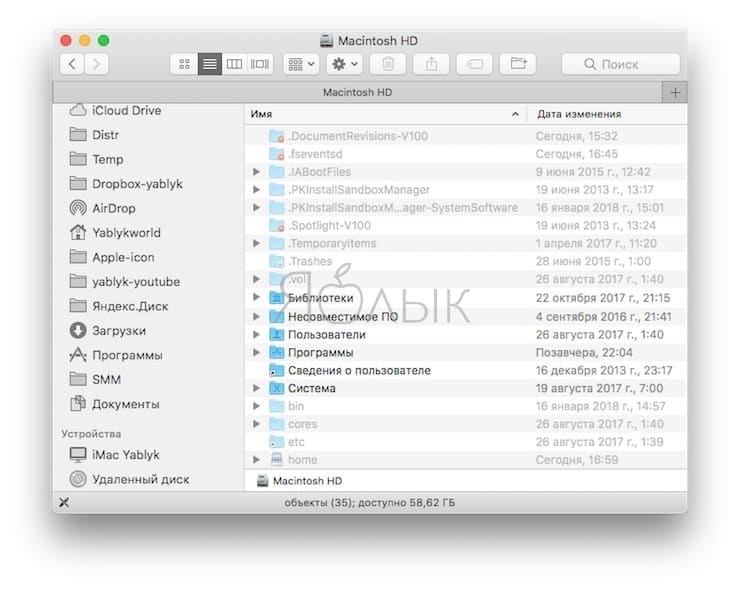
1. Из Finder перейдите в любую папку, где могут содержаться скрытые файлы (например, корневая папка Macintosh HD или домашняя папка).
2. Нажмите ⌘Cmd + ⇧Shift + Точка для отображения скрытых файлов.
Как это работает на примере Macintosh HD показано ниже.
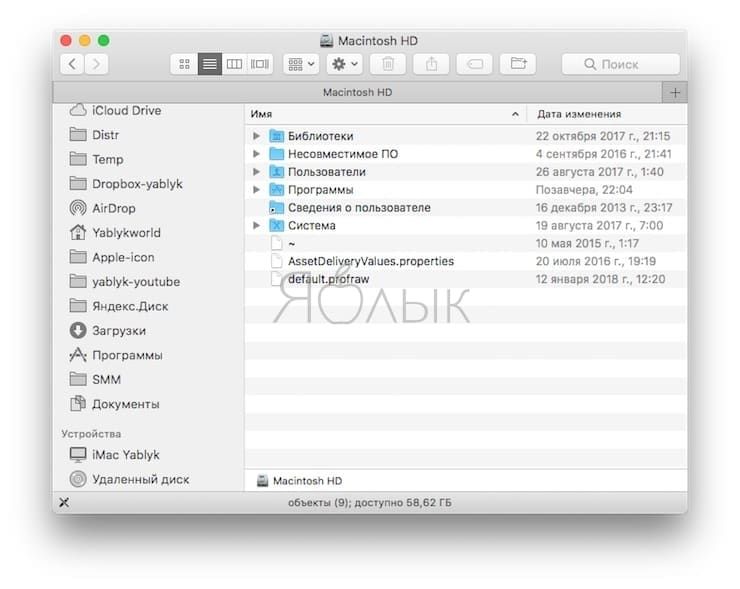
Как видите, при нажатии вышеуказанной комбинации клавиш в папке отображается весь скрытый контент. Скрытые файлы легко определить по слегка блеклым названиям и значкам. Стоит отметить, что при отображении файлов, видимыми станут скрытые файлы во всех папках на Mac, так же, как и в случае использования соответствующих команд.
Основная разница между современными релизами и более ранними версиями macOS заключается в том, что в новых редакциях доступен метод отображения скрытого контента с помощью сочетания ⌘Cmd + ⇧Shift + Точка, тогда как раньше для этой цели приходилось вводить команды в терминале (инструкция ниже). Но если вам нравится действовать по старинке, современные версии macOS также поддерживают данный способ.
Как спрятать скрытые файлы на Mac с помощью «горячих» клавиш
В Finder откройте любую папку и нажмите ⌘Cmd + ⇧Shift + Точка, чтобы скрыть файлы. После данного действия все невидимые папки на Mac будут снова скрыты. О том, как сделать скрытыми любые файлы и папки, смотрите ниже.
Помните, что нажатие комбинации ⌘Cmd + ⇧Shift + Точка в файловой системе отобразит или скроет невидимые папки. Вот как выглядит папка со скрытыми файлами:
После нажатия ⌘Cmd + ⇧Shift + Точка скрытые файлы отобразятся в папке. Визуально они будут выглядеть бледнее:
В современных версиях macOS функционал сочетания ⌘Cmd + ⇧Shift + Точка стал несколько шире и теперь позволяет отобразить папки и файлы в Finder.
Как уже упоминалось выше, отобразить или спрятать скрытое содержимое можно и с помощью команд Терминала, но зачем это делать, если новые версии «яблочной» операционки предлагают более быстрый и удобный метод?
В любом случае, если вы не уверены в том, что делаете, ни в коем случае не удаляйте и не изменяйте скрытые файлы, так как многие из них представляют собой конфигурационные файлы для различных функций, программ и приложений.
Как скрывать любые файлы и папки на Mac при помощи приложения Funter
Как присвоить файлу или папке атрибут «скрытый»
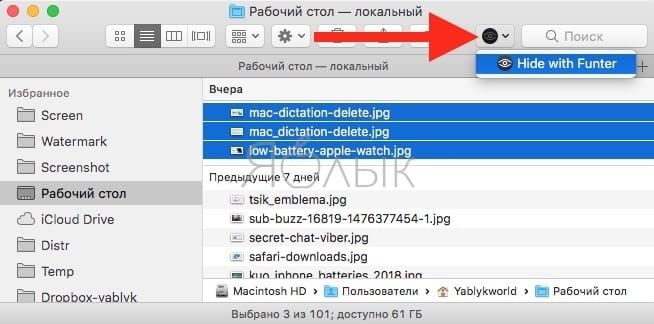
Бесплатное приложение Funter (ссылка на скачивание ниже) позволяет находить скрытые файлы через иконку в меню и на панели инструментов Finder. Иконка на панели Finder отображается при активированной интеграции (активирована по умолчанию).
Для того чтобы сделать файлы или папки скрытыми в Finder, нажмите на них правой кнопкой мыши или на кнопку Funder на панели Finder и в открывшемся меню выберите опцию «Hide with Funter».
Примечание: В случае, если в Finder активирован режим «Show Hidden Files» (см. ниже), то скрытые файлы и папки будут видны.
Как выключить отображение скрытых файлов и папок
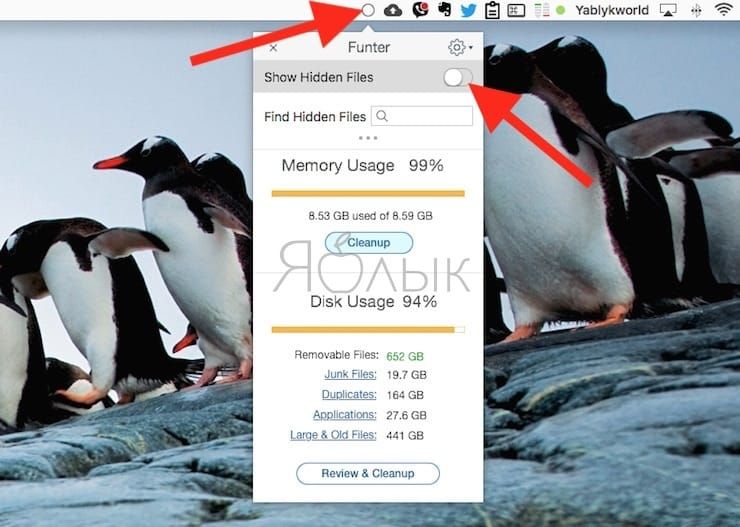
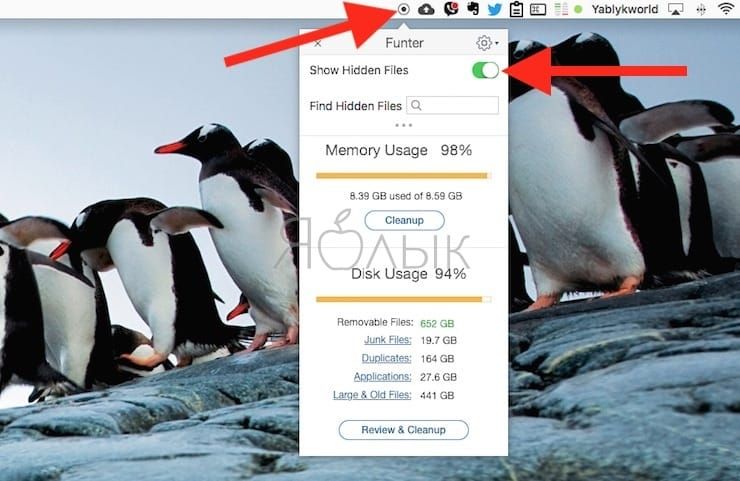
Для того чтобы выключить отображение скрытых файлов и папок, нажмите на иконку Funter на панели меню macOS и установите переключатель «Show Hidden Files» в положение Выключено.
Как показать скрытые файлы и папки на Mac
Для того чтобы включить отображение скрытых файлов и папок, нажмите на иконку Funter на панели меню macOS и установите переключатель «Show Hidden Files» в положение Включено.
Как удалить атрибут «скрытый» из файла или папки
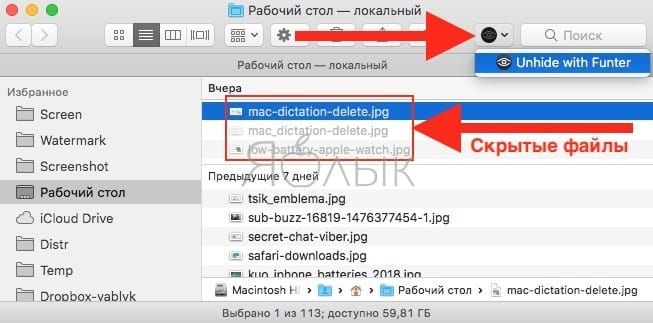
Для того чтобы скрытые файлы или папки сделать не скрытыми в Finder, нажмите на них правой кнопкой мыши (или на кнопку Funder на панели Finder) и в открывшемся меню выберите опцию «Unhide with Funter».
Как скрывать любые файлы и папки на Mac при помощи Терминала
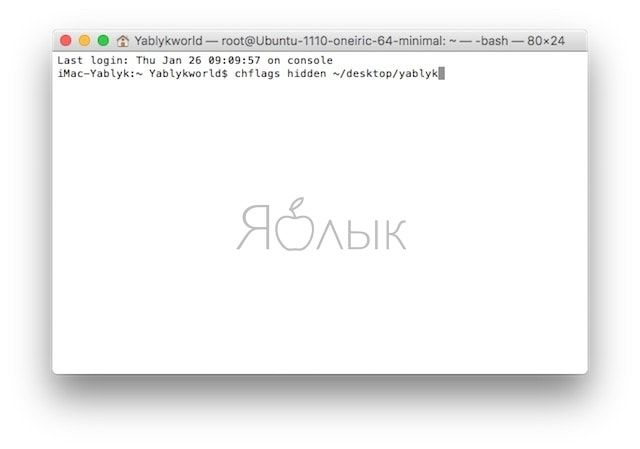
Для того, что бы сделать файлы и папки в macOS невидимыми придется использовать стандартную программу Терминал (Программы -> Терминал). В окне терминала необходимо будет ввести следующую команду:
/путь до папки или файла, которые вы собираетесь скрыть
пример: chflags hidden
Узнать путь до папки можно, например из строки пути Finder.
А затем просто перетянуть в это же окно терминала файл или папку. При этом в окне автоматически появится путь к выбранному объекту.
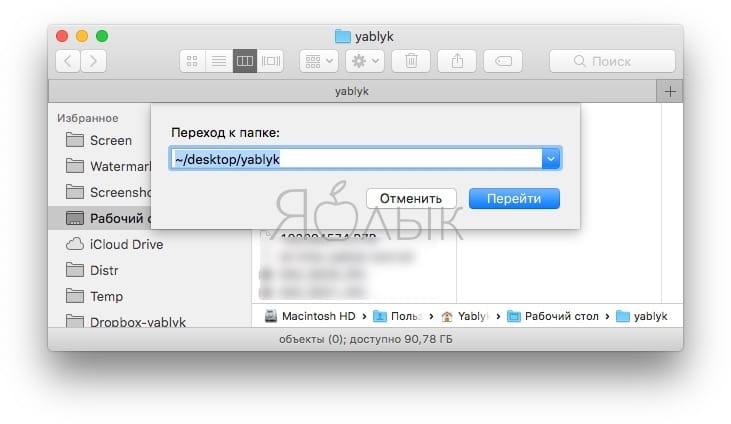
После выполнения этих действий получить доступ к файлу и папке можно будет через Finder с помощью перехода к папке, который активируется сочетанием клавиш ⌘Cmd + ⇧Shift + G.
пример:
Помимо этого, файлы будут видны и в поиске Spotlight. Для того, что бы полностью скрыть их от посторонних глаз:
- Перейдите в Системные настройки, раздел Spotlight;
- Откройте вкладку Конфиденциальность – тут вы сможете убрать отдельные папки из результатов поиска Spotlight.

Для того, что бы сделать файлы и папки снова видимыми достаточно использовать следующую команду для терминала:
Источник
Quickly Show/Hide Hidden Files on macOS Sierra, OS X El Capitan & Yosemite
Updates
Added shortcut method available on macOS Sierra keyboard.
Method of showing/hiding hidden files tested and working on macOS Sierra.
Method of showing/hiding hidden files tested and working on Mac OS X El Capitan.
It seems like every day I search Google for the command to show hidden files on Mac OS X, not to mention Googling for the command to then hide those hidden files a few minutes later.
Today I decided to make a short and easy to remember alias to speed up the process. All I need do now is type showFiles and hideFiles whenever I need to show/hide OS X’s hidden files. Here’s how you can do it too.
The Quickest Way to Show/Hide Hidden Files
Since the release of macOS Sierra, when in Finder, it is now possible to use the shortcut:
Press once to show hidden files and again to hide them. If you’re using a version earlier than macOS Sierra, see Show/Hide Hidden Files using Terminal Aliases to setup a toggle command via terminal.
Thanks to Guido Schlabitz for making me aware of this new shortcut.
Show/Hide Hidden Files the Long Way
The long way to show hidden Mac OS X files is as follows:
- Open Terminal found in Finder > Applications > Utilities
- In Terminal, paste the following: defaults write com.apple.finder AppleShowAllFiles YES
- Press return
- Hold the ‘Option/alt’ key, then right click on the Finder icon in the dock and click Relaunch.
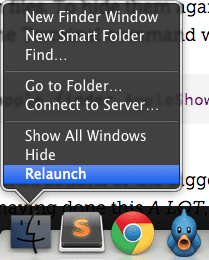
Relaunch Finder by right clicking the Finder Icon whilst holding the `option/alt` key
This will show all hidden files. To hide them again, follow the same steps but replace the Terminal command with:
It’s not the longest set of instructions or the biggest command to commit to memory but if you’re doing this a lot, it’s worth spending a few minutes now to save yourself a lot more time in the future.
Show/Hide Hidden Files using Terminal Aliases
A Terminal alias is a name or shortcut for one or multiple commands. Using an easy to remember alias, we can turn the above four step process into just one.
An alias can be made temporarily (just for the use of one terminal session) or permanently. As we want this to be a shortcut used now and in the future, let’s make it permanent:
- Open Terminal found in Finder > Applications > Utilities
- In Terminal, paste the following: sudo nano
/.bash_profile
Below that, paste the following: alias hideFiles=’defaults write com.apple.finder AppleShowAllFiles NO; killall Finder /System/Library/CoreServices/Finder.app’
/.bash_profile to refresh your profile and make the aliases available

Adding aliases to .bash_profile via Terminal
Now when you want to show hidden files, all you need type in Terminal is showFiles , then hideFiles when you want to hide them.
If you want to modify the behaviour or alias names, let’s take a closer look at the commands you just added:
alias tells Terminal we’re adding a new alias.
showFiles is the name of the alias. Change this to what you wish.
We then give the alias two commands. The first being:
This is the command to show hidden files and is ended with a semi-colon ; so we can then use the second command:
This will relaunch the Finder (to replicate the step of holding the ‘Option/alt’ key then right clicking the Finder icon in the dock).
Conclusion
With the aliases set up, all you need do in the future is type showFiles and hideFiles to show and hide Mac OS X’s hidden files respectively.
Aliases can be used to speed up your interaction with the Terminal. Set up an alias for navigating to your most used directories, to commit to a GitHub repo and so on.
Ian Lunn is a Front-end Developer with 12 years commercial experience, author of CSS3 Foundations, and graduate of Internet Technology. He creates successful websites that are fast, easy to use, and built with best practices.
Источник


