- How to Find Hidden Partition or Hide Partition in Windows 10/8/7
- Part 1. How to Show Hidden Partition in Windows 10В in 2 Ways
- 1. How to Show Hidden Partitions in Windows 10 with Free Partition Manager SoftwareВ
- 2. How to Unhide Partitions with Disk ManagementВ
- Part 2. How to Hide Partition in Windows 10/8/7
- 1. How to Hide Partition with EaseUS Free Partition Manager Software
- 2. How to Create Hidden Partition with Disk ManagementВ
- Conclusion
- FAQs About Hidden Partition Windows 10
- 4 Different Methods to Hide Drives or Partitions in Windows 7/8/10
- Hide Drives or Partition in Windows
- 1. Hide Drives Using Disk Management Tool
- 2. Hide Drives Using Group Policy
- 3. Hide Drives Using Windows Registry
- 4. Hide Drives Using Command Prompt
How to Find Hidden Partition or Hide Partition in Windows 10/8/7
Are you looking for a tutorial on how to show hidden partition in Windows 10? Have you forgotten how to unhide a hidden partition when you need to use the stored data on it?
When you can’t view a partition in File Explorer but can find it in Disk Management, the first thing you should check is that whether the disk partition is hidden or not. In Windows 10, 8, or 7. 3 causes can result in a hidden partition:
- Windows users setВ aВ partition as hidden which would be invisible to most ordinary users so to protect important data or files from being deleted, formatted, or lost due to unknown reasons.
- Partitions are hidden by a third-party program.
- Partitions are hidden by the manufacturer for system protection, such as Recovery Partition and OEM Partition.
If you want to unhide partitions on Windows 10/8/7, two simple and free methods are demonstrated here. Follow the guides to view hidden partition easily. Meanwhile, you can also learn how to hide partitions in vice versa.
Part 1. How to Show Hidden Partition in Windows 10В in 2 Ways
You can unhide and access hidden hard drive partitions by using a free partition manager or Disk Management.
1. How to Show Hidden Partitions in Windows 10 with Free Partition Manager SoftwareВ
To find a hidden partition or partition your hard drive with a disk management program,В EaseUS Partition Master Free will be a great choice. ItВ helps you create, resize, clone, move, merge, and format partitions without any data loss.В
To show hidden partition in Windows 10, download and run EaseUS Partition Master Free, then unhide partitions within seconds.В
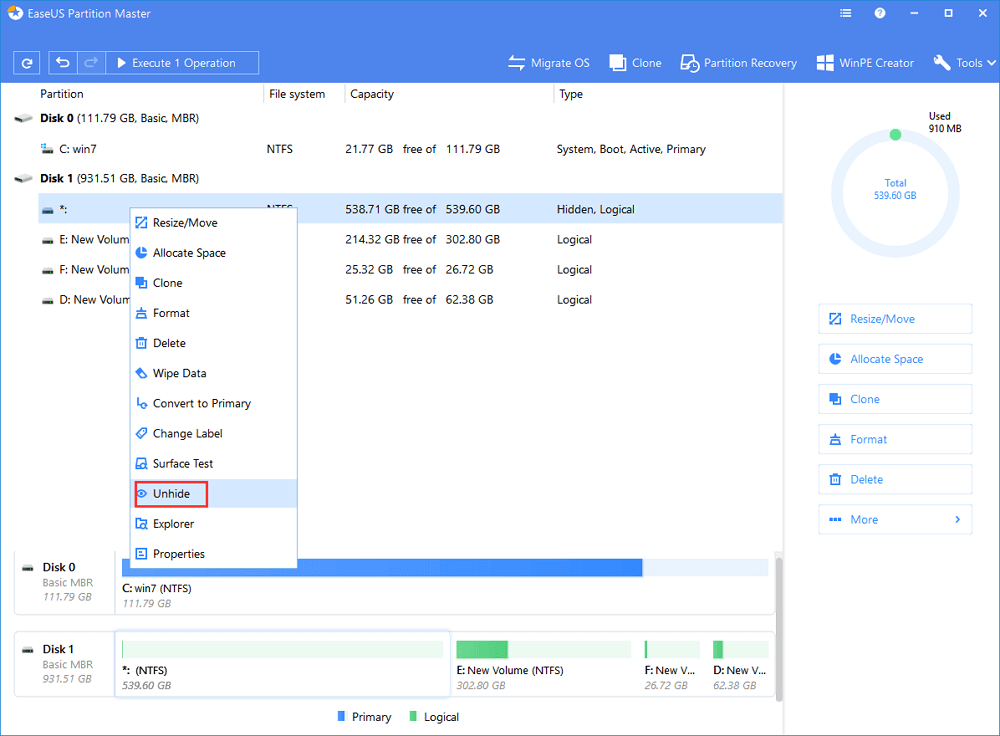
Step 1.В Open EaseUS Partition Master, right-click the partition you want to view and access.В Choose «Unhide» from the drop-down menu.
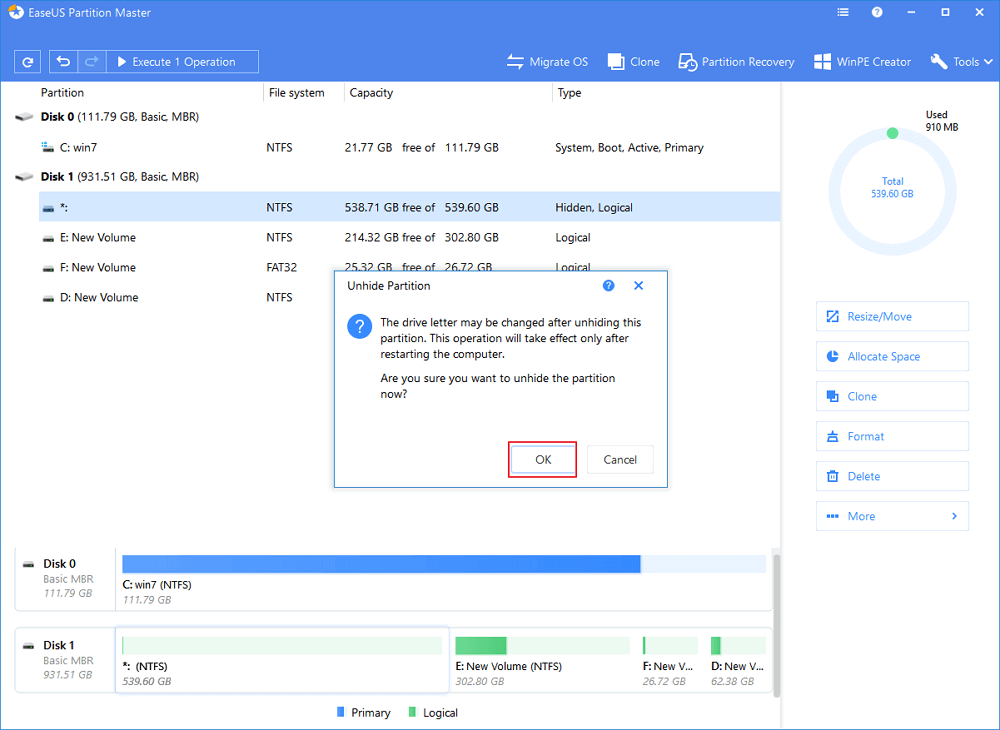
Step 2.В Then, a pop-up window will occur saying that unhide partition will cause drive letter change. Read the instructions and click «OK» to continue.
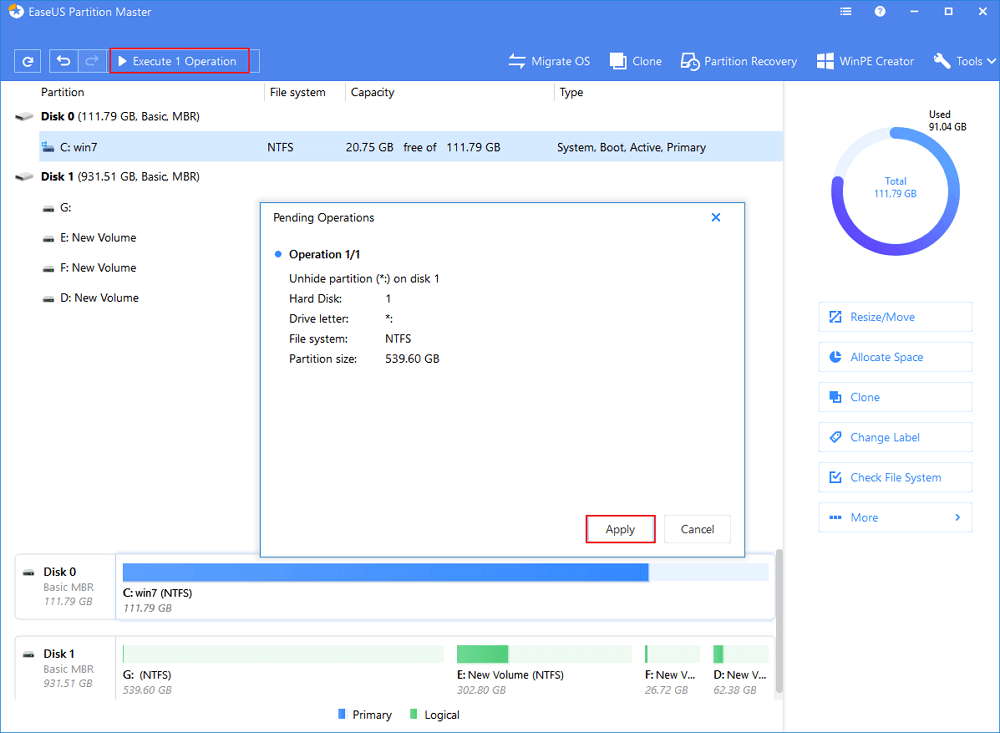
Step 3. Click the «Execute Operation» button in the top-left corner.В Check the pending operations, then click «Apply» to unhide partition on Windows 10, Windows 8, or Windows 7.
In addition to unhiding partitions, EaseUS Partition Master provides other one-stop partition and disk management solutions for your Windows computer, for instances:
- Resize/move partitions (the Pro version allows to move space from D drive to C drive without deleting or formatting), create, format, delete, and merge partitions
- Copy and clone an entire disk to another even the target partition is smaller than the source
- Convert a logical partition to primary or primary partition to logical, FAT32 to NTFS partition, MBR disk to GPT, or GPT disk to MBR
- Completely wipe out all the data on the hard disk to prevent information from being leaked or recovered
2. How to Unhide Partitions with Disk ManagementВ
This method is quite simple, but you need to very careful while hiding the partition. Or false operation may get your partition deleted by mistake.
Step 1.В Right-click on This PC/My Computer and click on «Manage».
Step 2.В Select the volume without a drive letter, the partition which you’ve hidden previously. Right-click it, select «Change Drive Letter and Paths. «.
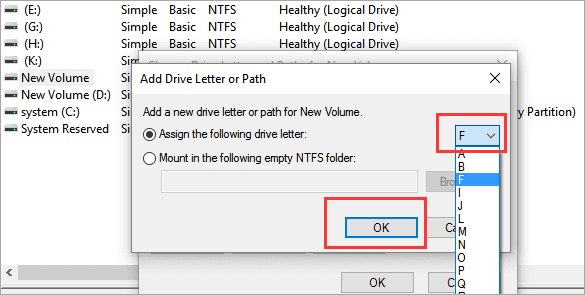
Step 3.В Click «Add» to assign the drive letter for the partition to unhide it.
Step 4.В Assign the drive letter for the hidden partition, such as F, and hit «OK». Then your hidden partition will show up in PC and work as a normal partition to store data for you again.В
Part 2. How to Hide Partition in Windows 10/8/7
The opposite of unhiding partitions is hiding partitions. As mentioned before, sometimes you want to hide disk partitions for some purposes, but how? Here you’ll have two methods to hide partitions in Windows 10, 8, or 7 computers: hide partition with EaseUS free partition manager software or hide partition with Disk Management.
1. How to Hide Partition with EaseUS Free Partition Manager Software
You can also apply EaseUS Partition Master Free to hide partition with easy clicks by following the steps below.В
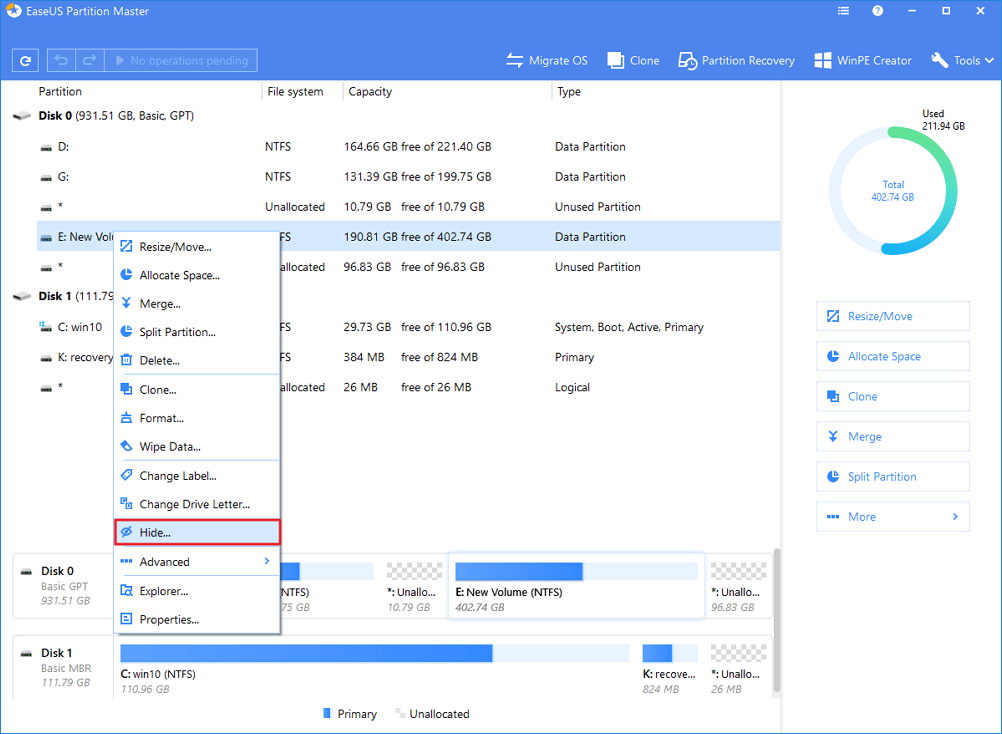
Step 1.В Open EaseUS Partition Master, right-click the partition you want to hide, and choose «Hide» from the drop-down menu.
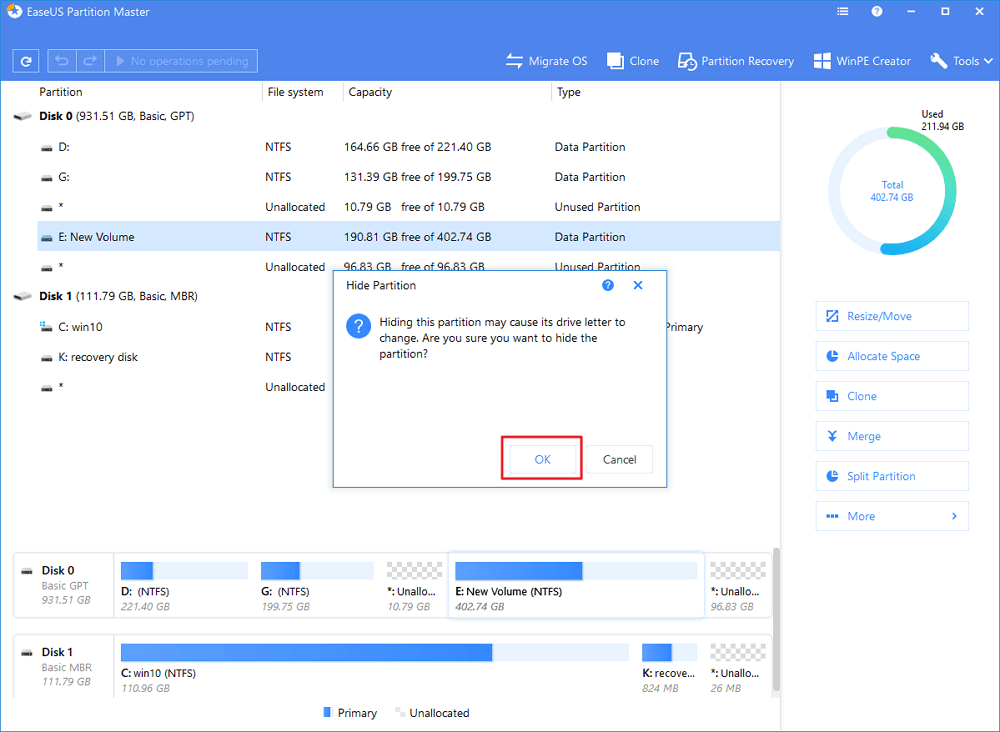
Step 2.Then you will see a window showing the notification. Read the instrunctions andВ click «OK» to continue.
Step 3. Click the «Execute Operation» button in the top-leftВ corner. Then, check the changes, then click «Apply» to hide your partition.

2. How to Create Hidden Partition with Disk ManagementВ
Step 1.В Right-click This PC/My Computer, select «Manage», and click «Disk Management».
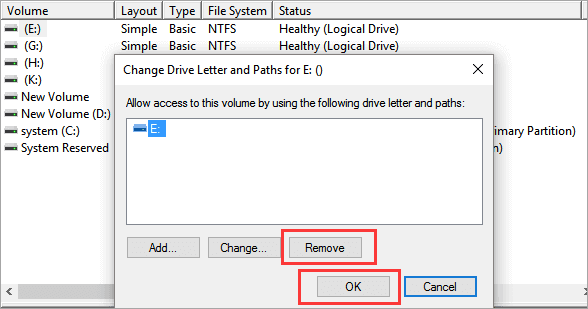
Step 2.В Select and right-click the partition that you want to hide and choose «Change Drive Letter and Path. «.
Step 3.В Click «Remove» and click «OK».
There, your partition will show as New Volume in Disk Management without a drive letter and will not show up in the File Explorer anymore.В
Conclusion
Follow these simple guides; you can easily and effectively find hidden partition or hide disk partition on Windows 10. As a popular and user-friendly partition management tool, EaseUS Partition MasterВ providesВ many usefulВ functions to help you organize your disk, like resize/move/delete/format partition, disk copy, partition copy, repair MBR, create WinPE bootable diskВ (Pro version),В and so on.
Download and try this disk management program to optimize your hard drive and improve computer performance.
FAQs About Hidden Partition Windows 10
The following are the top four highly relevant questions on how to show hidden partition in Windows 10. If you also have any of these problems, you can find the methods here.
How do I find a hidden partition on my hard drive?
You can find a hidden partition on your hard drive in two ways: using EaseUS Partition Master or applying Disk Management. Both solutions are quite simple.
How do I hide a partition in Windows 10?
Two methods are available for you to hide a partition in Windows 10, Windows 8, or Windows 7. Hide partition with Disk Management or EaseUS Partition Master. The operation is very simple and similar.
The difference is that this software gives you more comprehensive and more advanced disk management capabilities. For example, move free space from other partitions to target partition without deleting, clone bigger HDD to smaller SSD, convert logic partition to primary partition, or in the vice versa, etc.
How do I unhide a hidden drive?
You can access a hidden drive with the help of Disk Management:
Step 1. Right-click on This PC/My Computer and click on «Manage».
Step 2. Select the partition thatВ you’ve hidden previously. Right-click it, select «Change Drive Letter and Paths. «.
Step 3. Click «Add» to assign the drive letter for the partition to unhide it.
Step 4. Assign the drive letter for the hidden partition, and hit «OK».
How do I find hidden partitions in Windows 10?
To find hidden partitions on Windows 10, you can resort to EaseUS Partition Master is for help:
Step 1.В Open EaseUS Partition Master, right-click the partition you want to unhide, and choose «Unhide» from the drop-down menu.
Step 2.В Then you will see a window showing the notification. Check it and click «OK» to continue.
Step 3.В Click the «Execute Operation» button in the top-right corner, check the changes, then click «Apply» to showВ your partition.
4 Different Methods to Hide Drives or Partitions in Windows 7/8/10
Do you know how to hide drives in Windows?
We all know how to hide a folder with our personal files in Windows operating system. But to hide drives or partitions we use third-party software. And one thing we didn’t know that, we can also hide drives just like folders, without using any software, in Windows 7/8/10.
Why you have to hide drives or partition? Just think you have a large number of
Just think you have a large number of files in the different folder and you didn’t want to share it with anybody. So you hide each of that folders or use a folder lock software to keep them safe.
Here is an idea, why you create a new partition to store those personal files and then hide it from your Windows Explorer. And only make them visible when you needed. In this tutorial we are going to share four different methods to hide drives or partitions in your Windows PC.
Hide Drives or Partition in Windows
1. Hide Drives Using Disk Management Tool
So the first method, probably the easiest one to hide drives in Windows is by using Disk Management tool. Disk Management tool enables users to view and manage the disk drives installed in their computer and the partitions associated with those drives.
First hit ” + R” for Run dialogue box and type “diskmgmt.msc” to open Disk Management tool.
Now you can see all the partitions you created in your PC. Right-click on the partition which you want to hide and select the option “Change Letter and Paths“.
Now a new windows will pop-up showing your drive letter. Just click on “Remove” button. Now a small warning box will pop-up their click “Yes”
And that’s all, you now that particular drive is hidden for all users.
When you want to get access to that hidden drive, just go to Disk Management tool again and right-click on the hidden partition and select the option “Change Letter and Paths“.
This time click on “Add” button and assign a drive letter and press ok.
There it is, your hidden drive is back in action.
2. Hide Drives Using Group Policy
Next method to hide drives in Windows PC is by using Group Policy. Group Policy is a feature of the Microsoft Windows operating systems that controls the working environment of user accounts and computer accounts. Group Policy provides the centralised management and configuration of operating systems, applications, and users’ settings in an Active Directory environment.
In this method first hit ” + R” and type “gpedit.msc” in Run dialogue box to open “Local Group Policy Editor“.
In Group Policy Editor navigate to the following settings:
” User Configuration/Administrative Templates/Windows Components/File Explorer “
Their double-click “Hide these specified drives in My Computer” and select ” Enabled “.
And from the options drop-down menu, select the Drive you want to hide. And next click on Save and exit.
3. Hide Drives Using Windows Registry
Also using Windows registry you can hide partition in Windows. The registry is a database in Windows that contains important information about system hardware, installed programs and settings, and profiles of each of the user accounts on your computer. So always alert while you are playing with Windows registry settings.
So before editing registry settings I suggest you to take the backup of your registry. Once it is done, proceed!
First hit ” + R” to open Run dialogue box and enter “regedit” command to open registry editor console.
Next navigate to following path :
” HKEY_LOCAL_MACHINE –> Software –> Microsoft –> Windows –> CurrentVersion ->Explorer “
Here we are going to create a new DWORD value, so right-click on “Explorer” folder and choose “New > DWORD Value (32-bit)“.
Give the name as ‘NoDrives’ and double-click on it, to change the properties. Now, console opens where we need to enter values.
In Value data, choose the one based on the drive you want to hide. Each drive letter has unique value and values are as below :
A: 1, B: 2, C: 4, D: 8, E: 16, F: 32, G: 64, H: 128, I: 256, J: 512, K: 1024, L: 2048, M: 4096, N: 8192, O: 16384, P: 32768, Q: 65536, R: 131072, S: 262144, T: 524288, U: 1048576, V: 2097152, W: 4194304, X: 8388608, Y: 16777216, Z: 33554432, All: 67108863
So choose the corresponding values to hide drives and enter that value in “Value data“. Choose ‘Decimal’ for Base section.
For example if I want to hide drive F:,am entering Value data as 32.
If you want to hide two drives, say such as ‘E’ and ‘G’, you can enter value one value as ’80’ (E = 16 and G = 64) and it hides both the drives.
Restart your computer and your drive in hidden now.
If you are supposed to get the drive back, change the value to Zero or you can even delete the “NoDrives” registry key.
4. Hide Drives Using Command Prompt
Last method to hide drives in Windows is by using command prompt. Command Prompt helps you type and run MS‑DOS (Microsoft Disk Operating System) commands and other computer commands. By typing commands, you can perform tasks on your PC without using a mouse or touch. Command Prompt is typically only used by advanced users. If you going to hide drives using command prompt that means you are an advanced user.
So first run command prompt as administrator.
Now type “diskpart” and hit Enter.
Next type “List Volume” and hit Enter.
Now type select and the numeral against the letter of the Drive (eg. it could be G Drive), which you want to hide. For instance, it could be Select Volume 6. Hit Enter.
Finally, type Remove Letter G and hit Enter.
You will see a message – Diskpart successfully removed the drive letter or mount point.
To show the hidden drive, follow steps 1, 2, 3 mentioned above.
Now type Assign Letter D and hit Enter. This will show the drive in Explorer.
Try out the method which is appropriate for you. I prefer go with Method 1 to hide drives in Windows. If you have any doubts do comment below.


