- Fix problems with the Start menu
- Show a hidden taskbar
- How to hide App list in Start Menu in Windows 10
- Hide App list from Windows 10 Start Menu
- Related Posts
- How to restart StartMenuExperienceHost.exe using Command Prompt or PowerShell on Windows 10
- How to customize Windows 10 Start layout by replacing the .xml file
- How to enable Windows 10 Full screen Start Menu using REGEDIT or GPEDIT
- [email protected]
- Как исправить не работающее меню Пуск в Windows 10?
- Исправить меню «Пуск» Windows 10.
- Удалите сторонние приложения
- Включите XAML
- PowerShell
- Командная строка
- Удалите файлы Cortana
- С помощью команды «Выполнить»
- С помощью редактирования реестра Windows.
- Отключить параметр «Использовать мои данные для входа…»
- Если не одно решение не помогло
Fix problems with the Start menu
If you can’t see Start on your taskbar, the taskbar may be hidden.
Show a hidden taskbar
Press the Windows logo key + I, then select Personalization > Taskbar .
Turn on Lock the taskbar.
Turn off Automatically hide the taskbar in desktop mode or Automatically hide the taskbar in tablet mode.
If that doesn’t resolve the issue you’re experiencing, select any of the following headings to see steps you can try to get it working again.
Press Ctrl + Shift + Esc to open Task Manager. You may need to select More details at the bottom of the window to see everything.
Select the Processes tab.
Scroll down to Windows Explorer, select it, then select Restart.
The process may take a few seconds, and your taskbar and Start menu may not be visible while Windows Explorer restarts. You can close Task Manager when the process is complete.
Press the Windows logo key + I.
In Settings, choose Update & security > Windows Update , and then select Check for updates. Install any available updates and restart your computer if required.
Note: Need another way to get to Settings? Press the Windows logo key + R, then type ms-settings: (note the colon) in the Open box. Select OK to open Settings.
If you didn’t have any updates that required a restart, it’s still a good idea to restart your device to make sure any pending updates are installed.
To restart your device when you can’t access Start , press Ctrl + Alt + Delete, select Power and then select Restart .
Note: You can also manually shut down your device by pressing and holding the power button. Shutting down this way risks losing unsaved data, so first be sure to save and close everything you’re working on. If you shut down this way, you can restart your device by pressing the power button again.
While it’s likely you have the most recent drivers, if you’re still having trouble with the Start menu, you can try fixing it by manually updating your graphics or audio drivers. For more info, see Update drivers in Windows 10.
If you still can’t fix your problem with the Start menu, try creating a new local administrator account.
If you’re signed in with your Microsoft account, remove the link to that account first by doing the following (if that’s not how you’re signed in, skip to creating a new administrator account):
Press the Windows logo key + I.
In Settings, select Accounts > Your info (in some versions, it may be under Email & accounts instead).
Select Sign in with a local account instead. You’ll see this link only if you’re using a Microsoft account, and you may not see it if your device is on a network.
Type your Microsoft account password and select Next.
Choose a new account name, password, and password hint, and then select Finish and sign out.
Create the new administrator account:
Press the Windows logo key + I.
In Settings, select Accounts > Family & other people (or Other users , if you’re using Windows 10 Enterprise).
Under Other users , select Add someone else to this PC.
On Windows 10 Home and Windows 10 Professional, provide a name for the user and a password, and then select Next. On Windows 10 Enterprise, select I don’t have this person’s sign-in information, and then select Add a user without a Microsoft account.
Set a user name, password, and password hint. Then select Next > Finish.
Next, make the new account an administrator account:
Under Family & other people (or Other users , if you’re using Windows 10 Enterprise), choose the account you created, and then select Change account type.
Under Account type, select Administrator > OK.
Sign out of your account and then sign in to your new account. If everything is fixed, move your personal data and files to the new account.
To move your personal files from your old account to your new account, try opening File Explorer, expanding This PC > OSDisk (C:), and looking in the Users folder, where you should see folders for both accounts. You can then copy and paste your files from the old account folder to similar locations in the new account folder. Or if you prefer, you can upload your files from your old account to OneDrive, and then sign into the new account and download the files from OneDrive.
If the problem still isn’t fixed, try deleting the old administrator account:
Under Other users, select the old administrator account, then select Remove > Delete account and data.
After the old account is removed, restart your device and sign in with the new account again.
If you were using a Microsoft account to sign in before, associate the Microsoft account with the new administrator account.
In Settings , select Accounts > Your info (in some versions, it may be under Email & accounts instead).
Select Sign in with a Microsoft account instead and enter your account info. You’ll see this link only if you’re using a local account, and you may not see it if your device is on a network.
Note: Need another way to get to Settings? Press Windows logo key + R, then type ms-settings: (note the colon) in the Open box. Select OK to open Settings.
If none of the previous options work, try resetting your PC using Recovery options in Windows 10.
How to hide App list in Start Menu in Windows 10
Windows 10 v1703 offers a lot of Start Menu customization. You can have a normal old-style Start Menu, or you can have a full-screen Modern start. You can have a Start with no tiles or a Start with all the tiles. I’ve noticed a lot of users focusing on the design elements of their PC’s Start Menu. This post will show you how to make the Start Menu show only the Tiles, not the all applications list – which appears on the left side.

This way you can get a great design, and the Start menu looks proportional to the screen. And this way the Start menu kind of blends in and looks stunning. But that is completely subjective. Maybe you will like this or not. This can be a great Start customization if you do not generally use the all applications list and search for applications instead.
Hide App list from Windows 10 Start Menu
You just need to tweak a few settings to get this done, and it is very easy. Follow the steps below to hide the app list from the Start menu.
Step 1: Go to ‘Start’, and open ‘Settings’.
Step 2: Now select ‘Personalization’. Then from the left menu choose ‘Start’.
Step 3: Find the setting that says “Show app list in Start menu” and turn it off to hide the app list from the Start menu.
That is it – it is so simple to get this done!
Now that the app list is gone from the Start menu, the Start would appear less broad and visually aesthetic. Not that you have completely lost the app list, it is still accessible from the Start menu itself. You might have noticed the addition of two new icons in the top left corner of the Start menu. The bottom-most one opens the same application list that you just disabled. So technically you have not disabled it, you’ve just hidden it. And the top icon takes you back to the Tiles. Thus you can switch back and forth easily between the the App list and the Tiles.
You can easily revert back the changes if you do not like your new Start menu. To revert the changes, simply switch back the settings you changed while following the above steps.
If you are using the Start in full-screen mode, then you may not be able to see any noticeable changes after tweaking that setting. The app list will remain as it is and no changes will visible as such.
This is how you can hide the App list from Windows 10 Start Menu.
Date: April 10, 2018 Tags: Start Menu
Related Posts
How to restart StartMenuExperienceHost.exe using Command Prompt or PowerShell on Windows 10
How to customize Windows 10 Start layout by replacing the .xml file
How to enable Windows 10 Full screen Start Menu using REGEDIT or GPEDIT
[email protected]
Lavish loves to follow up on the latest happenings in technology. He loves to try out new Windows-based software and gadgets and is currently learning JAVA. He loves to develop new software for Windows. Creating a System Restore Point first before installing a new software is always recommended, he feels.
Как исправить не работающее меню Пуск в Windows 10?
Публикация: 25 Май 2019 Обновлено: 12 Октябрь 2020
Меню «Пуск» является основной частью Windows. Хотя вы можете запускать приложения из их папок напрямую, с помощью ярлыков на рабочем столе или даже с помощью команды «Выполнить», меню «Пуск» — гораздо более быстрый способ сделать это.
В Windows 10 меню «Пуск» постоянно совершенствуется, небольшие изменения все еще вносятся, чтобы сделать его лучше, однако, это одна из функций, которые часто ломаются. Вот как можно исправить кнопку «Пуск», не работающую в Windows 10.
Согласно последним обсуждениям на форуме Microsoft, проблема известна, и решение этой проблемы найдено. Для того чтобы исправить неработающее меню «Пуск», вы можете применить, одно из представленных ниже способов решения:
Убедитесь, что вы пытаетесь открыть меню «Пуск», нажав кнопку мышкой. Меню может не реагировать на клавишу Win на клавиатуре, но откроется, если кликнуть по нему мышью. Вам также следует перезагрузить систему хотя бы один раз, чтобы посмотреть, решит ли это проблему.
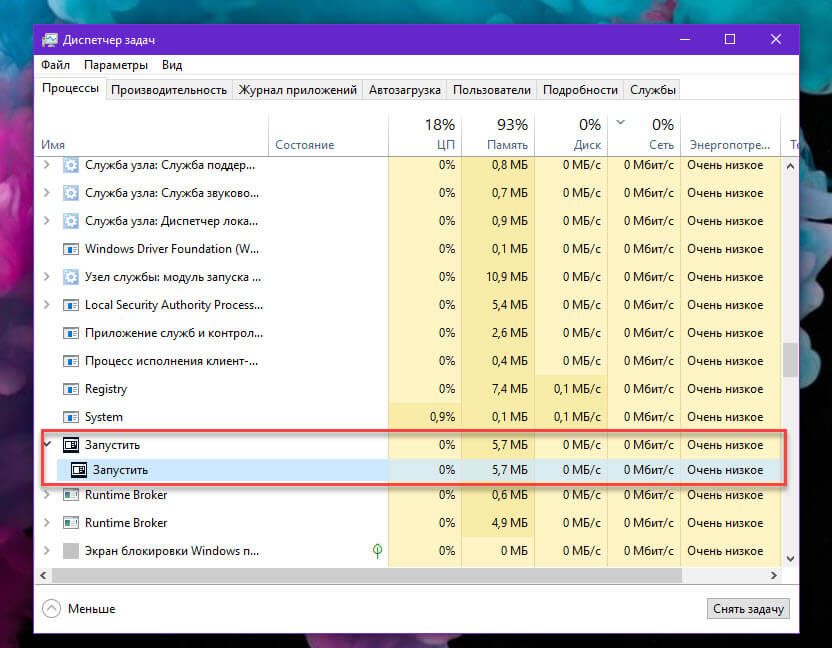
Исправить меню «Пуск» Windows 10.
Это исправление работает начиная с версии Windows 10 1903, вы можете попробовать его. Фактически, это должно быть первое, что вы сделаете, прежде чем предпринять что-то еще.
Меню «Пуск» теперь представляет собой отдельный процесс, который вы можете перезапустить так же, как вы можете перезапустить Проводник (Explorer.exe). Откройте диспетчер задач и на вкладке «Процессы» найдите «Пуск» (Запустить). Выберите его и нажмите кнопку «Снять задачу» внизу.
Удалите сторонние приложения
Многим пользователям Windows 10 все еще не нравится внешний вид и функциональность меню «Пуск», поэтому они склонны использовать приложения для его изменения. По большей части эти приложения стабильны и редко ломают что-либо, но вы должны удалить их, если кнопка меню Пуск перестанет работать.
Также, если у вас есть какие-либо приложения, которые изменяют работу вашей клавиатуры, например, приложение, которое переопределяет клавиши клавиатуры, отключите его.
Включите XAML
XAML — это язык, на котором написаны современные приложения для Windows 10, а меню «Пуск» — это приложение XAML, для которого требуется доступ UAC. Как правило, доступ к UAC для него включен по умолчанию, однако вы можете случайно отключить его, или его повторное включение может решить проблему. Вы можете сделать это из PowerShell или из командной строки.
PowerShell
Откройте PowerShell с правами администратора и выполните следующую команду;
Командная строка
Откройте новый файл в текстовом редакторе «Блокнот» и вставьте в него следующее. Сохраните файл с расширением CMD и запустите его от имени администратора. Он внесет изменения в реестр Windows, что позволит включить XAML.
Удалите файлы Cortana
Если вы не используете Windows 10 1903, меню «Пуск», «Поиск» и «Cortana» по-прежнему тесно связаны друг с другом, поэтому удаление файлов, связанных с «Cortana», может решить проблему.
Откройте командную строку с правами администратора и выполните следующие команды, одну за другой.
С помощью команды «Выполнить»
1. Нажмите сочетание клавиш Win + R , чтобы открыть команду «Выполнить»
2. Скопируйте и вставьте следующую команду и нажмите Enter :
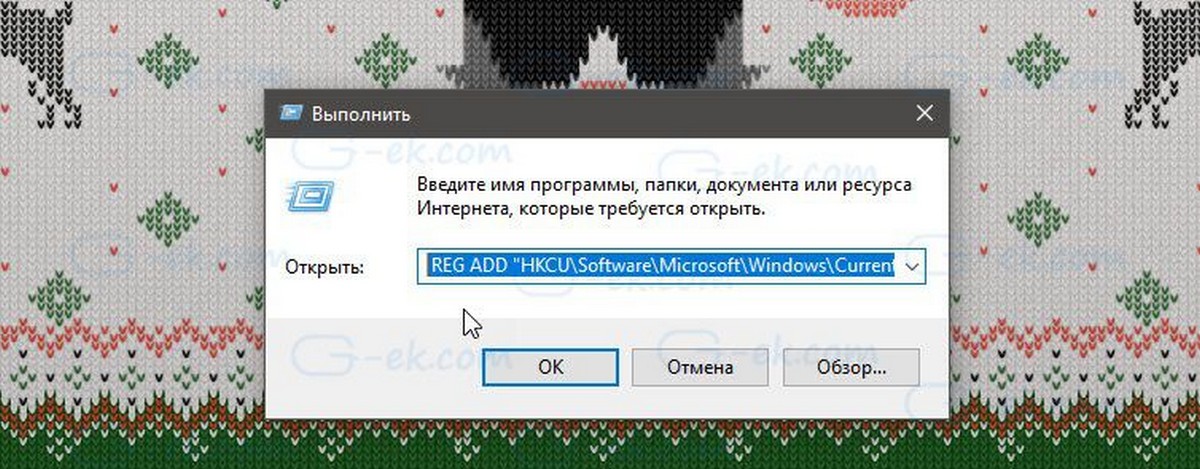
Это создаст параметр EnableXamlStartMenu со значением равным 0.
3.Снова откройте команду «Выполнить» и скопируйте и вставьте:
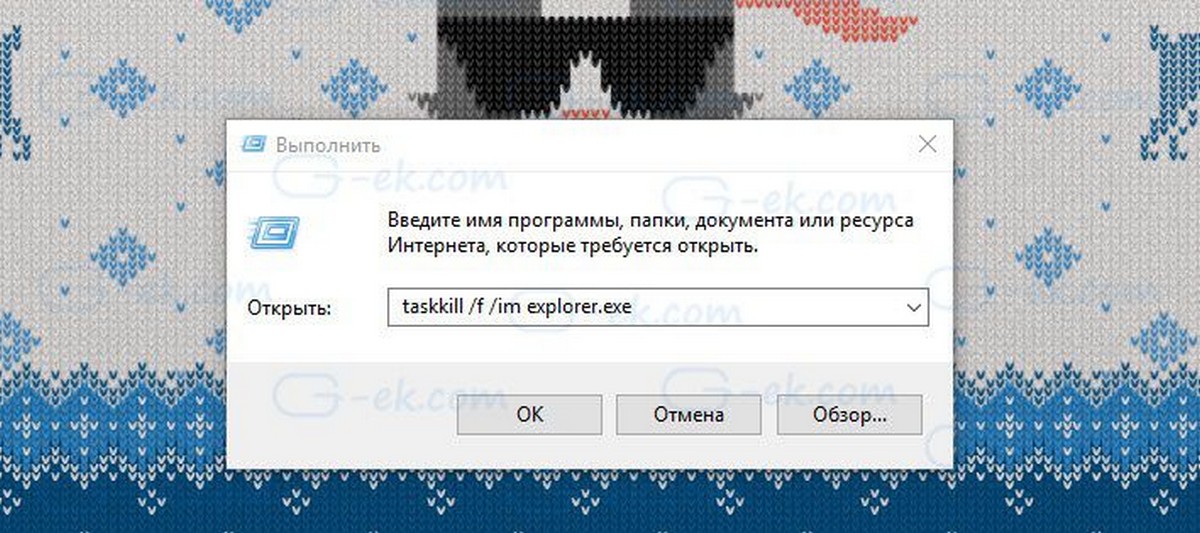
После нажатия Enter , будет завершена задача — Проводник Windows.
4.Нажмите сочетание клавиш Ctrl + Shift + Esc , в открывшимся Диспетчере задач, нажмите меню «Файл» → «Запустить новую задачу»
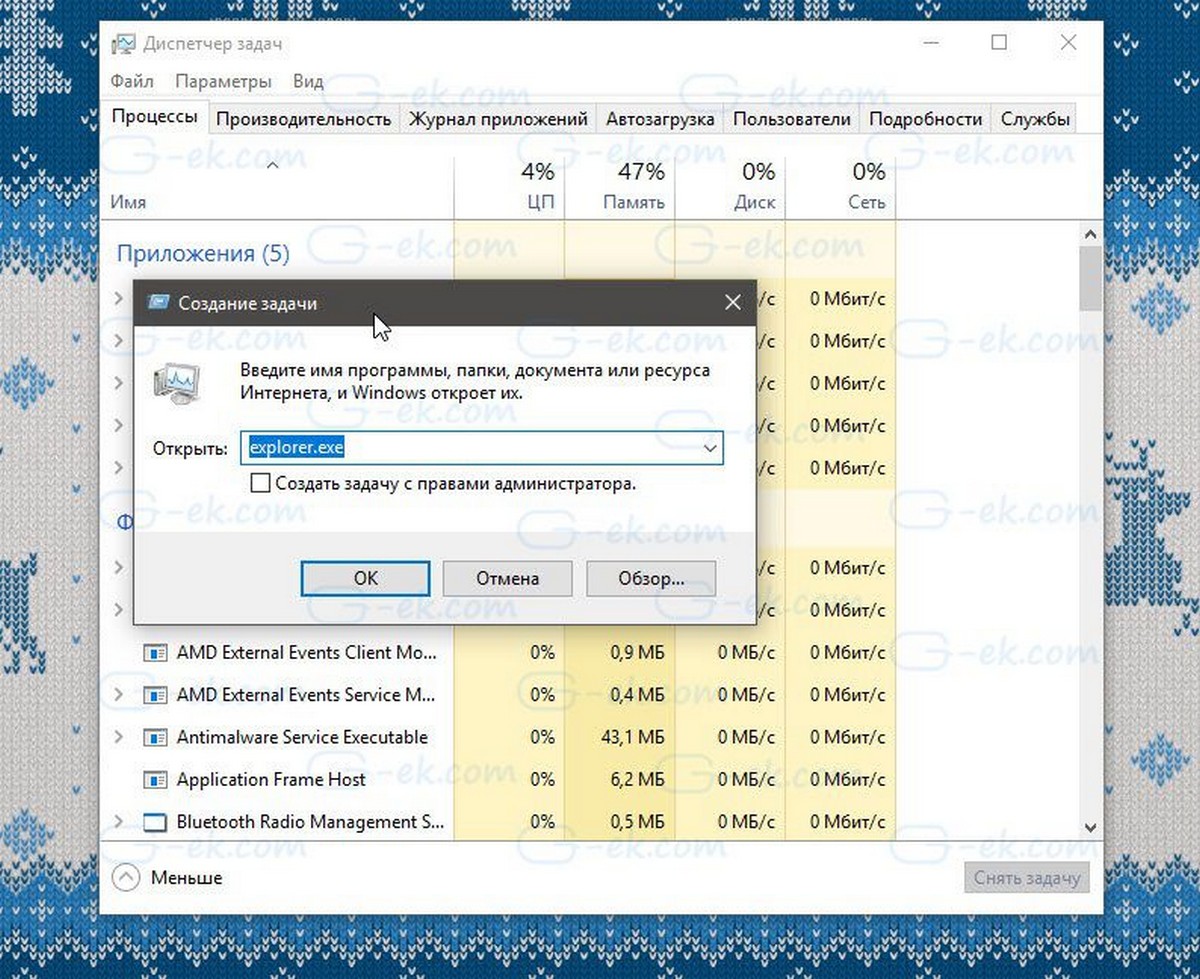
И нажмите Enter, это запустит новый экземпляр Проводника.
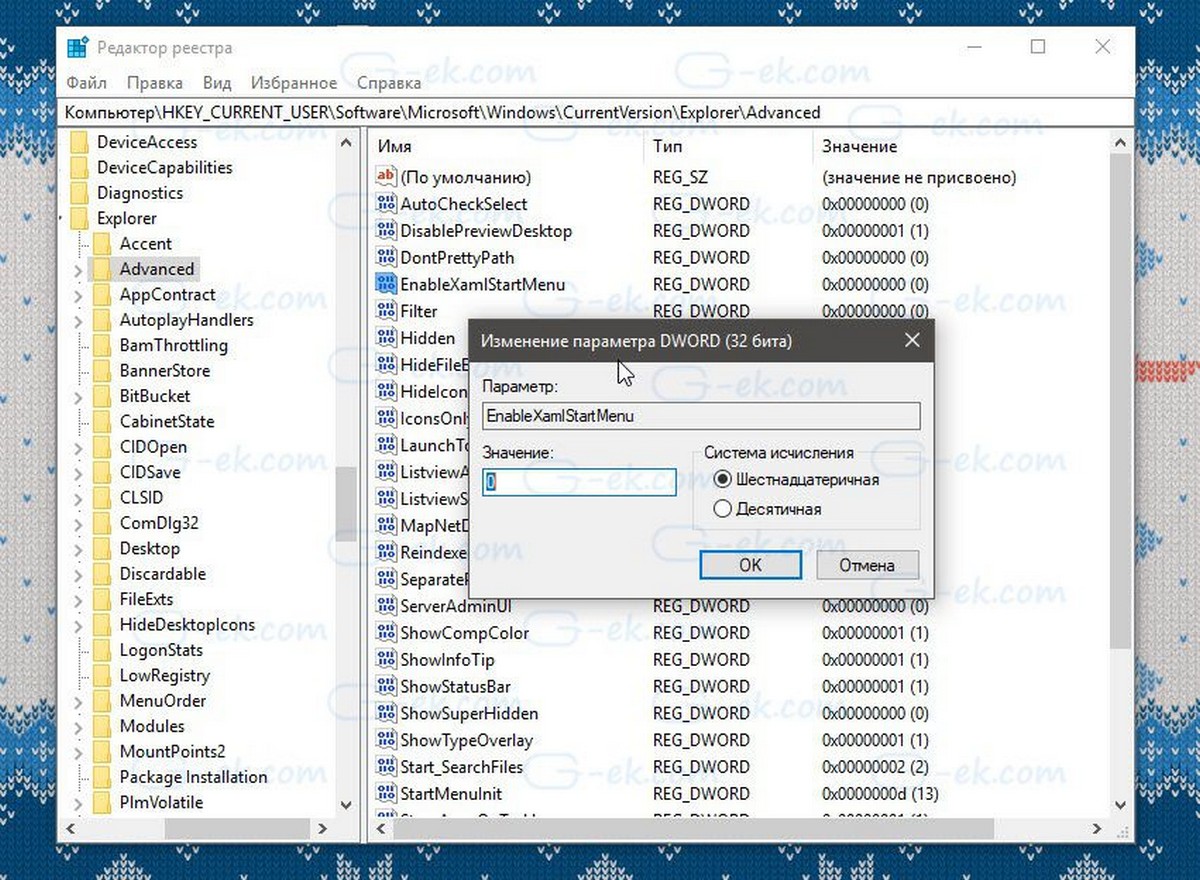
С помощью редактирования реестра Windows.
Выполните следующие действия:
1. Откройте редактор Реестра.
3. Создайте новый параметр Dword (32 бита) с именем «EnableXamlStartMenu».
4. Присвойте ему значение «0»
5. Выйдите из системы и войдите или перезагрузите систему.
Теперь ваше меню «Пуск» должно работать.
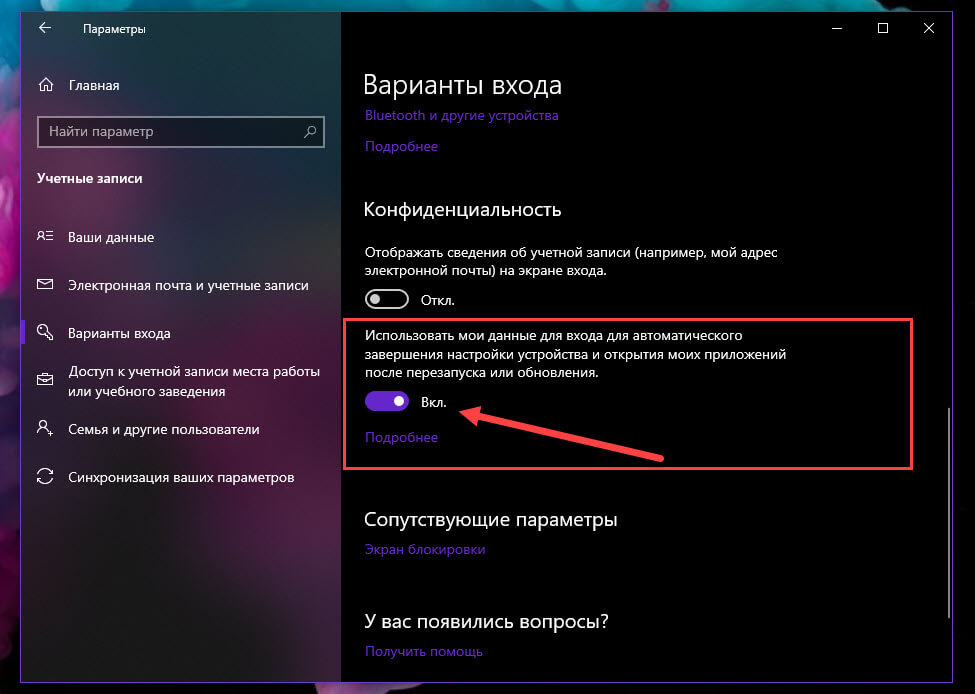
Отключить параметр «Использовать мои данные для входа…»
Это решение может показаться не связанным, но оно работает для некоторых пользователей. Откройте приложение «Параметры» и перейдите в группу настроек «Учетные записи». Выберите вкладку «Варианты входа» и отключите параметр «Использовать мои данные для входа, для автоматического завершения настройки устройства и открытия моих приложений после перезапуска и обновлений». Перезагрузите вашу систему.
Если не одно решение не помогло
Запустите Windows 10 в безопасном режиме и проверьте, работает ли кнопка меню «Пуск». Если нет, окончательный вариант действий — создать новую учетную запись пользователя и удалить ту, в которой кнопка меню «Пуск» не будет работать. Возможно, это не лучшее решение, но это лучше, чем новая установка ОС и повторная установка приложений.
Надеюсь, информация будет полезной, дайте нам знать, если это поможет решить вашу проблему.


