- Как включить Retina-разрешение на внешнем мониторе Mac
- Почему картинка на внешнем мониторе нечеткая
- Как отключить защиту SIP
- Как включить HiDPI на любом экране Mac
- Как обойтись без сторонних приложений
- Big Sur 11.1 Macbook Pro M1 not HiDPI #164
- Comments
- fernangcia commented Jan 4, 2021
- xzhih commented Jan 5, 2021
- zzm88 commented Jan 16, 2021
- akswalia23 commented Jan 22, 2021
- WilliamHoo commented Jan 29, 2021
- akswalia23 commented Feb 4, 2021
- Swiftpaws commented Feb 12, 2021
- cooper-lyt commented Feb 18, 2021 •
- Swiftpaws commented Feb 18, 2021 •
- ilovezans commented Mar 3, 2021
- remoteweb commented Mar 8, 2021
- khoatdd commented Mar 9, 2021
- leirock commented Mar 9, 2021
- remoteweb commented Mar 9, 2021
- tvhung83 commented Mar 9, 2021
- pjuhas commented Mar 11, 2021 •
- nildeveloper commented Mar 19, 2021
- remoteweb commented Mar 19, 2021
- leocho1989 commented Apr 25, 2021 •
- tvhung83 commented Apr 26, 2021
- leocho1989 commented Apr 26, 2021
- usmajeed commented May 7, 2021
- JM-Mendez commented Jun 28, 2021
- sunjianan9900 commented Jul 4, 2021
Как включить Retina-разрешение на внешнем мониторе Mac
Мы уже рассказывали о проблемах, которые могут возникнуть при выборе внешнего монитора для Mac. При неподходящем разрешении картинка на экране будет нечеткая, шрифты могут быть смазанными, а границы элементов превратятся в “лесенку”.
Даже после покупки монитора с “правильным” разрешением для macOS картинка может быть хуже, чем на экране MacBook или iMac. Сейчас разберёмся, почему так происходит и как это исправить.
Почему картинка на внешнем мониторе нечеткая
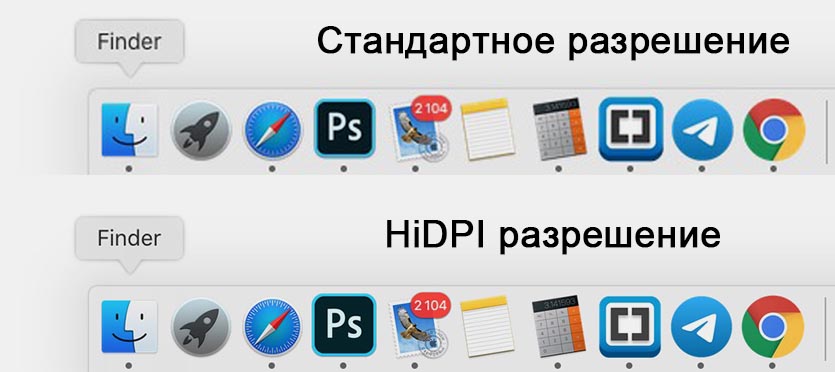
Оригинальные мониторы на компьютерах Apple работают в HiDPI режиме, по сути система удваивает разрешение, чтобы добиться четкости шрифтов и границ элементов. Даже на правильно подобранном внешнем мониторе картинка будет не такая четкая, как на оригинальной матрице MacBook или экране iMac.
Не видите разницу? Включите увеличение экрана (Настройки – Универсальный доступ – Увеличение) и приблизьте картинку в 3-4 раза.
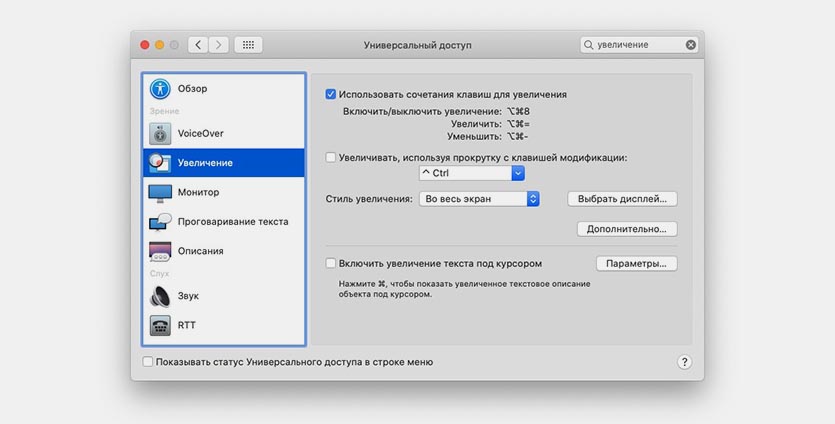
На экране Mac четкость не пропадет даже при большом увеличении, а на внешнем мониторе сразу же “поплывут” шрифты, а границы элементов интерфейса станут нечеткими.
Оказывается, есть способ заставить компьютеры Apple выводить изображение в HiDPI режиме и на внешний монитор.
Как отключить защиту SIP

Для работы с нестандартными разрешениями экрана потребуется модифицировать некоторые системные файлы. Еще в операционной системе El Capitan купертиновцы добавили специальную защиту SIP (System Integrity Protection), которая по умолчанию защищает важные данные от модификации.
На время настройки разрешения придется ее отключить. Для этого делаем следующее:
1. Перезагружаем Mac.
2. Во врем включения зажимаем клавиши Command + R для входа в режим восстановления.
Это нужно делать на оригинальной беспроводной или любой проводной клавиатуре. Сторонние беспроводные клавиатуры, скорее всего, подключаются к системе уже после начала загрузки системы и не успеют дать нужный сигнал.
3. После запуска в режиме восстановления в строке меню выбираем Утилиты – Терминал.
4. Вводим команду:
Подтверждаем действие паролем администратора.
5. Перезагружаем Mac в обычном режиме.
Теперь системные файлы можно модифицировать. После всех проделанных манипуляции настоятельно рекомендуем включить защиту обратно. Делается это аналогично, но с использованием команды “csrutil enable“.
Как включить HiDPI на любом экране Mac

Проще всего для этого использовать сторонние приложения вроде SwitchResX или QuickRes.
1. Вводим следующую команду в Терминале для активации режима HiDPI:
sudo defaults write /Library/Preferences/com.apple.windowserver.plist DisplayResolutionEnabled -bool true
2. Скачиваем подходящую программу с сайта разработчика и устанавливаем ее.
3. Запускаем приложение (на примере SwitchResX) и выбираем подходящее для монитора разрешение с пометкой HiDPI.
4. Если нужного разрешения в формате HiDPI нет, придется добавить его вручную. Для этого мы и отключали защиту SIP.
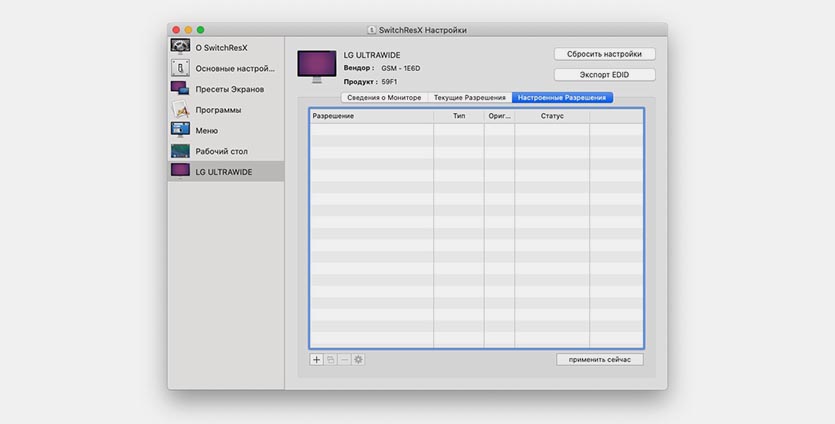
5. Переходим в параметры приложения и открываем вкладку своего внешнего монитора.
6. Открывшем раздел Настроенные разрешения и нажимаем “+”.
7. Включаем тип Масштабируемое разрешение.
8. Вводим удвоенные показатели пикселей для своего монитора.
Например, для монитора с разрешением 1920 х 1080 необходимо указать разрешение 3840 х 2160.
9. Нажимаем Файл – Сохранить настройки в строке меню.
10. Перезагружаем Mac.
Теперь в приложении можно выбрать добавленное разрешение с HiDPI. Можете сравнить картинку при увеличении масштаба.
Как обойтись без сторонних приложений
Держать сторонние приложения для активации всего одной фишки – не самая лучшая идея. Тем более, что обе описанные выше программы платные. Конечно, есть и бесплатные альтернативы, например, утилита RDM, но с ее помощью можно лишь изменить разрешение после того, как оно было добавлено в SwitchResX.
Есть способ обойтись без сторонних программ. Для этого придется немного повозиться в терминале. Всё как вы любите!
Внимание! Все описанные ниже действия вы делаете на свой страх и риск. Обязательно создайте резервную копию перед проведением описанных манипуляций.
1. Для начала активируем возможность использования режима HiDPI командой в Терминале:
sudo defaults write /Library/Preferences/com.apple.windowserver.plist DisplayResolutionEnabled -bool true
2. Идентифицируем свой дисплей при помощи команды:
ioreg -lw0 | grep IODisplayPrefsKey
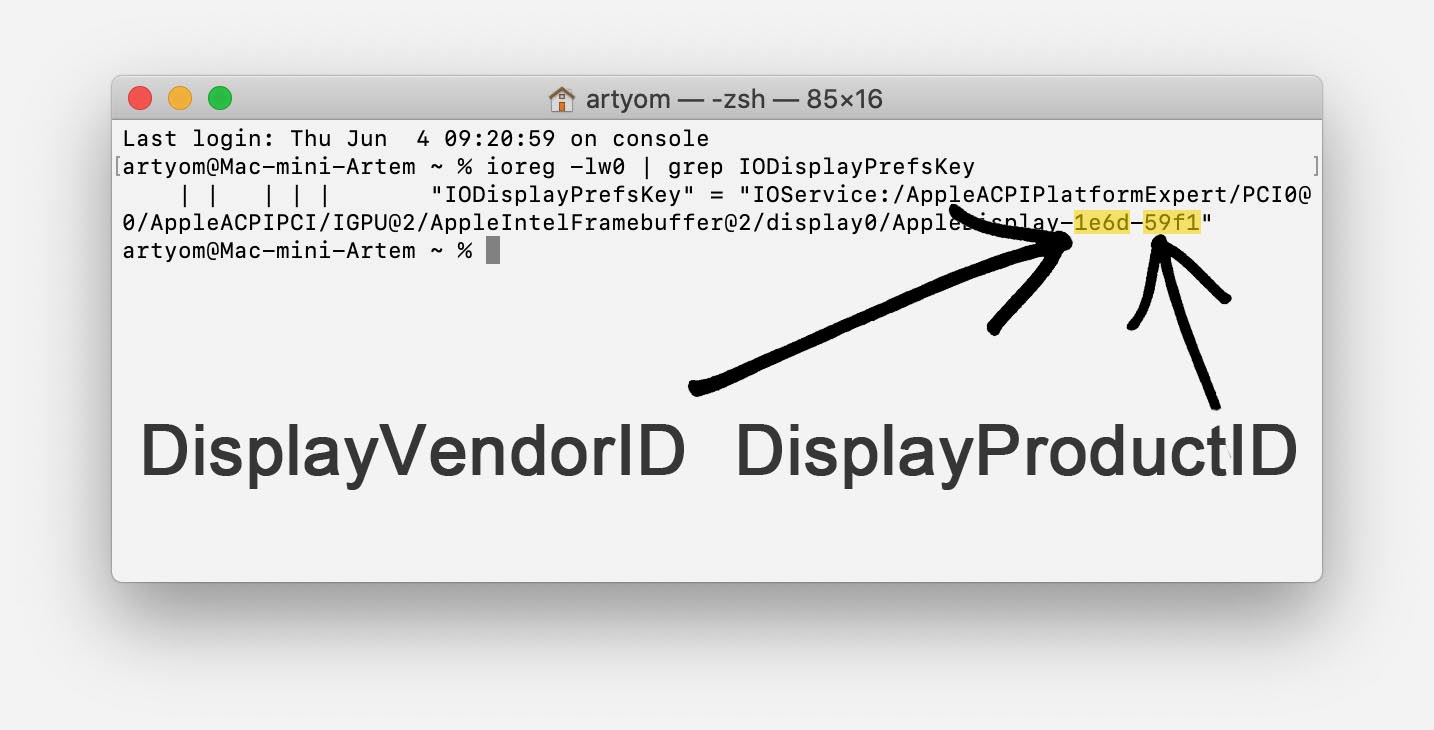
3. Находим в полученном ответе идентификаторы производителя (DisplayVendorID) и модели (DisplayProductID).
Если вводите команду на MacBook с подключенным монитором, система выдаст информацию как о штатной матрице, так и о внешнем дисплее. Вам нужны данные из строки, в конце которой указано “AppleDisplay”, строка с отметкой “AppleBacklightDisplay” нам не нужна.
4. Переходим на сайт, который генерирует HiDPI настройки для любого монитора.
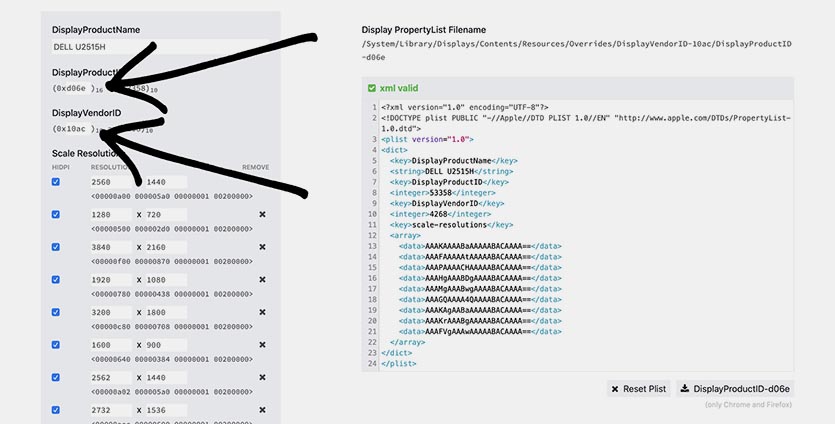
5. Вводим свои значения DisplayVendorID и DisplayProductID в соответствующие поля.
6. Ниже указываем желаемые параметры разрешения для своего монитора. Можете создать несколько параметров с разными разрешениями, включенной и отключенной опцией HiDPI.
Ненужные варианты разрешения можно удалить. Обратите внимание, что в самом низу страницы расположен калькулятор разрешения, который подскажет правильное количество пикселей при заданном соотношении сторон.
7. Когда все нужные варианты разрешения внесены, скачиваем сгенерированный файл настроек. Вкладку с сайтом при этом не закрываем, она нам еще понадобится.
8. В Терминале вводим команду:
Это необходимо, чтобы перемонтировать системный раздел в macOS Catalina с возможностью записи. Это еще одна защита данных в операционной системе Apple. Введенная команда будет действовать до первой перезагрузки, затем системный раздел снова будет доступен только для чтения.
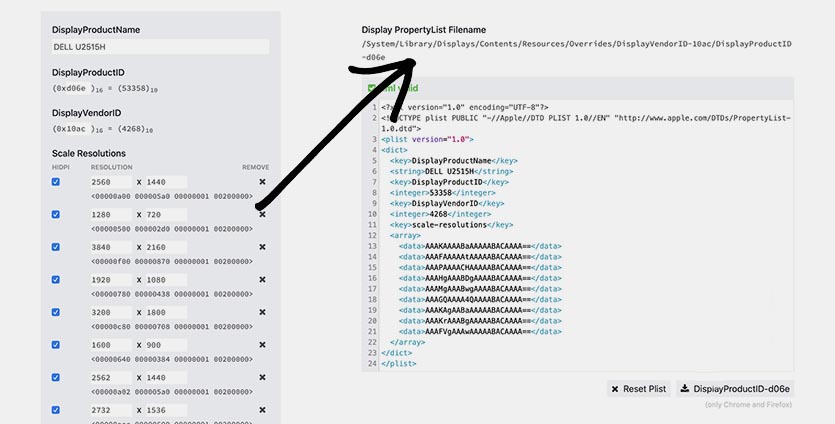
9. В Finder переходим по пути /System/Library/Displays/Contents/Resources/Overrides, здесь нужно создать папку, чтобы получить правильный путь к файлу конфигурации. Он указан на сайте.
Если нужная папка (с вашим DisplayVendorID) существуют, пропускаем этот шаг. Если папки нет, создаём ее при помощи команды “sudo mkdir путь_который_указан_на_сайте“.
10. Остается лишь скопировать сохраненный файл конфигурации по нужному пути.
Для этого вводим такую команду:
sudo cp путь_к_загруженному_файлу_plist путь_к_созданной_папке
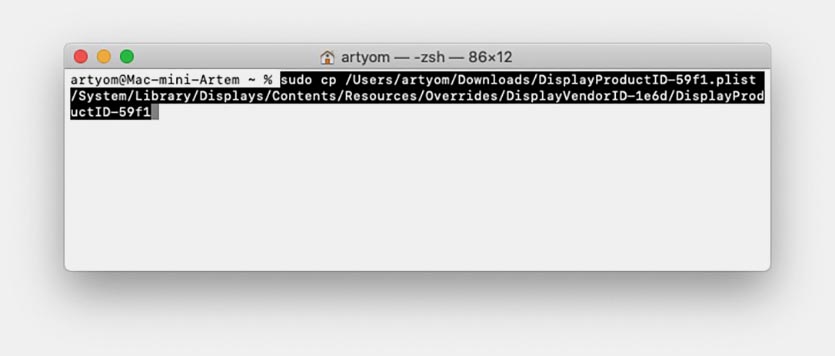
Вводить путь вручную необязательно. Достаточно ввести начало команды “sudo cp “, затем перетащить в окно Терминала файл *.plist и папку назначения. Пути при этом пропишутся автоматически.
11. После выполнения команды перезагружаем Mac.
Теперь система будет предлагать HiDPI разрешение для вашего монитора в стандартных настройках.
Источник
Big Sur 11.1 Macbook Pro M1 not HiDPI #164
Comments
fernangcia commented Jan 4, 2021
Hi xzhih, thank you for your work.
Trying to enable HiDPI on my external monitor (Dell U2515h) at 2560×1440 with no success.
The script seems to make changes but SwitchResx does not enable HiDPI for any resolution.
Could it be because of Apple Silicon processor?
Thanks. 
The text was updated successfully, but these errors were encountered:
xzhih commented Jan 5, 2021
Yes, M1 is not supported now.
Need Apple update.
zzm88 commented Jan 16, 2021
Is there any workaround before the update?
akswalia23 commented Jan 22, 2021
yeah any work around at all?
WilliamHoo commented Jan 29, 2021
i updated to big sur 11.2 this morning, still cannot scale the display on my external dell 32» monitor (2k). Does anyone knows how to fix this problem?
@xzhih please let me know if you wish to know anything from me to fix this problem. It really hurts my eyes now. 🙁
akswalia23 commented Feb 4, 2021
Swiftpaws commented Feb 12, 2021
On M1 macs creating custom resolutions is not possible due to EDID read issues. https://www.reddit.com/r/mac/comments/k7pkrp/your_help_is_needed/
There is no workaround as of now, Apple has to provide a fix
cooper-lyt commented Feb 18, 2021 •
SwitchResX 4.11.1a3 can creating custom resolutions. 
Swiftpaws commented Feb 18, 2021 •
Yes but it is still limited because you cannot enable HiDpi or activate higher resolutions than native. For example creating HiDpi 1080p resolutions (on a 1440p panel) is not possible.
ilovezans commented Mar 3, 2021
I have a M1 MacBook Air, and a Dell P2419HC 1920x1080p Monitor. The text is blurry and weird, games etc are normal. Will this work in the future to fix that?
remoteweb commented Mar 8, 2021
SwitchResX 4.11.1a3 can creating custom resolutions.
There is only 4.11.1 version available for M1 and custom resolutions don’t seem available. How did you manage to enable these tabs (display information, custom resolutions)
khoatdd commented Mar 9, 2021
SwitchResX 4.11.1a3 can creating custom resolutions.
There is only 4.11.1 version available for M1 and custom resolutions don’t seem available. How did you manage to enable these tabs (display information, custom resolutions)
You need to use beta version, not stable one
leirock commented Mar 9, 2021
SwitchResX 4.11.1a3 can creating custom resolutions.
There is only 4.11.1 version available for M1 and custom resolutions don’t seem available. How did you manage to enable these tabs (display information, custom resolutions)
You need to use beta version, not stable one
I can create the custom resolution but cannot make this active with beta version.
remoteweb commented Mar 9, 2021
@lei2rock @khoatdd I talked with Stephane, creator of SwitchResX and there is no way we can enable 1080p HiDPi for 1440p external displays as we used to, with older intel based Mac products. I would advice we all submit a suggestion for this on https://feedbackassistant.apple.com . Creator told me that this feature was initially enabled in M1 BigSur beta version which Apple blocked afterwards.
At the moment this HiDPi feature works only on 4k external monitors.
tvhung83 commented Mar 9, 2021
@remoteweb thank you for the info. That’s sad to know. I’ve submitted many feedbacks to Apple, and not a single update from them, for months 🙁
pjuhas commented Mar 11, 2021 •
This guy successfully created and activated custom resolution using newest 11.3 beta. Maybe 1080p HiDPI will work on Big Sur 11.3.
nildeveloper commented Mar 19, 2021
remoteweb commented Mar 19, 2021
Yes creator of SwitchResX told me that this is doable. And i did it also for my macbook. However the HiDPi is not working . and the display is kind of blurry. @pjuhas
leocho1989 commented Apr 25, 2021 •
So download new version SwitchresX, add a custom resolution like 5120×2144 into internal display, remember to save it and restart the mac. Use SwitchresX set the internal resolution to the new one. Then you can mirror the exterior display to internal display in display settings. Then it should be hidpi on external display too. I am using m1 macboom air on 11.3 and 11.4 beta on a 34 ultrawide. This should be the solution so far. Hope this can help. Been using like this for weeks.
tvhung83 commented Apr 26, 2021
So download new version SwitchresX, add a custom resolution like 5120×2144 into internal display, remember to save it and restart the mac. Use SwitchresX set the internal resolution to the new one. Then you can mirror the exterior display to internal display in display settings. Then it should be hidpi on external display too. I am using m1 macboom air on 11.3 and 11.4 beta on a 34 ultrawide. This should be the solution so far. Hope this can help. Been using like this for weeks.
What is your external monitor, ie. brand and resolution? Did you have the issue of «Not activate — Invalid»?
Then you can mirror the exterior display to internal display in display settings.
Can you give more details, screenshots would help. The reason I ask is, I’m using mac mini, there is no internal display. Thanks in advance!
leocho1989 commented Apr 26, 2021
So download new version SwitchresX, add a custom resolution like 5120×2144 into internal display, remember to save it and restart the mac. Use SwitchresX set the internal resolution to the new one. Then you can mirror the exterior display to internal display in display settings. Then it should be hidpi on external display too. I am using m1 macboom air on 11.3 and 11.4 beta on a 34 ultrawide. This should be the solution so far. Hope this can help. Been using like this for weeks.
What is your external monitor, ie. brand and resolution? Did you have the issue of «Not activate — Invalid»?
Then you can mirror the exterior display to internal display in display settings.
Can you give more details, screenshots would help. The reason I ask is, I’m using mac mini, there is no internal display. Thanks in advance!
Mine is LG 34 ultrawide 3440x 1440
for mac mini it doesn’t have an internal display, so probably it can use a 4k edid emulator to work as an internal display.

usmajeed commented May 7, 2021
Yep, agree with above. Someone posted something similar on Macrumors. More detailed.
JM-Mendez commented Jun 28, 2021
For those using m1 macs, this just worked for me on a macbook
SwitchResX -> create a custom resolution for INTERNAL display. Make it 2x the resolution you want, i.e. 3840×2160 for 1080p. Save it and reboot.
Then, connect your laptop up to your monitor. Select the SwitchResX icon in the menu bar at the top. Activate the custom HIDPI res for your internal monitor.
sunjianan9900 commented Jul 4, 2021
So download new version SwitchresX, add a custom resolution like 5120×2144 into internal display, remember to save it and restart the mac. Use SwitchresX set the internal resolution to the new one. Then you can mirror the exterior display to internal display in display settings. Then it should be hidpi on external display too. I am using m1 macboom air on 11.3 and 11.4 beta on a 34 ultrawide. This should be the solution so far. Hope this can help. Been using like this for weeks.
What is your external monitor, ie. brand and resolution? Did you have the issue of «Not activate — Invalid»?
Then you can mirror the exterior display to internal display in display settings.
Can you give more details, screenshots would help. The reason I ask is, I’m using mac mini, there is no internal display. Thanks in advance!
Mine is LG 34 ultrawide 3440x 1440
for mac mini it doesn’t have an internal display, so probably it can use a 4k edid emulator to work as an internal display.
hey ,
can you work more than 720P ?
Источник


