Information about the Attachment Manager in Microsoft Windows
Summary
This article describes Attachment Manager in Windows. This article includes the methods to configure Attachment Manager and the workarounds for two issue with Attachment Manager.
Introduction
The Attachment Manager is included in Microsoft Windows to help protect your computer from unsafe attachments that you might receive with an e-mail message and from unsafe files that you might save from the Internet.
If the Attachment Manager identifies an attachment that might be unsafe, the Attachment Manager prevents you from opening the file, or it warns you before you open the file. For more information about Attachment Manager, go to the «More Information» section.
Workarounds when you cannot download a file or a program
Many people encounter issues when they try to download a file or a program from the Internet. This could be caused by a number of reasons. Here we provide two general solutions for you to try if you are getting an error that your download is blocked, or if you get «virus scan failed» or «virus detected» messages.
You cannot download any file if the «File download» option is disabled in the Internet security settings. Follow these steps to check the Internet security settings:
Start the Internet Properties window.
Windows 7
Click Start, click All Programs, and then open the Accessories folder.
Type inetcpl.cpl, and then click OK.
Windows 8 or 10
From the Start screen, type inetcpl.cpl, and then press Enter.
In the Internet Properties window, click the Security tab, click the Ineternet zone (globe icon), and then click the Custom level button.
In the Security Settings window, scroll down to Downloads > File download.
Click to select Enable.
Scroll down the list further to Miscellaneous > Launching applications and unsafe files.
Click to select Prompt (recommended).
You may receive a «Virus scan failed» or «Virus detected» error message when you try to open or save a file or a program from Internet. In most cases, it is not caused by the Windows operating system, but by the antivirus software. If you are certain that the source you are trying to open is safe and trusted, try the following workaround to disable the virus scanning temporarily, and then enable the virus scanning immediately after you complete downloading the program or file. You have to be very cautious about using this workaround. Otherwise, you may be exposed to virus attacks.
Start Registry Editor.
Windows 7
Click Start, click All Programs, and then open the Accessories folder.
Type regedit.exe, and then click OK.
Windows 8 or 10
From the Start screen, type regedit.exe, and then press Enter.
Locate the following registry subkeys: HKEY_CURRENT_USER\Software\Microsoft\Windows\CurrentVersion\Policies\Attachments
If you do not see the Attachments subkey, create it by right clicking Policies, select New, click Key, and then type Attachments as the key name.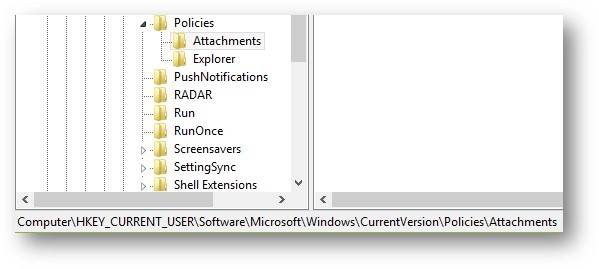
Right click Attachments, select New, and then click DWORD (32-bit) Value.
Type ScanWithAntiVirus as the value name, and then press Enter.
Right-click the new ScanWithAntiVirus DWORD value, and then click Modify.
In the Value data box, type 1, and then click OK.
Exit Registry Editor.
Log off and log in Windows to make the change take effect.
Open or save the program or file that you failed before.
Note We suggest you change the value of ScanWithAntiVirus subkey to 3 to enable the virus scan right after you completely open or save the program or file.
Configuring the Attachment Manager
There are several features of the Attachment Manager that can be configured by using Group Policy or the local registry.
This policy setting lets you manage the default risk level for file types. To fully customize the risk level for file attachments, you may also have to configure the trust logic for file attachments:
High Risk
If the attachment is in the list of high risk file types and is from the restricted zone, Windows blocks the user from accessing the file. If the file is from the Internet zone, Windows prompts the user before accessing the file.
Moderate Risk
If the attachment is in the list of Moderate Risk file types, Windows will not prompt the user before accessing the file, regardless of the file’s zone information.
Low Risk
If the attachment is in the list of low risk file types, Windows will not prompt the user before accessing the file, regardless of the file’s zone information.
If you enable this policy setting, you can specify the default risk level for file types. If you disable this policy setting, Windows sets the default risk level to moderate. If you do not configure this policy setting, Windows sets the default risk level to moderate.
User Configuration\Administrative Templates\Windows Components\Attachment Manager
High (6150)
or
Moderate (6151)
or
Note The default value of the DefaultFileTypeRisk registry entry is Moderate (6151).
This policy setting lets you manage whether Windows marks file attachments that have information about their zone of origin. These zones or origin are Internet, intranet, and local. This policy setting requires the NTFS file system to function correctly and will fail without notice on systems that use FAT32. By not preserving the zone information, Windows cannot make appropriate risks assessments. If you enable this policy setting, Windows does not mark file attachments by using their zone information. If you disable this policy setting, Windows marks file attachments by using their zone information. If you do not configure this policy setting, Windows marks file attachments by using their zone information.
User Configuration\Administrative Templates\Windows Components\Attachment Manager
Note The default value of the DefaultFileTypeRisk registry entry is Off (2).
Hide mechanisms to remove zone information
This policy setting lets you manage whether users can manually remove the zone information from saved file attachments by clicking
Unblock on the file’s Properties tab or by clicking to select a check box in the Security Warning dialog box. Removing the zone information lets users open potentially dangerous file attachments that Windows has blocked users from opening. If you enable this policy setting, Windows hides the check box and the Unblock button. If you disable this policy setting, Windows shows the check box and the Unblock button. If you do not configure this policy setting, Windows shows the check box and the Unblock button.
User Configuration\Administrative Templates\Windows Components\Attachment Manager
Note The default value of the DefaultFileTypeRisk registry entry is Off (0).
These policy settings let you configure the list of low, moderate, and high risk file types. The High list takes precedence over the Moderate and Low risk inclusion lists. Also, an extension is listed in more than one inclusion list. If you enable this policy setting you can create a custom list of low, moderate, and high risk file types. If you disable this policy setting, Windows uses its built in list of file types. If you do not configure this policy setting, Windows uses its built in list of file types.
User Configuration\Administrative Templates\Windows Components\Attachment Manager
HighRiskFileTypes
ModRiskFileTypes
LowRiskFileTypes
This policy setting lets you configure the logic that Windows uses to determine the risk for file attachments. Preferring the file handler instructs Windows to use the file handler data over the file type data. For example, it instructs Windows to trust Notepad.exe, but do not trust .txt files. Preferring the file type instructs Windows to use the file type data over the file handler data. For example, trust .txt files, regardless of the file handler. Using both the file handler and type data is the most restrictive option. Windows chooses the more restrictive recommendation. This causes users to see more trust prompts than selecting the other options. If you enable this policy setting, you can select the order in which Windows processes risk assessment data. If you disable this policy, Windows uses its default trust logic which prefers the file handler over the file type.
User Configuration\Administrative Templates\Windows Components\Attachment Manager
File Type (1)
or
Handler (2)
or
Both (3)
Note The default value of the DefaultFileTypeRisk registry entry is Handler (2).
This policy setting lets you manage the behavior for notifying registered antivirus programs. If multiple programs are registered, they will all be notified. If the registered antivirus program already performs on-access checks or scans files as they arrive on the computer’s e-mail server, additional calls would be redundant. If you enable this policy, Windows tells the registered antivirus program to scan the file when a user opens a file attachment. If the antivirus program fails, the attachment is blocked from being opened. If you disable this policy, Windows does not call the registered antivirus programs when file attachments are opened. If you do not configure this policy, Windows does not call the registered antivirus programs when file attachments are opened.
User Configuration\Administrative Templates\Windows Components\Attachment Manager
Off (1)
or Optional (2) or
Note The default value of the DefaultFileTypeRisk registry entry is Off (1). When the value is set to Optional (2), all scanners are called even after one reports a detection.
For more information, click the following article number to view the article in the Microsoft Knowledge Base:
182569 Internet Explorer security zones registry entries for advanced users
More Information
The following determine whether you are prevented from opening the file or whether you are warned before you open the file:
The type of program that you are using.
The file type that you are downloading or trying to open.
The security settings of the Web content zone that you are downloading the file from.
Note You can configure the Web content zones in Microsoft Internet Explorer on the Security tab. To view the Web content zones, click Tools, click Internet Options, and then click the Security tab. The following are the four Web content zones:
The Attachment Manager uses the IAttachmentExecute application programming interface (API) to find the file type, to find the file association, and to determine the most appropriate action.
Microsoft Outlook Express and Microsoft Internet Explorer use the Attachment Manager to handle e-mail attachments and Internet downloads.
The Attachment Manager classifies files that you receive or that you download based on the file type and the file name extension. Attachment Manager classifies files types as high risk, medium risk, and low risk. When you save files to your hard disk from a program that uses the Attachment Manager, the Web content zone information for the file is also saved with the file. For example, if you save a compressed file (.zip) that is attached to an e-mail message to your hard disk, the Web content zone information is also saved when you save the compressed file. When you try to extract the contents from the compressed file, or if you try to run a file, you cannot. The Web content zone information is saved together with the files only if the hard disk uses the NTFS file system.
You can open a blocked file from a known source if you want to. To open a blocked file, follow these steps:
Right-click the blocked file, and then click
Properties.
In the General tab, click
Unblock.
When you try to download or open a file from a Web site that is in the restricted Web content zone, you may receive a message that indicates that the file is blocked.
When you try to open high-risk file types from sites that belong to the Internet Web content zone, you may receive a warning message, but you may be able to open these types of files.
The file types that the Attachment Manager labels as high-risk include the following:
Параметры безопасности реестра windows 7

Редактор реестра (regedit) — инструмент, предназначенный для опытных пользователей. Этот инструмент предназначен для просмотра и изменения параметров в системном реестре, в котором содержатся сведения о работе компьютера.
Для запуска реестра нажмите клавишу Win + R и введите команду regedit
Примечание: Корпорация Майкрософт настоятельно рекомендует создать резервную копию системного реестра перед внесением в него какие-либо изменений, а также изменять только те параметры, назначение которых вам известно, или на которые вам указали
Примечание: Для большинство параметров требуется перезагрузка, чтобы изменения вступили в силу.
Отключить редактирование меню Пуск
Откройте раздел
и создайте в нем параметр типа DWORD с именем NoChangeStartMenu и значение параметра должно быть равно 1
Запрет запуска Панели управления
В разделе
создайте параметр типа DWORD с именем NoControlPanel и установите значение параметра 1
Отключить запуск Диспетчера задач
В разделе
создайте дополнительный подраздел с именем System (если его нет) и в этом разделе создайте параметр типа DWORD с именем DisableTaskMgr и значение 1.Теперь при вызове Диспетчера задач этот пункт в меню Панели задач будет не активен
Отключить автозагрузку USB-устройст, приводов, съемных дисков, сетевых дисков
Открываем раздел реестра
и создаем новый раздел с именем Explorer В этом разделе создаем параметр типа DWORD с именем NoDriveTypeAutoRun
Значение параметра выбираем на своё усмотрение
0x1 — отключить автозапуск на приводах неизвестных типов
0x4 — отключить автозапуск съёмных устройств
0x8 — отключить автозапуск НЕсъёмных устройств
0x10 — отключить автозапуск сетевых дисков
0x20 — отключить автозапуск CD-приводов
0x40 — отключить автозапуск RAM-дисков
0x80 — отключить автозапуск на приводах неизвестных типов
0xFF — отключить автозапуск вообще всех дисков
Отключить просмотр общих ресурсов анонимным пользователям
В разделе
измените значение параметра restrictanonymous на 1
Отключаем «расшаренные» административные ресурсы C$, D$, ADMIN$
Открываем редактор реестра и в разделе
создаем параметр типа DWORD и именем AutoShareWks. Значение параметра — 0. Теперь если открыть Управление компьютером — Общие папки — Общие ресурсы, то кроме IPC$ ничего не должно быть.
Отключение запуска Командной строки
Откройте раздел
и создайте дополнительный подраздел System с параметром типа DWORD DisableCMD, значение параметра могут иметь следующие:
- 0 — разрешить использовать Командную строку
- 1 — запретить использовать Командную строку
- 2 — разрешить запуск командных файлов
Отключить изменение обоев рабочего стола
В разделе
создайте подраздел ActiveDesktop и в нем параметр типа DWORD с именем NoChangingWallPaper со значением 1
Отключение Рабочего стола
Откройте раздел
и создайте в нем параметр типа DWORD с именем NoDesktop и значением 1.Вернуть Рабочий стол можно изменить параметр на 0 или удалить его.
Запрет запуска Редактора реестра (regedit)
Откройте раздел
и создайте в нем подраздел System. В этом подразделе создайте параметр типа DWORD с имнем DisableRegistryTools с именем 1.
Примечание. Если не сделать экспорт этого раздела где параметр DisableRegistryTools имеет значение 0, или не создать заранее reg-файл, для возврата запуска Редактора реестра, то запуск будет невозможен.
Для создания reg-файла откройте блокнот и скопируйте в него эти строки
Windows Registry Editor Version 5.00
Сохраните этот файл под любым, удобным для вас именем, и поменяйте расширение txt на reg. Теперь для возврата запуска Редактора реестра запустите этот файл.
Отключение автоматического обновления Internet Explorer
Откройте раздел
и установите значение параметра NoUpdateCheck равное 1
Запретить автоматическое обновление Media Player
Откройте раздел
и создайте строковый параметр AskMeAgain со значение no. И проверьте параметр EnableAutoUpgrade, его значение установите no
Запрет запуска определенных программ
Задать список программ, которые не будут запущены пользователем можно в разделе
Если подраздела DisallowRun нет — создайте его. Создайте строковый параметр (REZ_SZ) с именем 1(порядковый номер программ, вторая программа будет с именем 2, и т.д) Значени е параметров — это имя программы с расширение exe, например AkelPad.exe
Отключение сообщения о недостатке свободного места
Откройте раздел
создайте в нем параметр типа DWORD с именем NoLowDiskSpaseChecks и установите значение параметра 1
Откройте раздел
и измените значение параметра LowDiskMinimumMBytes на 0
Откройде раздел
HKEY_LOCAL_MACHINE\SOFTWARE\Microsoft\Windows Search\Gathering Manager
и измените значение параметра BackOffLowDiskThresholdMB на 0
Примечание: Чтобы менять значения в разделе могут понадобится права администратора. Для этого надо сделать следующее: Пуск — Все программы — Стандартные. Правой клавишей на Командная строка — Запуск от имени администратора. Ведите команду regedit. Теперь на разделе Gathering Manager кликните правой кнопкой и выберите Разрешения. В открывшемся окне выберите Дополнительно. Перейдите во вкладку Владелец и выберите свою учетную запись (У вас должны быть права администратора). Применить и ОК.
После этих изменений, если на диске будет меньше 10% свободно места, не будет работать система восстановления и дефрагментация диска.
Запрет на установку простого пароля
Дополнительная функция для усложнения пароля. По мимо установки минимальной длины, это параметр задает еще и буквенно-цифровой пароль. Откройте раздел
создайте подраздел Network и в этом подразделе создайте параметр типа DWORD с именем AlphanumPwds и значение параметра установите 1
Запретить отсылать данные в Microsoft SpyNet
Если вы используете «Защитник Windows», встроенный в Windows 7 по умолчанию, то Microsoft собирает информацию не только об ошибках в программах, но и о вашей ОС. Чтобы отключить оправку данных: Пуск — Панель управления — Защитник Windows. В открывшемся окне нажмите на иконку «Программы» в верхнем меню, затем перейдите по ссылке «Microsoft SpyNet». В диалоговом окне выберите опцию «Не присоединяться к сообществу Microsoft SpyNet» и сохраните изменения
Дополнительная информация:


