- Common Tasks — Supervised
- Update
- Run a specific version
- Run a beta version
- Run a development version
- Configuration check
- Configuring access to files
- Installing and using the Samba add-on
- Installing and using the SSH add-on (requires enabling advanced mode for the HA user)
- Installing and using the Visual Studio Code (VSC) add-on
- Installing and using the File Editor add-on
- Snapshots
- Making a Snapshot from the UI
- Restoring a Snapshot on a new install
- Creating snapshots using the Home Assistant Command Line Interface
- Copying your snapshots to another location
- Home Assistant via the command line
- Home Assistant
- Supervisor
- Hardware
- Usage examples
- Lost Password and password reset
- Installing third-party add-ons
- Help: Repository is not showing up
- Способы установки Home Assistant
- Home Assistant OS — установка на хост
- Home Assistant OS — установка в виртуальную машину
- Home Assistant Supervised
- Home Assistant Container
- Home Assistant Core
- HassWP
Common Tasks — Supervised
Update
Best practice for updating a Home Assistant installation:
Backup your installation, using the snapshot functionality Home Assistant offers.
Check the release notes for breaking changes on Home Assistant release notes. Be sure to check all release notes between the version you are running and the one you are upgrading to. Use the search function in your browser ( CTRL + f / CMD + f ) and search for Breaking Changes.
Check your configuration using the Check Home Assistant configuration add-on.
If the check passes, you can safely update. If not, update your configuration accordingly.
Update Home Assistant.
To update Home Assistant Core when you run Home Assistant Supervised you have 2 options.
- Open your Home Assistant UI
- Navigate to the Supervisor panel
- On the Dashboard tab you will be presented with an update notification
If you do not see that notification you can navigate to the System tab. and click the “Reload Supervisor” button.
Run a specific version
In the event that a Home Assistant Core version doesn’t play well with your hardware setup, you can downgrade to a previous release. In this example 2021.4.4 is used as the target version but you can choose the version you desire to run.
Run a beta version
If you would like to test next release before anyone else, you can install the beta version.
- In your Home Assistant UI navigate to the Supervisor panel
- Navigate to the System tab
- Click the link that says “Join beta”
- Navigate to the Dashboard tab
- Install the update that is presented to you
Join the beta channel
Reload the supervisor
Update Home Assistant core to the latest beta version
Run a development version
If you want to stay on the bleeding-edge Home Assistant Core development branch, you can upgrade to dev .
The dev branch is likely to be unstable. Potential consequences include loss of data and instance corruption.
Join the dev channel
Reload the supervisor
Update Home Assistant core to the latest dev version
Configuration check
Configuring access to files
Your Home Assistant Operating server includes two repositories by default: The official core add-on repository, and the community add-on repository. All of the add-ons mentioned here can be installed by navigating to the add-on store using Supervisor > Add-on Store in the UI.
One of the first things to take care of after installing Home Assistant OS is to provide yourself access to files. There are several add-ons commonly used for this, and most users employ a mix of various add-ons. Default directories on the host are mapped to the add-ons so that they can be accessed by the services any particular add-on might provide. On the host system these directories exist on the /data partition at /mnt/data/supervisor/ .
Using any of the add-ons listed below,the following directories are made available for access:
Installing and using the Samba add-on
The Samba add-on creates smb shares which can be accessed from another computer. You can also edit files using the editor of your preference from your client computer. This add-on can be installed from the add-on store’s official repository.
To configure the Samba add-on, you only need to set a user and password of your choice on the configuration page, save, and then start the add-on. The add-on will not start without setting a password!
To connect to the Samba server from another device, you will use the IP address or hostname of your server. Either of these can be found on the Supervisor > System > page of your UI within the Host card.
For connecting from Windows 10, you can enter the IP address or hostname in File Explorer’s address bar with two backslashes, as shown in the example screenshot.
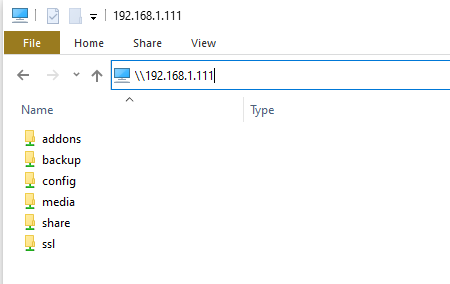
You should then be prompted for the credentials you entered in the Samba add-on configuration. You also have the option of having the credentials stored so that you do not need to enter them again. After that, you’ll have access to the directories which you can then mount as a drive or pin to Quick Access.
For OS X, connecting to the shares is a matter of using the Finder menu > Go > Connect to Server… You would then enter the IP address or hostname of your Home Assistant OS instance as smb://your.ha.ip.address or smb://homeassistant and enter your credentials when prompted.
Installing and using the SSH add-on (requires enabling advanced mode for the HA user)
The Terminal & SSH add-on provides access over an SSH connection, and also includes nano and vi editors. It can be installed from the add-on store’s Official add-on repository after enabling advanced mode for your Home Assistant user’s profile. Addtionally, this add-on provides access to the Home Assistant Command Line Interface (CLI) which provides custom commands for checking logs, stopping and starting Home Assistant and add-ons, creating/restoring snapshots, and more. (See Home Assistant via Command Line for further info). The Terminal & SSH add-on does not provide access to the underlying host file system.
To use the add-on, enter a password or public key on its configuration page, then save and start the add-on.
The Terminal & SSH add-on also provides a web terminal which allows you to access a terminal via the Home Assistant user interface. In order to access from an ssh client, a port needs to be entered in the network section of the add-on’s configuration page.
Installing and using the Visual Studio Code (VSC) add-on
The Visual Studio Code add-on provides access through a feature packed web-based version of the Visual Studio Code editor and currently only supports AMD64 and aarch64/ARM64 machines. This add-on can be installed in the add-on store from the Community add-on repository. The add-on also provides access to the Home Assistant Command Line Interface (CLI) using VSC’s built in terminal, which allows for checking logs, stopping and starting Home Assistant and add-ons, creating/restoring snapshots, and more. (See Home Assistant via Command Line for further info).
There is no configuration required for editing files within your /config directory. In order to enable access to other directories, it is necessary to edit the add-on’s configuration from its configuration tab. See the add-on documentation for details.
Installing and using the File Editor add-on
A more basic and light weight alternative to Visual Studio Code, the File Editor add-on provides access through Hass-Configurator, which is a web-based filesystem-browser and text-editor. YAML files are automatically checked for syntax errors while editing. This add-on can be installed via the add-on store from the official add-on repository.
There is no configuration required for editing files within your /config directory. In order to enable access to further directories, editing the add-on configuration is required. See the add-on documentation for details.
Snapshots
Snapshots are a backup of your Home Assistant and add-on data and configuration. They are stored in a compressed archive file (.tar). Snapshots are made from the Supervisor Snapshot panel. There is also a service available which allows you to trigger the creation of a snapshot from an automation. Backups are stored in the /backup directory.
A full snapshot includes the following directories:
- config
- share
- addons (only manually installed or created add-ons, not those installed from the store)
- ssl
- media
A partial snapshot consists of any number of the above default directories and installed add-ons.
Making a Snapshot from the UI
- Go to Supervisor > Snapshots in the UI
- Provide a name for the snapshot.
- Choose full or partial.
- Choose to password protect or not. Password protected snapshots cannot easily be browsed outside of Home Assistant OS
- Click “Create” to begin the snapshot.
Restoring a Snapshot on a new install
You can make use of snapshots which you have copied off of a previous install to restore to a new installation during the onboarding process. Follow the link at the bottom of the account creation page to upload your snapshot from the previous installation.
For restoring a snapshot at any other time, vist the Supervisor Snapshot panel in your UI and use the following steps:
- Select “Upload Snapshot” from the icon in the upper right of the page.
- Click on the folder icon to navigate to your snapshot .tar file and select it.
When the upload is completed, you will be presented with the snapshot restore dialog for restoring it, and can then choose to restore in full or in part by manually selecting individual items.
If the snapshot you are uploading is more than 1GB in size, it can be faster and more efficient to make use of the Samba add-on in order to transfer files to the /backup directory.
The length of time it takes to create or restore snapshots will depend on how much you have to compress or decompress.
If you’re looking to slim down your snapshots, check if your configuration directory contains a large database file ( home-assistant_v2.db ). See the recorder integration page for options to keep your database data down to a size that won’t cause issues. Note the keep days, purge interval, and include/exclude options.
When the restore is complete, Home Assistant will restart to apply the new settings. You will lose the connection to the UI and it will return once the restart is completed.
Creating snapshots using the Home Assistant Command Line Interface
- ha snapshot list — lists snapshots and their slugnames
- ha snapshot restore slugname — restores a specific snapshot
- ha snapshot new —name nameofsnapshot — create a snapshot
Use ha help to see more info.
Copying your snapshots to another location
You often need a snapshot in case your system has crashed. If you only store them on the crashed device, you won’t be able to access it easily. We recommend that you manually copy them from /backup to another machine on occasion. Or even better, create an automation to handle that, or make use of one of the following add-ons:
Home Assistant via the command line
 Home Assistant upgrade process from the SSH command line
On the SSH command line, you can use the ha command to retrieve logs, check the details of connected hardware, and more.
Home Assistant
Supervisor
Hardware
Usage examples
To update Home Assistant to a specific version, use the command:
Replace x.y.z with the desired version like —version 2021.4.4
You can get a better description of the CLI capabilities by typing ha help :
Lost Password and password reset
Please refer to the I’m locked out! documentation page.
Installing third-party add-ons
Home Assistant allows anyone to create add-on repositories to share their add-ons easily. To try this locally, you can use our example add-on repository at
 From the Supervisor main panel open the add-on store.
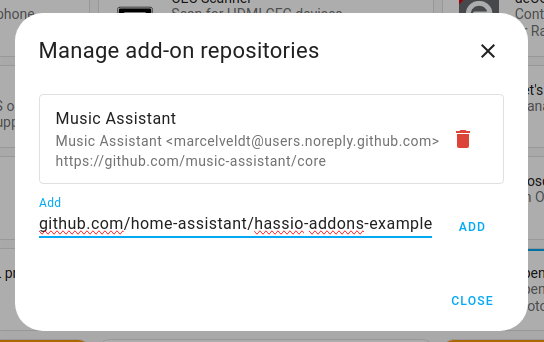 Add the URL of the repository and then press «Add». A new card for the repository will appear.
Help: Repository is not showing up
If you have added a repository, but it’s not showing up, it means that the repository contains invalid configuration. Go to the Supervisor panel and then the System tab to find the System log. It should tell you what went wrong. Report this information to the repository author.
Способы установки Home Assistant
Первая сложность с которой сталкиваются люди при работе с Home Assistant — как его поставить. Есть очень много способов установки системы.
С точки зрения использования системы все способы установки можно разбить на две группы:
- Где есть супервизор (supervisor)
- Где нет супервизора
Супервизор — это необязательная часть системы. Можно использовать Home Assistant и без супервизора.
Если есть супервизор, то в Home Assistant появляются дополнительные возможности:
- Можно «в один клик» устанавливать разные дополнения
- Появляется простая возможность делать бекапы системы
- Супервизор проверяет что система работает корректно, например уведомоляет если заканчивается место
- Появляются дополнительные сервисы hassio.*
Home Assistant OS — установка на хост
Это официально рекомендованный способ установки. Установка очень быстрая и простая. Устанавливается Home Assistant вместе с супервизором.
Очень часто этот способ используют для того чтобы установить Home Assistant на Raspberry Pi.
Из раздела «As an image for your device» страницы https://www.home-assistant.io/hassio/installation/ нужно скачать образ. В этом образе находится не только Home Assistant, но еще и операционная система.
Этот образ нужно залить на sd карту (в случае Raspberry Pi) или на жесткий диск (в случае Nuc). После этого нужно включить компьютер и вы получаете работающий Home Assistant.
У этого способа установки есть особенность — вы получаете «черный ящик» Home Assistant полностью работает, но доступ к операционной системе на которой он работает очень ограничен.
Home Assistant OS — установка в виртуальную машину
Официальный способ установки. Устанавливается Home Assistant вместе с супервизором.
С помощью этого способа можно получить работющий Home Assistant на компьютере с Windows, macOs или Linux. На компьютере появляется вирутальная машина в которой работает Home Assistant.
Нужно скачать образ из раздела «As a virtual appliance» страницы https://www.home-assistant.io/hassio/installation/. А дальше из этого образа нужно создать виртуальную машину. Это можно сделать, например с помощью VirtualBox.
Home Assistant Supervised
Это официальный способ установки. Но разработчики Home Assistant не особо любят его рекомендовать. Устанавливается Home Assistant вместе с супервизором.
Это возможность установить Home Assistant на компьютер с Linux. Этот способ подходит людям кто знает и умеет использовать Linux консоль. При таком способе установки остается полный доступ к операционной системе, но так же появляется Home Assistant с супервизором.
Опасность этого способа установки — нужно очень точно следовать всем рекомендациям. Если что-то сделать не совсем так, то Home Assistant переходит в режим «You are running an unsupported installation.» или даже в «Your installation is running in an unhealthy state», а в этом режиме Home Assistant работает исключительно плохо.
Главное требование — операционная система Linux обязательно должна быть Debian 10 aka Buster. Другие версии Linux официально не поддерживаются. Поддержка отсутствет даже для тех Linux дистрибутивов которые сильно похожи на Debian (например, Rasbperry OS, Ubuntu).
Прямо сейчас этот способ установки работает и на других операционных системах (Rasbperry OS, Ubuntu), но использование этих операционных систем выдает предупреждение «You are running an unsupported installation.» и, возможно, что в будущем это будет выдавать не только предупреждение, но и вызывать какие-то проблемы с работой. Так что скорее всего, если ставить Home Assistant этим способом, то стоит соблюдать все требования, или использовать другой способ установки.
Home Assistant Container
Это официальный способ запуска Home Assistant. При использовании этого способа супервизора нет.
Для этого способа нужно чтобы на машине был установлен докер. Этот способ можно использовать на любой операционной системе (Windows, macOS, Linux).
Это просто запуск докер контейнера из официального докерного образа Home Assistant. Можно запускать контейнер как напрямую через docker, можно через docker-compose, а можно использовать какие-то другие способы.
Самый простой способ для запуска HA этим способом — это одна команда:
Home Assistant Core
HassWP
Это неофицильный способ установки. Супервизора тут нет. Это возможность запустить Home Assistant на Windows машине очень быстро и просто, и сразу с некоторым наборо предустановленных дополенний.


