- Как включить функцию Share (Поделиться) в Windows 10
- Как включить скрытую страницу Share в приложении Параметры
- File sharing over a network in Windows 10
- Share things with nearby devices in Windows 10
- Как использовать Обмен с устройствами поблизости (Near Share) в Windows 10
- Как включить режим Обмена с устройствами поблизости в Windows 10
- Как передать файл на соседний компьютер с помощью Nearby sharing
- Не работает режим Обмен с устройствами поблизости (Nearby sharing) в Windows 10
- How to set up network file sharing on Windows 10
- How to share files using File Explorer
- Sharing files using basic settings
- Sharing files using advanced settings
- Sharing files with a specific user
- How to share files over the network without password
- How to share files using Homegroup (deprecated)
- Creating a Homegroup
- Joining a Homegroup
- Sharing files on a Homegroup
- How to share files using OneDrive
- Sharing OneDrive files from the web
Как включить функцию Share (Поделиться) в Windows 10
При помощи приложения Параметры можно настроить множество опций, но казалось, что возможность делиться контентом можно настроить на странице Share. На самом деле это не так. Эти опции по неизвестным причинам в системе Windows 10 скрыты. Если вы хотите настроить использование кнопки Share в браузере Microsoft Edge, приложениях магазина Windows Store и проводнике, нужно активировать секретную скрытую страницу настроек Share.
В этом руководстве по Windows 10 мы поговорим о шагах по редактированию реестра для включения секретной страницы Share, где можно настраивать разные опции обмена контентом.
Как включить скрытую страницу Share в приложении Параметры
Важно: не следует забывать о том, что редактирование реестра может повредить операционную систему и компьютер станет работать некорректно. Перед внесением изменений в реестр рекомендуется выполнить резервное копирование системы.
- Откройте окно Выполнить при помощи сочетания клавиш Windows + R.
- Введите команду regedit.
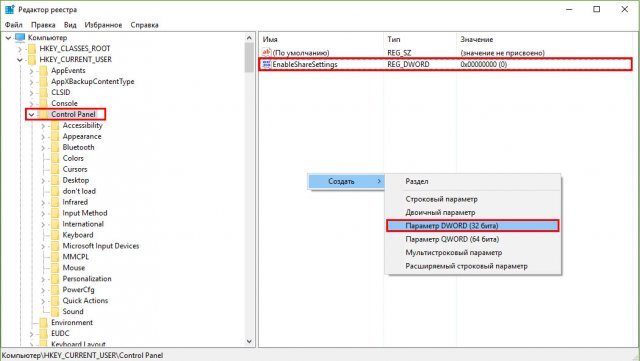
- Перейдите по адресу HKEY_CURRENT_USER\\Control Panel.
- Справа нажмите правой кнопкой мыши, выберите команду Создать параметр DWORD 32 бита.
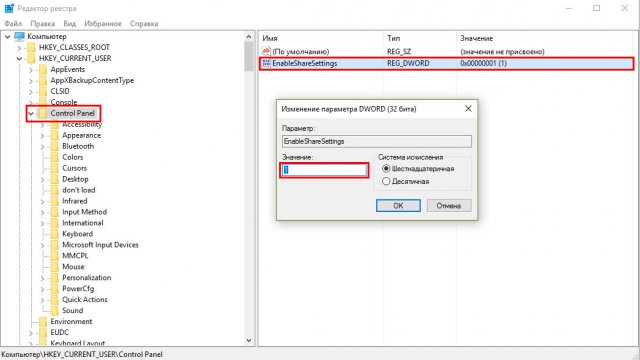
После этого в приложении Параметры должна появиться новая страница Share.
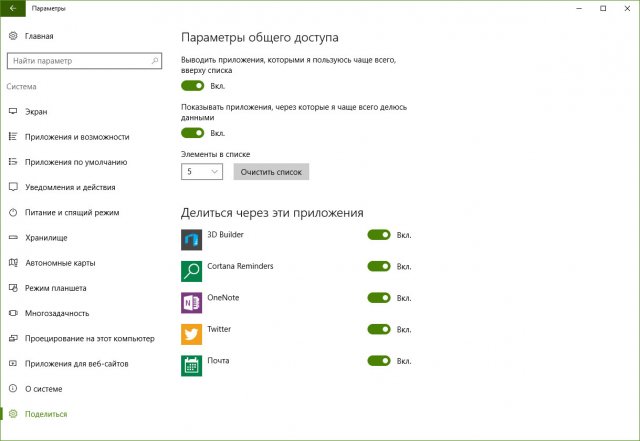
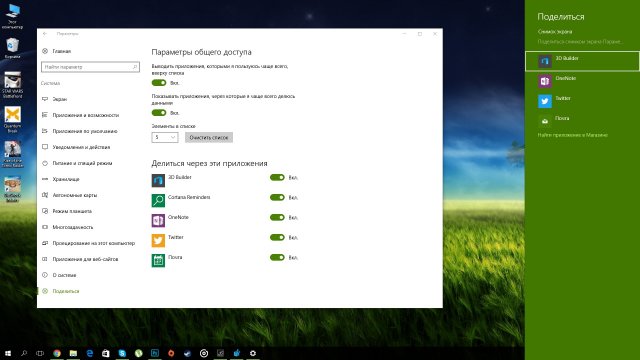
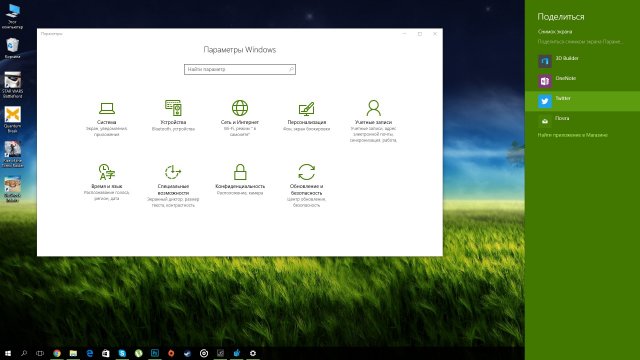
Для изменения опций обмена сделайте следующее: откройте Параметры > Система > Поделиться (Share). На этой странице можно устанавливать приложения, которым позволено делиться контентом, количество объектов на странице и отображение наиболее часто используемых приложений наверху списка. Вызвать боковую панель Share (Поделиться) можно при помощи комбинации клавиш Win + H.
Для просмотра изменений откройте приложение магазина Windows Store, браузер Edge или проводник и нажмите кнопку Share.
Если захотите убрать эту страницу, выполните вышеописанные шаги, в пункте 6 поменяв значение с 1 на 0.
File sharing over a network in Windows 10
In Windows 10, some features of file and folder sharing over a network have changed, including the removal of HomeGroup. Read on for answers to common questions about other changes to file and folder sharing in Windows 10.
To share a file or folder in File Explorer, do one of the following:
Right-click or press a file, select Give access to > Specific people.

Select a file, select the Share tab at the top of File Explorer, and then in the Share with section select Specific people.

If you select multiple files at once, you can share them all in the same way. It works for folders, too—share a folder, and all files in it will be shared.
To stop sharing in File Explorer, do one of the following:
Right-click or press a file or folder, then select Give access to > Remove access.

Select a file or folder, select the Share tab at the top of File Explorer, and then in the Share with section select Remove access.

File Explorer shows the «Remove access» option («Stop sharing» in older versions of Windows 10) for all files, even those that aren’t being shared over a network.
Open File Explorer, then type \\localhost into the address bar.
Note: When you’ve shared a file from a folder in your user profile and you go to \\localhost, you’ll see your user profile and all its files there. This doesn’t mean that all of your files are shared—just that you have access to all your own files.
If you open File Explorer, go to Network, and see an error message («Network discovery is turned off….»), you’ll need to turn on Network discovery to see devices on the network that are sharing files. To turn it on, select the Network discovery is turned off banner, then select Turn on network discovery and file sharing.

To troubleshoot problems with sharing files or folders, follow the steps below on all computers from which you’re trying to share.
Make sure the computers are on the same network. For example, if your computers connect to the internet through a wireless router, make sure they all connect through the same wireless router.
If you’re on a Wi-Fi network, set it to Private. To find out how, read Make a Wi-Fi network public or private in Windows 10.
Turn on network discovery and file and printer sharing, and turn off password protected sharing.
Select the Start button, then select Settings > Network & Internet , and on the right side, select Sharing options.
Under Private, select Turn on Network discovery and Turn on file and printer sharing.
Under All Networks, select Turn off password protected sharing.
Make sharing services start automatically.
Press the Windows logo key + R.
In the Run dialog box, type services.msc, and then select OK.
Right-click each of the following services, select Properties, if they’re not running, select Start, and next to Startup type, select Automatic:
Share things with nearby devices in Windows 10
Nearby sharing in Windows 10 lets you share documents, photos, links to websites, and more with nearby devices by using Bluetooth or Wi-Fi.
To use Nearby sharing, both PCs—the one you’re sharing from and the one your sharing to—must have Bluetooth and must be running Windows 10 (version 1803 or later). To find out which version of Windows you have installed, see Which Windows operating system am I running?
On the PC you’re sharing from, on the right end of the taskbar, select action center > Nearby sharing and make sure it’s turned on. Do the same thing on the PC you’re sharing to.
On the PC that has the document you want to share, open File Explorer , and find the document you want to share.
In File Explorer, select the Share tab, select Share , and then select the name of the device you want to share with.
On the device you’re sharing with, select Save & open or Save when the notification appears.
On the PC you’re sharing from, on the right end of the taskbar, select action center > Nearby sharing and make sure it’s turned on. Do the same thing on the PC you’re sharing to.
On the PC you want to share from, open Microsoft Edge , and then go to the webpage you want to share.
In Microsoft Edge, select Settings and more > Share , and then select the name of the device you want to share with.
On the device you’re sharing with, select Open when the notification appears to open the link in your web browser.
On the PC you’re sharing from, on the right end of the taskbar, select action center > Nearby sharing and make sure it’s turned on. Do the same thing on the PC you’re sharing to.
On the PC that has the photo you want to share, open the Photos app, select the picture you want to share, select Share , and then select the name of the device you want to share with.
On the device you’re sharing the photo to, select Save & open or Save when the notification appears.
Select the Start button, and then select Settings > System > Shared experiences.
For I can share or receive content from, choose the devices you want to be able to share or receive content from.
Note: If you choose Everyone nearby, the Bluetooth MAC address and name of your PC are made available to other devices around you so you can share with other PCs nearby. This info could be used to link your PC to you.
To change the place where files you receive are stored, under Save files I receive to, select Change, choose a new location, and then select Select folder.
Как использовать Обмен с устройствами поблизости (Near Share) в Windows 10
Как вы возможно уже знаете, в последнем обновлении Windows 10 1803 April Update Microsoft решила отказаться от функционала «Домашней группы» (HomeGroup), позволяющего организовать простой общий доступ к файлам и принтерам в домашней локальной сети. Вместо использования «Домашней группы» в Windows 10 1803 предлагается новый способ обмена файлов между соседними устройствами под названием Обмен с устройствами поблизости ( Nearby sharing ). Данный способ передачи файлов похож на режим передачи AirDrop в уставах Aplle.
Как и AirDrop, Nearby sharing может использоваться для передачи файлов с соседними устройствами по Wi-Fi или Bluetooth. Microsoft специально сделала этот способ передачи файлов максимально простым и эффективным в использовании и практически не требующим настройки. Таким образом любой пользователь должен легко передать или получить нужный файл, документ, изображение, видео, ссылку или другой контент на соседний компьютер в своей домашней сети.
Как включить режим Обмена с устройствами поблизости в Windows 10
Для передачи файлов между устройствами с помощью данной функции, на обоих устройствах должен быть включен адаптер Bluetooth или Wi-Fi. Включить режим Обмен с устройствами поблизости можно через Центр действий / Action Center (плитка Обмен с устройствами / Nearby Sharing).
Настроить режим работы обмена данных с устройствами можно а приложении Параметры -> Система -> Общие возможности ( Settings -> System -> Shared experiences ). Найдите секцию « Обмен с устройствами поблизости » ( Nearby sharing ).
Функция обмена с устройствами поблизости позволяет обмениваться содержимым через Bluetooth или Wi-Fi с любым пользователем, находящимся поблизости.
Переведите переключатель в положение Вкл . Чуть ниже в параметре « Куда я могу передавать и откуда получать содержимое » выберите хотите ли вы обмениваться файлами только со своими устройствами (My devices only) или всеми устройствами поблизости (Everyone nearby). Также можете указать папку, куда Windows 10 будет сохранять полученные с других устройств файлы (по умолчанию это папка Загрузки / Downloads в профиле пользователя).
Также можно включить режим Nearby sharing через реестр. Для этого запустите regedit.exe и перейдите в раздел HKCU\Software\Microsoft\Windows\CurrentVersion\CDP . Найдите в этой ветке два REG_DWORD параметра:
Чтобы отключить Nearby sharing измените их значение на 0 , при значении 1 – разрешен обмен данными только с авторизованными устройствами, значение 2 – разрешен обмен со всеми соседними устройствами. Для применения настроек компьютер нужно перезагрузить.
Как передать файл на соседний компьютер с помощью Nearby sharing
После того, как вы включили режим «Обмен с устройствами поблизости», вы можете отправить любой файл на соседний компьютер через беспроводную сеть. В проводнике щелкните правой кнопкой но нужному файлу и в меню выберите пункт Отправить .
В открывшемся окне « Поделиться » будет выполнен поиск доступных через беспроводную сеть устройств (Поиск устройств поблизости). Если нужного устройства нет в списке, убедитесь, что нам нем включен режим « Обмена с устройствами поблизости » и активен Wi-Fi / Bluetooth адаптер.
Выберите имя компьютера, на который вы хотите отправить файл. На втором компьютере появится уведомление о том, что вы хотите поделится файлом. Он может принять или отклонить передачу файла.
Естественно, передача файлов через Bluetooth выполняется намного медленнее, чем через WiFi сеть.
В большинстве приложений магазина Windows Store доступна кнопка Поделиться (например в Edge, приложении Фотографии и т.д.). Таким образом вы можете передать ссылку, фото или другой файл прямо из окна приложения.
Не работает режим Обмен с устройствами поблизости (Nearby sharing) в Windows 10
Если при нажатии кнопки «Поделиться» компьютер не обнаруживает другое устройство, необходимо проверить следующие условия:
- На обоих устройствах установлена Windows 10 1803 или выше, и режим Nearby sharing включен.
- Должен быть включен режим обмена со всеми соседними устройствами, либо устройства добавлены в аккаунт Microsoft или в друзья.
Wi-Fi или Bluetooth адаптеры активны. Необходим адаптер Bluetooth 4.0 (LMP 6.x) или выше с поддержкой режиме Low Energy (LE). Это можно проверить в свойствах драйвера адаптера в разделе Bluetooth radio supports Low Energy Central Role = True.
- Компьютеры находятся в одной Wi-Fi сети (вы можете использовать свой компьютер с Windows 10 как виртуальную точку доступа Wi-Fi ).
- При передаче файлов через Bluetooth устройства нужно держать ближе друг к другу.
Измените профиль сети на с Public на Private на обоих устройствах (Settings -> Network and Internet -> Status Change connection properties -> Private).
Microsoft анонсировала, что в ближайшем времени приложение для поддержки Nearby sharing появится для устройств с Android и iOS. Таким образом со своего компьютер с Windows 10 вы сможете легко передать файл на свой смартфон и планшет.
How to set up network file sharing on Windows 10
Windows 10 lets you quickly share files with other users over a network — here are three ways to do it.

On Windows 10, you can share files on your computer with other users over the network. While this might seem complicated, it’s actually a simple task when using the tools the operating system provides.
Depending on your network environment and what you want to accomplish, there are at least four ways to set up file sharing on Windows 10. You can use the Public folder, a special setup that allows you to share files over the local network without configuring permissions. Or you can share content using the File Sharing feature on Windows 10. And if you are looking to share files with other people across the internet, you can use file sharing with OneDrive.
In previous versions, you were also able to use Homegroup, which unlike the Public folder, automatically shared Windows 10 libraries folders (Pictures, Videos, Music, Documents), Printers, and other devices connected to your computer. However, it is no longer a feature on Windows 10.
In this guide, you will learn the steps to share files over the network using File Sharing and OneDrive on Windows 10. (Although Homegroup is no longer available in the latest version of Windows 10, the steps to use the feature will continue to be available, as it’s still a feature in older releases.)
How to share files using File Explorer
Using the built-in File Sharing feature on Windows 10 is the best method you can use to share files in a local network, as it is more flexible. You can use more restrictive permissions, and you can share files with virtually any device, including Mac, Android, and Linux devices.
There are two ways to share files using File Explorer. You can use the basic settings, which allows you to share files on the network with minimal configuration quickly, or you can use the advanced settings to set custom permissions and set other advanced options.
Sharing files using basic settings
To share files on a local network using the express settings, use these steps:
Open File Explorer on Windows 10.
Navigate to the folder you want to share.
Right-click the item, and select the Properties option .
 Folder Properties option
Click on the Sharing tab.
Click the Share button.
 Folder Sharing tab
Use the drop-down menu to select the user or group to share a file or folder. (For this guide, select the Everyone group.)
Click the Add button.
 Choose people to share with
Under the “Permission Level” section, select the sharing permissions you want the folder to have. For example, you can select Read (default) if you only want users to view and open files. If you select Read/Write, users can view, open, modify, and delete the content on the folder you are sharing.
Click the Share button.
 Share permission level
Confirm the folder’s network path that other users will need to access the network’s content and click the Done button.
Click the Close button.
 Shared folder path
Sharing files using advanced settings
To share files on a local network using the advanced sharing settings, use these steps:
Open File Explorer.
Navigate to the folder you want to share.
Right-click the item, and select the Properties option.
 Folder Properties option
Click on the Sharing tab.
Click the Advanced Sharing button.
 Folder Sharing tab, Advanced Sharing
Check the Share this folder option.
Windows 10, by default, allows other users read-only access to the content you share, which means that they can only view files, but they cannot do anything else. If you want users to edit the files, delete, and create new documents in the location, you will need to click the Permissions button.
 Advanced Sharing options
On the “Permissions” window, you will notice the “Everyone” group is the default option highlighted. In the section below, you can customize the permissions for a specific user or group. If you want users to open, edit, delete, and create files, then make sure to check the Read and Change permissions under the “Allow” column.
Click the Apply button.
Click the OK button.
 Share Permissions options
Click the OK button again.
Sharing files with a specific user
If you only want to share files with only a specific user, you can follow the same steps, but on step 8, use these instructions:
Select the Everyone group and click the Remove button.
Click the Add button.
 Add or remove users and groups.
Type the name of the user you want to share the files with.
Click the Check Name button.
Click the OK button.
 Select users and groups to share with
Select the user account, and you will notice that the “Read” permission is checked by default. If you want the user to be able to edit, delete, and create new files, make sure also to check the Change permission option.
Click the Apply button.
Click the OK button.
 Share permissions for a specific user.
Once you complete the steps, the shared content should be available when browsing the remote computer on File Explorer > Network.
How to share files over the network without password
On Windows 10, any file you share is by default secured with a username and password. This means only people who have an account and password on the computer can access shared files.
If you’re setting up file sharing on a local network for your family members or people you know, it is possible to disable the requirement to sign-in with Windows credentials to allow users to access files on the sharing computer without needing a password.
To disable password protection for file sharing on Windows 10, use these steps:
Open Control Panel.
Click on Network and Internet.
Click on Network and Sharing Center.
On the left pane, click the Change advanced sharing settings link.
 Change advanced sharing settings.
Expand the All Networks tab.
Under the “Password protected sharing” section, select the Turn off password protected sharing option.
Click the Save changes button.
 Password protections sharing
After you complete the steps, users should be able to access the shared folder without a password.
How to share files using Homegroup (deprecated)
Microsoft created Homegroup to be an easy to use method for non-technical users to securely share files between computers running Windows 7 and later versions of the operating system connected to the same local network.
Typically, home users are the ones who will use Homegroup, as it offers a straightforward and convenient way to share files, but this method has limited options. For example, you can share your libraries (Pictures, Videos, Music, Documents), folders, printers, and other devices connected to your computer. However, you cannot share files with versions of Windows older than Windows 7 or other devices running a different operating system, such as Android and iOS.
Creating a Homegroup
To create a Homegroup on a local network, use these steps:
Open Control Panel.
Click on Network and Internet.
Click on Homegroup.
Click the Create a homegroup button.
 Create Homegroup on Windows 10
Click the Next button.
Use the drop-down menu to select which folders and resources (Pictures, Videos, Music, Documents, Printer & Devices) you want to share. If you don’t want to share an item, make sure to select the Not Shared option.
Click the Next button.
 Share libraries with Homegroup
Make sure to note the Homegroup password as you will need it to join other computers, and click Finish to complete the task.
 Homegroup password
Once you complete the task, the Homegroup settings page will be updated, displaying the libraries you are currently sharing and additional options, including the ability to leave the Homegroup and change the resources you are sharing.
Joining a Homegroup
Use these steps to join another computer to the Homegroup to access the files you are sharing on your device:
Open Control Panel.
Click on Network and Internet.
Click on the Choose homegroup and sharing options link.
 Control Panel Network and Internet
Click the Join now button.
 Join a PC to a Homegroup
Continue with the on-screen directions to complete the setup.
If you do not see the Join now button, click the Start the Homegroup troubleshooter option, which will force a rescan of the network and make the option available.
Sharing files on a Homegroup
Once you have a Homegroup created, your PC is already sharing those files and folders within the libraries you shared during the setup process. However, if you want to share files on a different location with users connected to the Homegroup, do the following.
Use these steps to start sharing files using Homegroup:
Open File Explorer.
Navigate to the content you want to share.
Right-click the folder you want to share and select the Give access to option.
You will see several sharing options in the submenu, including Homegroup (view) and Homegroup (view and edit).
If you only want users to read permissions to your files, select the Homegroup (view) option.
If you want users to have read and write permissions (which also allows them to delete and create files and folders), select the Homegroup (view and edit) option.
 Share additional folders on a Homegroup.
In the case, you want to stop sharing a folder you previously shared, right-click the folder, select the Give access to option, and select the Remove access option.
Once you complete the steps, the shared content should be available when browsing the remote computer from File Explorer > Homegroup.
How to share files using OneDrive
You can also share files with other people across a network or around the world using OneDrive.
To share files using OneDrive on Windows 10, use these steps:
Open your OneDrive folder on Windows 10.
Navigate to the folder you want to share.
Right-click the folder and select the Share option.
 OneDrive share option in File Explorer
Specify the email for the person you want to share the content with. (Or the available options to copy the link or share files using other apps.)
 OneDrive share options on Windows 10
Click the Send button.
Any user who receives your message will be able to click the link and view the folder’s content on any web browser.
Sharing OneDrive files from the web
If you want users to view and edit the content inside of an OneDrive folder, you’ll need to share the folder using OneDrive on the web.
To share OneDrive files from the web, use these steps:
Open OneDrive online.
Navigate to the file or folder you want to share.
Right-click the item and select the Share option.
 OneDrive online share option
Specify the email for the person you want to share the content with. (Or the available options to copy the link.)
 OneDrive online share settings
Click the Send button.
Once you complete the steps, anyone with the link can view and edit the file or the content inside of the folder.
If you only want to share files with specific users privately, you want to select the option to share via email.
Files you share will only be available to users as long as your computer is turned on, except for the OneDrive sharing method. However, using OneDrive, users must have an internet connection to access the shared content.
Update January 26, 2021: This guide has been revised to ensure the instructions are still accurate.
We may earn commission for purchases using our links to help keep offering the free content. Privacy policy info.
All content on this site is provided with no warranties, express or implied. Use any information at your own risk. Always backup of your device and files before making any changes. Privacy policy info.


