- Installing Homebrew on a Mac
- Installation
- Prerequisites
- Installation Overview
- Installation Steps
- How to Update Homebrew
- How to Uninstall Homebrew on Mac Completely
- Part 1. What is Homebrew?
- Do You Need Homebrew?
- Part 2. How to Install and Use Homebrew on Your Mac
- How to Install Homebrew
- How to Use Homebrew on Mac to Install Software
- Step 1. Test Homebrew
- Step 2. List Packages
- Step 3. Install Node
- Step 4. Get Information about Software
- Step 5. Update and Upgrade Packages
- Part 3. Two Ways on How to Uninstall Homebrew on Mac
- Method #1. Uninstall Homebrew on Mac Completely with iMyMac PowerMyMac
- Step 1. Download thePowerMyMac
- Step 2. Choose the Uninstaller
- Step 3. Select Homebrew
- Step 4. Uninstall Homebrew on Mac
- Method #2. Manually Uninstall Homebrew on Mac
- Step 1. Copy the Curl Command from Homepage
- Step 2. Change Install to Uninstall
- Step 3. Confirm Action
- Part 4. Conclusion
- How can I completely uninstall Homebrew and uninstall everything it has done? #48792
- Comments
- corysimmons commented Feb 3, 2016
- DomT4 commented Feb 3, 2016
- corysimmons commented Feb 3, 2016
- DomT4 commented Feb 3, 2016
- corysimmons commented Feb 3, 2016
- DomT4 commented Feb 3, 2016
- corysimmons commented Feb 3, 2016
- MikeMcQuaid commented Feb 3, 2016
- Установка и использование Homebrew на macOS
- Требования
- 1: Работа с терминалом macOS
- 2: Установка инструментов командной строки Xcode
- 3: Установка и настройка Homebrew
- 4: Установка, обновление и удаление пакетов
- 5: Установка настольных приложений
- 6: Удаление Homebrew
- Заключение
Installing Homebrew on a Mac
Installation
Homebrew is package manager for Macs which makes installing lots of different software like Git, Ruby, and Node simpler. Homebrew lets you avoid possible security problems associated with using the sudo command to install software like Node.
Prerequisites
- You should have some familiarity with the Mac Terminal application since you’ll need to use it to install Homebrew. The Terminal application is located in the Utilities folder in the Applications folder.
- Dependencies. You need to install one other piece of software before you can install Homebew:
- Xcode. Install Apple’s Xcode development software: Xcode in the Apple App Store.
Installation Overview
Installing Homebrew is straightforward as long as you understand the Mac Terminal. The Homebrew installation process guides through each step.
Installation Steps
- Open the Terminal app.
- Type ruby -e «$(curl -fsSL https://raw.githubusercontent.com/Homebrew/install/master/install)» You’ll see messages in the Terminal explaining what you need to do to complete the installation process. You can learn more about Homebrew at the Homebrew website.
How to Update Homebrew
New versions of Homebrew come out frequently, so make sure you update it before updating any of the other software components that you’ve installed using Homebrew. * In Terminal type brew update
Источник
How to Uninstall Homebrew on Mac Completely

Written By Pamela Garcia Last updated: September 3, 2021
Technical Writing Expert who is good at writing troubleshoot to any Mac issue and have helped lots of readers rescue their Macs.
It’s your choice. You don’t have to use Homebrew anymore if you don’t want to. After all, it does take up some space on your Mac and might result in running out of application memory of your system. That is a good enough reason for you to know how to uninstall Homebrew on Mac.
Cleaning your Mac of any unneeded apps like Homebrew on Mac is pretty easy. As a matter of fact, there are two ways to do it. If you continue reading this article, you will learn more about them.
Part 1. What is Homebrew?
Homebrew is free and open-source software that is used as a package management system that simplifies the installation of software on Mac OS X. It’s a terminal-based package manager for Mac.
Think of it like yum or apt for Linux and pip for Python. It’s great for coders and non-coders. Homebrew allows you to install software using the Terminal command line. It is a great way to keep and manage all your packages.
Tip: If you also want to remove Python for more space, then turn to the provided link for more details.
Do You Need Homebrew?
Now, that is a good question. There is no doubt that Homebrew is very useful. However, the question of whether you should use it or not depends on you. The coders out there can easily say that anyone can use Homebrew.
However, if you’re not a coder, you might not feel too comfortable using it. Since it’s Terminal-based, you might not feel too comfortable typing in commands.
Nonetheless, you can do it. You can get used to it after some time. That is the reason why it’s really up to you as to whether you need it or not. If you learn how to install, use, and uninstall Homebrew on Mac, you will have a good idea as to whether you need it or not.
Continue reading this article because you will learn how to do all those.

Part 2. How to Install and Use Homebrew on Your Mac
How to Install Homebrew
The steps below will show you how to install Homebrew on Mac.
- You can install command line tools through Xcode. Open Terminal and type in Xcode-select –-install .
- Go to your favorite search browser and type in Homebrew. Click on the first link that appears.
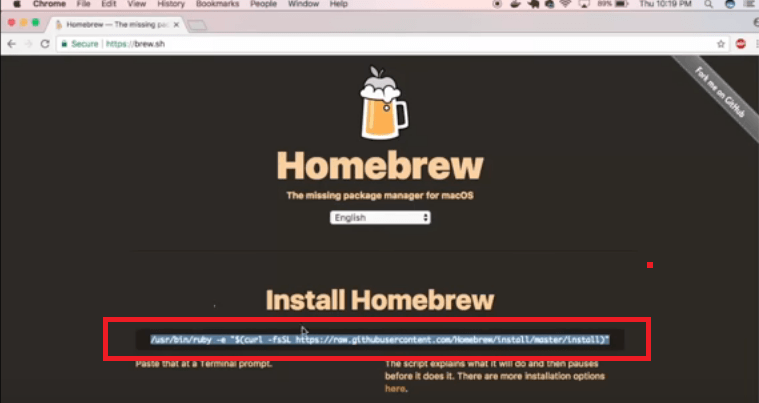
- Once you get on the Homebrew website, copy the installation command you see under Install Homebrew. It’s a Ruby command and it’s going to install a Ruby script. Then minimize your browser.
- You can use the Spotlight search to open the Terminal. Once it’s up on your screen, paste the installation command.
- Hit enter and type in your Mac’s password to start installing Homebrew on your Mac.
How to Use Homebrew on Mac to Install Software
Once you see Installation successful on the Terminal, you are all set to use Homebrew on Mac. The steps below will show you how.
Step 1. Test Homebrew
Before you use Homebrew, it’s better that you test it first. You can do that by running brew help . Type in those two words on the Terminal and see if there are any errors. If there aren’t any and you see brew commands on, then you’re good to go.
Step 2. List Packages
You can list all the packages that you want to install with Homebrew by saying or typing in brew search . You will see a long list of packages that you can install. If you want to see exactly how many packages there are in the list, you could simply say brew search and pipe that into word count and then – L . That will count the number of lines.
Step 3. Install Node
You now have your Homebrew installed successfully. You have seen the long list of packages it offers you. For example, you want to install Node. You just type in brew install node then hit Enter to begin the installation process. If you want to install git, you can just type in brew install git .
Step 4. Get Information about Software
You can get information about the package by typing in simple brew commands. For example, if you want to list all the versions of a particular package, you just have to type in the command brew list –versions . After the word versions, type in the name of the package.
So, if you want to see the versions of Node, type in node after the word versions. Press Enter to show you whatever package is installed using Brew on your Mac. If you type in brew info and name of the package, you will be able to list all other information about the package.
Step 5. Update and Upgrade Packages
You can also update and upgrade packages on the brew. You can do that by tying in brew update if you want to see the outdated packages on the brew, just type in brew outdated .
Part 3. Two Ways on How to Uninstall Homebrew on Mac
There are two methods on how to uninstall Homebrew on Mac. These two methods are listed below.
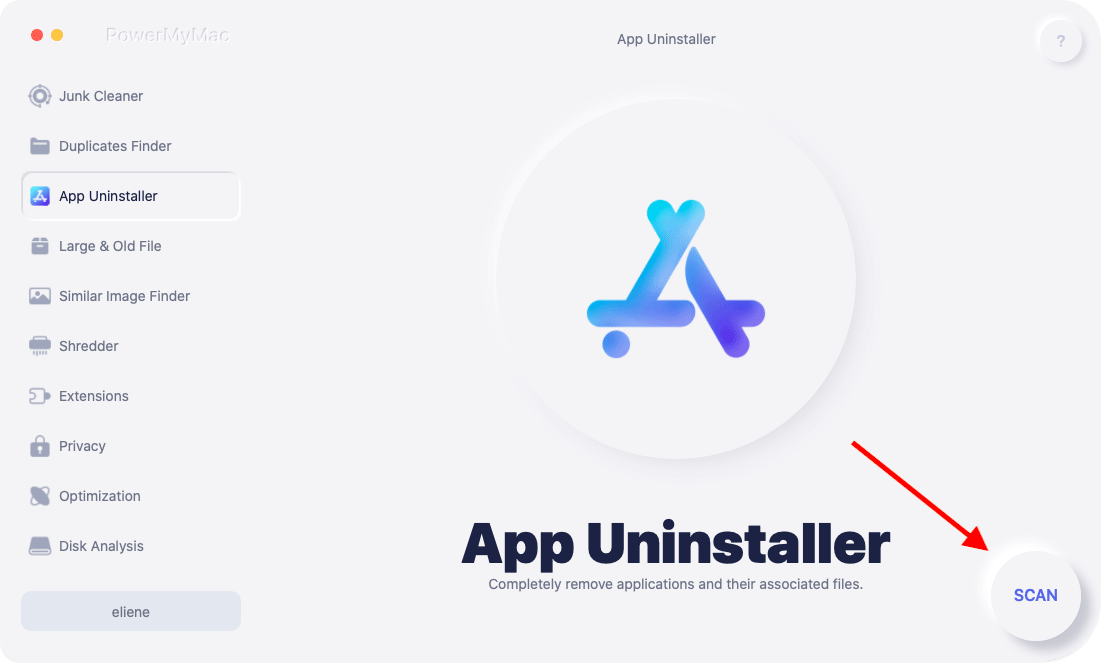
Method #1. Uninstall Homebrew on Mac Completely with iMyMac PowerMyMac
If you don’t want to deal with the Terminal to uninstall Homebrew on your Mac, you can resort to using an app cleaner to uninstall your unwanted apps. We recommend iMyMac PowerMyMac, which is actually a cleaning program for Macs. It’s a very powerful tool that cleans up Macs with just a couple of clicks and it’s exclusively offered on the iMyMac website.
The iMyMac PowerMyMac boasts thirteen modules that can scan and clean your Mac of any unneeded apps, files, photos, videos, email attachments, and even extensions. One of those modules is the Uninstaller.
The Uninstaller makes it very easy for you to clean out Homebrew on your Mac. You won’t have any leftovers taking up space on your Mac. Check out the steps below to see how you can use the Uninstaller of the PowerMyMac.
- Download the PowerMyMac
- Choose the Uninstaller
- Select Homebrew
- Uninstall Homebrew on Mac
The detailed steps are listed below. Make sure to go over them to see how to uninstall Homebrew on Mac using the PowerMyMac.
Step 1. Download the PowerMyMac
Click on the Download button to automatically start the installation of the PowerMyMac. Once that is done, launch it on your screen.
Step 2. Choose the Uninstaller
You will see all the thirteen modules on the left-hand side of the screen. Scroll down the list and towards the bottom part, you will see the Uninstaller. Click on it to prompt the Scan button to show up on the main screen. Once you see the Scan button, click on it to start the scanning of your Mac.
Step 3. Select Homebrew
Give it a few seconds to finish the scanning. Once it’s done, you will see the list of programs on your main screen. Search and click on Homebrew.
Step 4. Uninstall Homebrew on Mac
If you’re really sure about uninstalling Homebrew on Mac, you can just click on the Clean tab you see at the bottom part of the page.
Method #2. Manually Uninstall Homebrew on Mac
The steps below will show you how you can uninstall Homebrew on Mac in a manual manner.
Step 1. Copy the Curl Command from Homepage
Remember the installation command line or the curl command you had to copy from the Homepage of Homebrew to install it? Well, you need to copy that again and paste in on to the Terminal.
Step 2. Change Install to Uninstall
Once you have pasted the curl command on the Terminal, make sure to change the word install at the end of the script. Change it to uninstall. Then hit Enter . That pulls a Ruby script from their GitHub to uninstall all associated Homebrew system files.

Step 3. Confirm Action
Once you run the curl command that pulls the uninstall script, you are going to be prompted to confirm your action. Just click on Yes and then put in your admin credentials. After all that, you’re done.

Part 4. Conclusion
You can always give Homebrew a try. After all, it’s pretty easy to install and use it. After some time, you can get used to typing in commands.
If you do decide not to use it anymore, it’s even a lot easier to uninstall Homebrew on Mac. You can just use the iMyMac PowerMyMac to uninstall it. That will spare you from typing in any commands, let alone, changing it.
Do you use Homebrew? Feel free to share some of your tips and tricks with us. Our readers would love to hear from you.
Excellent Thanks for your rating.
Источник
How can I completely uninstall Homebrew and uninstall everything it has done? #48792
Comments
corysimmons commented Feb 3, 2016
It’s a cool tool, it just doesn’t mesh with me. What are the steps to uninstall every package/dependency it has every installed and the uninstall Homebrew completely from my system?
The text was updated successfully, but these errors were encountered:
DomT4 commented Feb 3, 2016
corysimmons commented Feb 3, 2016
Well that’s an oddly named repo.
Will this uninstaller uninstall everything Homebrew has ever installed and all their dependencies, or is Homebrew going to leave a ton of stuff on my system?
DomT4 commented Feb 3, 2016
The uninstall script was added much later than the install script, by which point links across the internet were telling people to go find Homebrew’s install repo.
Will this uninstaller uninstall everything Homebrew has ever installed and all their dependencies
Yes. If you run it with —dry-run it should tell you what is being removed, without actually doing any removing.
corysimmons commented Feb 3, 2016
I might just uninstall everything, then reinstall a clean version of Homebrew. I think my problem was going crazy installing tons of packages, now it just feels insane to maintain.
DomT4 commented Feb 3, 2016
If you want to remove all the packages you’ve installed but keep Homebrew around you could also do something like:
corysimmons commented Feb 3, 2016
The more I think about it, the more I probably just need to do a factory restore. This laptop is full of so much junk.
MikeMcQuaid commented Feb 3, 2016
@DomT4 I’d recommend brew bundle dump for that, just FYI.
You can’t perform that action at this time.
You signed in with another tab or window. Reload to refresh your session. You signed out in another tab or window. Reload to refresh your session.
Источник
Установка и использование Homebrew на macOS
Интерфейс командной строки – это неграфический способ взаимодействия с компьютером. Вместо того чтобы нажимать кнопки в окнах при помощи мыши, вы можете вводить команды в виде текста и получать обратную связь – тоже в виде текста. Командная строка, также известная как оболочка, позволяет автоматизировать многие задачи, которые вы выполняете ежедневно, и является важным инструментом для разработчиков программного обеспечения.
Интерфейс командной строки macOS имеет множество таких же функций, как в Linux и других системах Unix, однако из коробки у него нет хорошего менеджера пакетов. Менеджер пакетов – это набор программных инструментов, предназначенный для автоматизации установки, настройки и обновления программного обеспечения. Менеджеры пакетов централизованно хранят ПО, которое они устанавливают, и поддерживают все пакеты в системе в широко используемых форматах.
Homebrew – это менеджер пакетов для macOS, который позволяет устанавливать бесплатное программное обеспечение с открытым исходным кодом с помощью терминала. Homebrew можно использовать для установки таких инструментов разработчика, как Python, Ruby, Node.js и др.
В этом мануале мы покажем, как установить Homebrew на Mac и начать работу с ним.
Требования
Для работы вам понадобится компьютер macOS с версией High Sierra+, административным доступом и подключением к Интернету.
1: Работа с терминалом macOS
Чтобы получить доступ к интерфейсу командной строки на вашей машине, используйте приложение Terminal, предоставляемое macOS по умолчанию. Как и любое другое приложение, вы можете найти терминал через поиск, перейдя в папку Applications, а затем в Utilities. Чтобы открыть приложение терминала, дважды кликните по нему. Кроме того, вы можете использовать Spotlight, чтобы найти терминал: удерживайте клавишу COMMAND и нажмите пробел, а затем введите Terminal в появившемся поле.
Примечание: больше полезной информации о работе с командной строкой вы найдете в мануале Основы работы с терминалом Linux. Интерфейс командной строки macOS очень похож.
Терминал запущен, а теперь давайте установим дополнительные инструменты, необходимые Homebrew.
2: Установка инструментов командной строки Xcode
Xcode – это интегрированная среда разработки (IDE), состоящая из инструментов разработки программного обеспечения для macOS. Xcode не понадобится для работы Homebrew, но некоторые программы и компоненты, которые пригодятся вам в будущем, используют пакет инструментов командной строки Xcode.
Выполните следующую команду в терминале, чтобы загрузить и установить необходимые компоненты:
Вам будет предложено начать установку, а затем – принять лицензию. После этого инструменты автоматически загрузятся и установятся.
Теперь вы можете установить Homebrew.
3: Установка и настройка Homebrew
Чтобы установить Homebrew, загрузите сценарий установки, а затем выполните его.
Чтобы загрузить сценарий на локальный компьютер, введите следующую команду в окно терминала:
curl -fsSL -o install.sh https://raw.githubusercontent.com/Homebrew/install/master/install.sh
Команда использует curl для загрузки сценария установки Homebrew из Git репозитория Homebrew на GitHub.
Давайте рассмотрим флаги, связанные с командой curl:
- Флаг -f (или –fail) не дает терминалу выдавать HTML-документ при ошибках сервера.
- Флаг -s (–silent) отключает индикатор выполнения, а в сочетании с флагом -S (–show-error) он заставляет curl выводить сообщение об ошибке в случае сбоя.
- Флаг -L (–location) сообщает curl, что перенаправления нужно обрабатывать. Если сервер говорит, что запрошенная страница перемещена в другое место, команда автоматически выполнит запрос снова, используя новое расположение.
- Флаг -o определяет локальное имя файла.
Прежде чем запустить загруженный из интернета сценарий, рекомендуем просмотреть его содержимое, чтобы точно знать, что он будет делать. Используйте команду less для просмотра:
Когда вы изучите содержание скрипта, выполните его с помощью команды bash:
Сценарий установки объяснит, что он будет делать, и предложит вам подтвердить эти действия. Так вы будете точно знать, что Homebrew собирается сделать с вашей системой, прежде чем вы решите продолжить установку. Кроме того, вы сможете убедиться, что выполнили все предварительные условия, необходимые для установки.
Во время установки вам будет предложено ввести пароль. Однако при этом нажатия клавиш не будут отображаться в окне терминала. Это мера безопасности, которая часто используется при запросе пароля в командной строке. Все нажатия клавиш регистрируются системой, хотя вы их и не видите. После ввода пароля нажмите RETURN.
Каждый раз, когда система будет предлагать подтвердить установку, нажимайте y.
После завершения установки нужно поместить каталог, который Homebrew использует для хранения своих исполняемых файлов, в начало переменной среды PATH. Благодаря этому установки Homebrew будут вызываться через инструменты, которые включает macOS.
Файл, который вам нужно сейчас отредактировать, зависит от того, какую оболочку вы используете. Если вы используете Bash, вам нужен файл
Если же вы используете ZSH, откройте
Когда файл откроется в терминале, добавьте в конец следующие строки:
# Add Homebrew’s executable directory to the front of the PATH
export PATH=/usr/local/bin:$PATH
Первая строка – это комментарий, который поможет вам вспомнить, что делает следующая строка.
Чтобы сохранить изменения, удерживайте клавишу CTRL и O, а при появлении запроса нажмите RETURN. Затем выйдите из редактора, удерживая CTRL и нажав X. Это вернет вас в окно терминала.
Чтобы активировать эти изменения, закройте и снова откройте терминал. Также для загрузки изменений можно использовать команду source.
Если вы изменили .bash_profile, выполните эту команду:
Если вы редактировали .zshrc, выполните команду:
Как только вы это сделаете, изменения, внесенные вами в переменную среды PATH, вступят в силу. Переменная будет правильно настроена даже после завершения этой сессии, поскольку конфигурационный файл для вашей оболочки запускается автоматически при открытии приложения Terminal.
Теперь давайте убедимся в том, что Homebrew настроен правильно. Выполните эту команду:
Если в данный момент никаких обновлений не требуется, вы увидите в своем терминале такое сообщение:
Your system is ready to brew.
В противном случае вы можете получить предупреждение о необходимости запустить другую команду, например, brew update, чтобы обновить установку Homebrew. Следуйте инструкциям на экране, чтобы обновить среду, прежде чем двигаться дальше.
4: Установка, обновление и удаление пакетов
Теперь, когда менеджер пакетов Homebrew установлен, попробуйте использовать его для загрузки пакета tree. Эта команда позволяет увидеть графическое дерево каталогов и доступна через Homebrew.
Установите ее с помощью команды brew install:
brew install tree
Homebrew обновит свой список пакетов, а затем загрузит и установит команду tree:
Updating Homebrew.
==> Downloading https://homebrew.bintray.com/bottles/tree-1.8.0.catalina.bottle.tar.gz
######################################################################## 100.0%
==> Pouring tree-1.8.0.catalina.bottle.tar.gz
🍺 /usr/local/Cellar/tree/1.8.0: 8 files, 117.2KB
По умолчанию Homebrew устанавливает файлы в каталог /usr/local, чтобы они не мешали будущим обновлениям macOS. Убедитесь, что пакет tree установлен, запросив расположение команды с помощью which:
Вывод показывает, что пакет находится в /usr/local/bin:
Запустите команду tree с флагом –version, чтобы увидеть версию установленного пакета:
Версия будет выведена на экран (что также подтвердит, что пакет установлен правильно):
tree v1.8.0 (c) 1996 — 2018 by Steve Baker, Thomas Moore, Francesc Rocher, Florian Sesser, Kyosuke Tokoro
Иногда возникает необходимость обновить существующий пакет. Для этой задачи используйте команду brew upgrade, в которой укажите имя пакета:
brew upgrade tree
Если запустить brew upgrade без дополнительных аргументов, команда обновит все программы и пакеты, которыми управляет Homebrew.
Когда вы устанавливаете новую версию пакета, Homebrew сохраняет старую версию. Через некоторое время вы, возможно, захотите освободить место на диске, удалив эти копии старых версий. Запустите команду brew cleanup, чтобы удалить все старые версии программ, управляемых Homebrew.
Чтобы удалить пакет, которым вы больше не пользуетесь, используйте brew uninstall. Чтобы удалить команду tree, введите:
brew uninstall tree
Вывод покажет, что пакет был удален:
Uninstalling /usr/local/Cellar/tree/1.8.0. (8 files, 117.2KB)
Вы также можете использовать Homebrew для установки приложений для рабочего стола.
5: Установка настольных приложений
Homebrew не ограничивается установкой инструментов командной строки. Homebrew Cask позволяет также устанавливать настольные приложения. Эта функция включена в Homebrew, поэтому дополнительно ничего устанавливать не нужно.
Например, чтобы использовать Homebrew для установки Visual Studio Code, выполните следующую команду:
brew cask install visual-studio-code
Приложение будет установлено:
Updating Homebrew.
==> Auto-updated Homebrew!
Updated 1 tap (homebrew/cask).
==> Updated Casks
abstract cacher chirp sipgate-softphone
==> Downloading https://update.code.visualstudio.com/1.48.2/darwin/stable
==> Downloading from https://az764295.vo.msecnd.net/stable/a0479759d6e9ea56afa657e454193f72aef85bd0/VSC
######################################################################## 100.0%
==> Verifying SHA-256 checksum for Cask ‘visual-studio-code’.
==> Installing Cask visual-studio-code
==> Moving App ‘Visual Studio Code.app’ to ‘/Applications/Visual Studio Code.app’.
==> Linking Binary ‘code’ to ‘/usr/local/bin/code’.
🍺 visual-studio-code was successfully installed!
Вы найдете приложение в папке Applications, как если бы вы установили его вручную.
Чтобы удалить его, используйте brew cask uninstall:
brew cask uninstall visual-studio-code
Homebrew удалит установленное программное обеспечение:
==> Uninstalling Cask visual-studio-code
==> Backing App ‘Visual Studio Code.app’ up to ‘/usr/local/Caskroom/visual-studio-code/1.48.2/Visual St
==> Removing App ‘/Applications/Visual Studio Code.app’.
==> Unlinking Binary ‘/usr/local/bin/code’.
==> Purging files for version 1.48.2 of Cask visual-studio-code
Сначала команда выполнит резервное копирование (на случай сбоя операции удаления); после полного удаления программы резервная копия также будет удалена.
6: Удаление Homebrew
Если вам больше не нужен пакетный менеджер Homebrew, вы можете удалить его с помощью специального сценария.
Загрузите скрипт удаления с помощью curl:
curl -fsSL -o uninstall.sh https://raw.githubusercontent.com/Homebrew/install/master/uninstall.sh
Рекомендуем всегда предварительно проверять содержимое загруженных из сети сценариев с помощью команды less:
После проверки сценария запустите его с флагом –help; это выведет на экран различные флаги, которые вы можете использовать со сценарием:
bash uninstall.sh —help
На экране появятся доступные опции:
Homebrew Uninstaller
Usage: uninstall.sh [options] -p, —path=PATH Sets Homebrew prefix. Defaults to /usr/local.
—skip-cache-and-logs
Skips removal of HOMEBREW_CACHE and HOMEBREW_LOGS.
-f, —force Uninstall without prompting.
-q, —quiet Suppress all output.
-d, —dry-run Simulate uninstall but don’t remove anything.
-h, —help Display this message.
Используйте флаг –d, чтобы увидеть действия сценария:
bash uninstall.sh -d
Скрипт покажет список всех файлов, которые он собирается удалить:
Warning: This script would remove:
/Users/brianhogan/Library/Caches/Homebrew/
/Users/brianhogan/Library/Logs/Homebrew/
/usr/local/Caskroom/
/usr/local/Cellar/
/usr/local/bin/brew -> /usr/local/bin/brew
==> Removing Homebrew installation.
Would delete:
.
Если вы готовы удалить все эти файлы, выполните сценарий без флагов:
Эта команда удалит Homebrew и все программы, которые вы установили с его помощью.
Заключение
В этом мануале вы установили Homebrew на свой Mac и попробовали работать с этим менеджером пакетов. Теперь вы можете использовать Homebrew для установки инструментов командной строки, языков программирования и других утилит, которые вам понадобятся для разработки программного обеспечения.
У Homebrew есть много пакетов, которые вы можете установить. Изучите официальный список пакетов, чтобы выбрать необходимые вам программы.
Источник


