- Установка сертификатов Vmware View Horizon Connection Server SSL certificate install how
- Иллюстрация сказанного:
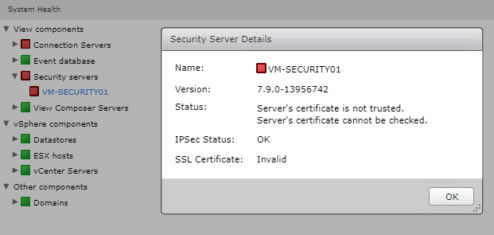
- VMware Horizon View 7.9 reports the following error for connection and security servers: “Server’s certificate is not trusted.” and “Server’s certificate cannot be checked.”
- VMware Horizon View 7.9 reports the following error for connection and security servers: “Server’s certificate is not trusted.” and “Server’s certificate cannot be checked.”
- Docs
- Using an SSL Proxy Server
- VMware Horizon View Connection Server SSL Certificate How-to
- Create Certificate Template with Active Directory Certificate Services. (AD CS)
- Wrap up:
Установка сертификатов Vmware View Horizon Connection Server SSL certificate install how
День мучений, и из-за чего? Надеюсь кому-нибудь поможет избежать напрасной траты времени.
Итак, при установке Vmware View Connection Server мы СНАЧАЛА разрешаем получать сертификат типа «веб-сервер» у нашего СА для наших CS-серверов.
Затем получаем сертификат у нашего СА.
А уж потом ставим сам CS.
Иллюстрация сказанного:
Разрешаем получать сертификаты типа Web-server нашему будущему Connection Server на нашем доменном центре сертификации (ВНИМАНИЕ! это должен быть или корневой ЦС, или, если это подчиненный ЦС — сертификат должне включать всю цепочку до корневого ЦС). Открываем оснастку ЦС, Шаблоны сертификатов, пр кнопкой — Управление. В примере — ЦС на 2003 контроллере домена.


В открывшемся окне выбираем шаблон Веб-сервер, пр кнопкой — Свойства.

В открывшемся окне во вкладке Безопасность добавляем наш будущеий сервер CS, если сервер не виден — выбираем в Тип объекта также и Компьютеры.

Затем идем на наш будущеий CS-сервер, открываем оснастку ММС, добавляем Сертификаты — Локального ПК. Пр кнопкой на поле — Создать запрос. Ставим галку напротив Web-server, жмем ссылку на настройку атрибутов сертификата:

Заполняем поля атрибутов, хватит следующих — Common Name Country Locality Organization. Также не забываем заполнить поле Alternate Name DNS, пишем то же самое что и СN:

Дружественное имя делаем именно таким — VDM — зачем-то в мануалах vmware много на это указаний, может там внутри чего привязано именно к этом имени

Обращаем внимание, что ключ должен быть не менее 2048 символов. Иначе потом начнутся какие-то грабли при работе всей структуры. 
ОК, Apply, готово.
Теперь можно ставить сам Connection Server, он не станет создавать «самоподписной» сертификат, а будет использовать вот этот, уже готовый.
Источник
VMware Horizon View 7.9 reports the following error for connection and security servers: “Server’s certificate is not trusted.” and “Server’s certificate cannot be checked.”
VMware Horizon View 7.9 reports the following error for connection and security servers: “Server’s certificate is not trusted.” and “Server’s certificate cannot be checked.”
This issue occurs if the Certificate Revocation List (CRL) includes a URL that cannot be accessed from the Connection Server paired to the Security Server.
but in the Horizon client the certificate is trusted and ok.
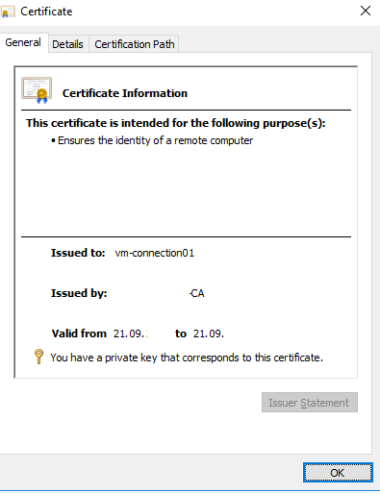
i have certificate, which is issued by my certification authority and is trusted.
The workaround this issue, create a CertificateRevocationCheckType registry string in Windows Registry on the Connection server.
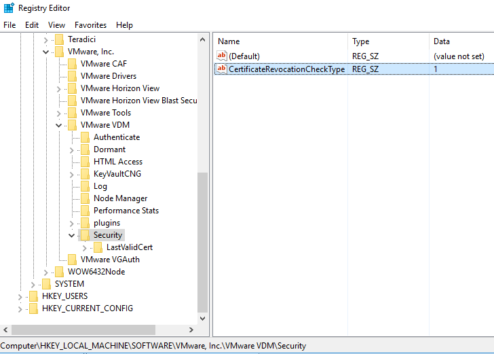
Navigate to HKEY_LOCAL_MACHINE\Software\VMware, Inc.\VMware VDM\Security\ in the View Connection Server.
Create the CertificateRevocationCheckType registry string (REG_SZ) and set its value to 1.
Источник
Docs
—> share-line
—> —> —> —> plus
Server certificate checking occurs for connections between Horizon Client and a server. A certificate is a digital form of identification, similar to a passport or a driver’s license.
Server certificate checking includes the following checks:
- Is the certificate intended for a purpose other than verifying the identity of the sender and encrypting server communications? That is, is it the correct type of certificate?
- Has the certificate expired, or is it valid only in the future? That is, is the certificate valid according to the computer clock?
- Does the common name on the certificate match the host name of the server that sends it? A mismatch can occur if a load balancer redirects Horizon Client to a server that has a certificate that does not match the host name entered in Horizon Client . Another reason a mismatch can occur is if you enter an IP address rather than a host name in the client.
- Is the certificate signed by an unknown or untrusted certificate authority (CA)? Self-signed certificates are one type of untrusted CA. To pass this check, the certificate’s chain of trust must be rooted in the device’s local certificate store.
For information about distributing a self-signed root certificate and installing it on Mac client systems, see the Advanced Server Administration document for the Mac Server that you are using, which is available from the Apple website.
To set the certificate checking mode, start Horizon Client and select VMware Horizon Client > Preferences from the menu bar. You can select one of the following options.
- Never connect to untrusted servers . This setting means that you cannot connect to the server if any of the certificate checks fail. An error message lists the checks that failed.
- Warn before connecting to untrusted servers . This setting means that you can click Continue to ignore the warning if a certificate check fails because the server uses a self-signed certificate. For self-signed certificates, the certificate name is not required to match the server name that you entered in Horizon Client . You can also receive a warning if the certificate has expired.
- Do not verify server identity certificates . This setting means that no certificate checking occurs.
If an administrator later installs a security certificate from a trusted certificate authority and all certificate checks pass when you connect, this trusted connection is remembered for that specific server. In the future, if that server ever presents a self-signed certificate again, the connection fails. After a particular server presents a fully verifiable certificate, it must always do so.
You can configure the default certificate checking mode and prevent end users from changing it in Horizon Client . For more information, see Configuring the Certificate Checking Mode for End Users.
Using an SSL Proxy Server
If you use an SSL proxy server to inspect traffic sent from the client environment to the Internet, enable the Allow connection via an SSL Proxy setting. This setting allows certificate checking for secondary connections through an SSL proxy server and applies to both Blast Secure Gateway and secure tunnel connections. If you use an SSL proxy server and enable certificate checking, but you do not enable the Allow connection via an SSL Proxy setting, connections fail because of mismatched thumbprints. The Allow connection via an SSL Proxy setting is not available if you enable the Do not verify server identity certificates option. When the Do not verify server identity certificates option is enabled, Horizon Client does not verify the certificate or thumbprint and an SSL proxy is always allowed.
To allow VMware Blast connections through a proxy server, see Configure VMware Blast Options.
Источник
VMware Horizon View Connection Server SSL Certificate How-to
By Vladan SEGET | Last Updated: September 12, 2019
VMware Horizon View Connection Server SSL Certificate (auto-signed) isn’t valid and you find yourself with a nice error when you open the VMware view administration web console. It says that the certificate is untrusted and that you have to install a valid (not a self-signed) SSL on this server.
So you’ll have have a valid certificate. You have two options:
1. Commercial certificate
2. Self-signed certificate with Microsoft certification authority, which you can add as a role to one of your VMs in your domain.
VMware recommends using valid SSL certificates issued by a valid Certificate Authority (CA) like a public CA such as GoDaddy, Verisign, etc.When you plan your View deployment, you should know if you’ll be using any non domain joined devices and (or) if there will be some mobile devices. If there will be, you have to make sure that all the non-domain PCs you use to connect to your View desktops did the import of the CA Root certificate into the Trusted Root Certification Authorities store.
Using SAN certificate (Subject alternative names) might also be the way to go if you planning large View deployment with more than one connection server.
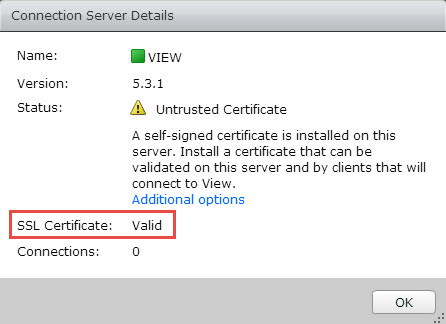
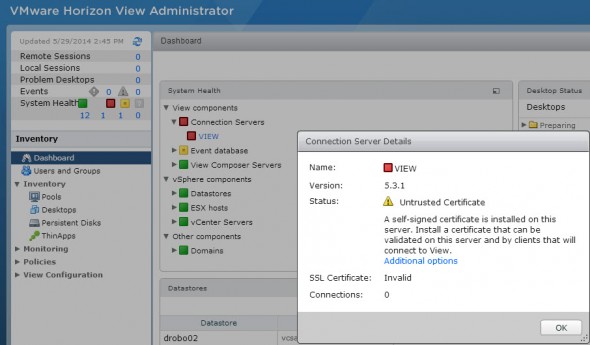
Screenshot from the Dashboard without an option to accept the default self-signed certificate for Horizon View Connection Server.
I have tested the VMware Certificate Automation tool for vCenter installation, but it’s still quite lengthy process. The tool can be used to automate the process of uploading certificates and restarting the different components of vCenter, but on the list of the vCenter components the Horizon View connection server is not present, as Horizon View is standalone product. (Note that the tool was recently updated, to 1.0.1 version which automates a bit more the process.)
My lab has the view composer and vCenter server on the same VM and I’m only using single View connection manager server. No security server. The setup don’t differ from the steps I’ve written for View 5.0. You can find the whole serie of how-to setup VMware View in a lab here. The only thing which is causing “a problem” now with View 5.3.1 Connection Server – the self-signed SSL certificate.
Create Certificate Template with Active Directory Certificate Services. (AD CS)
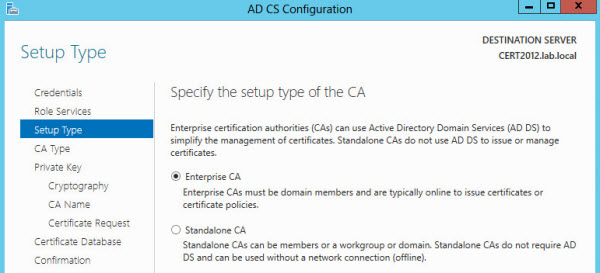
First, install the role and reboot the server. In my case I’m using Windows Server 2012 AD CS, but you can also use W 2008 or 2003 depending on your environment.
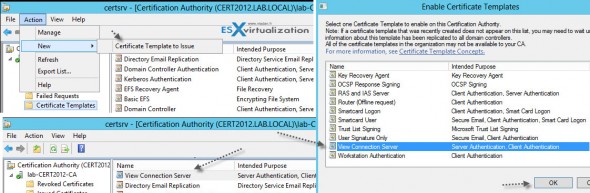
Launch the AD CS console and right click the “Certificate Templates” > and then Manage > to bring up the second console called “Certificate Templates. Check the screenshot below.
Once done click the Duplicate Template on a Web server template. We’re doing this to obtain an option to request web server certificate in addition to the only one default option – computer. You should also:
- create a security group (I called mine view-servers) in your AD and put your View connection server in this group. Add this group to the Security Tab on the properties of the new template and give this group a Write and Enroll permission, in addition to the default read permission.
- As a compatibility, I’ve selected 2003
- Allow private key to be exported
- Add client authentication to the list
- 50 years of validity
- 4096 as an encryption
Click to enlarge to see the details…
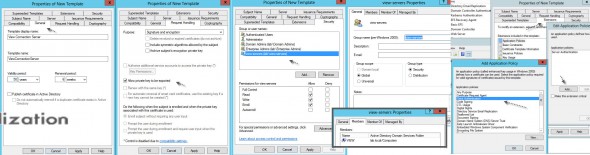
Then, expand the base certificate console, click the menu Actions > New > Certificate Template to issue.

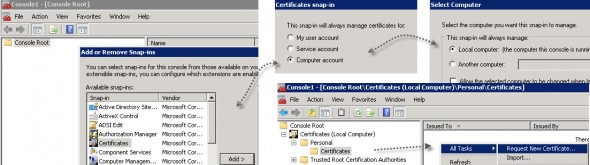
- Now go to your View connection server > launch new mmc and add/remove new snappin for local computer account.
- local computer
- Launch the console and select Certificates > Request new certificate
Then follow the assistant, click on the More Information is required to enroll for this certificate…and enter the common name that you want to use.
- Enter the DNS details
- General tab needs to have “vdm” as a friendly name

Click enroll…And check the view admin dashboard for results…
Then go and export the created certificate from the Personal > certificates folder.
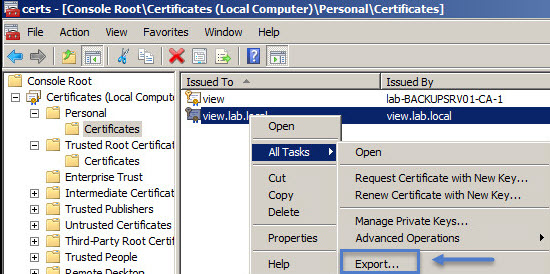
Save the file with some name with *.cer extension.
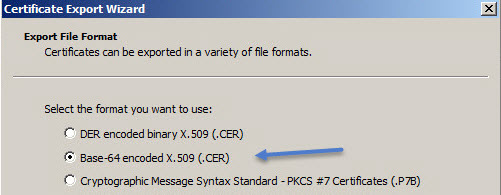
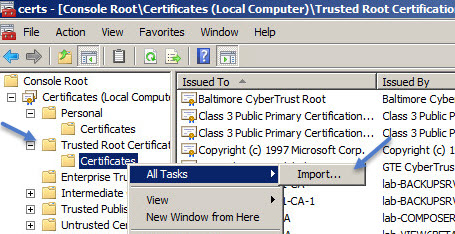
Once you have the file, you’ll need then to import the certificate into a Trusted Root certificate store:
That’s it! you’re done.
The easiest way might be, for lab testing, to create and import certificates before installing View 5.2 ,like this it will use the signed certificate instead of creating one. If
VMware Documentation:
Excellent how-to’s:
- With 2008 as a CA – https://my-virt.alfadir.net/2012/11/the-simpliest-way-to-create-view-connection-certificats-with-active-directory-ca
Wrap up:
Certificates are pain. This tutorial helped me to validate the installation and questions I had about View 5.2 certificates. We saw that even if the composer self-signed certificate error can be accepted and the green light let’s you go through, its not the same for the View connection server. So the Microsoft PKI is a must as the default View connection server certificate isn’t accepted. It’s logical as VMware want us to use real , commercial certificates. As a result, if you want to avoid that the only way is to build an enterprise root PKI, create (clone) your own template and then issue a request. This validation process was done mostly for my own purposes, to test it on on the latest Microsoft Windows Server 2012. If you find it useful, just share.
The full serie – VMware View 5 Install, configure – How-to in my lab :
Источник


