How to Edit the Hosts File in Windows 10


If you’re a regular groovyPost reader, you know that DNS translates domain names like groovyPost.com into IP addresses like 104.24.11.25. But did you know that there’s a file on your Windows 10 PC that can override that? It’s called your hosts file and lets you map specific domain names to an IP address of your choosing. Your HOSTS file only affects your computer, so you can use it to create custom URLs for IP addresses on your network, or you can use it to redirect certain websites.
As you can imagine, editing the HOSTS file can easily break your internet if it’s modified incorrectly or maliciously. So, it’s not particularly easy for a normal user to edit. This is a good thing. But if you want to purposefully change your HOSTS file, here’s how.
Edit Your Windows 10 Host File as an Administrator
The HOSTS file is normally stored in a plain text file in the Windows System folder and can be modified for a variety of use cases. One particular reason I edited the Host file in the past was to block certain websites when I imaged computers for a local high school. This was probably one of the best and easiest ways I could ensure students didn’t load any unauthorized websites such as Facebook or YouTube.
Editing your Windows Hosts file doesn’t have to feel like going down a rabbit hole. In Windows XP and earlier versions, the process was quite easy, just add an exception to your antivirus, open it in Notepad, make your changes then save it.
In Windows 10, if you try to edit your hosts file, you’ll probably be able to open it just fine, but when you go to save it, you’ll get an error:

Here’s how you can edit your hosts file without getting the “You don’t have permission to save in this location. Contact the administrator to obtain permission” error.
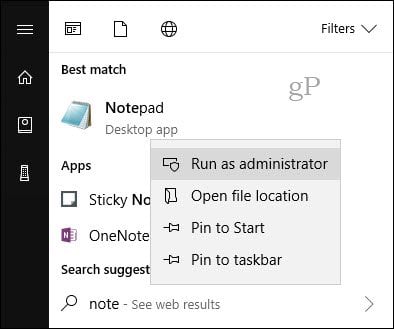
Hit the start menu or press the Windows key and start typing Notepad.
Right-click Notepad and choose Run as administrator.
In Notepad, click File then Open… In the File name field, paste the following path in:

Now you’ll be able to edit and save changes to your HOSTS file.
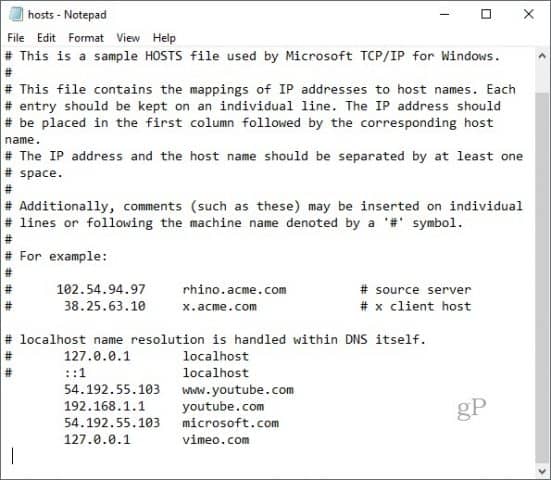
To map a domain, simply add a line based on the examples in the HOSTS file.
Start with the target IP address, then a space, then the domain name. If you want to block a website, redirect it to 127.0.0.1.
Don’t put in the # if you want it to take effect.
Also, remember that www.youtube.com is different than youtube.com.
You may need to restart your computer for the new HOSTS file to take effect.
An Easier Way to Edit the Hosts File in Windows 10
If you found that process a bit cumbersome, there’s a third-party utility you can use to modify your HOSTS file. I found a good one called Hosts File Editor by Scott Lerch. Let’s take a look and see how it works.
Now that you know the basics, here’s how you do it using the app, HOSTS File editor.
Download the 1 MB installer then proceed to set it up. Remember to choose the option just for yourself if you don’t want other users to have access to it.

Launch the app in Start > All apps—this will add the app to the Notification area where can launch the editor anytime you need to.

Hosts File Editor features a clean, easy to use interface. To begin using the program, populate the table with IP Addresses, Host Names, and a comment on the websites you want to manage. It’s not just limited to popular Internet websites, even devices on your home network with an IP address can be managed, so your Xbox, iPad, web cameras, or routers are much easier to block access to if needed.

When you are ready to block a website, check the box for the sites you want to prevent access to, click Save and that’s it.
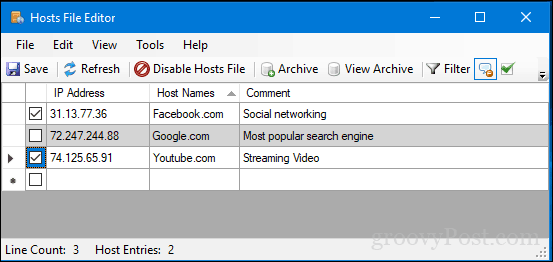
Another nice ease of use feature is the ability to simply right click the Hosts File Editor in the Notification area then click Disable Hosts File or make a quick edit. No need to go hunting or launch the command line anymore.

There are some other cool features included for power users and network administrators such as:
- Cut, copy, paste, duplicate, enable, disable and move one or more entries at a time.
- Filter and sort when there are a large number of host entries
- Archive and restore various hosts file configurations when switching between environments
- Automatically ping endpoints to check availability
So, there you have it, a quick and easy way to edit your Hosts File in Windows 10.
Как восстановить содержимое файла Hosts по умолчанию
Аннотация
Рекомендации, приведенные в этой статье, позволяют вернуть содержимое файла hosts к используемому по умолчанию.
Что такое файл Hosts?
Файл hosts используется операционной системой для сопоставления удобных для человека имен узлов с номерами IP-адресов, которые определяют и обнаруживают узел в IP-сети. Файл hosts — это один из нескольких системных ресурсов, которые связаны с сетевыми узлами в компьютерной сети, и является общей частью реализации IP-адреса операционной системы.
Файл hosts содержит текстовые строки, которые состоят из IP-адреса, указанного в текстовом поле, и одного или нескольких имен узлов. Каждое поле отделено пробелом (по историческим причинам часто предпочтение отдают знакам табуляции, но пробелы также используются). Файл также может включать строки с примечаниями, обозначенные символом #, который ставится в начале каждой такой строки. Пустые строки в файле игнорируются.
Если файл Hosts изменяется с по умолчанию, сброс может помочь устранить некоторые проблемы подключения.
Решение
Чтобы восстановить параметры файла Hosts по умолчанию, выполните указанные ниже действия в зависимости от используемой версии операционной системы.
Чтобы восстановить параметры файла hosts по умолчанию, выполните указанные ниже действия.
Откройте приложение «Блокнот». Для этого выполните поиск «Блокнота» с помощью Cortana, а затем коснитесь или щелкните значок «Блокнот».
Скопируйте приведенный ниже текст и вставьте его в файл: # Copyright (c) 1993-2006 Microsoft Corp. # # This is a sample HOSTS file used by Microsoft TCP/IP for Windows. # # This file contains the mappings of IP addresses to host names. Each # entry should be kept on an individual line. The IP address should # be placed in the first column followed by the corresponding host name. # The IP address and the host name should be separated by at least one # space. # # Additionally, comments (such as these) may be inserted on individual # lines or following the machine name denoted by a ‘#’ symbol. # # For example: # # 102.54.94.97 rhino.acme.com # source server # 38.25.63.10 x.acme.com # x client host # localhost name resolution is handle within DNS itself. # 127.0.0.1 localhost # ::1 localhost
В меню Файл выберите команду Сохранить как, введите «hosts» в поле Имя файла (как показано на рисунке ниже) и сохраните файл на рабочий стол. 
Закройте приложение «Блокнот».
Найдите %WinDir%\System32\Drivers\Etc с помощью Cortana, а затем выберите значок папки «Файл ».
Коснитесь и удерживайте файл Hosts (или щелкните на нем правой кнопкой мыщи), выберите команду Переименовать и присвойте файлу имя «Hosts.old».
Скопируйте или переместите файл Hosts, созданный на этапе 3, с рабочего стола в папку %WinDir%\System32\Drivers\Etc. Если система предложит ввести пароль администратора, нажмите кнопку Продолжить.
Чтобы восстановить параметры файла hosts по умолчанию, выполните указанные ниже действия.
Откройте приложение «Блокнот». Для этого проведите пальцем от правого края экрана, коснитесь элемента Поиск, введите запрос Блокнот и коснитесь значка Блокнот. Если вы используете мышь, наведите указатель на правый верхний угол экрана, переместите его вниз и щелкните кнопку Поиск, введите запрос Блокнот и щелкните значок Блокнот.
Скопируйте приведенный ниже текст и вставьте его в файл: # Copyright (c) 1993-2006 Microsoft Corp. # # This is a sample HOSTS file used by Microsoft TCP/IP for Windows. # # This file contains the mappings of IP addresses to host names. Each # entry should be kept on an individual line. The IP address should # be placed in the first column followed by the corresponding host name. # The IP address and the host name should be separated by at least one # space. # # Additionally, comments (such as these) may be inserted on individual # lines or following the machine name denoted by a ‘#’ symbol. # # For example: # # 102.54.94.97 rhino.acme.com # source server # 38.25.63.10 x.acme.com # x client host # localhost name resolution is handle within DNS itself. # 127.0.0.1 localhost # ::1 localhost
В меню Файл выберите команду Сохранить как, введите «hosts» в поле Имя файла (как показано на рисунке ниже) и сохраните файл на рабочий стол. 
Закройте приложение «Блокнот».
Откройте папку %WinDir%\System32\Drivers\Etc. Для этого выполните следующие действия:
Проведите пальцем от правого края экрана, коснитесь кнопки Поиск, введите слово выполнить, а затем коснитесь значка Выполнить. Если вы используете мышь, наведите указатель на правый верхний угол экрана, переместите его вниз, щелкните Поиск, введите выполнить и щелкните значок Выполнить.
В поле Открыть введите команду %WinDir%\System32\Drivers\Etc и нажмите кнопку ОК.
Выберите файл Hosts, выберите команду Переименовать и присвойте файлу имя «Hosts.old».
Скопируйте или переместите файл Hosts, созданный на этапе 3, в папку %WinDir%\System32\Drivers\Etc. Если будет предложено ввести пароль администратора, нажмите или коснитесь кнопки Продолжить.
Чтобы самостоятельно восстановить параметры файла hosts до значений по умолчанию, сделайте следующее:
Нажмите кнопку Пуск, щелкните команду Выполнить, введите слово «Блокнот», а затем нажмите кнопку ОК.
Скопируйте в файл приведенный ниже текст.
Windows 7 # Copyright (c) 1993-2006 Microsoft Corp. # # This is a sample HOSTS file used by Microsoft TCP/IP for Windows. # # This file contains the mappings of IP addresses to host names. Each # entry should be kept on an individual line. The IP address should # be placed in the first column followed by the corresponding host name. # The IP address and the host name should be separated by at least one # space. # # Additionally, comments (such as these) may be inserted on individual # lines or following the machine name denoted by a ‘#’ symbol. # # For example: # # 102.54.94.97 rhino.acme.com # source server # 38.25.63.10 x.acme.com # x client host # localhost name resolution is handle within DNS itself. # 127.0.0.1 localhost # ::1 localhost Windows Vista или Windows Server 2008 # Copyright (c) 1993-2006 Microsoft Corp. # # This is a sample HOSTS file used by Microsoft TCP/IP for Windows. # # This file contains the mappings of IP addresses to host names. Each # entry should be kept on an individual line. The IP address should # be placed in the first column followed by the corresponding host name. # The IP address and the host name should be separated by at least one # space. # # Additionally, comments (such as these) may be inserted on individual # lines or following the machine name denoted by a ‘#’ symbol. # # For example: # # 102.54.94.97 rhino.acme.com # source server # 38.25.63.10 x.acme.com # x client host 127.0.0.1 localhost ::1 localhost Windows XP или Windows Server 2003 # Copyright (c) 1993-1999 Microsoft Corp. # # This is a sample HOSTS file used by Microsoft TCP/IP for Windows. # # This file contains the mappings of IP addresses to host names. Each # entry should be kept on an individual line. The IP address should # be placed in the first column followed by the corresponding host name. # The IP address and the host name should be separated by at least one # space. # # Additionally, comments (such as these) may be inserted on individual # lines or following the machine name denoted by a ‘#’ symbol. # # For example: # # 102.54.94.97 rhino.acme.com # source server # 38.25.63.10 x.acme.com # x client host 127.0.0.1 localhost
В меню Файл выберите команду Сохранить как, введите «hosts» в поле Имя файла, а затем сохраните файл на рабочий стол.
Нажмите кнопку Пуск и выберите элемент Выполнить, введите команду %WinDir%\System32\Drivers\Etc и нажмите кнопку ОК.
Выберите файл hosts и переименуйте его в hosts.old.
Скопируйте или переместите файл Hosts, созданный на этапе 3, в папку %WinDir%\System32\Drivers\Etc. Если система предложит ввести пароль администратора, нажмите кнопку Продолжить.
Поддержка Windows XP прекращена
Корпорация Майкрософт прекратила поддержку Windows XP с 8 апреля 2014 г. Это могло повлиять на безопасность и своевременную установку обновлений для вашего программного обеспечения. Что это значит и как обеспечить защиту.
Поддержка Windows Server 2003 завершилась 14 июля 2015 г.
Поддержка Windows Server 2003 завершилась 14 июля 2015 г. Это могло повлиять на безопасность и своевременную установку обновлений для вашего программного обеспечения. Что это значит и как обеспечить защиту.


