- Не работает DNS через VPN в Windows 10 (РЕШЕНО)
- How to change DNS settings on your PC running Windows 10
- What’s DNS?
- How to change Windows 10 DNS settings using Control Panel
- How to change Windows 10 DNS settings using Settings
- How to change Windows 10 DNS settings using Command Prompt
- More Windows 10 resources
- Halo: MCC’s live service elements make it better, not worse
- Microsoft’s Surface Duo is not ‘failing up’
- Here’s what you can do if Windows 10 update KB5001330 is causing issues
- These are the best PC sticks when you’re on the move
Не работает DNS через VPN в Windows 10 (РЕШЕНО)
DNS-серверы и суффиксы, настроенные для VPN-подключений, используются в Windows 10 для разрешения имён с помощью DNS в режиме Force Tunneling (принудительного туннелирования) (включён параметр Use default gateway on remote network («Использовать шлюз по умолчанию в удаленной сети»)), если ваше VPN-подключение активно. В этом случае вы не можете преобразовать DNS-имена в своей локальной сети или получить доступ в Интернет через внутреннюю локальную сеть.
В то же время вы можете проверить связь с любыми ресурсами в вашей локальной сети (попробуйте проверить связь со своим шлюзом, соседним компьютером или IP-адресом принтера). Они доступны только по IP-адресам, но не по именам хостов. Дело в том, что Windows 10 пытается разрешить имена хостов в вашей локальной сети через DNS-серверы, указанные в настройках VPN-подключения.
Я нашёл несколько рекомендаций по отключению протокола IPv6 для вашего локального (LAN) интерфейса, и это поможет, если вы хотите использовать режим Force-Tunneling.
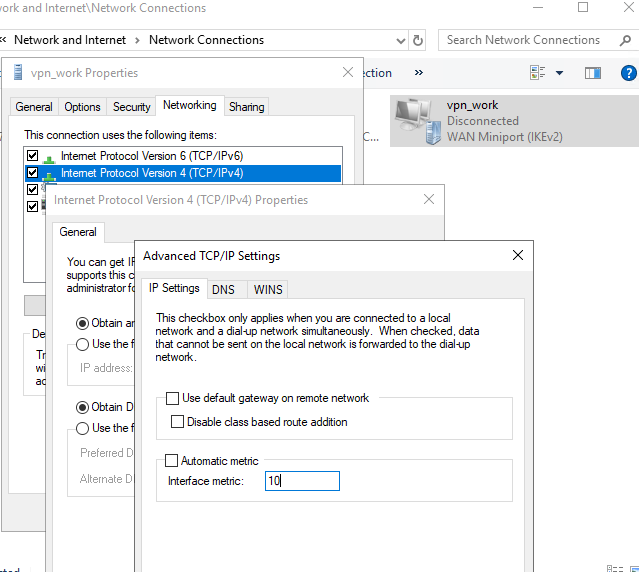
Если вы используете Split Tunneling (раздельное туннелирование) (опция Use default gateway on remote network («Использовать шлюз по умолчанию в удаленной сети») не отмечена) для вашего VPN-соединения, вы можете получить доступ к Интернету из своей локальной сети, но вы не можете разрешать DNS-адреса в удалённой сети VPN (отключение IPv6 здесь не поможет).
Вы должны понимать, что Windows отправляет DNS-запрос из сетевого интерфейса, который имеет наивысший приоритет (меньшее значение метрики интерфейса). Например, ваше VPN-соединение работает в режиме раздельного туннелирования (вы хотите получить доступ в Интернет из вашей локальной сети и ваших корпоративных ресурсов через VPN).
Проверьте значения всех метрик сетевого интерфейса из PowerShell:

На приведённом выше снимке экрана показано, что локальное соединение Ethernet имеет более низкую метрику (25), чем интерфейс VPN (100). Таким образом, трафик DNS проходит через интерфейс с меньшим значением метрики. Это означает, что ваши DNS-запросы отправляются на ваши локальные DNS-серверы, а не на DNS-серверы для VPN-подключения. В этой конфигурации вы не можете разрешать имена в подключённой внешней сети VPN.
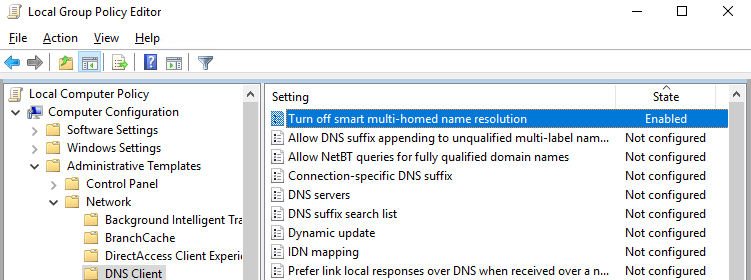
Кроме того, здесь следует упомянуть новую функцию DNS-клиента для Windows 8.1 и Windows 10. В эти версии ОС было добавлено Smart Multi-Homed Name Resolution (SMHNR) (интеллектуальное разрешение многодомных имён) для более быстрого ответа на запросы DNS. По умолчанию SMHNR отправляет одновременные запросы DNS ко всем DNS-серверам, известным системе, и использует ответ, полученный первым (запросы LLMNR и NetBT также отправляются). Это небезопасно, поскольку внешние DNS-серверы (указанные для вашего VPN-соединения) потенциально могут видеть ваш DNS-трафик (утечка ваших DNS-запросов). Вы можете отключить SMHNR в Windows 10 через GPO: Конфигурация компьютера → Административные шаблоны → Сеть → DNS-клиент → Отключить интеллектуальное многосетевое разрешение имен = Включено.
В английской версии: Computer Configuration → Administrative Templates → Network → DNS Client → Turn off smart multi-homed name resolution = Enabled.
Или вы можете отключить SMHNR, используя следующие команды (в Windows 8.1):
В Windows 10 Creators Update (1709) и новее запросы DNS отправляются на все известные DNS-серверы один за другим (не параллельно). Вы можете повысить приоритет определённого DNS-сервера, если снизите его значения метрики.
Таким образом, изменение метрики интерфейса позволяет вам отправлять DNS-запросы через соединение (LAN или VPN), где разрешение имён является для вас самым приоритетным.
Таким образом, чем ниже значение метрики интерфейса, тем выше приоритет соединения. Windows автоматически назначает метрики интерфейсов IPv4 в зависимости от их скорости и типа. Например, соединение LAN со скоростью > 200 Мбит/с имеет значение метрики, равное 10, а соединение Wi-Fi со скоростью 50-80 Мбит/с имеет значение 50 (смотрите таблицу https://docs.microsoft.com/en-us/troubleshoot/windows-server/networking/automatic-metric-for-ipv4-routes).
Вы можете изменить метрику интерфейса из графического интерфейса Windows, PowerShell или с помощью команды netsh.
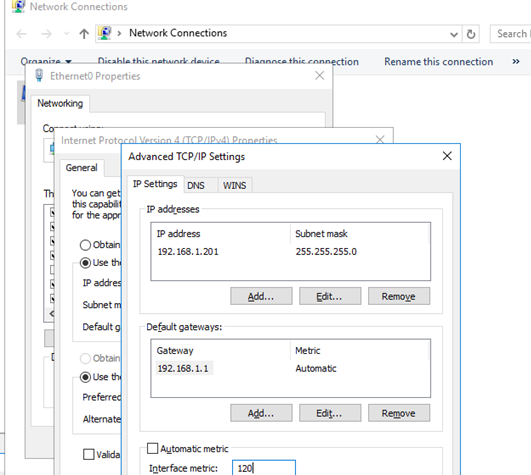
Например, вы хотите, чтобы ваши DNS-запросы отправлялись через VPN-соединение. Вам необходимо увеличить показатели ваших подключений к локальной сети, чтобы их значения превышали 100 (в моем примере).
Перейдите в Панель управления → Сеть и Интернет → Центр управления сетями и общим доступом → Изменение параметров адаптера (либо используйте путь «Панель управления\Сеть и Интернет\Сетевые подключения»). Затем откройте свойства вашего Ethernet-соединения, выберите «IP версии 4 (TCP/IPv4)». На вкладки «Общие» нажмите кнопку «Дополнительно». Снимите флажок «Автоматическое назначение метрики» и измените метрику интерфейса на 120.
Вы можете сделать то же самое с помощью следующей команды PowerShell (используйте индекс вашего интерфейса LAN, который вы можете получить с помощью командлета Get-NetIPInterface):
Или с помощью netsh (укажите имя вашего LAN-соединения):
Таким же образом вы можете уменьшить значение метрики в свойствах вашего VPN-соединения.
Также вы можете изменить настройки своего VPN-подключения, изменив режим на Split Tunneling и указав DNS-суффикс для подключения с помощью PowerShell:
How to change DNS settings on your PC running Windows 10
 Source: Windows Central
When you subscribe for internet access for home or business, the Internet Service Provider (ISP) also provides the necessary network settings, including the Domain Name System (DNS) addresses, which makes possible to access your favorite sites, online services that you may need to work from home, and download files.
The only caveat is that the ISP’s DNS servers are usually slower, unreliable at times, and not very private. However, you can always use different resolvers from third-party companies to improve your internet experience on Windows 10. Here’s how.
What’s DNS?
A Domain Name System is a service (usually at no cost to you) that allows you to type a friendly domain name in the web browser to load a web page, and without them, it’d be a nightmare to surf the internet.
The issue is that every device connected to a network requires an IP address (104.18.189.55) to communicate with other devices. However, these addresses are not easy for humans to remember, and DNS servers are the ones that provide the mechanism to translate friendly domain names (WindowsCentral.com) into an IP address that computers can understand.
Although you can type https://windowscentral.com to get to our website, in the background, the browser first sends a request to the DNS servers to resolve the website name into an IP address. When the address is found, it returns, and then the browser connects to the site and downloads the contents of the page.
Typically, you don’t notice this process, because everything happens in milliseconds. However, if the resolvers that you’re using aren’t reliable, they’re slowing down your internet, or you want to use faster and more private servers, Windows 10 allows you to change these settings to any services you want to use.
In this Windows 10 guide, we’ll walk you through the steps to change the DNS settings on your computer using Control Panel, Command Prompt, and Settings app.
How to change Windows 10 DNS settings using Control Panel
To change the DNS settings on Windows 10 using Control Panel, use these steps:
- Open Control Panel.
- Click on Network and Internet.
- Click on Network and Sharing Center.
Click the Change adapter settings option in the left pane.
 Source: Windows Central
Right-click the network interface that connects Windows 10 to the internet, and select the Properties option.
Source: Windows Central
Quick tip: You’ll know which adapter is connected to the network because it won’t have a «Disabled» or «Network cable unplugged» label.
Click the Properties button.
 Source: Windows Central
Select the Use the following DNS server addresses option.
Quick note: When you select the option to specify the DNS settings manually, the device will continue to receive the TCP/IP address from the DHCP server (router).
Type your «preferred» and «alternate» DNS addresses.
![]() Source: Windows Central
Source: Windows Central
If you want to use Cloudflare, Google Public DNS, or Cisco OpenDNS, you can use these settings:
- Cloudflare: 1.1.1.1 and 1.0.0.1
- Google Public DNS: 8.8.8.8 and 8.8.4.4
- OpenDNS: 208.67.222.222 and 208.67.220.220
Click the Add button.
Quick tip: In addition to adding more addresses, from this tab, you can also edit and remove resolvers, and you even have an option on the side to change their priority.
Once you complete the steps, the device will immediately start using the DNS settings that you specified.
How to change Windows 10 DNS settings using Settings
To change the DNS addresses using the Settings app, use these steps:
- Open Settings.
- Click on Network & Internet.
- Click on Ethernet (or Wi-Fi depending on your connection).
Select the connection that connects Windows 10 to the network.
 Source: Windows Central
Under the «IP settings» section, click the Edit button.
Source: Windows Central
Confirm your «Preferred DNS» and «Alternate DNS» addresses.
 Source: Windows Central
If you want to use Cloudflare, Google Public DNS, or Cisco OpenDNS, you can use these settings:
- Cloudflare: 1.1.1.1 and 1.0.0.1
- Google Public DNS: 8.8.8.8 and 8.8.4.4
- OpenDNS: 208.67.222.222 and 208.67.220.220
After you complete the steps, you should now be able to connect to the internet using the new resolvers.
Although the Settings app should be the recommended experience to change the DNS settings on your computer, we’re not listing this option first because it can be confusing for some people.
How to change Windows 10 DNS settings using Command Prompt
Alternatively, you can also use Command Prompt to change the DNS settings on Windows 10.
To use Command Prompt to change the device DNS settings, use these steps:
- Open Start.
- Search for Command Prompt, right-click the top result, and select the Run as administrator option.
Type the following command to launch the tool to change the networking settings and press Enter:
Type the following command to identify the names of the network adapters and press Enter:
interface show interface
Type the following command to set the primary DNS IP address and press Enter:
interface ip set dns name=»ADAPTER-NAME» source=»static» address=»X.X.X.X»
In the command, remember to change ADAPTER-NAME with the name of your network adapter you identified on step No. 4, and change X.X.X.X with the IP address of the DNS server that you want to use.
If you want to use Cloudflare, Google Public DNS, or Cisco OpenDNS, you can use these settings:
- Cloudflare: 1.1.1.1 and 1.0.0.1
- Google Public DNS: 8.8.8.8 and 8.8.4.4
- OpenDNS: 208.67.222.222 and 208.67.220.220
For example, this command sets the primary DNS addres to 1.1.1.1:
interface ip set dns name=»Ethernet1″ source=»static» address=»1.1.1.1″
Source: Windows Central
Type the following command to add an alternative DNS IP address and press Enter:
interface ip add dns name=»ADAPTER-NAME» addr=»X.X.X.X» index=2
In the command, remember to change ADAPTER-NAME with the name of your network adapter you queried on step No. 4, and change X.X.X.X with the secondary address that you want to use.
For example, this command sets the secondary DNS addres to 1.0.0.1:
interface ip add dns name=»Ethernet1″ addr=»1.0.0.1″ index=2
Source: Windows Central
Quick tip: If you need to add even more DNS addresses, you can repeat the above steps, but increase the number of the index option by 1. For instance, interface ip add dns name=»Ethernet1″ addr=»8.8.8.8″ index=3
Once you complete the steps, Windows 10 will start using the new DNS server addresses to resolve domain names to numeric addresses that your device can understand.
More Windows 10 resources
For more helpful articles, coverage, and answers to common questions about Windows 10, visit the following resources:
![]()
Halo: MCC’s live service elements make it better, not worse
Halo: The Master Chief Collection is more popular than ever, but some fans don’t agree with the live service approach 343 Industries has taken with it. Here’s why those elements are, at the end of the day, great for the game and for Halo overall.
![]()
Microsoft’s Surface Duo is not ‘failing up’
Microsoft announced this week that it was expanding Surface Duo availability to nine new commercial markets. While Surface Duo is undoubtedly a work in progress, this is not a sign of a disaster. It’s also doesn’t mean that Surface Duo is selling a ton either. Instead, the reason for the expansion is a lot more straightforward.
![]()
Here’s what you can do if Windows 10 update KB5001330 is causing issues
In this guide, we’ll show you the steps to get rid of the update KB5001330 to fix profile, gaming, and BSoD problems with the Windows 10 October 2020 Update and May 2020 Update.
![]()
These are the best PC sticks when you’re on the move
Instant computer — just add a screen. That’s the general idea behind the ultra-portable PC, but it can be hard to know which one you want. Relax, we have you covered!


