- Move a Window with the Keyboard in Windows 7/8/10
- Method 1 – Incremental Move
- Method 2 – Windows Snap
- Method 3 – Multi-Monitor Setups
- How to Move Your Windows Drive to a New PC
- Step 1: Back Up the Entire Drive
- Step 2: Move Your Drive to the New PC
- Step 3: Install New Drivers (and Uninstall Old Ones)
- Step 4: Re-Activate Windows
- Different Types of Windows in House
- (A) Types of Windows Based on Material:
- 01. Timber or Wooden Windows:
- Moving to a Windows 10 PC
- Step 1: Learn the benefits of a modern Windows 10 PC
- Step 2: Purchase your new PC
- Step 3: Sign in with Microsoft to streamline your experience
- Step 4: Bring your files and favorites with you
Move a Window with the Keyboard in Windows 7/8/10
Comes in handy once in a blue moon
So for those of you who do not like to use a mouse, it would be pretty cool if you could move a window using just the keyboard in Windows 7 right? Well, there are a couple of ways to do this and even though you may not need to do it very often, it does come in handy on the rare occasion!
In this article, I’ll tell you how to move a window in small increments to the exact position you want, how to snap a window to the left or right and how to move a window between monitors on a multi-monitor setup, all by just using the keyboard!
Method 1 – Incremental Move
For exact positioning, you first need to click on the window. Now this is obviously going to only work for windows that are not fully maximized. If it’s fully maximized, there is really nowhere to move the window.
Step 1: Either click on the window or if you want to use the keyboard, press ALT+TAB and make the window you want to move active.
Step 2: Now go ahead and press ALT+SPACEBAR and you’ll see a small menu appear in the window.
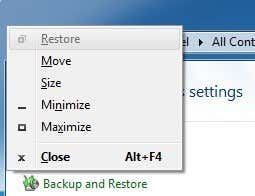
Step 3: Now press M, which will basically choose the Move option in the menu.
Step 4: Now use the arrow keys on your keyboard to move the window to the new position that you desire.
Step 5: Press the Enter key to get out of the move mode. Also, if you want to have the window go back to the original position before you started the move, press the Esc key instead.
Method 2 – Windows Snap
Windows has a nifty feature that lets you snap windows to the left-hand or right-hand side of the screen. If you drag a window to the right or left, it will automatically resize and snap to the side.

To do this using the keyboard, press the Windows Key + the right or left arrow. Make sure to hold down the Windows key while pressing the left and right arrow keys. It’s actually pretty neat and much faster than dragging the window around the screen.
Method 3 – Multi-Monitor Setups
Lastly, for moving between multiple monitors, all you have to do is add SHIFT to the above key combo, so it would simply be Windows Key + Shift + right or left arrow.
For the power users who really want to control their windows, moving may not be enough. So here’s a few other shortcuts that could come in handy if you are left with nothing but a keyboard and Windows:
End – Will display the bottom of the active window (in case you need to scroll using the keyboard)
Home – Will display the top of the active window
F11 – Will either maximize or minimize the active window
Ctrl + Tab – If you have a window with tabs, then this will move you forward through the tabs
Ctrl + Shift + Tab – Will move you back through the tabs
Windows Key + Shift + Up Arrow – This will stretch a window to the top and bottom of the screen.
Founder of Help Desk Geek and managing editor. He began blogging in 2007 and quit his job in 2010 to blog full-time. He has over 15 years of industry experience in IT and holds several technical certifications. Read Aseem’s Full Bio
How to Move Your Windows Drive to a New PC
Need to migrate your Windows installation to a new PC? It’s technically possible, and Windows 10 streamlines the process, but there are caveats.


Buying a new computer can be fun, until you have to slog through migrating all your old apps, preferences, and files. Wouldn’t it be easier if you could just pop your old hard drive into the new PC and pick up where you left off? It’s technically possible, though it comes with some caveats.
With Windows 7, this was less tenable; it introduced driver conflicts, especially with lower-level hardware like your hard drive’s SATA controller. As a result, you’d often see a blue screen as soon as the computer booted, preventing you from even getting to the desktop.
Microsoft’s sysprep tool could sometimes help with this, but it wasn’t really meant for this purpose, and it came with many of its own caveats. You were almost always better off doing a clean install.
Windows 8 and 10, on the other hand, are much better about handling these conflicts. When you throw an existing Windows installation at a new PC, it’ll perform its first-time setup as if it were a new computer, grab drivers for your new hardware, and hopefully drop you onto the desktop without too much trouble.
You’ll have to do a few things yourself, but overall, it should work—I moved my drive from an AMD-based machine to an Intel/Nvidia machine with barely a hiccup. Windows Update was even able to download new patches.
That’s not to say you won’t run into any problems. This could all vary from PC to PC, and you never know what driver conflicts or performance issues may lay underneath the surface of a seemingly fine setup.
All told, I would still recommend doing a clean install if you’re migrating permanently to a new machine, but if you need something quick and dirty—like if your old PC dies and you need to access some data from your old installation—this should work well enough.
Step 1: Back Up the Entire Drive
Before making any substantial changes, it’s always a good idea to back up your data—and that goes double when you’re messing with hard drives. If you have a backup tool you really like, go ahead and use that.
However, for this particular case, I recommend cloning the entire drive. That way, if something goes wrong and you can’t boot, you can restore an exact image of the original drive and try a different approach.
Alternatively, if your new PC takes a different kind of drive than your old PC—say, you’re migrating from a PC with a 2.5-inch drive to one with an M.2 slot—you can clone the old drive to a new drive with the correct form factor, then plug that drive into your new PC.
Note that this may mean buying a new SSD and plugging it in with a USB-to-M.2 SATA or USB-to-M.2 NVMe enclosure in order to clone it. Do some research on which type of drives your new PC supports before buying.
Step 2: Move Your Drive to the New PC
Once your drive has been safely backed up, it’s time to swap it into your new PC, removing it from the external enclosure first (if you used one). You may have to look up instructions for opening up your specific machine and installing new storage.
Then, turn your PC on. Chances are, it’ll try to boot from the new drive automatically, but if not, you may need to press a key at startup to enter the BIOS settings, like F2 or Delete, and change the boot order.
Once the PC finds the right drive, you should be greeted with the Windows logo with the spinning wheel. It’ll likely say something like «Getting Devices Ready,» and you’ll have to let it do its thing—in my experience, this is pretty quick, though others have noted that it could require multiple restarts.
Step 3: Install New Drivers (and Uninstall Old Ones)
Windows will likely install a lot of the necessary drivers for you, especially once you connect your new PC to the internet. You may notice some flickering as it downloads the display drivers, so give it some time to go through its process (and restart when it asks you to do so).
You may find that you need to download some drivers manually, if Windows doesn’t do so on its own (or if it only downloads generic drivers instead of manufacturer-supplied ones).
To be safe, I recommend heading to your PC manufacturer’s website and downloading the chipset, audio, and other drivers yourself. If you built the computer yourself, go to the motherboard manufacturer’s website instead.
You can also head to Nvidia, AMD, or Intel’s website for graphics drivers, though again, Windows installed the non-generic versions for me without my intervention.
Finally, if you want to keep things clean, you can uninstall the old drivers left on your system by searching for «Add or Remove Programs» from the Start menu. For graphics drivers, you may want to use a tool like DDU to really clean them out.
For everything else, search the Start menu for Device Manager in the Control Panel, click View > Show Hidden Devices, and right-click devices you no longer use to uninstall their drivers.
Step 4: Re-Activate Windows
There’s one last hitch to this process: when you toss your drive into a new computer, Windows will recognize that the hardware has changed, and potentially—depending on the type of license you have—de-activate itself.
If this setup is temporary, and you’re only using it to grab a few things off your old PC, you don’t need to worry about activation—Windows should keep working as normal, with an activation watermark in the corner and a few features disabled.
If you plan on using this setup permanently, though, you should re-activate Windows. You can try entering the same product key you used before, but this may fail if you have an OEM license that isn’t meant to migrate to new hardware. I recommend trying the activate-by-phone option, though, as sometimes that will succeed when online activation fails.
Again, this whole thing is not a foolproof process—there are many tiny things that could trip things up, so you may have to do a bit of troubleshooting if something doesn’t work properly. And even then, there’s no guarantee you’ll be getting optimal performance if the system isn’t configured properly for your new hardware.
If you can take the time, a clean install is best—but when you need to get up and running right now, it’s nice to know Windows 10 has streamlined the process enough to make it usable.
Different Types of Windows in House

Monalisa Patel is a Structural Engineer who has earned her Master’s degree (ME) from the L.J College of Engineering and Technology Ahmadabad in 2018. She is an Engineer (Civil) at SDCPL – Gharpedia. Helping people to solve their queries about construction is her passion. Apart from being blogger, she also participates in structural design at SDCPL. She is reachable on LinkedIn, Twitter, Instagram & Facebook.
The windows are an essential part of the house. It also provides light, fresh air and ventilation in the house. Windows are often arranged, also for the purposes of architectural decoration. It allows light into the room, enhance your wall colours or furniture. It provides solar heating in the winter, insulation against heat loss and in some cases against sound, too, if properly designed acoustically.
Also Read: All You Need to Know About Window

There are different types of windows that make up the construction of the house. There are so many different options available that it can be pretty overwhelming to try to pick out the right one for your needs. The shapes of windows can be square, rectangular, octagonal and even triangular also. Some windows open to the side and some slide up. Most styles of windows are available in a number of different materials. Traditionally, windows were made of timber, but now steel, aluminium, PVC, are also popular. The windows are classified in following ways, based on their
(A) Material
(B) Position
(C) Operational Movement
(D) Construction or Form of Shutter
(A) Types of Windows Based on Material:
When you design your home, it is important to know which types of materials are used in the construction of windows. Based on the material, windows are classified in following ways:
01. Timber or Wooden Windows:
Timber or wooden windows give a beautiful look to your home. It offers good thermal performance and natural beauty to your house. They are costly as compared to other types of windows; particularly when made in teak.
Moving to a Windows 10 PC
Making the move to a new Windows 10 PC? We’re happy you’re here and we’ve got you covered.
This guide will help you discover the best Microsoft has to offer and help you transfer your favorite files and apps to your new device so you can get up and running quickly, and get back to doing what you love.
If you’re on a Windows 7 device, note that support has ended and we recommend you move to a Windows 10 PC to stay secure. Learn more about the Windows 7 end of support and how to get Windows 10.
Step 1: Learn the benefits of a modern Windows 10 PC
Shopping for a new PC? Watch videos about common device-related terms you might come across in your research, including storage types, graphics processing units, and more.
Regular updates are built in to Windows 10, meaning you’ll always have the latest features. Explore what‘s new in the latest Windows 10 updates.
Get customized info about your current Windows 7 PC health and performance with the Guide to Windows 10 app (for Windows 7 devices).
Step 2: Purchase your new PC
For quicker startup times, longer battery life, and more responsive apps, a new PC has you covered. Find a new PC that fits your needs.
Step 3: Sign in with Microsoft to streamline your experience

Never forget a password again. Get personal access to all things Microsoft with a single, secure sign-on, plus get free OneDrive storage to help you move your files to your new PC. Good news—if you have an Xbox or Office account, you may already have a Microsoft account. You can also sign in with any email to get started.
Step 4: Bring your files and favorites with you

There’s no need to leave your files or browser favorites behind. Bring them with you to your new PC using one of the following options. We recommend using OneDrive so your files are backed up and protected in the cloud.
Select your current version of Windows to find instructions on how to move your files.


