- Windows 10: How to Change or Add Keyboard Language
- Problem
- Solution
- Manage the input and display language settings in Windows 10
- Change your keyboard layout
- Change the keyboard layout or other method you use to type
- Install or change a display language
- Change your keyboard layout
- How to Change the Keyboard Language in Windows
- Change Keyboard Language in Windows 8/Windows 10
- Change Keyboard Language in Windows 7
- Change Keyboard Language in XP
- Using the Language Bar
Windows 10: How to Change or Add Keyboard Language
Problem
- How to change or add new keyboard language in Windows 10?
Solution
- 1. Open the Settings Charm with the shortcut Windows Key
+ I
- 2. Click/tap Change PC settings.

- 3. Click/tap on the Time and Language.

- 4. Click/tap on the Region and language.

- 5. Under «Languages» click/tap on the Add languages. (See picture below)

- 6.Choose your languages, for instance German.(See picture below)

- 7. Now you have two languages on your Keyboard English and German.(See picture below)

- 8. To make new language the main language tap the new language and tap on «Set as primary».(See picture below)

- 9. When finished, you can close PC settings if you like.
- 10. To switch between keyboard languages use the shortcut Shift + Alt
Manage the input and display language settings in Windows 10
To manage all aspects of the input and display language settings on your Windows 10 device, use the following methods.
To switch the keyboard layout you’re using in Windows 10, press and hold the Windows key and then repeatedly press the Spacebar to cycle through all your installed keyboards. (If this doesn’t do anything, it means you have only one installed.)
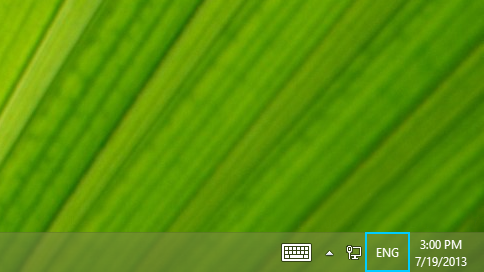
You can also select the language abbreviation on the far right of the taskbar and then choose the language or input method you want to use.
Note: In the input field, press Windows +period (.) to access the emoji keyboard, if your language supports this.
If you can’t find the keyboard layout you want, you may have to add a new keyboard.
Adding an input language lets you set a language-preference order for websites and apps, as well as change your keyboard language.
Select the Start button, then select Settings > Time & Language > Language.
Under Preferred languages, select the language that contains the keyboard you want, and then select Options.
Select Add a keyboard and choose the keyboard you want to add. If you don’t see the keyboard you want, you may have to add a new language to get additional options. If this is the case, go on to step 4.
Return to the Language settings page, and select Add a language.
Choose the language you want to use from the list, and then select Next.
Review any language features you want to set up or install, and select Install.
The display language you select changes the default language used by Windows features like Settings and File Explorer.
Select the Start button, then select Settings > Time & Language > Language.
Choose a language from the Windows display language menu.
If a language is listed under Preferred languages but doesn’t appear on the Windows display language list, you’ll first need to install its language pack (if it’s available).
Select the Start button, then select Settings > Time & Language > Language.
Choose a language from the Add a language list under Preferred languages, and then select Options.
Select Download from the Download language pack option.
After the language pack is installed, select Back .
Choose a language from the Windows display language menu.
If you receive an «Only one language pack allowed» or «Your Windows license supports only one display language» message, you have a single language edition of Windows 10. Here’s how to check your Windows 10 language edition:
Select the Start button, select Settings > About, and then scroll down to the Windows specification section.
If you see Windows 10 Home Single Language next to Edition, you have a single language edition of Window 10, and you can’t add a new language unless you purchase an upgrade to either Windows 10 Home or Windows 10 Pro.
Select the Start button, then select Settings > Time & Language > Language.
Under Preferred languages, select the language you want to remove, and then click Remove.
To remove an individual keyboard, select the language in question (see step 2), select Options, scroll down to the Keyboards section, select the keyboard you want to remove, and click Remove.
Change your keyboard layout
Swipe in from the right edge of the screen, tap Settings, and then tap Change PC settings. (If you’re using a mouse, point to the lower-right corner of the screen, move the mouse pointer up, click Settings, and then click Change PC settings.)
Tap or click Time and language, and then tap or click Region and language, and then tap or click Add a language.
Browse for the language you want, and then tap or click it to add it to your language list.
Swipe in from the right edge of the screen, tap Settings, and then tap Change PC settings. (If you’re using a mouse, point to the lower-right corner of the screen, move the mouse pointer up, click Settings, and then click Change PC settings.)
Tap or click Time and language, and then tap or click Region and language.
If the language says Language pack available, tap or click Options.
Note: If you don’t see Language pack available, you might be able to download the language pack at the Download Center.
Tap or click Download. The download process might take a while, depending on your PC and the size of the language pack.
Swipe in from the right edge of the screen, tap Settings, and then tap Change PC settings. (If you’re using a mouse, point to the lower-right corner of the screen, move the mouse pointer up, click Settings, and then click Change PC settings.)
Tap or click Time and language, and then tap or click Region and language.
Tap or click the language that you want to see Windows in, and then tap or click Set as primary. The Will be display language after next sign-in message will appear under the language.
Tap or click Set as primary to move the language to the top of the list. If the language can become your Windows display language, you’ll see Will be display language after next sign-in appear under the language.
Sign out of Windows, and then sign back in.
Warning: When you change your primary language, your keyboard layout might also change. When signing back in to Windows, make sure you’re using the right keyboard layout for entering your password. Otherwise, you might not be able to sign in. You can change your keyboard layout on the sign-in screen by tapping or clicking the language abbreviation button in the lower-right corner.
Change the keyboard layout or other method you use to type
Whenever you add a language, a keyboard layout or input method is added so you can enter text in the language. If you want to use a different keyboard layout or input method, you can add a new one or switch between the ones you have.
Swipe in from the right edge of the screen, tap Settings, and then tap Change PC settings. (If you’re using a mouse, point to the lower-right corner of the screen, move the mouse pointer up, click Settings, and then click Change PC settings.)
Tap or click Time and language, and then tap or click Region and language.
Tap or click the language you want to add a keyboard to, and then tap or click Options.
Tap or click Add a keyboard, browse the input method list for the one you want to use, and then tap or click it.
You can enter text with different keyboard layouts or input methods by switching between them. There are a few different ways to switch between keyboard layouts or input methods:
On a hardware keyboard, press and hold the Windows logo key , and then press the Spacebar to cycle through your input methods.
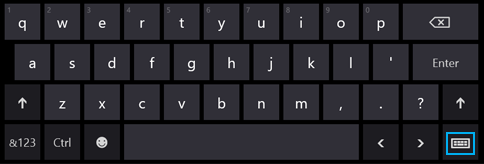
If you have a touchscreen, you can switch your touch keyboard layout by tapping or clicking the keyboard icon, and then tapping or clicking the keyboard layout you want to switch to.
Language abbreviation button in the touch keyboard
On the desktop taskbar, tap or click the language abbreviation in the notification area at the far right of the taskbar, and then tap or click the keyboard layout or input method you want to switch to.
Language abbreviation button in the desktop taskbar
Your default keyboard layout or input method is the one that’s automatically used with the language you see Windows in (for example, the QWERTY keyboard for American English). If you want to keep your Windows language the same but use a different keyboard automatically, follow these steps:
Open Control Panel by swiping in from the right edge of the screen, tapping Search (or if you’re using a mouse, pointing to the upper-right corner of the screen, moving the mouse pointer down, and then clicking Search), entering Control Panel in the search box, and then tapping or clicking Control Panel.
Enter Add a language in the search box, and then tap or click Add a language.
Tap or click Advanced settings.
Under Override for default input method, choose the keyboard layout or input method you’d like to be your new default, and then tap or click Save.
Note: If you don’t see the keyboard layout or input method you want, then you haven’t added it to your input method list. For instructions, see the Add a keyboard layout or input method for a language section.
Install or change a display language
You can change the language Windows uses to display text in wizards, dialog boxes, menus, and other items in the user interface. Some display languages are installed by default, while others require you to install additional language files.
To install a Language Interface Pack (LIP), double-click the file to open the setup program. To install a language pack, follow these steps:
Open Region and Language by clicking the Start button , clicking Control Panel, clicking Clock, Language, and Region, and then clicking Region and Language.
Click the Keyboards and Languages tab.
Under Display language, click Install/uninstall languages, and then follow the steps. 
Note: The Display language section will be visible only if you have already installed a Language Interface Pack or if your edition of Windows supports a language pack. Language packs are available only in Windows 7 Ultimate and Windows 7 Enterprise.
When you change the display language, the text in menus and dialog boxes for some programs might not be in the language that you want. This happens because the program might not support Unicode.
Open Region and Language by clicking the Start button , clicking Control Panel, clicking Clock, Language, and Region, and then clicking Region and Language.
Click the Keyboards and Languages tab.
Under Display language, choose a language from the list, and then click OK.
Note: If you don’t see the list of display languages, you need to install additional language files.
Change your keyboard layout
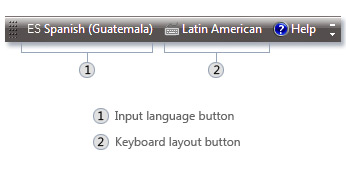
On the Language bar, click the Input language button, and then select an input language.
Click the Keyboard layout button, and then select a keyboard layout.
Note: If you don’t see the Language bar, right-click the taskbar, point to Toolbars, and then click Language bar.
On the Welcome screen, click the Keyboard layout button 
Note: If you don’t see the Keyboard layout button, you might not have more than one input language, or your regional and language settings might not be applied to reserved accounts.
How to Change the Keyboard Language in Windows
Modify a few settings in the Windows Control Panel
Are you looking for a way to change the keyboard language in Windows? There are occasions where you might need to do this such as when you buy a used computer and the keyboard is set to another language or if you need to type something in a foreign language instead of English.
You can easily change the keyboard language from French to English, US to UK, etc. by modifying a few settings in the Windows Control Panel. You can do this by changing the language and keyboard settings.
It’s worth noting that when you switch languages in Windows, the settings are configured per application. You have to change the input language depending on which program you are using. This is very easily done using the language bar that shows up automatically when you add another language in Windows. I’ll also explain using the language bar at the bottom of this article.
Change Keyboard Language in Windows 8/Windows 10
For Windows 8 and Windows 10, open the Control Panel and click on Language.
Click on the Add a language button that is located above the list of installed languages.
Windows 8 and 10 have a much better interface for browsing the languages as compared to Windows 7 and earlier. Here you get a nice preview of a few characters for each language.
Pick the language and then click on the Add button at the bottom. You should now see it as an installed language. You might also get some messages from Windows as it installs any necessary files for the language.
You can click on Options to download the language pack for the newly installed language, which will allow you to change the Windows display language. You can also add additional input methods for the language.
Change Keyboard Language in Windows 7
For Windows Vista and Windows 7, open the Control Panel and click on Region and Language.
Now click on the Keyboards and Languages tab and then click on Change keyboards.
You’ll see the current default input language and installed services. To add a language, go ahead and click on the Add button.
Now scroll down to the language you want to add and expand the keyboard section. Depending on the physical keyboard you are using, choose the correct keyboard option. You might have to play around with the different options because sometimes one keyboard doesn’t work properly.
You can also click on the Preview button to see how the characters for your language are mapped to the keyboard you are using.
In my example, I chose Hindi Traditional for the keyboard language. Scroll down to the Using the Language Bar section to see how to type into different applications using the new language.
Change Keyboard Language in XP
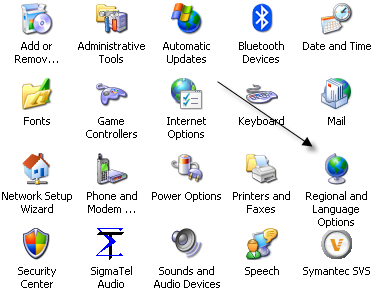
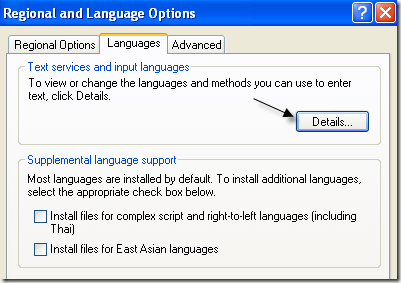
For Windows XP, you want to go to the Control Panel and click on Regional and Language Options.
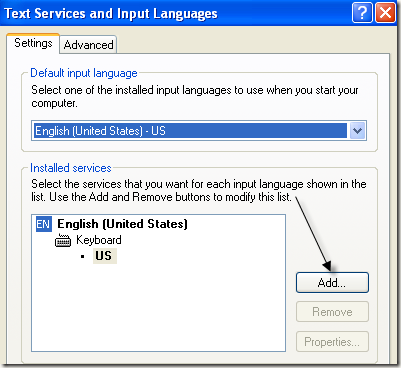
Next click on the Languages tab and then click on the Details button.
This will load up the Text Services and Input Languages dialog box. Here you will see the list of installed services and keyboards on your computer. You can click Add to install a new keyboard layout and input language.
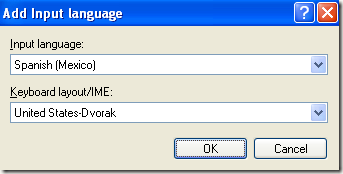
Choose the input language and choose the type of keyboard that you have attached to your computer. If you want to type Spanish on an English keyboard, choose Spanish as the Input language and United States-Dvorak.
Using the Language Bar
When you install a new language in Windows, it automatically enables the language bar. This is really useful for quickly switching between languages in Windows. You’re probably not going to be typing in one language for every application, so the language bar makes it easy to switch.
You’ll see the language bar in your taskbar with letters to denote the language you are currently using. If you click on it, a list will appear and you can simply click on another language to select it.
Now you can open an application like Word, select the language from the language bar and start typing. You should see the characters for your language appear as you type.
That’s about it! So if you want to type in another language, such as a foreign language, or if you want to switch the keyboard language back to English, the above steps should solve your problem! Enjoy!
Founder of Online Tech Tips and managing editor. He began blogging in 2007 and quit his job in 2010 to blog full-time. He has over 15 years of industry experience in IT and holds several technical certifications. Read Aseem’s Full Bio
 + I
+ I