- Join an Ubuntu Linux virtual machine to an Azure Active Directory Domain Services managed domain
- Prerequisites
- Create and connect to an Ubuntu Linux VM
- Configure the hosts file
- Install required packages
- Configure Network Time Protocol (NTP)
- Join VM to the managed domain
- Update the SSSD configuration
- Configure user account and group settings
- Allow password authentication for SSH
- Configure automatic home directory creation
- Grant the ‘AAD DC Administrators’ group sudo privileges
- Sign in to the VM using a domain account
- Next steps
- Preview: Login to a Linux virtual machine in Azure with Azure Active Directory using SSH certificate-based authentication
- Supported Linux distributions and Azure regions
- Requirements for login with Azure AD using SSH certificate-based authentication
- Network
- Virtual machine
- Client
- Enabling Azure AD login in for Linux VM in Azure
- Using Azure portal create VM experience to enable Azure AD login
- Using the Azure Cloud Shell experience to enable Azure AD login
- Configure role assignments for the VM
- Using Azure AD Portal experience
- Using the Azure Cloud Shell experience
- Install SSH extension for Az CLI
- Using Conditional Access
- Login using Azure AD user account to SSH into the Linux VM
- Using Az CLI
- Using Az Cloud Shell
- Login using Azure AD service principal to SSH into the Linux VM
- Exporting SSH Configuration for use with SSH clients that support OpenSSH
- Sudo and Azure AD login
- Virtual machine scale set support
- Migration from previous preview
- Using Azure Policy to ensure standards and assess compliance
- Troubleshoot sign-in issues
- Could not retrieve token from local cache
- Access denied: Azure role not assigned
- Extension Install Errors
- Non-zero exit code: 22
- Non-zero exit code: 23
- Az ssh vm fails with KeyError: ‘access_token’.
- SSH Connection closed
- Virtual machine scale set Connection Issues
- Preview feedback
Join an Ubuntu Linux virtual machine to an Azure Active Directory Domain Services managed domain
To let users sign in to virtual machines (VMs) in Azure using a single set of credentials, you can join VMs to an Azure Active Directory Domain Services (Azure AD DS) managed domain. When you join a VM to an Azure AD DS managed domain, user accounts and credentials from the domain can be used to sign in and manage servers. Group memberships from the managed domain are also applied to let you control access to files or services on the VM.
This article shows you how to join an Ubuntu Linux VM to a managed domain.
Prerequisites
To complete this tutorial, you need the following resources and privileges:
- An active Azure subscription.
- If you don’t have an Azure subscription, create an account.
- An Azure Active Directory tenant associated with your subscription, either synchronized with an on-premises directory or a cloud-only directory.
- If needed, create an Azure Active Directory tenant or associate an Azure subscription with your account.
- An Azure Active Directory Domain Services managed domain enabled and configured in your Azure AD tenant.
- If needed, the first tutorial creates and configures an Azure Active Directory Domain Services managed domain.
- A user account that’s a part of the managed domain.
- Unique Linux VM names that are a maximum of 15 characters to avoid truncated names that might cause conflicts in Active Directory.
Create and connect to an Ubuntu Linux VM
If you have an existing Ubuntu Linux VM in Azure, connect to it using SSH, then continue on to the next step to start configuring the VM.
If you need to create an Ubuntu Linux VM, or want to create a test VM for use with this article, you can use one of the following methods:
When you create the VM, pay attention to the virtual network settings to make sure that the VM can communicate with the managed domain:
- Deploy the VM into the same, or a peered, virtual network in which you have enabled Azure AD Domain Services.
- Deploy the VM into a different subnet than your Azure AD Domain Services managed domain.
Once the VM is deployed, follow the steps to connect to the VM using SSH.
Configure the hosts file
To make sure that the VM host name is correctly configured for the managed domain, edit the /etc/hosts file and set the hostname:
In the hosts file, update the localhost address. In the following example:
- aaddscontoso.com is the DNS domain name of your managed domain.
- ubuntu is the hostname of your Ubuntu VM that you’re joining to the managed domain.
Update these names with your own values:
When done, save and exit the hosts file using the :wq command of the editor.
Install required packages
The VM needs some additional packages to join the VM to the managed domain. To install and configure these packages, update and install the domain-join tools using apt-get
During the Kerberos installation, the krb5-user package prompts for the realm name in ALL UPPERCASE. For example, if the name of your managed domain is aaddscontoso.com, enter AADDSCONTOSO.COM as the realm. The installation writes the [realm] and [domain_realm] sections in /etc/krb5.conf configuration file. Make sure that you specify the realm an ALL UPPERCASE:
Configure Network Time Protocol (NTP)
For domain communication to work correctly, the date and time of your Ubuntu VM must synchronize with the managed domain. Add your managed domain’s NTP hostname to the /etc/ntp.conf file.
Open the ntp.conf file with an editor:
In the ntp.conf file, create a line to add your managed domain’s DNS name. In the following example, an entry for aaddscontoso.com is added. Use your own DNS name:
When done, save and exit the ntp.conf file using the :wq command of the editor.
To make sure that the VM is synchronized with the managed domain, the following steps are needed:
- Stop the NTP server
- Update the date and time from the managed domain
- Start the NTP service
Run the following commands to complete these steps. Use your own DNS name with the ntpdate command:
Join VM to the managed domain
Now that the required packages are installed on the VM and NTP is configured, join the VM to the managed domain.
Use the realm discover command to discover the managed domain. The following example discovers the realm AADDSCONTOSO.COM. Specify your own managed domain name in ALL UPPERCASE:
If the realm discover command can’t find your managed domain, review the following troubleshooting steps:
- Make sure that the domain is reachable from the VM. Try ping aaddscontoso.com to see if a positive reply is returned.
- Check that the VM is deployed to the same, or a peered, virtual network in which the managed domain is available.
- Confirm that the DNS server settings for the virtual network have been updated to point to the domain controllers of the managed domain.
Now initialize Kerberos using the kinit command. Specify a user that’s a part of the managed domain. If needed, add a user account to a group in Azure AD.
Again, the managed domain name must be entered in ALL UPPERCASE. In the following example, the account named contosoadmin@aaddscontoso.com is used to initialize Kerberos. Enter your own user account that’s a part of the managed domain:
Finally, join the VM to the managed domain using the realm join command. Use the same user account that’s a part of the managed domain that you specified in the previous kinit command, such as contosoadmin@AADDSCONTOSO.COM :
It takes a few moments to join the VM to the managed domain. The following example output shows the VM has successfully joined to the managed domain:
If your VM can’t successfully complete the domain-join process, make sure that the VM’s network security group allows outbound Kerberos traffic on TCP + UDP port 464 to the virtual network subnet for your managed domain.
If you received the error Unspecified GSS failure. Minor code may provide more information (Server not found in Kerberos database), open the file /etc/krb5.conf and add the following code in [libdefaults] section and try again:
Update the SSSD configuration
One of the packages installed in a previous step was for System Security Services Daemon (SSSD). When a user tries to sign in to a VM using domain credentials, SSSD relays the request to an authentication provider. In this scenario, SSSD uses Azure AD DS to authenticate the request.
Open the sssd.conf file with an editor:
Comment out the line for use_fully_qualified_names as follows:
When done, save and exit the sssd.conf file using the :wq command of the editor.
To apply the change, restart the SSSD service:
Configure user account and group settings
With the VM joined to the managed domain and configured for authentication, there are a few user configuration options to complete. These configuration changes include allowing password-based authentication, and automatically creating home directories on the local VM when domain users first sign in.
Allow password authentication for SSH
By default, users can only sign in to a VM using SSH public key-based authentication. Password-based authentication fails. When you join the VM to a managed domain, those domain accounts need to use password-based authentication. Update the SSH configuration to allow password-based authentication as follows.
Open the sshd_conf file with an editor:
Update the line for PasswordAuthentication to yes:
When done, save and exit the sshd_conf file using the :wq command of the editor.
To apply the changes and let users sign in using a password, restart the SSH service:
Configure automatic home directory creation
To enable automatic creation of the home directory when a user first signs in, complete the following steps:
Open the /etc/pam.d/common-session file in an editor:
Add the following line in this file below the line session optional pam_sss.so :
When done, save and exit the common-session file using the :wq command of the editor.
Grant the ‘AAD DC Administrators’ group sudo privileges
To grant members of the AAD DC Administrators group administrative privileges on the Ubuntu VM, you add an entry to the /etc/sudoers. Once added, members of the AAD DC Administrators group can use the sudo command on the Ubuntu VM.
Open the sudoers file for editing:
Add the following entry to the end of /etc/sudoers file:
When done, save and exit the editor using the Ctrl-X command.
Sign in to the VM using a domain account
To verify that the VM has been successfully joined to the managed domain, start a new SSH connection using a domain user account. Confirm that a home directory has been created, and that group membership from the domain is applied.
Create a new SSH connection from your console. Use a domain account that belongs to the managed domain using the ssh -l command, such as contosoadmin@aaddscontoso.com and then enter the address of your VM, such as ubuntu.aaddscontoso.com. If you use the Azure Cloud Shell, use the public IP address of the VM rather than the internal DNS name.
When you’ve successfully connected to the VM, verify that the home directory was initialized correctly:
You should be in the /home directory with your own directory that matches the user account.
Now check that the group memberships are being resolved correctly:
You should see your group memberships from the managed domain.
If you signed in to the VM as a member of the AAD DC Administrators group, check that you can correctly use the sudo command:
Next steps
If you have problems connecting the VM to the managed domain or signing in with a domain account, see Troubleshooting domain join issues.
Источник
Preview: Login to a Linux virtual machine in Azure with Azure Active Directory using SSH certificate-based authentication
To improve the security of Linux virtual machines (VMs) in Azure, you can integrate with Azure Active Directory (Azure AD) authentication. You can now use Azure AD as a core authentication platform and a certificate authority to SSH into a Linux VM with AD and SSH certificate-based authentication. This functionality allows organizations to centrally control and enforce Azure role-based access control (RBAC) and Conditional Access policies that manage access to the VMs. This article shows you how to create and configure a Linux VM and login with Azure AD using SSH certificate-based authentication.
This capability is currently in public preview. The previous version that made use of device code flow will be deprecated August 15, 2021. To migrate from the old version to this version, see the section, Migration from previous preview. This preview is provided without a service level agreement, and is not recommended for production workloads. Certain features might not be supported or might have constrained capabilities. Use this feature on a test virtual machine that you expect to discard after testing. For more information, see Supplemental Terms of Use for Microsoft Azure Previews.
There are many security benefits of using Azure AD with SSH certificate-based authentication to log in to Linux VMs in Azure, including:
- Use your Azure AD credentials to log in to Azure Linux VMs.
- Get SSH key based authentication without needing to distribute SSH keys to users or provision SSH public keys on any Azure Linux VMs you deploy. This experience is much simpler than having to worry about sprawl of stale SSH public keys that could cause unauthorized access.
- Reduce reliance on local administrator accounts, credential theft, and weak credentials.
- Password complexity and password lifetime policies configured for Azure AD help secure Linux VMs as well.
- With Azure role-based access control, specify who can login to a VM as a regular user or with administrator privileges. When users join or leave your team, you can update the Azure RBAC policy for the VM to grant access as appropriate. When employees leave your organization and their user account is disabled or removed from Azure AD, they no longer have access to your resources.
- With Conditional Access, configure policies to require multi-factor authentication and/or require client device you are using to SSH be a managed device (for example: compliant device or hybrid Azure AD joined) before you can SSH to Linux VMs.
- Use Azure deploy and audit policies to require Azure AD login for Linux VMs and to flag use of non-approved local accounts on the VMs.
- Login to Linux VMs with Azure Active Directory also works for customers that use Federation Services.
Supported Linux distributions and Azure regions
The following Linux distributions are currently supported during the preview of this feature when deployed in a supported region:
| Distribution | Version |
|---|---|
| CentOS | CentOS 7, CentOS 8.3 |
| Debian | Debian 9, Debian 10 |
| openSUSE | openSUSE Leap 42.3 |
| RedHat Enterprise Linux | RHEL 7.4 to RHEL 7.10, RHEL 8.3 |
| SUSE Linux Enterprise Server | SLES 12 |
| Ubuntu Server | Ubuntu Server 16.04 to Ubuntu Server 20.04 |
The following Azure regions are currently supported during the preview of this feature:
The preview of this feature will be supported in Azure Government and Azure China by June of 2021.
It’s not supported to use this extension on Azure Kubernetes Service (AKS) clusters. For more information, see Support policies for AKS.
If you choose to install and use the CLI locally, this tutorial requires that you are running the Azure CLI version 2.22.1 or later. Run az —version to find the version. If you need to install or upgrade, see Install Azure CLI.
Requirements for login with Azure AD using SSH certificate-based authentication
To enable Azure AD login using SSH certificate-based authentication for your Linux VMs in Azure, you need to ensure the following network, virtual machine, and client (ssh client) requirements are met.
Network
VM network configuration must permit outbound access to the following endpoints over TCP port 443:
For Azure Global
- https://packages.microsoft.com – For package installation and upgrades.
- http://169.254.169.254 – Azure Instance Metadata Service endpoint.
- https://login.microsoftonline.com – For PAM (pluggable authentication modules) based authentication flows.
- https://pas.windows.net – For Azure RBAC flows.
For Azure Government
- https://packages.microsoft.com – For package installation and upgrades.
- http://169.254.169.254 – Azure Instance Metadata Service endpoint.
- https://login.microsoftonline.us – For PAM (pluggable authentication modules) based authentication flows.
- https://pasff.usgovcloudapi.net – For Azure RBAC flows.
For Azure China
- https://packages.microsoft.com – For package installation and upgrades.
- http://169.254.169.254 – Azure Instance Metadata Service endpoint.
- https://login.chinacloudapi.cn – For PAM (pluggable authentication modules) based authentication flows.
- https://pas.chinacloudapi.cn – For Azure RBAC flows.
Virtual machine
Ensure your VM is configured with the following functionality:
- System assigned managed identity. This option gets automatically selected when you use Azure portal to create VM and select Azure AD login option. You can also enable System assigned managed identity on a new or an existing VM using the Azure CLI.
- aadsshlogin and aadsshlogin-selinux (as appropriate). These packages get installed with the AADSSHLoginForLinux VM extension. The extension is installed when you use Azure portal to create VM and enable Azure AD login (Management tab) or via the Azure CLI.
Client
Ensure your client meets the following requirements:
- SSH client must support OpenSSH based certificates for authentication. You can use Az CLI (2.21.1 or higher) with OpenSSH (included in Windows 10 version 1803 or hiher) or Azure Cloud Shell to meet this requirement.
- SSH extension for Az CLI. You can install this using az extension add —name ssh . You do not need to install this extension when using Azure Cloud Shell as it comes pre-installed.
- If you are using any other SSH client other than Az CLI or Azure Cloud Shell that supports OpenSSH certificates, you will still need to use Az CLI with SSH extension to retrieve ephemeral SSH cert and optionally a config file and then use the config file with your SSH client.
- TCP connectivity from the client to either the public or private IP of the VM (ProxyCommand or SSH forwarding to a machine with connectivity also works).
Enabling Azure AD login in for Linux VM in Azure
To use Azure AD login in for Linux VM in Azure, you need to first enable Azure AD login option for your Linux VM, configure Azure role assignments for users who are authorized to login in to the VM and then use SSH client that supports OpensSSH such as Az CLI or Az Cloud Shell to SSH to your Linux VM. There are multiple ways you can enable Azure AD login for your Linux VM, as an example you can use:
- Azure portal experience when creating a Linux VM
- Azure Cloud Shell experience when creating a Windows VM or for an existing Linux VM
Using Azure portal create VM experience to enable Azure AD login
You can enable Azure AD login for any of the supported Linux distributions mentioned above using the Azure portal.
As an example, to create an Ubuntu Server 18.04 LTS VM in Azure with Azure AD logon:
- Sign in to the Azure portal, with an account that has access to create VMs, and select + Create a resource.
- Click on Create under Ubuntu Server 18.04 LTS in the Popular view.
- On the Management tab,
- Check the box to enable Login with Azure Active Directory (Preview).
- Ensure System assigned managed identity is checked.
- Go through the rest of the experience of creating a virtual machine. During this preview, you will have to create an administrator account with username and password/SSH public key.
Using the Azure Cloud Shell experience to enable Azure AD login
Azure Cloud Shell is a free, interactive shell that you can use to run the steps in this article. Common Azure tools are preinstalled and configured in Cloud Shell for you to use with your account. Just select the Copy button to copy the code, paste it in Cloud Shell, and then press Enter to run it. There are a few ways to open Cloud Shell:
- Select Try It in the upper-right corner of a code block.
- Open Cloud Shell in your browser.
- Select the Cloud Shell button on the menu in the upper-right corner of the Azure portal.
If you choose to install and use the CLI locally, this article requires that you are running the Azure CLI version 2.22.1 or later. Run az —version to find the version. If you need to install or upgrade, see the article Install Azure CLI.
- Create a resource group with az group create.
- Create a VM with az vm create using a supported distribution in a supported region.
- Install the Azure AD login VM extension with az vm extension set.
The following example deploys a VM named myVM, using Ubuntu 18.04 LTS, into a resource group named AzureADLinuxVMPreview, in the southcentralus region. It then installs the Azure AD login VM extension to enable Azure AD login for Linux VM. VM extensions are small applications that provide post-deployment configuration and automation tasks on Azure virtual machines.
The example can be customized to support your testing requirements as needed.
It takes a few minutes to create the VM and supporting resources.
The AADSSHLoginForLinux extension can be installed on an existing (supported distribution) Linux VM with a running VM agent to enable Azure AD authentication. If deploying this extension to a previously created VM, ensure the machine has at least 1 GB of memory allocated else the extension will fail to install.
The provisioningState of Succeeded is shown once the extension is successfully installed on the VM. The VM must have a running VM agent to install the extension.
Configure role assignments for the VM
Now that you have created the VM, you need to configure Azure RBAC policy to determine who can log in to the VM. Two Azure roles are used to authorize VM login:
- Virtual Machine Administrator Login: Users with this role assigned can log in to an Azure virtual machine with administrator privileges.
- Virtual Machine User Login: Users with this role assigned can log in to an Azure virtual machine with regular user privileges.
To allow a user to log in to the VM over SSH, you must assign them either the Virtual Machine Administrator Login or Virtual Machine User Login role. An Azure user with the Owner or Contributor roles assigned for a VM do not automatically have privileges to Azure AD login to the VM over SSH. This separation is to provide audited separation between the set of people who control virtual machines versus the set of people who can access virtual machines.
There are multiple ways you can configure role assignments for VM, as an example you can use:
- Azure AD Portal experience
- Azure Cloud Shell experience
The Virtual Machine Administrator Login and Virtual Machine User Login roles use dataActions and thus cannot be assigned at management group scope. Currently these roles can only be assigned at the subscription, resource group, or resource scope. It is recommended that the roles be assigned at the subscription or resource level and not at the individual VM level to avoid risk of running out of Azure role assignments limit per subscription.
Using Azure AD Portal experience
To configure role assignments for your Azure AD enabled Linux VMs:
Select Access control (IAM).
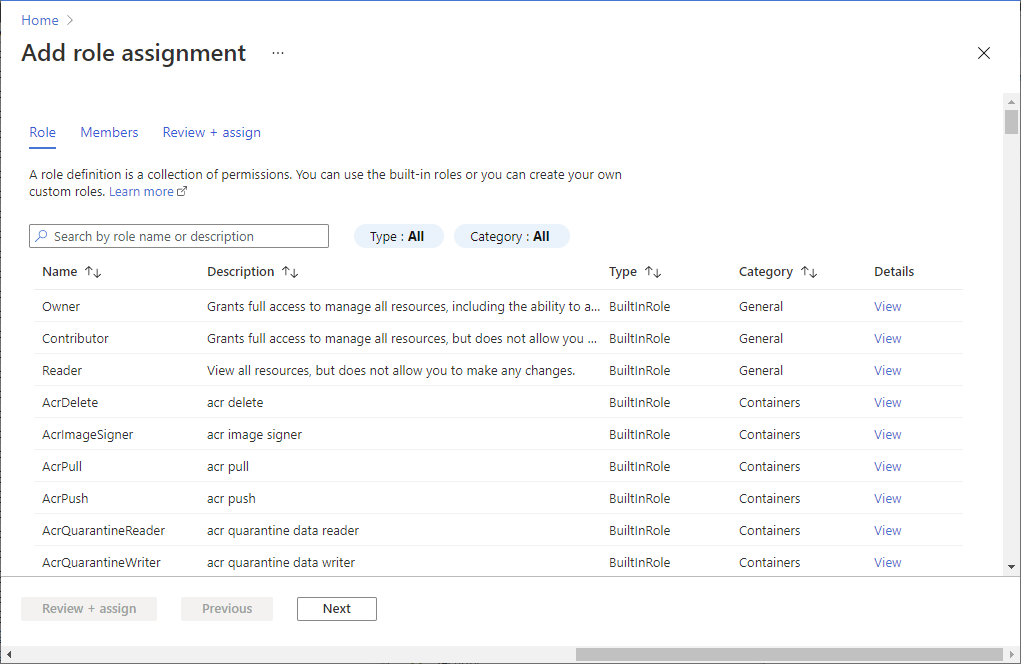
Select Add > Add role assignment to open the Add role assignment page.
Assign the following role. For detailed steps, see Assign Azure roles using the Azure portal.
| Setting | Value |
|---|---|
| Role | Virtual Machine Administrator Login or Virtual Machine User Login |
| Assign access to | User, group, service principal, or managed identity |
After a few moments, the security principal is assigned the role at the selected scope.
Using the Azure Cloud Shell experience
The following example uses az role assignment create to assign the Virtual Machine Administrator Login role to the VM for your current Azure user. The username of your current Azure account is obtained with az account show, and the scope is set to the VM created in a previous step with az vm show. The scope could also be assigned at a resource group or subscription level, normal Azure RBAC inheritance permissions apply.
If your Azure AD domain and logon username domain do not match, you must specify the object ID of your user account with the —assignee-object-id , not just the username for —assignee . You can obtain the object ID for your user account with az ad user list.
For more information on how to use Azure RBAC to manage access to your Azure subscription resources, see the article Steps to assign an Azure role.
Install SSH extension for Az CLI
If you are using Azure Cloud Shell, then no other setup is needed as both the minimum required version of Az CLI and SSH extension for Az CLI are already included in the Cloud Shell environment.
Run the following command to add SSH extension for Az CLI
The minimum version required for the extension is 0.1.4. Check the installed SSH extension version with the following command.
Using Conditional Access
You can enforce Conditional Access policies such as require MFA for the user, require compliant/Hybrid Azure AD joined device for the device running SSH client, check for low user and sign-in risk before authorizing access to Linux VMs in Azure that are enabled with Azure AD login in.
To apply Conditional Access policy, you must select the «Azure Linux VM Sign-In» app from the cloud apps or actions assignment option and then use user and /or sign-in risk as a condition and Access controls as Grant access after satisfying require multi-factor authentication and/or require compliant/Hybrid Azure AD joined device.
Conditional Access policy enforcement requiring device compliance or Hybrid Azure AD join on the client device running SSH client only works with Az CLI running on Windows and macOS. It is not supported when using Az CLI on Linux or Azure Cloud Shell.
Login using Azure AD user account to SSH into the Linux VM
Using Az CLI
First do az login and then az ssh vm.
This command will launch a browser window and a user can sign in using their Azure AD account.
The following example automatically resolves the appropriate IP address for the VM.
If prompted, enter your Azure AD login credentials at the login page, perform an MFA, and/or satisfy device checks. You will only be prompted if your az CLI session does not already meet any required Conditional Access criteria. Close the browser window, return to the SSH prompt, and you will be automatically connected to the VM.
You are now signed in to the Azure Linux virtual machine with the role permissions as assigned, such as VM User or VM Administrator. If your user account is assigned the Virtual Machine Administrator Login role, you can use sudo to run commands that require root privileges.
Using Az Cloud Shell
You can use Az Cloud Shell to connect to VMs without needing to install anything locally to your client machine. Start Cloud Shell by clicking the shell icon in the upper right corner of the Azure portal.
Az Cloud Shell will automatically connect to a session in the context of the signed in user. During the Azure AD Login for Linux Preview, you must run az login again and go through an interactive sign in flow.
Then you can use the normal az ssh vm commands to connect using name and resource group or IP address of the VM.
Conditional Access policy enforcement requiring device compliance or Hybrid Azure AD join is not supported when using Az Cloud Shell.
Login using Azure AD service principal to SSH into the Linux VM
Azure CLI supports authenticating with a service principal instead of a user account. Since service principals are account not tied to any particular user, customers can use them to SSH to a VM to support any automation scenarios they may have. The service principal must have VM Administrator or VM User rights assigned. Assign permissions at the subscription or resource group level.
The following example will assign VM Administrator rights to the service principal at the resource group level. Replace the service principal object ID, subscription ID, and resource group name fields.
Use the following example to authenticate to Azure CLI using the service principal. To learn more about signing in using a service principal, see the article Sign in to Azure CLI with a service principal.
Once authentication with a service principal is complete, use the normal Az CLI SSH commands to connect to the VM.
Exporting SSH Configuration for use with SSH clients that support OpenSSH
Login to Azure Linux VMs with Azure AD supports exporting the OpenSSH certificate and configuration, allowing you to use any SSH clients that support OpenSSH based certificates to sign in Azure AD. The following example exports the configuration for all IP addresses assigned to the VM.
Alternatively, you can export the config by specifying just the IP address. Replace the IP address in the example with the public or private IP address (you must bring your own connectivity for private IPs) for your VM. Type az ssh config -h for help on this command.
You can then connect to the VM through normal OpenSSH usage. Connection can be done through any SSH client that uses OpenSSH.
Sudo and Azure AD login
Once, users assigned the VM Administrator role successfully SSH into a Linux VM, they will be able to run sudo with no other interaction or authentication requirement. Users assigned the VM User role will not be able to run sudo.
Virtual machine scale set support
Virtual machine scale sets are supported, but the steps are slightly different for enabling and connecting to virtual machine scale set VMs.
First, create a virtual machine scale set or choose one that already exists. Enable a system assigned managed identity for your virtual machine scale set.
Install the Azure AD extension on your virtual machine scale set.
Virtual machine scale set usually do not have public IP addresses, so you must have connectivity to them from another machine that can reach their Azure Virtual Network. This example shows how to use the private IP of a virtual machine scale set VM to connect from a machine in the same virtual network.
You cannot automatically determine the virtual machine scale set VM’s IP addresses using the —resource-group and —name switches.
Migration from previous preview
For customers who are using previous version of Azure AD login for Linux that was based on device code flow, complete the following steps.
- Uninstall the AADLoginForLinux extension on the VM.
- Using Azure CLI: az vm extension delete -g MyResourceGroup —vm-name MyVm -n AADLoginForLinux
- Enable System assigned managed identity on your VM.
- Using Azure CLI: az vm identity assign -g myResourceGroup -n myVm
- Install the AADSSHLoginForLinux extension on the VM
- Using Azure CLI:
Using Azure Policy to ensure standards and assess compliance
Use Azure Policy to ensure Azure AD login is enabled for your new and existing Linux virtual machines and assess compliance of your environment at scale on your Azure Policy compliance dashboard. With this capability, you can use many levels of enforcement: you can flag new and existing Linux VMs within your environment that do not have Azure AD login enabled. You can also use Azure Policy to deploy the Azure AD extension on new Linux VMs that do not have Azure AD login enabled, as well as remediate existing Linux VMs to the same standard. In addition to these capabilities, you can also use Azure Policy to detect and flag Linux VMs that have non-approved local accounts created on their machines. To learn more, review Azure Policy.
Troubleshoot sign-in issues
Some common errors when you try to SSH with Azure AD credentials include no Azure roles assigned, and repeated prompts to sign in. Use the following sections to correct these issues.
Could not retrieve token from local cache
You must run az login again and go through an interactive sign in flow. Review the section Using Az Cloud Shell.
Access denied: Azure role not assigned
If you see the following error on your SSH prompt, verify that you have configured Azure RBAC policies for the VM that grants the user either the Virtual Machine Administrator Login or Virtual Machine User Login role. If you are running into issues with Azure role assignments, see the article Troubleshoot Azure RBAC.
Extension Install Errors
Installation of the AADSSHLoginForLinux VM extension to existing computers fails with one of the following known error codes:
Non-zero exit code: 22
The Status of the AADSSHLoginForLinux VM extension shows as Transitioning in the portal.
Cause 1: This failure is due to a System Assigned Managed Identity being required.
Solution 1: Perform these actions:
- Uninstall the failed extension.
- Enable a System Assigned Managed Identity on the Azure VM.
- Run the extension install command again.
Non-zero exit code: 23
The Status of the AADSSHLoginForLinux VM extension shows as Transitioning in the portal.
Cause 1: This failure is due to the older AADLoginForLinux VM extension is still installed.
Solution 1: Perform these actions:
- Uninstall the older AADLoginForLinux VM extension from the VM. The Status of the new AADSSHLoginForLinux VM extension will change to Provisioning succeeded in the portal.
Az ssh vm fails with KeyError: ‘access_token’.
Cause 1: An outdated version of the Azure CLI client is being used.
Solution 1: Upgrade the Azure CLI client to version 2.21.0 or higher.
SSH Connection closed
After the user has successfully signed in using az login, connection to the VM using az ssh vm -ip or az ssh vm —name -g fails with Connection closed by port 22.
Cause 1: The user is not assigned to the either the Virtual Machine Administrator/User Login Azure RBAC roles within the scope of this VM.
Solution 1: Add the user to the either of the Virtual Machine Administrator/User Login Azure RBAC roles within the scope of this VM.
Cause 2: The user is in a required Azure RBAC role but the System Assigned managed identity has been disabled on the VM.
Solution 2: Perform these actions:
- Enable the System Assigned managed identity on the VM.
- Allow several minutes to pass before trying to connect using az ssh vm —ip .
Virtual machine scale set Connection Issues
Virtual machine scale set VM connections may fail if the virtual machine scale set instances are running an old model. Upgrading virtual machine scale set instances to the latest model may resolve issues, especially if an upgrade has not been done since the Azure AD Login extension was installed. Upgrading an instance applies a standard virtual machine scale set configuration to the individual instance.
Preview feedback
Share your feedback about this preview feature or report issues using it on the Azure AD feedback forum.
Источник


