- Как отключить (включить) индексирование поиска (службу Windows Search) в Windows
- Как отключить индексирование
- Включение индексирования поиска
- Управление через командную строку
- How to Disable Windows Search
- How to Enable / Disable Windows Search service
- Disable windows search for specific items
- How to disable web search in Windows 10’s start menu
- Disable Web Search in Windows 10
- Disable Web Search using Group Policy
- Disable online search in the Registry
- Search preferences
- Disable Web Search using the Firewall
Как отключить (включить) индексирование поиска (службу Windows Search) в Windows

В данной статье показаны действия, с помощью которых можно отключить или включить индексирование поиска (службу поиска Windows Search) в операционной системе Windows.
По умолчанию Windows использует индекс при поиске, чтобы ускорить результаты поиска. Индекс поиска выполняет индексирование контента, кэширование свойств и результатов поиска для файлов, электронной почты и другого контента.
Индекс использует службу поиска Windows Search и выполняется в фоновом режиме как процесс SearchIndexer.exe. Индекс автоматически перестраивается и обновляется при изменении, внесенных с момента последнего перестроения индекса, чтобы повысить точность результатов поиска.
Если вы предпочитаете выполнять поиск без использования индекса, можно полностью отключить индексирование поиска (службу поиска Windows Search). Если отключить индексацию поиска, то поиск займет немного больше времени, но результаты поиска всегда будут актуальными и точными.
- Чтобы отключить или включить индексирование поиска (службу поиска Windows Search), необходимо войти в систему с правами администратора
- Если отключить индексирование поиска, пользователи больше не смогут выполнять поиск в библиотеках.
- Функция Временная шкала (Timeline) требует, чтобы служба поиска Windows была включена, запущена и настроена на автоматический (отложенный запуск).
Как отключить индексирование
Чтобы отключить индексирование поиска (службу поиска Windows Search), откройте консоль «Службы», для этого нажмите сочетание клавиш  + R, в открывшемся окне Выполнить введите services.msc и нажмите клавишу Enter↵.

В окне Службы дважды щёлкните левой кнопкой мыши службу Windows Search .

В открывшемся окне Свойства: Windows Search (локальный компьютер) остановите службу нажав кнопку Остановить.

Затем в выпадающем списке Тип запуска: выберите пункт Отключена и нажмите кнопку OK.

Включение индексирования поиска
Чтобы включить индексирование поиска (службу поиска Windows Search), откройте консоль «Службы», для этого нажмите сочетание клавиш + R, в открывшемся окне Выполнить введите services.msc и нажмите клавишу Enter↵.

В окне Службы дважды щёлкните левой кнопкой мыши службу Windows Search .

В открывшемся окне Свойства: Windows Search (локальный компьютер) в выпадающем списке Тип запуска: выберите пункт Автоматически (отложенный запуск) и нажмите кнопку Применить.

Затем запустите службу нажав кнопку Запустить.

Управление через командную строку
Также отключить или включить индексирование поиска (службу поиска Windows Search) можно используя командную строку.
Чтобы отключить индексирование поиска (службу поиска Windows Search), запустите командную строку от имени администратора и выполните следующую команду:
sc stop «wsearch» && sc config «wsearch» start=disabled

Чтобы включить индексирование поиска (службу поиска Windows Search), запустите командную строку от имени администратора и выполните следующую команду:
sc config «wsearch» start=delayed-auto && sc start «wsearch»
How to Disable Windows Search

In either Windows 8 or 7, you don’t have to deal with Microsoft’s built-in search features if you don’t want to. Turn them off and use whatever one you want!
While Windows Search can make finding and opening things really convenient, some users may still want to get rid of it. Some might prefer to disable Windows Search to pro-long the life of their SSD. In my case, I use a combination of the two free utilities Search Everything and Launchy, and I find them much more effective. Microsoft has made disabling the Windows Search feature quite simple, if you know where to look.
What else does disabling Windows Search do? A few things:
- Disables the background processes SearchIndexer.exe, SearchProtocolHost.exe, and SearchFilterHost.exe.
- (SSD users will like this one) No more writes to the search index database at C:\ProgramData\Microsoft\Search\Data\Applications\Windows\Windows.edb
- No more offline caches of external network attached storage or shares.
- Increased system performance, even if it is barely noticeable.
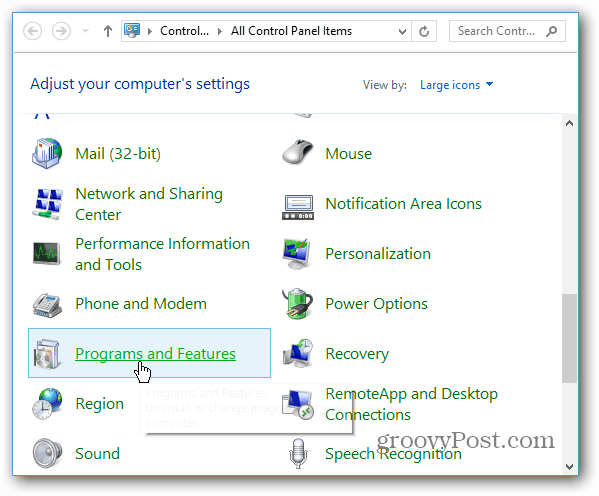
Ready to disable it? Okay, the first thing to do is open Control Panel. From here click on “Programs and Features.”
In the left-sidebar of the following window click the “Turn Windows features on or off.”
Note: You’ll need either administrator privileges, or be logged into an administrator-level account in order to complete this action.

In the Windows Features pop-up, scroll down and uncheck the box labeled “Windows Search.” Click OK to save and apply changes.

A small confirmation box will appear. Click Yes, and then restart the computer when prompted. We can also wait to restart if it is not currently convenient, however Windows Search will not be disabled until you do so.


Once the system comes back up, Windows Search will be disabled. You can see the direct effects of this by opening the Start menu. The Search/Run box will be gone! This configuration might not work for everyone, but I sure am happy to have the option.
How to Enable / Disable Windows Search service
‘Windows Search’ helps to find files, programs and emails easily on the computer. To use this, we just need to click on start button and start typing the search words in the search box. This feature is enabled by Windows Search service, which indexes the files on the computer for a faster search experience.
If you are not going to use Windows search feature, thenВ you can disable the service permanently. Open administrator command prompt and run the below command.
To enable windows search, we can run the below command.
Disable windows search for specific items
Windows search can index files, emails in Outlook and items and also browsing history from Internet explorer. Search for these items can be configured separately.
- Click on start button
- Type ‘Indexing options’
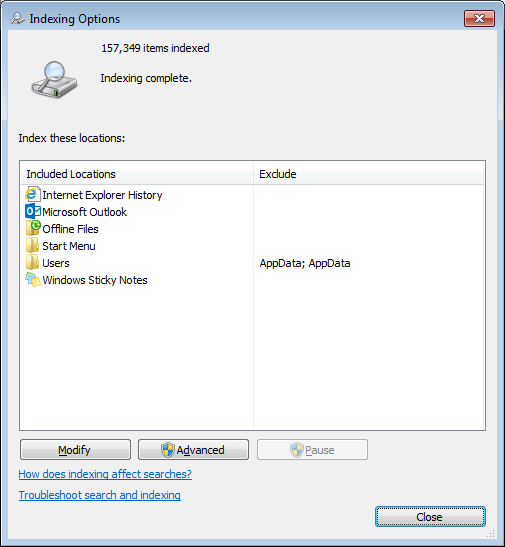
- Click on Modify.
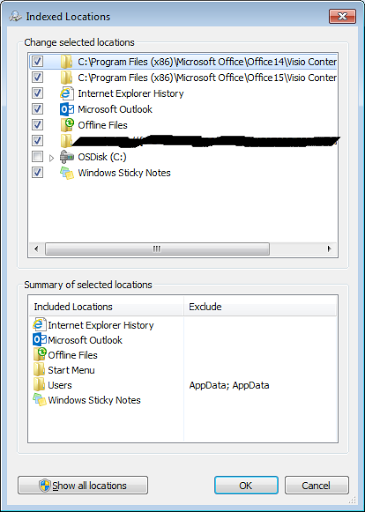
Here you can select/deselect the folders/categories for enabling or disabling search.
I don’t save files locally, I do them on a network drive connected to the server as M: \
I can’t find a way for Windows Search to search that drive.
There should be an option the index box or via Regedit, but I can’t find it.
How to disable web search in Windows 10’s start menu
The search in Windows 10 returns local files, programs and settings but also web results by default. While that may be useful to some users of the operating system, it is irritating or useless for others.
Since most web results are generic search suggestions, it is just a faster way of running searches instead of getting results directly displayed in the interface.
If you search for gpedit.msc for instance using the search in Windows 10, you will notice that the right result is displayed at the top.
Below that are web results however which make up the bulk of the results listing. While some results may be useful at times, others appear outdated, e.g. gpedit.msc vista, and of little use because of that.
Disable Web Search in Windows 10

I will never use the search for a couple of reasons. First, I don’t need it there as I want local files and settings to be returned exclusively when I run a search on Windows 10.
Second, the suggestions are too generic most of the time and third, since a browser is open all the time on my system, I can run a search using it as well without having to add another step to the process.
Thankfully, Microsoft has added options to disable web search in Windows 10 so that only local results are returned.
The problem with this right now is however that it won’t work for everybody. While Microsoft has added policies to block web searches in Windows 10, they don’t seem to work in recent builds, at least not for everybody.
However, it is more than likely that this will get sorted out before release.
Disable Web Search using Group Policy

- To open the Group Policy Editor, tap on the Windows-key, type gpedit.msc and hit enter. Note that the editor is (likely) only included in Pro and Enterprise versions and not in Windows 10 Home. If you run home, check out the other methods listed below instead.
- Browse to the following path using the left sidebar: Local Computer Policy > Computer Configuration > Administrative Templates > Windows Components > Search
- Locate «Do not allow web search» and double-click it. Switch the preference to enabled.
- Locate «Don’t search the web or display web results in Search and double-click it. Switch the preference to enabled.
- Locate «Don’t search the web or display web results in Search over metered connections» and double-click it. Switch the preference to enabled.
This method worked in earlier builds of Windows 10 and it is very likely that it will work in newer builds as well.
Disable online search in the Registry

The following method is useful to Windows 10 Home users who don’t have access to the Group Policy Editor.
- Tap on the Windows-key, type regedit.exe and hit enter.
- Navigate to the following key: HKEY_LOCAL_MACHINE\SOFTWARE\Policies\Microsoft\Windows\Windows Search
- If the key does not exist, right-click on Windows and select New > Key, and name it Windows Search.
- If the preference ConnectedSearchUseWeb exists, double-click on it and set it to 0 to turn web search in Windows 10 off.
- If it does not exist, right-click on Windows Search and select New > Dword (32-bit) Value, name it ConnectedSearchUseWeb, and set its value to 0.
Search preferences

Update: Microsoft removed the option to disable web searches in the Settings UI. The following method does not work anymore.
Probably the easiest option of the four methods to disable web search in Windows 10.
- Run a search by tapping on the Windows-key and starting to type. Don’t hit enter though.
- Locate the settings icon on the left of the search interface and click on it.
- Scroll down until you find «Search online and include web results» listed there as an option.
- Flip the switch from on to off.
- Some users have stated that this option becomes only available if Cortana is set to off.
Disable Web Search using the Firewall

What you may do instead for now is block access to Search using the Windows Firewall. If you open the firewall configuration, you will notice that a Search rule is set there already which you just need to disable.
Note : Search is listed as an option in stable builds, but most recent Insider Builds don’t seem to have that entry anymore. You may need to block «cortana» instead, but that may affect the functionality of the digital assistant as well.
- Tap on the Windows-key, type Windows Firewall select the «Windows Firewall with Advanced Security» (in newer versions of Windows 10 «Windows Defender Firewall with Advanced Security») result, and hit enter.
- Select «Outbound Rules» on the left.
- Click on the «name header» of the outbound rules listing to sort the listing alphabetically.
- Scroll down until you find «search» listed there and double-click on the entry.
- Switch the action from «allow the connection» to «block the connection».
When you run searches now, web results are not displayed anymore in the search results. Please note that a «can’t connect to Search, make sure you’ve got Internet» is displayed in the start menu if you block Search from making outbound connections.


