- 10 ways to take a screenshot on any Windows 10 device
- Print Screen
- Windows + Print Screen
- Alt + Print Screen
- Snip & Sketch tool
- Snipping Tool
- Game Bar
- Power + Volume Up
- Third-party screenshot apps for Windows
- Как сделать скриншот экрана на компьютере или ноутбуке с Windows
- Первый способ: кнопка «Print Screen»
- Как сделать
- Как сохранить скриншот в отдельный файл
- Способ второй: программа «Ножницы»
- Как сделать
- Как сохранить скриншот в отдельный файл
- Где найти скриншоты
- Question: How To Print Screen In Windows?
- How do you take a screenshot on Windows?
- How to «Print Screen» in Windows 10?
- Replies (14)
10 ways to take a screenshot on any Windows 10 device
If you need to capture a screenshot of something on your computer screen, Windows 10 offers a variety of methods for doing just that.
Whether you want to save the entire screen, or just a piece of it, we’ve rounded up all the most common techniques for taking a Windows 10 screenshot.
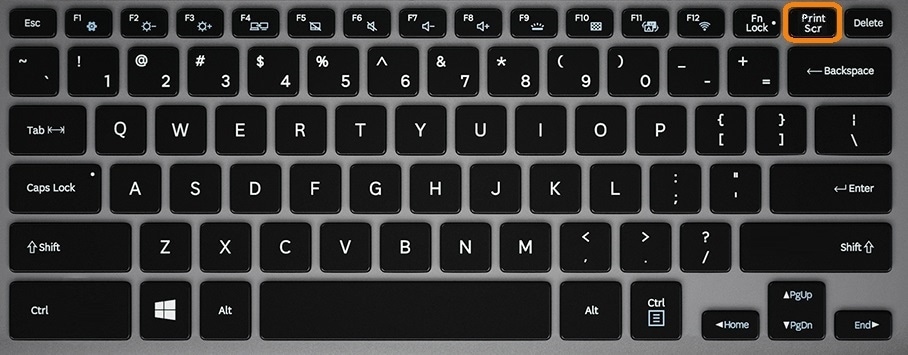
Print Screen
The easiest way to take a screenshot on Windows 10 is the Print Screen (PrtScn) key. To capture your entire screen, simply press PrtScn on the upper-right side of your keyboard.
The screenshot will be saved to your Clipboard. To save the file, paste the screenshot into any program that allows you to insert images, like Microsoft Word or Paint.
Windows + Print Screen
To take a screenshot on Windows 10 and automatically save the file, press the Windows key + PrtScn.
Your screen will go dim and a screenshot of your entire screen will save to the Pictures > Screenshots folder.
Alt + Print Screen
To capture only the active window you’re working in and copy it to your Clipboard, press Alt + PrtScn. You’ll need to paste it into another program to save it.
Snip & Sketch tool
Snip & Sketch is the best way to screenshot on Windows if you’re looking to customize, annotate, or share your screen captures.
To activate Snip & Sketch, use the keyboard shortcut Windows Key + Shift + S. Your screen will dim and a mini menu will appear at the top of your screen, giving you the option to take a rectangular, free-form, window, or full-screen capture.
With these Snip & Skitch options, you can choose how you’d like to take a screenshot:
| Mode | Function |
| Rectangular | Size a rectangle for your screenshot. |
| Free-form | Draw free-hand with your cursor. |
| Window | Choose a specific window to capture. |
| Full-screen | Grab an image of your entire screen. |
After you capture the screenshot, it will be saved to your clipboard and a preview notification will appear in the lower-right corner of your screen.
Click on the preview notification to open the Snip & Sketch app and edit the screenshot with the available drawing tools before saving or sharing.
Snipping Tool
Though Snip & Sketch will eventually replace the Snipping Tool on Windows, it’s still possible to use the old tool to take screenshots in Windows 10, 8, 7, and Vista.
To start the Snipping Tool, you’ll have to find it through the search bar. Use the «Mode» button to customize your screenshot and then click the «New» button to capture your screen.
You can also time your capture up to five seconds via the «Delay» dropdown menu. After you take your screenshot, it’ll open in a new window, where you can annotate it, save it, or share it with Microsoft Outlook.
Game Bar
The Game Bar is an overlay you can use within most Windows 10 apps and games to take screenshots and record video. To open the Game Bar, press Windows Key + G.
Quick tip: If the Game Bar doesn’t open, make sure it’s enabled. To enable the Game Bar, search «Game bar settings» and in the menu, toggle on «Record game clips, screenshots, and broadcast using Game Bar.»
On the overlay menu, click the camera icon to capture a full-screen screenshot. You can also record a video clip by pressing the record button, with the option to include audio by clicking the microphone icon.
Screenshots and video clips captured by the Game Bar are saved in PNG format to the Videos > Captures folder. You can also find it through the Game Bar, by clicking «Show all captures» underneath the screenshot and recording buttons.
Power + Volume Up
To take a screenshot on Windows 10 with a Microsoft Surface device, press the Power Button + Volume Up Button. The screen will dim, and your screenshot will save to the Pictures > Screenshots folder.
Important: To take a screenshot on a Surface 3 or earlier, you’ll need to press the Windows Logo + Volume Down Button.
Third-party screenshot apps for Windows
If you’re unsatisfied with any of the built-in Windows methods, there are third-party screenshot tools worth considering, each with their own extra offerings.
- Snagit is a screenshot tool that allows you to create animated GIFs, take full-page screenshots, and more. The downside? The premium version costs $50. There’s also a 30-day free trial, although any picture you capture during this trial will be watermarked.
- Lightshot is a free screenshot tool designed for quick social sharing. When you download and install Lightshot on Windows 10, it replaces the Print Screen function and offers more editing capabilities.
- Greenshot is another free tool that allows you to edit and customize screenshots, as well as the option to capture a complete scrolling web page.
Как сделать скриншот экрана на компьютере или ноутбуке с Windows
Первый способ: кнопка «Print Screen»
На любой клавиатуре предусмотрена специальная кнопка для снятия скриншотов. Она называется «Print Screen», а иногда «PrntScrn», «PrtScn», «PrtScr» или «PrtSc».
Как сделать
Если у вас компьютер, нажмите кнопку «Print Screen».
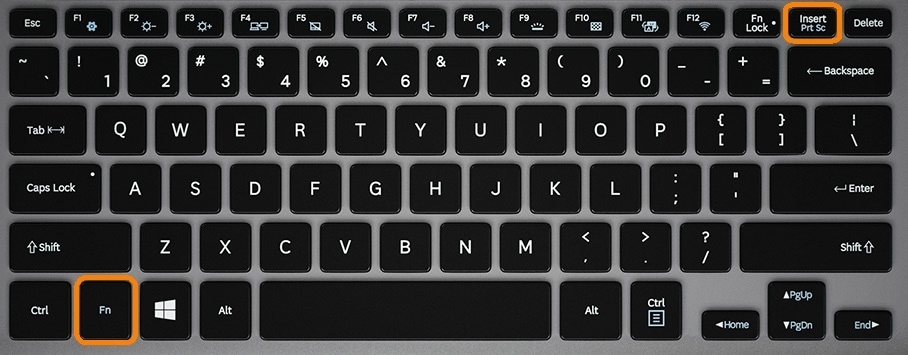
Если у вас ноутбук, нажмите одновременно две кнопки: «Print Screen» и «Fn».
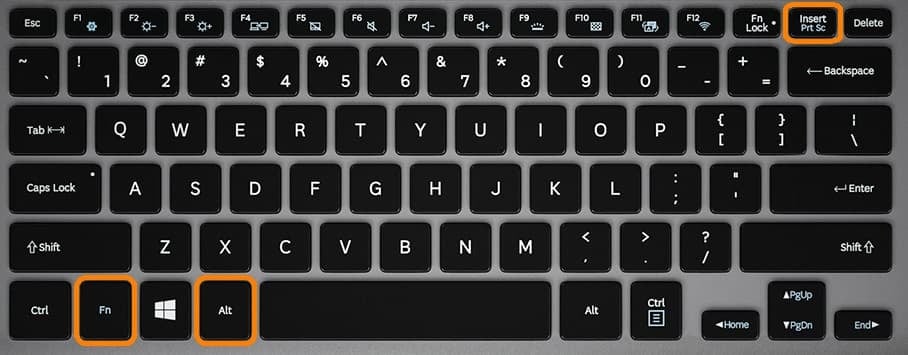
Если хотите сделать скриншот только активного окна (программы), нажмите одновременно «Alt» и «Print Screen» на компьютере; «Alt», «Print Screen» и «Fn» — на ноутбуке.
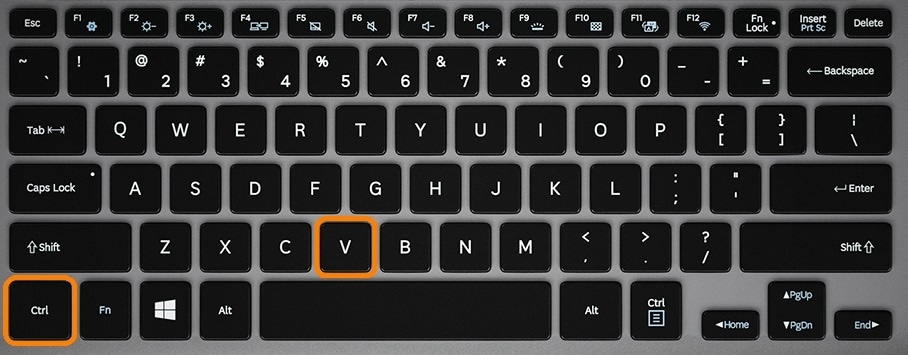
Скриншот сохранится в буфер обмена. Теперь можно вставить его в письмо, фоторедактор или Word (нажать одновременно кнопки «Ctrl» и «V»).
Как сохранить скриншот в отдельный файл
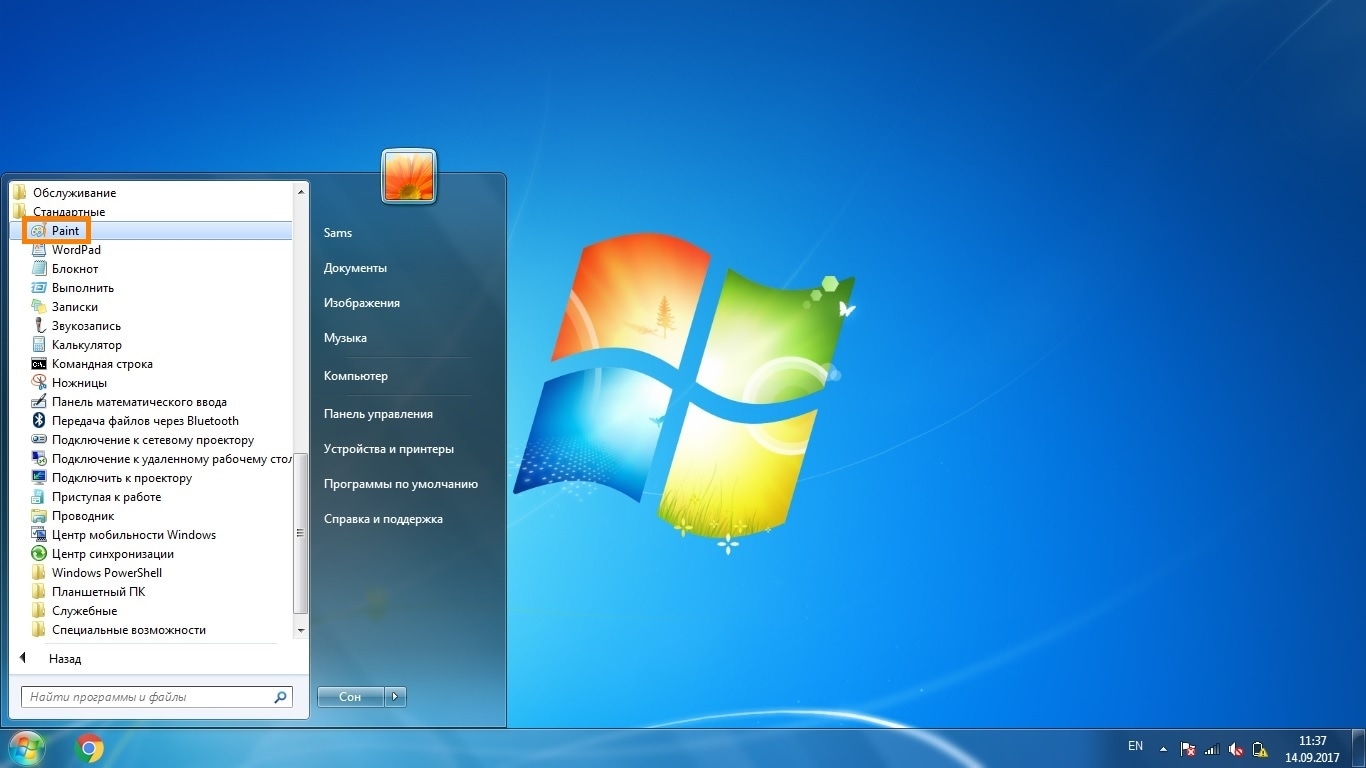
После того, как сделали скриншот, нажмите кнопку «Пуск» > «Все программы» > «Стандартные» > «Paint».
Нажмите одновременно две кнопки: «Ctrl» и «V». На экране появится ваш скриншот.
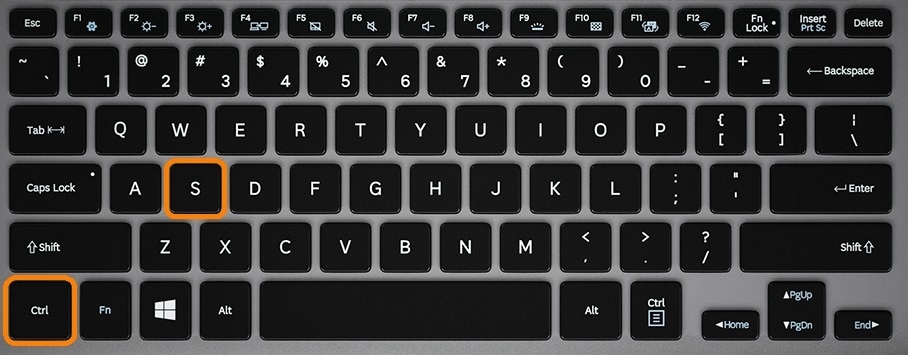
Нажмите одновременно две кнопки: «Ctrl» и «S».
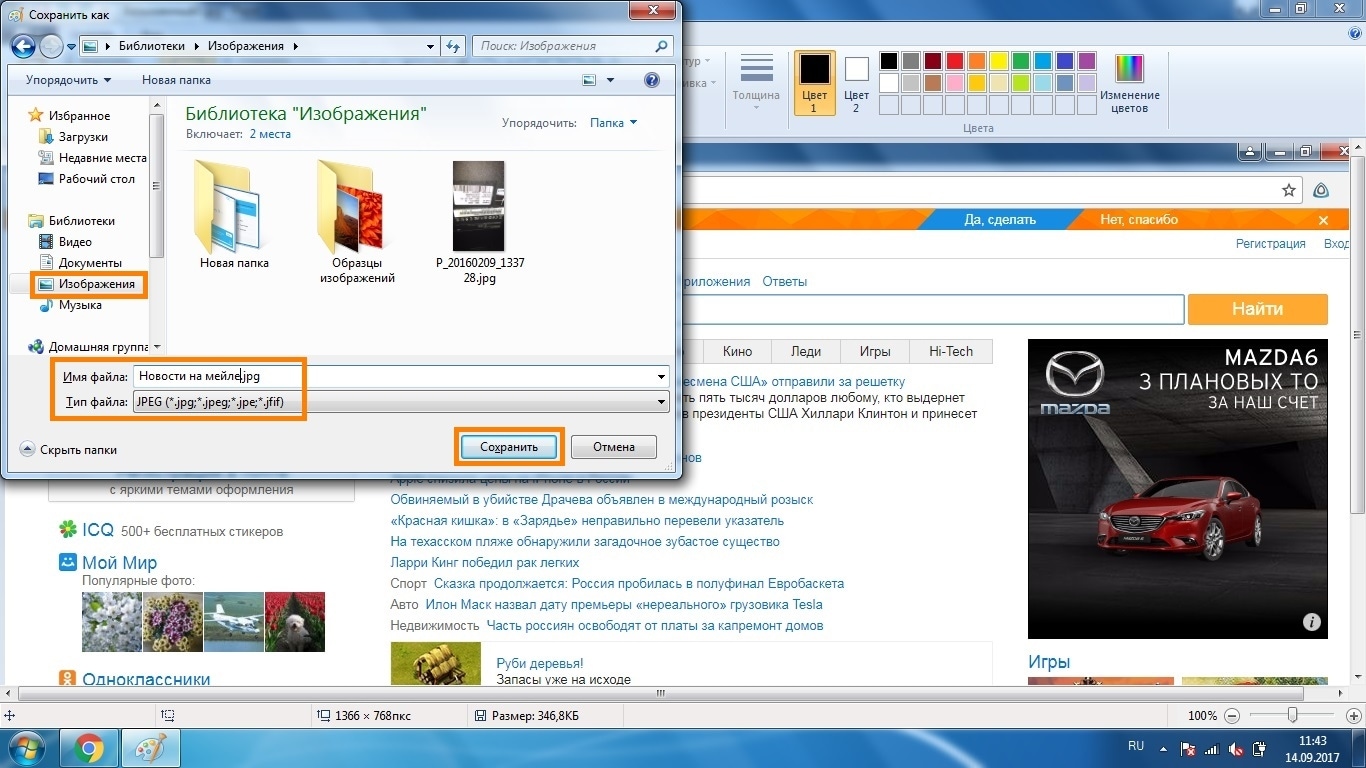
Появится окно для сохранения. Напишите имя файла и выберите место его для сохранения. Тип файла лучше использовать JPEG.
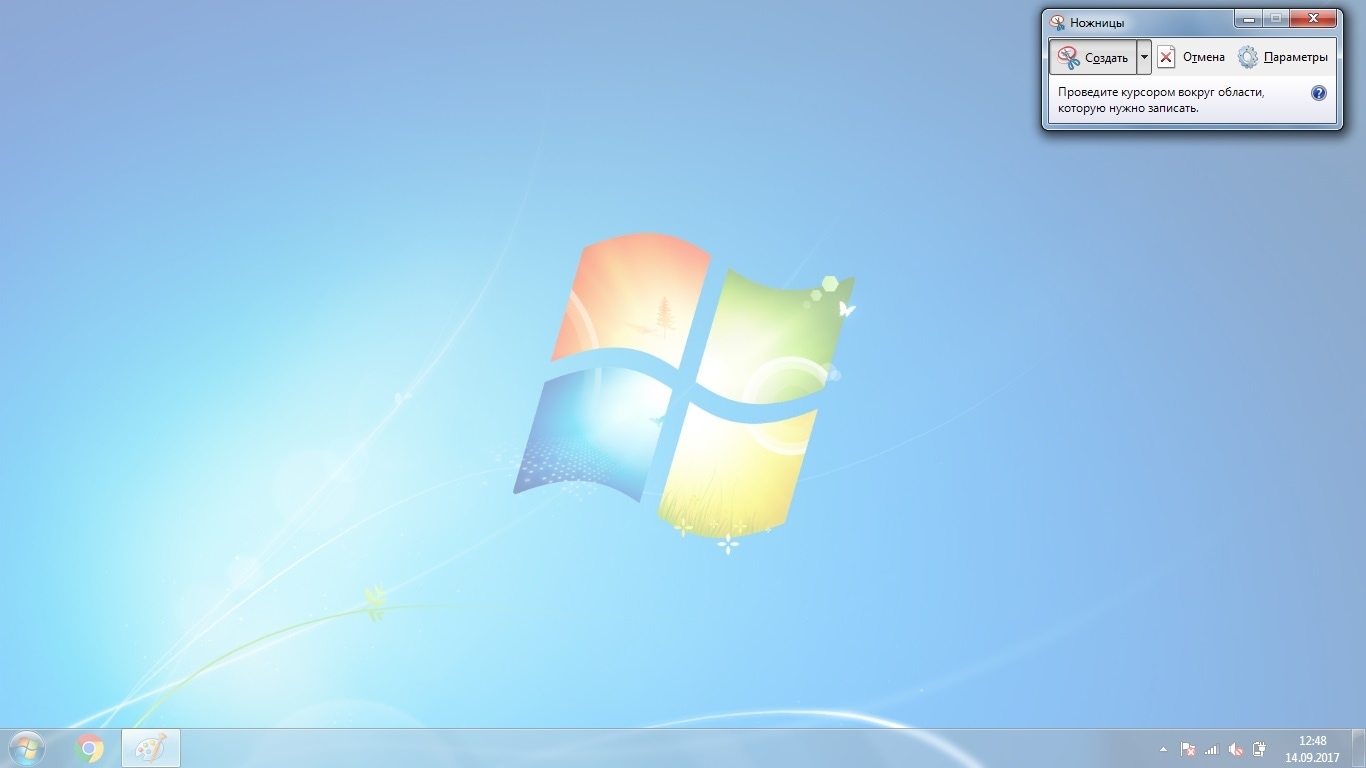
Способ второй: программа «Ножницы»
Такая программа есть в Windows 7, 8, 8.1, 10.
Как сделать
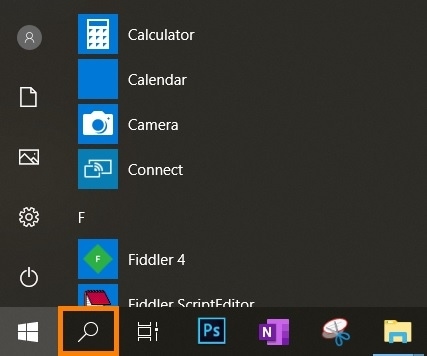
Нажмите кнопку «Пуск» > («Все программы») > («Стандартные») > «Ножницы».
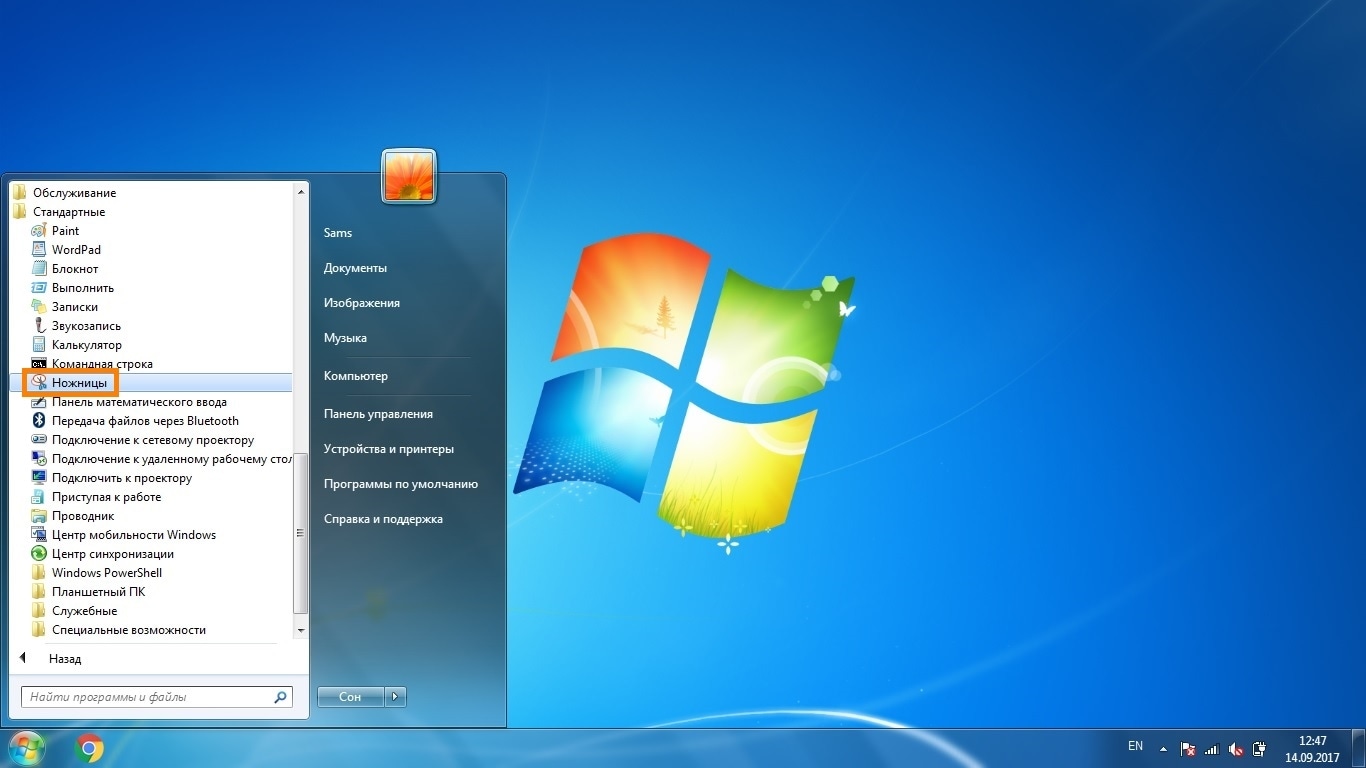
Или в поле поиска напишите «Ножницы» (в Windows 7 и 8 поле поиска появляется при нажатии кнопки «Пуск», в Windows 10 — при нажатии кнопки с лупой).
Программа запустится и вместо курсора мыши появится крестик. Выделите нужный кусок экрана.
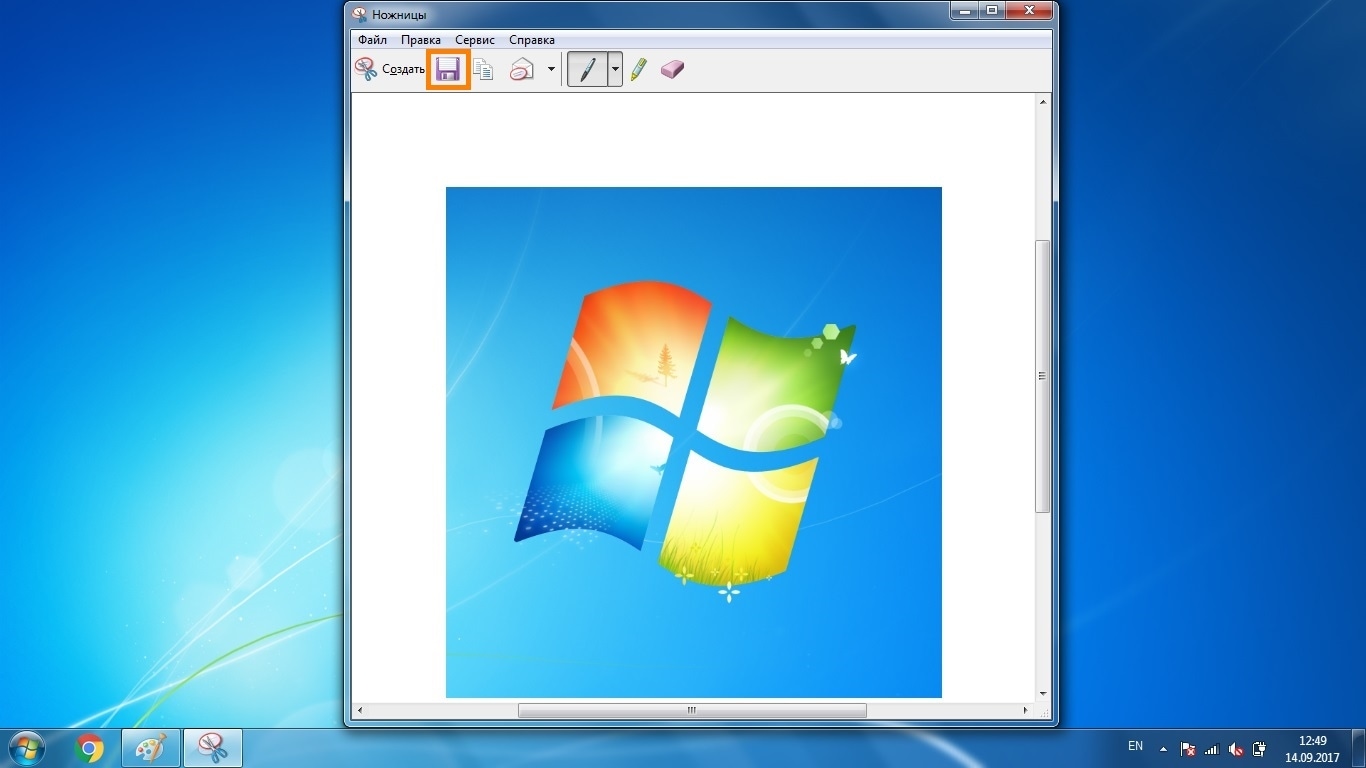
Скриншот сохранится в буфер обмена. Теперь можно вставить его в письмо, фоторедактор или Word (нажать одновременно кнопки «Ctrl» и «V»). Также на скриншоте можно что-то написать или нарисовать (значки в виде карандаша и фломастера).

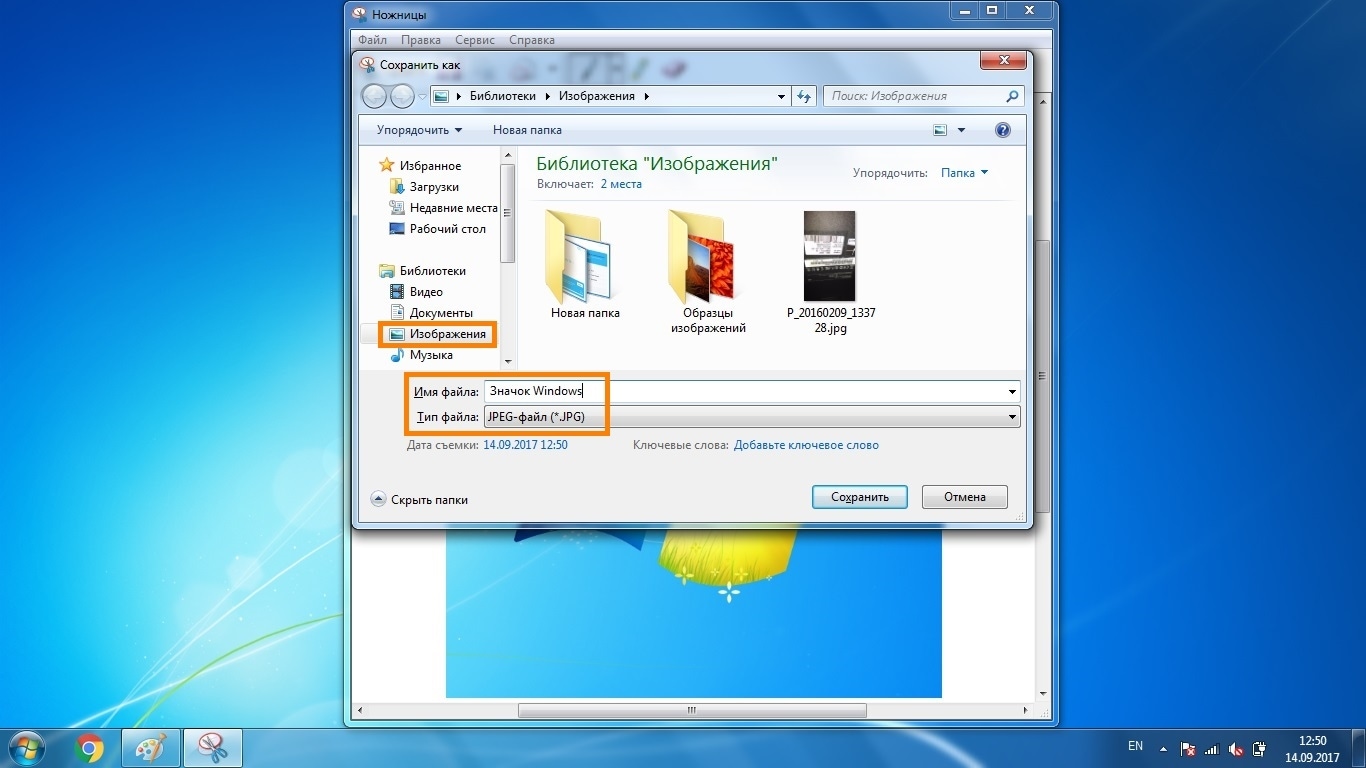
Как сохранить скриншот в отдельный файл
Нажмите на значок дискеты.
Появится окно для сохранения. Напишите имя файла и выберите место его для сохранения. Тип файла лучше использовать JPEG.
Где найти скриншоты
В той папке, которую выбирали при сохранении. Лучше хранить скриншоты в папке «Изображения».
Question: How To Print Screen In Windows?

- Click on the window you would like to capture.
- Press Ctrl + Print Screen (Print Scrn) by holding down the Ctrl key and then pressing the Print Screen key.
- Click the Start button, located on the lower left-hand side of your desktop.
- Click on All Programs.
- Click on Accessories.
- Click on Paint.
Alt + Print Screen. To take a quick screenshot of the active window, use the keyboard shortcut Alt + PrtScn. This will snap your currently active window and copy the screenshot to the clipboard.Press the Windows logo key + “PrtScn” buttons on your keyboard. The screen will dim for a moment, then save the screenshot as a file in the Pictures > Screenshots folder. Press the CTRL + P keys on your keyboard, then select “Print.” The screenshot will now be printed.Screenshot – Screen Capture – Print Screen in Windows on Mac. To capture the entire screen simply press Function (fn) + Shift + F11. To capture the front most window press Option (alt) + Function (fn) + Shift + F11.When you’re ready to capture a screenshot of your current Surface or tablet screen, press and hold the Windows button on the front of the device and then press and release the device’s volume down button.
How do you take a screenshot on Windows?
Method One: Take Quick Screenshots with Print Screen (PrtScn)
- Press the PrtScn button to copy the screen to the clipboard.
- Press the Windows+PrtScn buttons on your keyboard to save the screen to a file.
- Use the built-in Snipping Tool.
- Use the Game Bar in Windows 10.
How to «Print Screen» in Windows 10?
Original title: How do I do a print screen in windows 10?
How to do a print screen in windows 10?
Replies (14)
* Please try a lower page number.
* Please enter only numbers.
* Please try a lower page number.
* Please enter only numbers.
![]()
Thank you for posting your query on Microsoft Community.
Press the Windows key (on bottom left of key board) and Print Screen Key (on top right of keyboard) at the same time.
Please refer to the below article for more information.
(Also applies to Windows 10)
Kindly let us know if you need any further assistance with Windows. We are happy to assist you.
172 people found this reply helpful
Was this reply helpful?
Sorry this didn’t help.
Great! Thanks for your feedback.
How satisfied are you with this reply?
Thanks for your feedback, it helps us improve the site.
How satisfied are you with this reply?
Thanks for your feedback.
Unable to print screen. I do not or cannot find an symbol for print under the toolbar. Please help
5 people found this reply helpful
Was this reply helpful?
Sorry this didn’t help.
Great! Thanks for your feedback.
How satisfied are you with this reply?
Thanks for your feedback, it helps us improve the site.
How satisfied are you with this reply?
Thanks for your feedback.
Thank you for the post.
Kindly, let us know how exactly you are trying to do a print screen on Windows 10.
You may also try using the snipping tool.
Let us know the result.
9 people found this reply helpful
Was this reply helpful?
Sorry this didn’t help.
Great! Thanks for your feedback.
How satisfied are you with this reply?
Thanks for your feedback, it helps us improve the site.
How satisfied are you with this reply?
Thanks for your feedback.
6 people found this reply helpful
Was this reply helpful?
Sorry this didn’t help.
Great! Thanks for your feedback.
How satisfied are you with this reply?
Thanks for your feedback, it helps us improve the site.
How satisfied are you with this reply?
Thanks for your feedback.
Back in the days of DOS, the PrtScn key used to print the screen. But in all versions of Windows, this works differently, and the name of the key is now an anachronism. The key does *not* print the screen. PrtScrn captures the whole screen, and Alt-PrtScrn captures the active window.
Either one captures the image to the Windows clipboard. Once it’s in the clipboard you can paste (Ctrl-V) it into any application that supports graphics (Windows Paint, other graphics programs, even your favorite word processor). You can edit or add to the image as you wish, then print it.
This ability to manipulate the image in a program before printing it is an improvement over the original DOS method of just printing it. But if you’d like that old facility back, there are several third-party freeware/shareware programs that can do this, such as PrintKey2000 at http://www.sharewarejunkies.com/00zwd2/printkey2000.htm
17 people found this reply helpful
Was this reply helpful?
Sorry this didn’t help.
Great! Thanks for your feedback.
How satisfied are you with this reply?
Thanks for your feedback, it helps us improve the site.


