- How to Repair Windows 10 Using Command Prompt (5 Ways)?
- How do I repair Windows 10 with command prompt?
- Method 1. How to repair Windows 10 using SFC?
- Method 2. How to repair Windows 10 using DISM?
- Method 3. How to reset Windows 10 with command line?
- Method 4. How to run system restore with command prompt?
- Method 5. How to repair Windows 10 with AOMEI.exe?
- How to refresh, reset, or restore your PC
- Before you start to refresh or reset your PC
- Refresh, reset, or restore
- To refresh your PC
- To reset your PC
- To restore your PC to an earlier point in time
- How to Reinstall Windows 10 without Losing Data (3 Ways)?
- Case: Reinstall Windows 10 without losing data
- How does reinstalling Windows 10 work, will it erase your data?
- Method 1: Repair install Windows 10 without losing any dataВ
- Method 2: Fresh install Windows 10 without losing personal files
- Method 3: Clean install Windows 10 without losing data
- Reinstall Windows 10 isn’t always a perfect solution
- Backup system in case you need to restore Windows 10 without data loss
- Wrapping things up
How to Repair Windows 10 Using Command Prompt (5 Ways)?
When your computer won’t work properly, you can learn how to repair Windows 10 using command prompt from this article.

By AOMEI  / Last Updated March 9, 2021
How do I repair Windows 10 with command prompt?
When there is some problem happens to Windows, you can repair your windows with some basic repair like Windows directory repair, boot directory repair. When the error is too serious, you can run advanced repair like system restore. For Windows 10, you can also use DISM command line utility to repair Windows 10 image. Next, this article will introduce you how to repair Windows 10 using command prompt with five methods.
Method 1. How to repair Windows 10 using SFC?
SFC (System File Checker) is a command-line utility that can scan for corruption in Windows system files and replace any corrupted or missing protected system files with a known good version. When you feel buggy with your computer or notice problems during boot, you can use SFC to diagnose problems and repair it.В
To repair Windows 10 using SFC with detailed steps:
1. Open «Start», search for the Command Prompt, select it and run as administrator.
2. Then type the command: «sfc /scannow» and press «Enter».
If SFC is unable to fix the problem, probably the utility cannot get the necessary files from the Windows image, which might have become broken. In this situation, you can use DISM to repair the Windows image.
Method 2. How to repair Windows 10 using DISM?
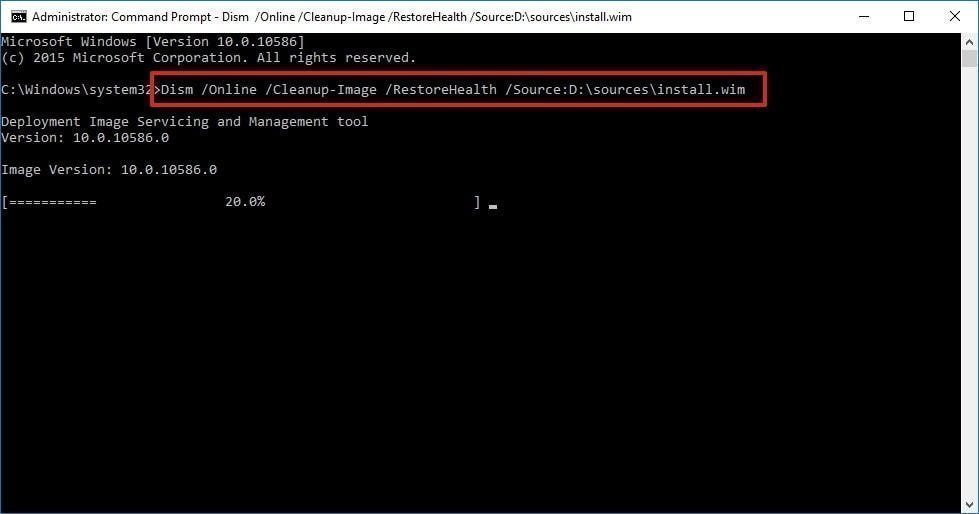
Windows 10 includes a command-line utility known as DISM (Deployment Image Servicing and Management). DISM command Windows 10 can be used to repair and prepare Windows images, including, Windows Setup, Windows Recovery Environment, and Windows PE. Also, DISM can be used to fix the recovery image within an installation of the operating system.
To repair Windows 10 using DISM commands:
To check whether there is any corruption, Run command line as administrator, then type the following syntaxВ and press «Enter».
DISM /Online /Cleanup-Image /CheckHealth
To scan the Windows image for any corruption, type below command and hit «Enter».
DISM /Online /Cleanup-Image /ScanHealth
To fix Windows image, type the following command and hit «Enter».
DISM /Online /Cleanup-Image /RestoreHealth /Source:repairSource\install.wim
Method 3. How to reset Windows 10 with command line?
To reset Windows 10 with «Reset this PC», follow the instructions below:
Type “systemreset -cleanpc” in an elevated command prompt and press «Enter».В (If your computer cannot boot, you can boot into recovery mode and select «Troubleshoot», and then choose «Reset this PC».)
Method 4. How to run system restore with command prompt?
If the problem is too severe, you can try to restore your Windows 10 to the previous state as long as you have enabled system restore. But, it willВ notВ restoreВ documents, music, emails, or personal files of any kind. If this is what you need, see below.
To run system restore in safe mode, follow the steps below:
1. Start your computer and press «F8» repeatedly until the Windows advanced options menu appears.
2. Click «Safe Mode with command prompt» and press «Enter». If your computer can boot normally, type «cmd» in the search box and click «Command Prompt» to continue.
3. Sign in using an administrator account if needed. Once the command prompt is showing, enterВ «rstrui.exe» at first in the Command Prompt Window andВ press «Enter» to continue.
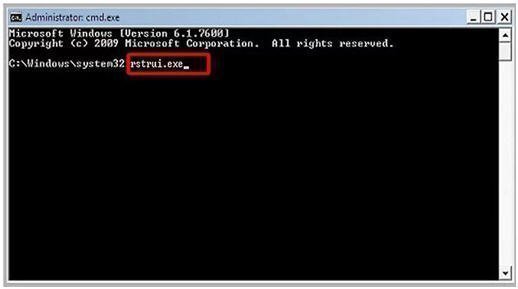
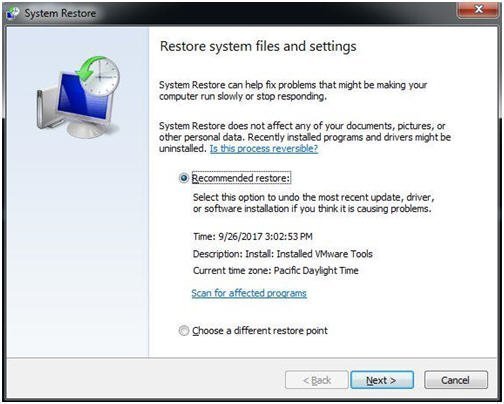
4. This command will bring you to the interface of System Restore. You can either use the recommended restore point or click «Next» to choose an available restore point. Then, follow the instruction to complete system restore.
Method 5. How to repair Windows 10 with AOMEI.exe?
Besides system restore, you can also repair Windows 10 with AOMEI.exe. AOMEI Backupper is a reliable backup and restore software which is designed for Windows 10/8/7/XP/Visa. You can either backup and restore from graphic users interface or command line. It has some features that Windows built-in tool does not have. For example, you can use AOMEI Backupper to create incremental backup, and you can restore to a dissimilar hardware.
Suppose you have created system image backup with AOMEI Backupper. Before restoring system, you can use a utility named Check Image to check if system image backup is intact and without error.В
Then, use the following steps to restore windows 10 with AOMEI.exe:
1. Navigate to AOMEI Backupper installation directory by typing the following command in command line and press «Enter». For example: cd C:\Program Files (x86)\AOMEI Backupper.
Note: If you run this command under Windows PE environment, the drive letters might change.
2. Run the following command to start restore: AMBackup /r /t [backup type] /s «[backup location path]» /d [destination location]. For example: To restore the system backup saved in J:\systembackup1 to disk 1. You should type the command: AMBackup /r /t system /s “J:\system backup\systembackup1.adi” /d 1
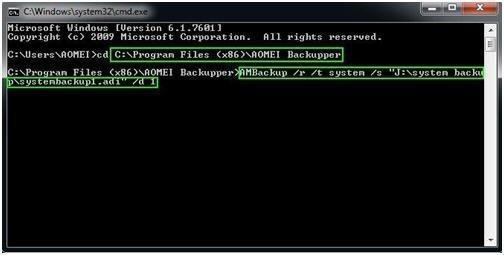
Tip: If you need to restore to another computer, AOMEI Backupper «Universal Restore» feature can make this very easy. For example: Run system restore in the image named «systembackup1.adi» to the partition 0 on disk 0 and perform a universal restore. AMBackup /r /t system /s «D:\system backup\systembackup1.adi» /d 0:0 /x
Now you have learned how to repair Windows 10 using command line with five methods. You can choose one based on your preference. It is also suggested to keep backup software AOMEI Backupper installed on your computer to provide continuous protection (try 30-day free trial).В
Also, you can find «Recovery Environment» utility in «Tools» toВ enable the boot option of AOMEI Backupper recovery environment. When system crashes, it enables you to perform backup/restore from boot easily.
If you want to protect unlimited computers within your company, you can pick AOMEI Backupper Technician. With the inbuilt AOMEI Image Deploy tool, you are also allowed to deploy/restore system image file on server-side computer to multiple client-side computers over network.
How to refresh, reset, or restore your PC
Note: For information about this topic in Windows 10, see Recovery options in Windows 10.
If you’re having problems with your PC, you can:
Refresh your PC to reinstall Windows and keep your personal files and settings. Refresh also keeps the apps that came with your PC and the apps you installed from the Microsoft Store.
Reset your PC to reinstall Windows but delete your files, settings, and apps—except for the apps that came with your PC.
Restore your PC to undo recent system changes you’ve made.
If you’re having trouble starting (booting) your PC, see Windows Startup Settings (including safe mode), and go to the “Get to Windows Startup Settings in the Windows Recovery Environment” section. You can refresh, reset, or restore your PC from the Windows Recovery Environment.
If you want to back up and restore your personal files using File History, see Set up a drive for File History.
Before you start to refresh or reset your PC
In most cases, once you start to refresh or reset your PC, it’ll finish on its own. However, if Windows needs missing files, you’ll be asked to insert recovery media, which is typically on a DVD disc or thumb drive. If that happens, what you’ll need depends on your PC.
If your PC came with Windows 8.1 or Windows RT 8.1, you’ll need the discs or thumb drive that came with your PC. Check the info that came with your PC to see if your PC manufacturer provided these discs or media. In some cases, you might have created them when you first set up your PC.
If you don’t have either of those, you can make them if you have a USB thumb drive of 16 GB or larger. Having a recovery drive can help you troubleshoot and fix problems with your PC, even if it won’t start. For more info, see Create a USB recovery drive.
If you upgraded your PC to Windows 8.1 or Windows RT 8.1 with a DVD, use that disc. If you don’t have Windows 8.1 or Windows RT 8.1 media, contact Microsoft Support.
Refresh, reset, or restore
Select any of the following for more detailed info.
If your PC isn’t performing as well as it once did, and you don’t know why, you can refresh your PC without deleting any of your personal files or changing your settings.
Note: If you upgraded your PC from Windows 8 to Windows 8.1 and your PC has a Windows 8 recovery partition, refreshing your PC will restore Windows 8. You’ll need to upgrade to Windows 8.1 after the refresh has finished.
Warning: Apps you installed from websites and DVDs will be removed. Apps that came with your PC and apps you installed from Microsoft Store will be reinstalled. Windows puts a list of removed apps on your desktop after refreshing your PC.
To refresh your PC
Swipe in from the right edge of the screen, tap Settings, and then tap Change PC settings.
(If you’re using a mouse, point to the upper-right corner of the screen, move the mouse pointer down, click Settings, and then click Change PC settings.)
Tap or click Update and recovery, and then tap or click Recovery.
Under Refresh your PC without affecting your files, tap or click Get started.
Follow the instructions on the screen.
If you want to recycle your PC, give it away, or start over with it, you can reset it completely. This removes everything and reinstalls Windows.
Note: If you upgraded your PC from Windows 8 to Windows 8.1 and your PC has a Windows 8 recovery partition, resetting your PC will restore Windows 8. You’ll need to upgrade to Windows 8.1 after the reset has finished.
Warning: All of your personal files will be deleted and your settings will be reset. All apps that you installed will be removed. Only apps that came with your PC will be reinstalled.
To reset your PC
Swipe in from the right edge of the screen, tap Settings, and then tap Change PC settings.
(If you’re using a mouse, point to the upper-right corner of the screen, move the mouse pointer down, click Settings, and then click Change PC settings.)
Tap or click Update and recovery, and then tap or click Recovery.
Under Remove everything and reinstall Windows, tap or click Get started.
Follow the instructions on the screen.
Note: You’ll be asked to choose whether you want to erase data quickly or thoroughly. If you choose to erase data quickly, some data might be recoverable using special software. If you choose to erase data thoroughly, this will take longer but it makes recovering data less likely.
If you think an app or driver that you recently installed caused problems with your PC, you can restore Windows back to an earlier point in time, called a restore point. System Restore doesn’t change your personal files, but it might remove recently installed apps and drivers.
System Restore isn’t available for Windows RT 8.1.
Windows automatically creates a restore point when you install desktop apps and new Windows updates, if the last restore point is older than 7 days. You can also create a restore point manually at any time.
To restore your PC to an earlier point in time
Swipe in from the right edge of the screen, and then tap Search.
(If you’re using a mouse, point to the upper-right corner of the screen, move the mouse pointer down, and then click Search.)
Enter Control Panel in the search box, and tap or click Control Panel.
Enter Recovery in the Control Panel search box, and then tap or click Recovery.
Tap or click Open System Restore, and then follow the instructions.
If you need additional help refreshing, resetting, or restoring your PC, check out the Repair and Recovery community pages in the Windows forum for solutions that other people have found for problems they’ve experienced.
How to Reinstall Windows 10 without Losing Data (3 Ways)?
Sometimes, you may need to reinstall Windows 10 to solve system issues. This guide will show you how to reinstall Windows 10 without losing data step by step.
By AOMEI / Last Updated March 2, 2021
Case: Reinstall Windows 10 without losing data
Hi there. I have an issue with my laptop and I was told to resolve that issue, I’d need to reinstall Windows 10. I don’t recall where I put my CD, but I have my product key. My question is, if I reinstall Windows 10, will it delete the data on my laptop or do I have to back it all up into a hard drive?»
How does reinstalling Windows 10 work, will it erase your data?
When you’ve tried many solutions to fix system errors and none of them actually works, it may be the time to reinstall Windows 10 and get all problems sorted out. But does this process delete your important data? Can you reinstall Windows 10 without any data loss?
Well, it depends on the approach you take:
By using Repair Install, you can choose to reinstall Windows 10 while keeping all personal files, apps and settings, keeping personal files only, or keeping nothing.
By using Reset This PC, you can do a fresh install to reset Windows 10 and keep personal files, or remove everything.
By using installation disk to perform a clean install, your data won’t be delete, but will be moved to Windows.old folder in the root directory of C: drive after installing.
In short, you definitely can, and have different methods to reinstall Windows 10 without losing data.В
If you are pretty sure that all your files and applications are in good conditions and have no thing to do with the problem you are facing, then you can choose a way to reinstall Windows 10 without losing files and programs.В
To do that, Windows will scan your C: drive and place all your personal data aside. And when the installation is complete, Windows will put these files and settings back.
If you are using a genuine Windows 10, Windows 10 will automatically get activated after the reinstallation.
Quick navigation for Windows 10 reinstallation:
Method 1: Repair install Windows 10 without losing any dataВ
If your Windows 10 can boot and you believe all the installed programs are fine, then you can use this method to reinstall Windows 10 without losing files and programs. If one or more of your program are damaged, you’d better keep personal files only.
1. Download the latest Windows 10 installation ISO file. You can also use Windows Media Creation tool to create an installation ISO.
2. Double click to mount the ISO file (for Windows 7, you need to use other tools to mount it). At the root directory, double-click to run the Setup.exe file.

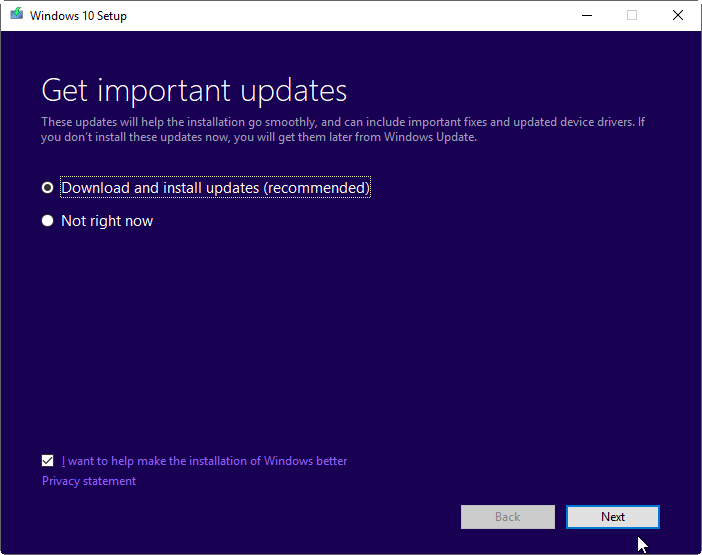
3. When the Windows 10 Setup is ready, you can whether to download updates or not based on your needs.
4. In the screen, click «Change what to keep«.
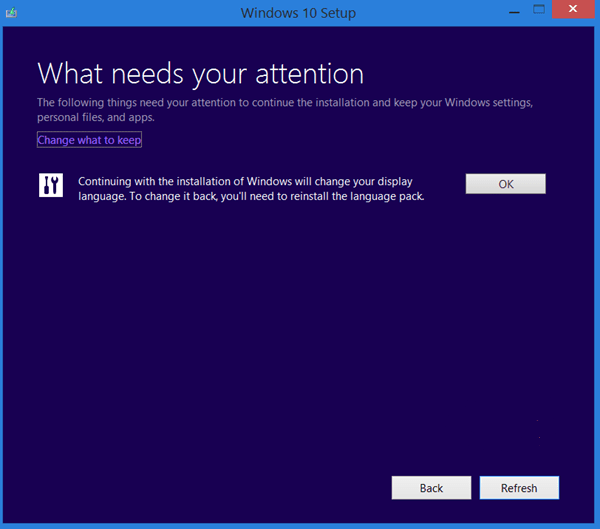
5. From there. You can select «Keep personal files, apps, and Windows settings» or «Keep personal files only«.

6. Click Next to install Windows 10.
This may take a while because it will spend extra time scanning your hard drive and moving files. If you just want to keep your files where they are, then try the next method.
Method 2: Fresh install Windows 10 without losing personal files
Windows 10 provides the feature «Reset this PC» to help you solve system problems by reinstalling Windows 10. During the process, you can choose whether to keep your personal files or not.
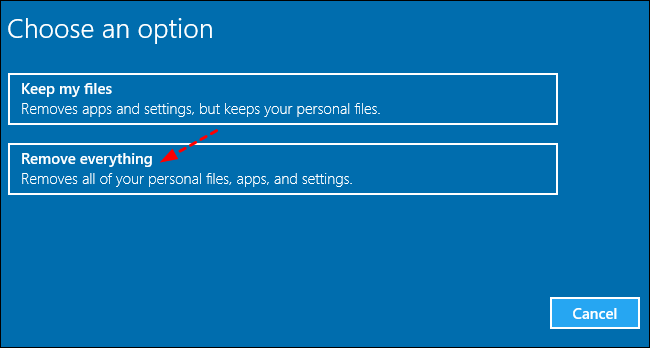
To use the feature, you can go to Settings > Update&Security > Recovery > Reset this PC, then you will have two options, «Keep my files» and «Remove everything«, select one of them and follow the on-screen instruction.
You can also reset Windows 10 from command line. The process are shown below:
1. Type “cmd” in the search box and press Enter.
2. In the listed results, right click on the Command Prompt and select «Run as Administrator«.
3. Type “systemreset” (without quotes) in the command prompt window and press Enter. If you need to reinstall Windows 10 and install new updates, you can run command “systemreset -cleanpc”.

If your system cannot boot, you can boot into recovery mode and from there, you can reset your PC. You can boot your PC from a recovery drive to reset your Windows 10.
Method 3: Clean install Windows 10 without losing data
If you prefer installing Windows 10 without losing data from USB drive or installation disc, you can choose to upgrade Windows 10 using this method. Before you do, you need to make sure your C: drive has more than 16GB of free space.
1. Insert your installation disc and boot from it. If you do not have one, you can download the Windows Media Creation tool to create one.
2. When it loads, select the language and keyboard, then click «Next«.
3. Click «Install Now«.
4. Type your product key or skip it.
5. Select the installation type «Custom«.
6. At the following screen, just select the C: drive and click Next to proceed. Then, wait patiently until the installation complete 100%.

As long as you do not format the C: drive in the Setup, you will not lose your data, but they are moved to another location. After the installation, you can find a folder Windows.old in the root directory of C: drive. All your files are saved there.
After copy all your needed files out from Windows.old folder, you can use Disk Cleanup to delete the Windows.old folder to free up disk space.
Reinstall Windows 10 isn’t always a perfect solution
Though there are several methods to choose, they all have some shortcomings in practical use. For example, the first method will keep your programs, but won’t fix problems caused by them. And the other two methods can only keep your files, so you have to spend time and effort reinstalling these apps. That’s why I say reinstallation is not a perfect way.
To avoid such trouble, you can use a free backup software to create a system image in case of possible system issues. For simplicity and effectiveness, I strongly recommend youВ AOMEI Backupper Standard to protect your Windows 10 PC.
It enables you to backup file, partition, system or even the whole disk in a simple manner.
It can save you from manual operation with the scheduled backup on daily, weekly, monthly, etc.
With theВ incremental/differential backupВ mode, you don’t need to worry about cumulative backups filling up the space.
Also, you can change the compression level, split backup images, choose backup mode, etc. as you like.
Backup system in case you need to restore Windows 10 without data loss
If you want to fix the computer without losing any important files, apps and settings, restoring system to an earlier normal state is the safer way than reinstalling from scratch.В
To simplify the process, you could set up a scheduled backup to make it run automatically. Thus when any error arises, you can easily restore Windows 10 to the latest normal state without losing data.
1. Download and install this free backup software.
2. On the main page, click the «Backup» tab and then choose «System Backup«. If you want to backup entire disk, you can choose «Disk Backup» as instead.

3. Select a destination location to receive the backup image. You can backup to any location (folder) that Windows detects, including external hard drive, NAS network location, local storage, etc.

4. In the next screen, click «Schedule» to configure scheduled backup settings if needed. After that, click «Start Backup» to start the operation.

Note: System backup in AOMEI Backupper Standard can satisfy almost users’ need. But if you have advanced needs like below, higher editions like Professional may serve you better.
• Enable encryption for backup: This feature is useful for users who store sensitive data or business data on their computer to prevent unauthorized access.
• USB Plug in:В This feature is designed for users who frequently use USB storage device, and make the backup task more convenient. Once you create a schedule backup with «USB Plug in», AOMEI Backupper will automatically start backup when USB connected to your computer.
• Scheme: This is a indispensable feature is for all users who don’t want to miss any changes, but worry about disk space issue. It can delete old backups automatically when backup versions reaches the specified number.
In a short time, the backup will be created. With a backup, whenever you have problems with your system, you can easily restore from the backup. Even when your PC fails to boot, you can restore from bootable CD. AOMEI Backupper also enables you to create a specialized recovery environment for backup/restore without booting Windows. Just go to Tools > Recovery Environment to enable it.
Wrapping things up
To reinstall Windows 10 without losing data is surely possibly using these three methods mentioned above, and it can fix system issues that your computer may have. But, honestly, it’s not perfect. And it is obvious that restoring from a backup is easier and more convenient to solve Windows issues.
The basic version AOMEI Backupper Standard is enough to prevent unexpected disaster, such as, system crash, disk failure, virus, fire etc. But if you want more advanced features, such as, USB plug in, incremental and differential backup, universal restore, you need to upgrade from the basic version.В
If you want to protect unlimited computers within your company, AOMEI Backupper TechnicianВ is worth a shot. The inbuilt AOMEI Image Deploy tool allow users to deploy/restore system image file on server-side computer to multiple client-side computers over network.


