- Restart your Mac in macOS or Windows
- How to start up in macOS from Windows
- How to start up in Windows from macOS
- Learn more
- Install Windows 10 on your Mac with Boot Camp Assistant
- What you need to install Windows 10 on Mac
- How to install Windows 10 on Mac
- 1. Check your Secure Boot setting
- 2. Use Boot Camp Assistant to create a Windows partition
- 3. Format the Windows (BOOTCAMP) partition
- 4. Install Windows
- 5. Use the Boot Camp installer in Windows
- How to switch between Windows and macOS
- Learn more
- How to quickly switch between windows and apps on Mac
- Switch between application windows on Mac
- Keyboard shortcut
- Trackpad gesture
- Switch between windows of the same app on Mac
- More shortcuts
- Wrapping it up
- Mac: Shortcut for switching between two windows of the same application
- 7 Answers 7
Restart your Mac in macOS or Windows
After installing Microsoft Windows on your Mac, you can choose whether your Mac starts up in macOS or Windows.
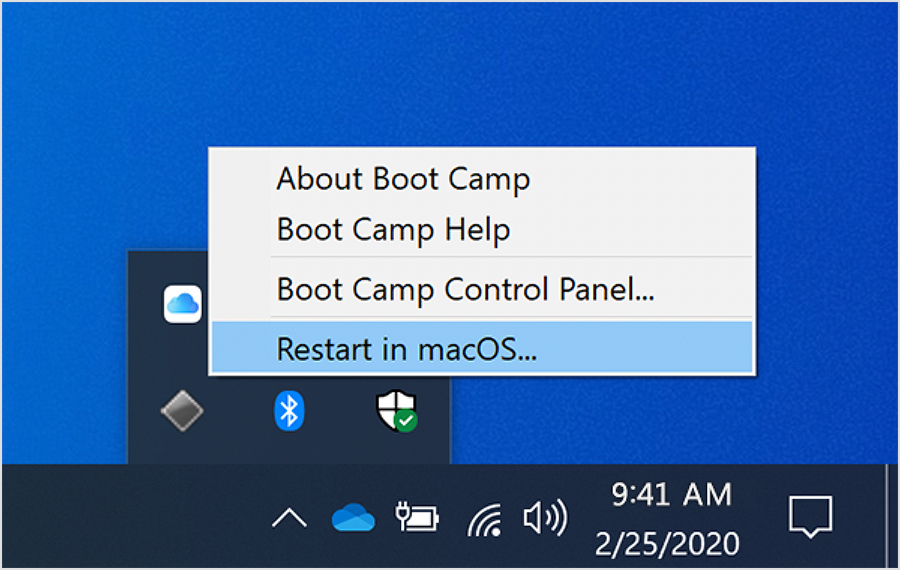
How to start up in macOS from Windows
- From the notification area on the right side of the Windows taskbar, click to show hidden icons.
- Click the Boot Camp icon .
- From the menu shown, choose Restart in macOS.
If you haven’t installed the latest Boot Camp updates, you might get the message ”Could not locate the OS X boot volume.»
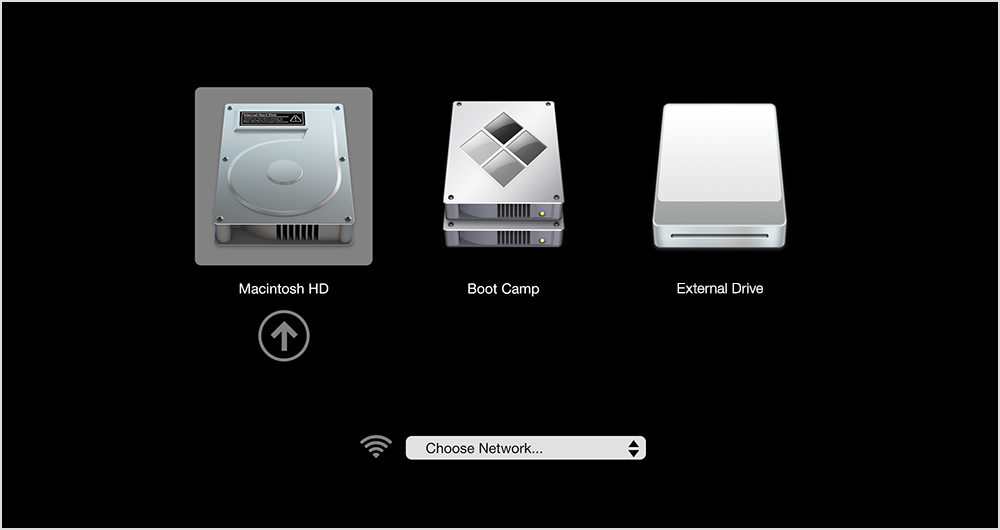
Or use Startup Manager as your Mac starts up:
- Restart your Mac from the Start menu in Windows.
- Press and hold the Option (or Alt) ⌥ key as your Mac begins to restart.
- Select your Mac startup volume (Macintosh HD) in the Startup Manager window, then press Return or click the up arrow:
How to start up in Windows from macOS
- Use Startup Manager to choose your Windows (Boot Camp) volume during startup.
- Or select your Boot Camp volume in Startup Disk preferences, then restart.
Learn more
- If you’re having difficulty using VoiceOver or another screen reader to complete these steps, please contact Apple Support.
- Learn how to install Windows 10 on your Mac.
Information about products not manufactured by Apple, or independent websites not controlled or tested by Apple, is provided without recommendation or endorsement. Apple assumes no responsibility with regard to the selection, performance, or use of third-party websites or products. Apple makes no representations regarding third-party website accuracy or reliability. Contact the vendor for additional information.
Install Windows 10 on your Mac with Boot Camp Assistant
With Boot Camp, you can install Microsoft Windows 10 on your Mac, then switch between macOS and Windows when restarting your Mac.
What you need to install Windows 10 on Mac
- MacBook introduced in 2015 or later
- MacBook Air introduced in 2012 or later
- MacBook Pro introduced in 2012 or later
- Mac mini introduced in 2012 or later
- iMac introduced in 2012 or later 1
- iMac Pro (all models)
- Mac Pro introduced in 2013 or later
The latest macOS updates, which can include updates to Boot Camp Assistant. You will use Boot Camp Assistant to install Windows 10.
64GB or more free storage space on your Mac startup disk:
- Your Mac can have as little as 64GB of free storage space, but at least 128GB of free storage space provides the best experience. Automatic Windows updates require that much space or more.
- If you have an iMac Pro or Mac Pro with 128GB of memory (RAM) or more, your startup disk needs at least as much free storage space as your Mac has memory. 2
An external USB flash drive with a storage capacity of 16GB or more, unless you’re using a Mac that doesn’t need a flash drive to install Windows.
A 64-bit version of Windows 10 Home or Windows 10 Pro on a disk image (ISO) or other installation media. If installing Windows on your Mac for the first time, this must be a full version of Windows, not an upgrade.
- If your copy of Windows came on a USB flash drive, or you have a Windows product key and no installation disc, download a Windows 10 disk image from Microsoft.
- If your copy of Windows came on a DVD, you might need to create a disk image of that DVD.

![]()
How to install Windows 10 on Mac
To install Windows, use Boot Camp Assistant, which is included with your Mac.
1. Check your Secure Boot setting
Learn how to check your Secure Boot setting. The default Secure Boot setting is Full Security. If you changed it to No Security, change it back to Full Security before installing Windows. After installing Windows, you can use any Secure Boot setting without affecting your ability to start up from Windows.
2. Use Boot Camp Assistant to create a Windows partition
Open Boot Camp Assistant, which is in the Utilities folder of your Applications folder. Follow the onscreen instructions.
- If you’re asked to insert a USB drive, plug your USB flash drive into your Mac. Boot Camp Assistant will use it to create a bootable USB drive for Windows installation.
- When Boot Camp Assistant asks you to set the size of the Windows partition, remember the minimum storage-space requirements in the previous section. Set a partition size that meets your needs, because you can’t change its size later.
3. Format the Windows (BOOTCAMP) partition
When Boot Camp Assistant finishes, your Mac restarts to the Windows installer. If the installer asks where to install Windows, select the BOOTCAMP partition and click Format. In most cases, the installer selects and formats the BOOTCAMP partition automatically.
4. Install Windows
Unplug any external devices that aren’t necessary during installation. Then click Next and follow the onscreen instructions to begin installing Windows.
5. Use the Boot Camp installer in Windows
After Windows installation completes, your Mac starts up in Windows and opens a ”Welcome to the Boot Camp installer” window. Follow the onscreen instructions to install Boot Camp and Windows support software (drivers). You will be asked to restart when done.
- If the Boot Camp installer never opens, open the Boot Camp installer manually and use it to complete Boot Camp installation.
- If you have an external display connected to a Thunderbolt 3 port on your Mac, the display will be blank (black, gray, or blue) for up to 2 minutes during installation.
How to switch between Windows and macOS
Restart, then press and hold the Option (or Alt) ⌥ key during startup to switch between Windows and macOS.
Learn more
If you have one of these Intel-based Mac models using OS X El Capitan or later, you don’t need a USB flash drive to install Windows:
- MacBook introduced in 2015 or later
- MacBook Air introduced in 2017 or later 3
- MacBook Pro introduced in 2015 or later 3
- iMac introduced in 2015 or later
- iMac Pro (all models)
- Mac Pro introduced in late 2013 or later
For more information about using Windows on your Mac, open Boot Camp Assistant and click the Open Boot Camp Help button.
1. If you’re using an iMac (Retina 5K, 27-inch, Late 2014) or iMac (27-inch, Late 2013) or iMac (27-inch, Late 2012) with a 3TB hard drive and macOS Mojave or later, learn about an alert you might see during installation.
2. For example, if your Mac has 128GB of memory, its startup disk must have at least 128GB of storage space available for Windows. To see how much memory your Mac has, choose Apple menu > About This Mac. To see how much storage space is available, click the Storage tab in the same window.
3. These Mac models were offered with 128GB hard drives as an option. Apple recommends 256GB or larger hard drives so that you can create a Boot Camp partition of at least 128GB.
Information about products not manufactured by Apple, or independent websites not controlled or tested by Apple, is provided without recommendation or endorsement. Apple assumes no responsibility with regard to the selection, performance, or use of third-party websites or products. Apple makes no representations regarding third-party website accuracy or reliability. Contact the vendor for additional information.
How to quickly switch between windows and apps on Mac

When you’re working on your Mac, the simplest shortcuts can help you do things faster and easier. Whether it’s gestures or keyboard shortcuts, there are plenty of ways to navigate your Mac and your apps. So, for more to add to your list of shortcuts, here’s how to quickly switch between windows and apps on Mac.
Switch between application windows on Mac
You likely have more than one app open at a time on your Mac. And while the Dock is handy for grabbing the app you need at the time; you can do it with one of two quick shortcuts too.
Keyboard shortcut
Hold Command + Tab and you will see a bar appear on your screen with all open apps.

Continue to hold Command and then press Tab to go through each application. You can hold Command and press Shift + Tab to go in the opposite direction.
And you can hold Command and use your left and right arrow keys too.
Release both keys when you land on the one you want and it’ll pop right to the front of your screen.
If you’re not fond of the keys being used, you can change them in your keyboard settings. Head to Apple icon > System Preferences > Keyboard from the menu bar. Click Shortcuts and select Keyboard on the left.

Trackpad gesture
If you have a Macbook and use your trackpad, you can see all open windows a bit differently. Using three fingers, swipe up on your trackpad. Then just move your pointer over the app you want to focus on, click, and it will become front and center.
Switch between windows of the same app on Mac
Along with switching between your open applications on Mac, you might want to switch between windows of the same app. For instance, you may have more than one Word document, Firefox window, or Numbers spreadsheet open at the same time.
Hold Command + ` (tilde key, to the left of 1 on your keyboard) to switch between windows of the same app.

If you hold Command and continue to click the ` key, it will move you through each open window. Just release your keys when you land on the one you want.
You can also use the trackpad gesture described above, just note that you will see all windows for all open applications.
More shortcuts
Here are some additional keyboard shortcuts you can use for your Mac in case you missed them.
Wrapping it up
Shortcuts using your keyboard or trackpad are just plain handy. It can be hard to remember them all, but once you start using certain ones daily, it’ll become such a habit that you won’t even think about it.
What are your favorite shortcuts? Which ones do you find the most useful? Let us know in the comments below or ping us on Twitter!
Mac: Shortcut for switching between two windows of the same application
I want to switch between two different windows opened in the same desktop on Mac (El Capitan). I can’t do it with cmd+tab . Does anyone knows how to do it?
None of the following shortcuts work as well: cmd+` , cmd+shift+` , cmd+number
7 Answers 7
The shortcut is defined in System Preferences > Keyboard > Shortcuts

⌘` is the default, Check the shortcut and if it’s enabled at all

Using CMD + Shift + Backtick allows you to cycle through windows. To select a specific tab in a window you can use CMD + a number .
You may have this disabled in your settings. System Preference > Keyboard > Shortcuts

This is a common issue in all [currently released] versions of 10.12 [Sierra]. Although there isn’t a solid fix for it the quickest workaround is to go to the Apple menu > System Preferences > Keyboard > Text and in the lower left corner first click the ‘+’ button then click the ‘-‘ button, close System Preferences and you should be good to go. You may need to do this after restarting each time but it only takes a second.
Using cmd+number you will switch the windows, starting in number 1 to the number of open windows
Had this problem too (MaxOS Mojave) I knew about this fix: System Preferences > Keyboard > Shortcuts > Keyboard > Move focus to next window — but could not make it work The thing is. First just click on the right side of the «Move focus to the next window» you then see the area becomes editable with a line around the symbol to the right. Then you click the combination you want and voila! I noticed when done and then clicked «restore defaults» it went back to not working again. Followed the steps again and all good. Jonny
The solution by Johnny H works in my Mojave 10.14.2. You obviously cannot assign a key combination already in use in other shortcuts.
Had this problem too (MaxOS Mojave) I knew about this fix: System Preferences > Keyboard > Shortcuts > Keyboard > Move focus to next window — but could not make it work The thing is. First just click on the right side of the «Move focus to the next window» you then see the area becomes editable with a line around the symbol to the right. Then you click the combination you want and voila! I noticed when done and then clicked «restore defaults» it went back to not working again. Followed the steps again and all good. Jonny


