- . как установить Maven на Windows?
- Автор: Алексей Баранцев
- How to install Maven on Windows 10
- Download and install Java
- Download maven
- Add System variables
- Add JAVA_HOME variable
- Add M2_HOME and MAVEN_HOME variables
- Add Maven to PATH variable
- Verify installation
- How to install Maven on Windows
- 1. JDK and JAVA_HOME
- 2. Download Apache Maven
- 3. Add MAVEN_HOME system variable
- 4. Add %MAVEN_HOME%\bin To PATH
- 5. Verification
- 6. FAQs
- References
- mkyong
- How to install Maven on Windows
- installing Maven on Windows
- Prerequisites
- Step 1. setting JAVA_HOME
- Step 2. Downloading Apache Maven
- step 3. Add M2_HOME and MAVEN_HOME
- step 4. M2_HOME To PATH
- Step 5. verify Maven
- How to install Maven on Windows 7,8 or 10?
- What you need to Install Maven in Windows
. как установить Maven на Windows?
Надеюсь, что эту инструкцию читают те, кто знает, что такое Maven, а те, кто не знает, могут почитать на официальном сайте ну или хотя бы в википедии.
Maven реализован на языке программирования Java, поэтому первым делом конечно же нужно установить Java.
Как и многие другие Java-программы, Maven не имеет специальной программы для инсталляции, его нужно просто «скачать и распаковать».
Скачать с официального сайта, берите самую последнюю версию, на выбор в формате .tar.gz или .zip (если не уверены – берите .zip).
Распаковать в произвольное место. Ну, не совсем произвольное, лучше, если в пути к этому месту не будет русских букв в названиях директорий. Нельзя сказать, что Java не умеет с этим работать, просто могут потребоваться дополнительные настройки, связанные с кодировками. Поэтому постарайтесь этого избежать, используя в названиях директорий только латиницу.
Всё, Maven готов к работе!
Но чтобы его было удобно запускать, полезно ещё настроить переменные окружения, аналогично тому, как это было описано в инструкции по установке Java. Только на этот раз надо настраивать переменную MAVEN_HOME (она должна указывать на ту директорию, куда вы распаковали Maven), а также в переменную PATH надо добавить путь к директории %MAVEN_HOME%\bin (подробнее о том, как настраиваются переменные окружения, можно почитать в инструкции по установке Java).
После того, как вы изменили переменные окружения, новые значения будут действительны только для новых запускаемых программ, уже работающие программы не узнают о том, что переменные окружения поменялись. Поэтому если у вас уже была запущенная консоль — её придётся перезапустить, чтобы изменения переменных окружения вступили в силу.
Итак, стартуем новую консоль и проверяем, что Maven доступен и работает — выполняем команду mvn :
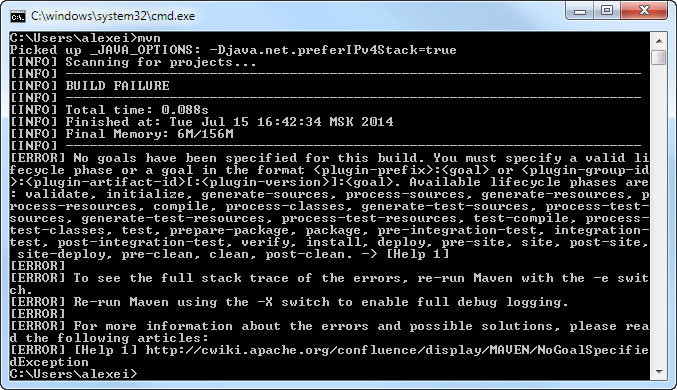
При этом, конечно, появляется сообщение об ошибке, ведь мы запускаем Maven в каком-то странном месте, где нет описания проекта, который ему нужно собирать.
Но тем не менее, он работает, и можно начинать создавать проекты. Впрочем, это уже совсем другая история.

Автор: Алексей Баранцев
Если вам понравилась эта статья, вы можете поделиться ею в социальных сетях (кнопочки ниже), а потом вернуться на главную страницу блога и почитать другие мои статьи.
Ну а если вы не согласны с чем-то или хотите что-нибудь дополнить – оставьте комментарий ниже, может быть это послужит поводом для написания новой интересной статьи.
How to install Maven on Windows 10
Maven is build tool primary for Java projects. In this tutorial I will describe how to install maven on Windows 10 operating system.
Download and install Java
To use maven we need to install Java first. If maven is used for Java projects java jdk should be installed, otherwise jre would be enough. Jdk or Jre could be found here.
Download maven
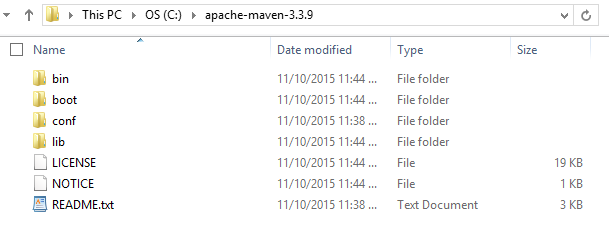
After Java (jre or jdk) is installed we need to download Apache Maven from official web site https://maven.apache.org/download.cgi. Currently the latest Maven version is 3.3.9 . So we need to download apache-maven-3.3.9-bin.zip . After archive is downloaded we need to extract it, e.g. to c:\maven
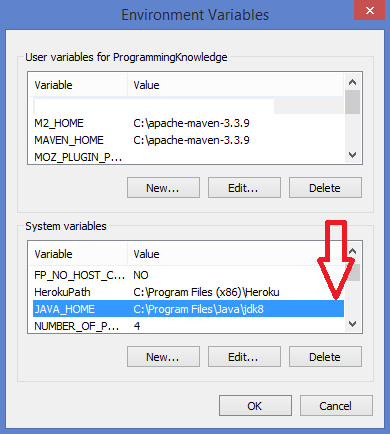
Add System variables
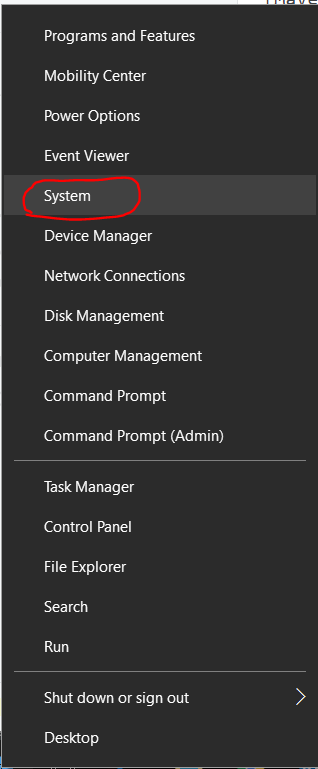
Right click on the Start button and select System :
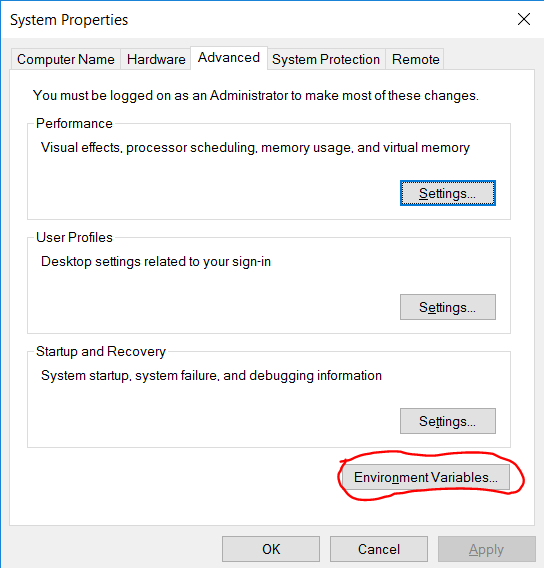
In the System window click on Advanced system settings in the left menu. System properties pop-up will be opened. Click on Environment Variables :
Now we need to add the following variables to the System variables :
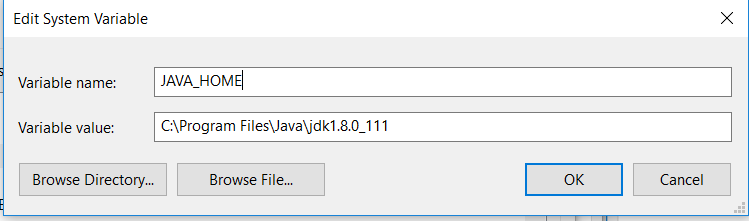
Add JAVA_HOME variable
JAVA_HOME points to the folder where java is installed and should have the value like this:
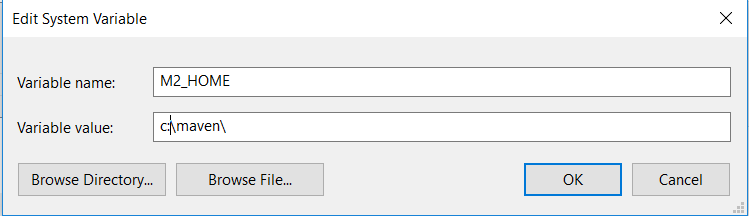
Add M2_HOME and MAVEN_HOME variables
M2_HOME and MAVEN_HOME variables should have the same value and point to the folder where maven was extracted:
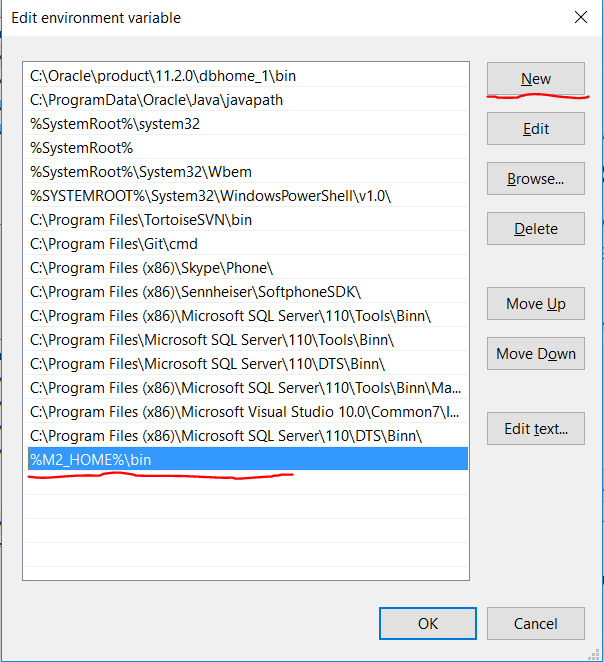
Add Maven to PATH variable
Find the PATH variable in System variables and click on Edit button. The Edit environment variable pop-up will be opened. Press the New button and add the following value:
Verify installation
Open terminal (command prompt) and enter the following:
How to install Maven on Windows
To install Apache Maven on Windows, you just need to download the Maven’s zip file, unzip it to a folder, and configure the Windows environment variables.
- Maven 3.3+ requires JDK 1.7+
- Maven 3.2 requires JDK 1.6+
- Maven 3.0/3.1 requires JDK 1.5+
1. JDK and JAVA_HOME
Make sure JDK is installed, and JAVA_HOME environment variable is configured.
2. Download Apache Maven
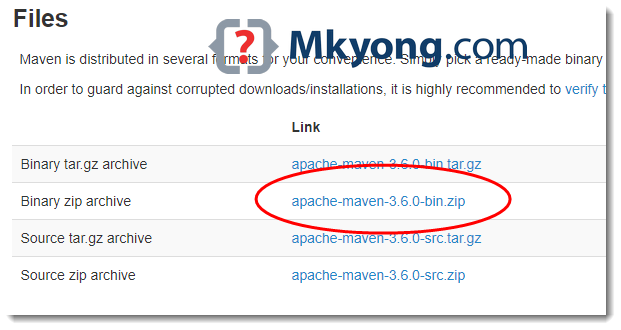
2.1 Visit Maven official website, download the Maven zip file, for example : apache-maven-3.6.0-bin.zip .
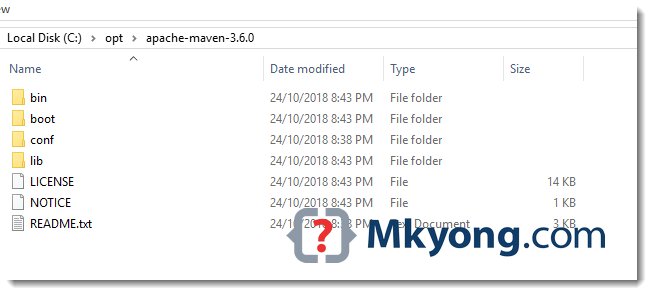
2.2 Unzip it to a folder. In this article, we are using c:\opt\apache-maven-3.6.0
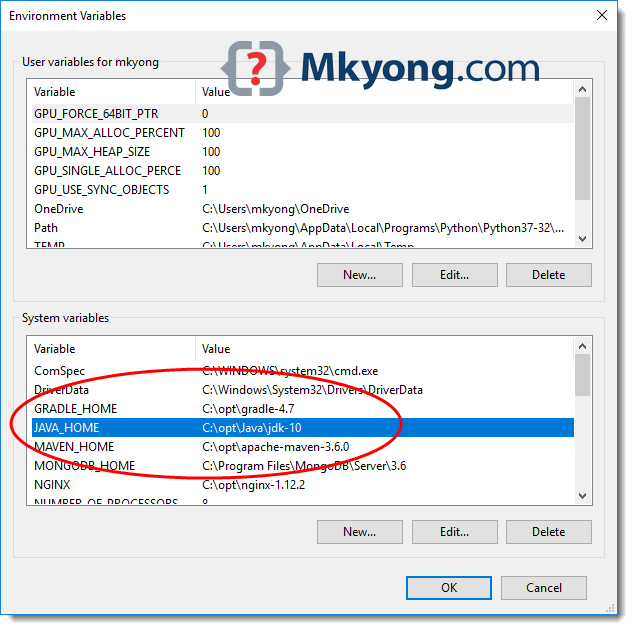
3. Add MAVEN_HOME system variable
Add a MAVEN_HOME system variables, and point it to the Maven folder.
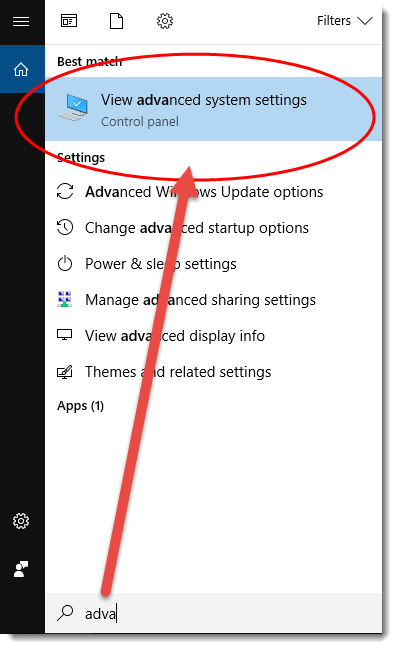
3.1 Press Windows key, type adva and clicks on the View advanced system settings
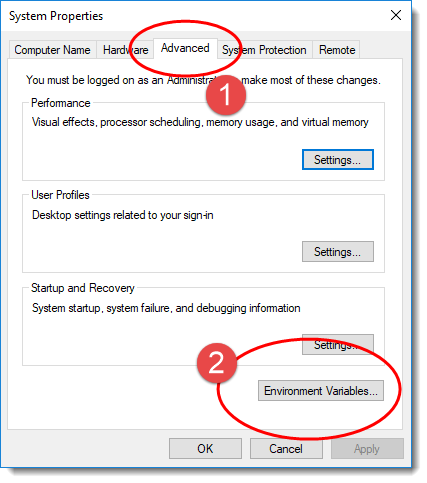
3.2 In System Properties dialog, select Advanced tab and clicks on the Environment Variables. button.
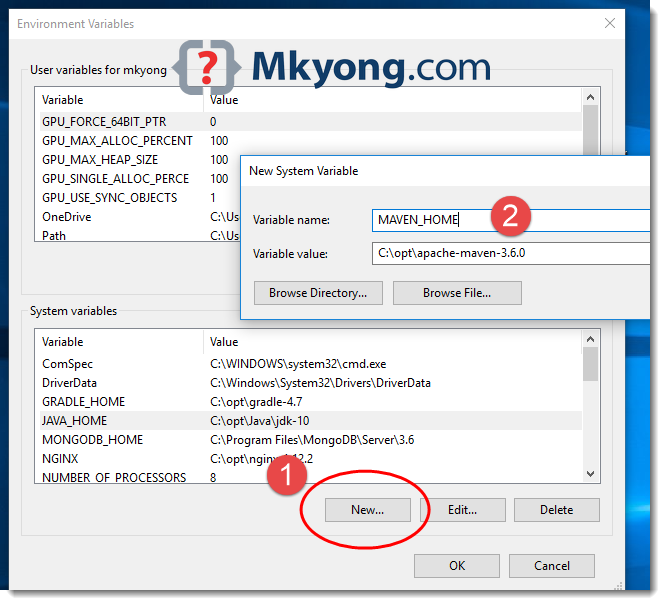
3.3 In “Environment variables” dialog, System variables , Clicks on the New. button and add a MAVEN_HOME variable and point it to c:\opt\apache-maven-3.6.0
4. Add %MAVEN_HOME%\bin To PATH
In system variables, find PATH , clicks on the Edit. button. In “Edit environment variable” dialog, clicks on the New button and add this %MAVEN_HOME%\bin

5. Verification
Done, start a new command prompt, type mvn –version :
The Apache Maven is installed successfully on Windows.
6. FAQs
6.1 ‘mvn’ is not recognized as an internal or external command?
Answer: Refer to Step 4, make sure the %MAVEN_HOME%\bin is added to the PATH system variable.
6.2 The JAVA_HOME environment variable is not defined correctly
Answer: Refer to Step 2, make sure JDK is installed and the JAVA_HOME system variable is configured.
References
mkyong
i have an error while running mvn -version saying : notrecognized command as external or internal command ,knowing that i have added MAVEN_HOME IN the system variables …so any idea how to fix it ??…thanks
Download Binary zip archive instead of Source zip archive from https://maven.apache.org/download.cgi. it worked for me.
Its working with directly adding the path , rather than setting MAVEN_HOME and then giving path in Environment varibale >> System variable > path
Thank you. This is the only thing that worked for me after some 4-5 hours of just finding a solution
anyone who still has a problem. After you do all the above things or anything you found on stackoverflow and still not working do this
Environment Vars => System Variables => path => Edit => New => C:\opt\apache-maven-3.6.2\bin
Done. Worked for me
yes this worked.Please add bin path in path
Make sure MAVEN_HOME is configured and %MAVEN_HOME%bin is added to the PATH.
Refer Step 3 and Step 4.
I had the same issue. I restarted cmd, then tried again ‘mvn -version’. It worked.
yes it worked for me
I just tried the steps mentioned in the above blog (not any comments), restarted cmd and it worked fine.
thanks a lot @Guna
Even i faced the same problem. Create a ‘mvn’ env variable it will work fine.
Run CMD as administrator and then type command mvn -version
I tried with comma and it worked but why comma?
This post helped a lot. If anyone have the following issue “Error: Could not find or load main class org.codehaus.plexus.classworlds.launcher.Launcher”. Download Binary zip archive files, Instead of downloading Source zip archives.
Thanks for your input, article is updated.
You are correct. Binary.zip should be downloaded.
Hi all:
This works in Windows 10 latest with all updates as of Dec. 22, 2017.
Unzip maven zip file to any folder.
e..g c:Program Files is recommended for Windows 10. Like into c:Program FilesApacheMaven like I gave here.
Every setup given here is fine.
Just also MAKE SURE that you do the mvn variable setting (in BOTH user and system sections to make sure it catches it everywhere, to allow you to run Maven everywhere) and and in the path, i.e. %mvn%bin.
Close command terminal window and reopen a new one.
run: mvn -v or mvn –version
Output will look like this:
Apache Maven 3.5.2 (138edd61fd100ec658bfa2d307c43b76940a5d7d; 2017-10-18T02:58:13-05:00)
Maven home: C:Program FilesApachemavenapache-maven-3.5.2-binapache-maven-3.5.2bin..
Java version: 1.8.0_131, vendor: Oracle Corporation
Java home: C:Program Files (x86)Javajdk1.8.0_131jre
Default locale: en_US, platform encoding: Cp1252
OS name: “windows 10”, version: “10.0”, arch: “x86”, family: “windows”
‘cmd’ is not recognized as an internal or external command,
operable program or batch file.
I also ran the mvn command:
e..g.
mvn clean install -Dmaven.test.skip=true
and it built my project without any errors.
How to install Maven on Windows
installing Maven on Windows
Maven is a command-line tool made for building Java (and also other) programs. We can install maven using a simple ZIP file containing a pre-compiled version of Maven for our convenience. There is no Maven installer.
In order to install maven we need to fulfill some prerequisites and set environment to run it on Windows.
Prerequisites
Maven is written in Java (and mainly used to build Java codes). So, the major prerequisite is the Java SDK.
Step 1. setting JAVA_HOME
Make sure that Java is installed in your windows operating system. Then set the Windows environment variable called “JAVA_HOME” as shown below :
Open the default installation path if the Java JDK:
The Java folder must contain the following subsirectory:
Set the JAVA_HOME Variable
Once you have the JDK installation path:
- Right-click My Computer icon on your desktop and select Properties.
- Click the Advanced tab, then click the Environment Variables button.
- Under System Variables, click New.
- Enter the variable name as JAVA_HOME.
- Enter the variable value as the installation path for the Java Development Kit.
- Click OK.
- Click Apply Changes.
Step 2. Downloading Apache Maven
Open the Maven official website and download the Maven zip file, e.g. apache-maven-3.3.9-bin.zip. Unzip the zip to the folder of you choice.
Let’s say we unzip to this folder – C:\apache-maven-3.3.9
step 3. Add M2_HOME and MAVEN_HOME

step 4. M2_HOME To PATH
Add %M2_HOME%\bin to PATH variable, so that you can run the Maven’s command line from anywhere. 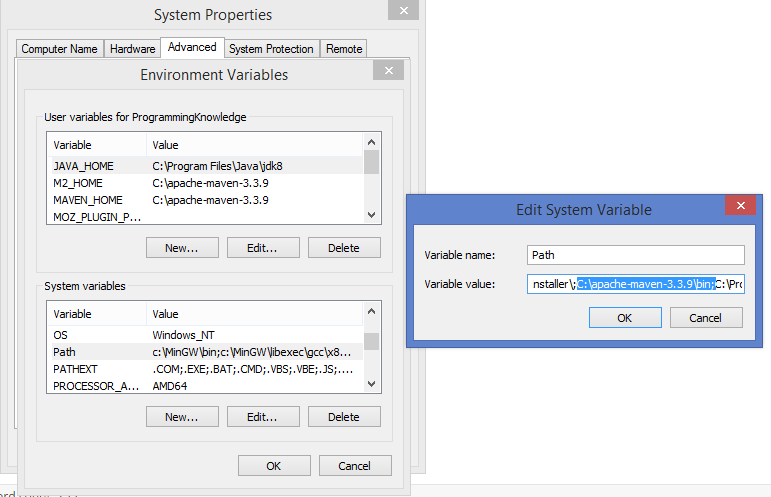
Step 5. verify Maven
run mvn –version in the command prompt.

Apache Maven is installed successfully on Windows. Enjoy!!
Video Instructions
How to install Maven on Windows 7,8 or 10?
There is no difference in installing Maven on Windows7, Windows 8, Windows 8.1 or Windows 10, you can follow the same steps to install Maven in any version Windows operating system. Installing Maven is very easy, just download the Apache Maven ZIP file from the Apache Maven Project website (https://maven.apache.org/download.cgi). You can download the apache-maven-3.3.9-bin.zip for using Maven in your 64-bit Windows machine. Remember, Maven 3.3 requires JDK 1.7 or above to run, so make sure you already installed JDK 7 or JDK8. Once you download the binary distribution of Maven, half of the job is down.
Now, you only need to extract the binary distribution and add the bin folder in PATH or add a couple of environment variable e.g. M2, M2_HOME into your Windows machine.
Btw, if you are just starting with Maven, I suggest you to first go through a comprehensive Maven course like Apache Maven: Beginner to Guru to learn some fundamentals. It will not only help you to build and deploy your Java and Spring Boot projects using Maven but also learn Maven itself in depth.
What you need to Install Maven in Windows
1) Make sure JDK is already installed. You need JDK 1.7 or above to run Maven 3.3. If you don’t know how to install Java, see this guide for step by step tutorial.
2) Make sure that the JAVA_HOME environment variable is defined and should point to the installation directory of Java. Maven uses this environment variable to find the Java installation directory. See here to learn more about the JAVA_HOME environment variable.
Once you ensure that the above is in place, you need to follow the below steps to install Maven on your Windows machine.
1) Setup following environment variables
I am using Cygwin that’s why I am using the export command if you are using DOS command prompt then you should use the «set» command version shown below.
Though simply adding the bin directory of Maven installation folder to PATH is enough to run the «mvn» command, it’s better to define well-known maven environment variables like M2_HOME and MAVEN_OPTS .
The M2_HOME is equivalent to JAVA_HOME and should point to the installation directory of Maven. On the other hand, MAVEN_OPTS is used by Maven script to fetch additional JVM arguments provided by the user. You can use this environment variable to increase the heap size of Maven by supplying JVM memory arguments e.g. -Xms and -Xmx.
You can also read Maven Essentials to learn more about how Maven uses these environment variables.

One you have to add bin directory of Maven folder, either directly or indirectly via an M2 environment variable, you should be able to run the mvn command from Cygwin or DOS command prompt. If Maven is setup correctly you will see similar output as shown below:
You can see that it prints the Apache Maven version, along with Maven home, Java version, Java home and OS name.
At this point of time installation of Apache Maven is completed successfully and you are now ready to create and build Maven based Java project using different arch types. You can also use this locally installed Maven in eclipse instead of the default one installed by M2Eclipse plugin.


