- How to Inject Drivers into a Windows 10 WIM/ISO Install Image?
- How to Inject Driver into a Windows 10 Install Image using PowerShell?
- Adding Drivers to an Offline Windows Server 2012 R2 Image Using DISM
- Update drivers in Windows 10
- Before you begin
- Update the device driver
- Reinstall the device driver
- More help
- Developing, Testing, and Deploying Drivers
- Additional Videos
- Add and Remove Drivers to an offline Windows Image
- Driver types
- Add drivers to an offline Windows image
- Remove drivers from an offline Windows image
- Add drivers to an offline Windows image by using an unattended answer file
How to Inject Drivers into a Windows 10 WIM/ISO Install Image?
In this article, we will show you how to add the necessary device drivers directly into the Windows installation image. The integration of the device drivers into your offline Windows image is widely used when you need to deploy a large number of workstations and servers on the same hardware. Instead of manually installing specific drivers (including AHCI/ RAID/ NVMe) on each device, you can significantly simplify and accelerate OS deployment process by integrating the drivers directly into the Driver Store of the Windows installation image in the ISO/WIM or the VHD/VHDX file. When installing such an image, the Plug and Play service (PnP) will automatically install the necessary drivers for the detected hardware.
This manual is about the integration of device drivers into a Windows image and can be used both on desktop editions of Windows 10, Windows 8.1 and on Windows Server 2016, 2012 R2.
In modern Windows editions you can add drivers to the installation ISO image in two ways:
- using the DISM utility;
- using the PowerShell CLI.
In fact, both techniques perform the same operation: add additional drivers into the offline Windows image. How to use it is a matter of personal administrator preference. Let us consider in more detail both ways on the example of integrating drivers into the Windows 10 installation image.
How to Inject Driver into a Windows 10 Install Image using PowerShell?
First of all you need to download and place all the necessary device drivers in one directory (for each driver you need to create a separate folder). Please note that many vendors (including Dell, HP) supply their drivers in the form of self-extracting exe or zip archive files. Such archives must be unpacked to local drive so that the directory with drivers contains inf, cat and sys files.
Before you start, create the following directory structure on your local drive:
- The Drivers folder – it contains unpacked driver files for your Windows 10 edition (which are supposed to be integrated into the install media);
List all Windows editions contained in the Install.wim file using the Get-WindowsImage PowerShell cmdlet. This is necessary in order to specify the Widows edition into which it is planned to integrate the additional drivers.
Get-WindowsImage -ImagePath C:\WinWork\ISO\install.wim
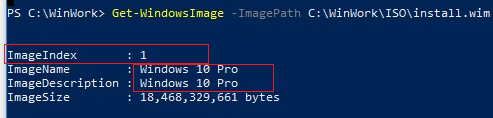
In our example, the WIM file contains only one Windows 10 Pro edition with the index 1 (ImageIndex: 1).
Next you need to mount the image of the selected Windows edition in the directory Mount. The Windows image index, which you need to mount, must be specified as an argument of the Index parameter:
Mount-WindowsImage -Path C:\WinWork\Mount\ -ImagePath C:\WinWork\ISO\install.wim -Index 1

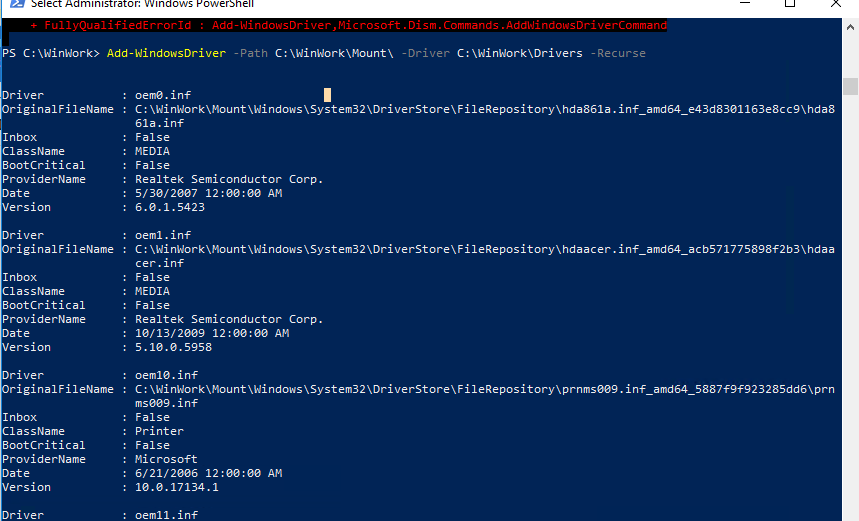
After the image is mounted, you can add drivers to it from the Drivers directory using the command:
Add-WindowsDriver -Path C:\WinWork\Mount\ -Driver C:\WinWork\Drivers -Recurse
The Add-WindowsDriver cmdlet will recursively search (the -Recurse parameter) the specified folder for all *.inf files with driver description. According to the description in the inf file, the cmdlet will add the dependent INF, DLL, CAT, PNF, etc. files to the Driver Store of your Windows image.
So, the drivers are copied, and the current image can be unmounted with saving changes:
Dismount-WindowsImage -Path C:\WinWork\Mount\ –Save

In the above example, we added drivers to the Install.wim image file. This is the Windows image that will be deployed to a computer local disk. If you need to add drivers to a Windows boot image (from which the computer boots when you install Windows), you need to add drivers to the Boot.wim file. This is usually necessary when installing Windows, the computer doesn’t detect local hard drives or doesn’t connect to LAN. Usually, only drivers of disk controllers and network adapters need to be integrated into the boot.wim image.
You can convert your install.wim file containing the Windows installation image with integrated drivers into the install.esd format using the DISM compress option:
DISM /Export-Image /SourceImageFile:C:\WinWork\ISO\install.wim /SourceIndex:1 /DestinationImageFile:C:\WinWork\ISO\install.esd /Compress:recovery
It remains to create an ISO file using Dism++ or the oscdimg command and write it to a disk or USB flash drive:
oscdimg -n -m -bc:\ISO\boot\etfsboot.com C:\ISO C:\new_win10pro_image.iso
Adding Drivers to an Offline Windows Server 2012 R2 Image Using DISM
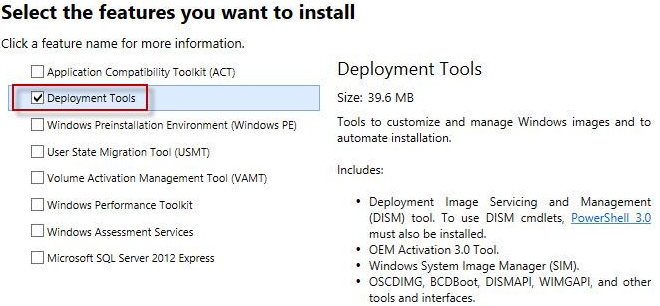
Now we will show an example of integrating drivers into the install image of Windows Server 2012 R2. If you are building an image on Windows 8.1, you will need to download and install Windows 8 ADK (http://www.microsoft.com/en-us/download/details.aspx?id=30652) to continue working with the latest version of DISM. You need to install the Deployment Tools component.
Use the same directory structure: Drivers (drivers and *.inf files are stored), ISO (unpacked image of Windows Server 2012 R2), Mount (image mount directory). It is assumed that in the install.wim file we are interested in the Windows Server 2012 R2 Datacenter edition with index 3.
Mount the install.wim installation image:
dism /Mount-Wim /WimFile:c:\iso\sources\install.wim /Index:3 /MountDir:c:\mount
Run a recursive search and integration of the new drivers into the driver store of the Windows Server 2012 R2 image:
dism /image:c:\mount /Add-Driver «/driver:c:\drivers\» /recurse
Save the changes to the WIM image:
dism /unmount-wim /mountdir:d:\mount /commit
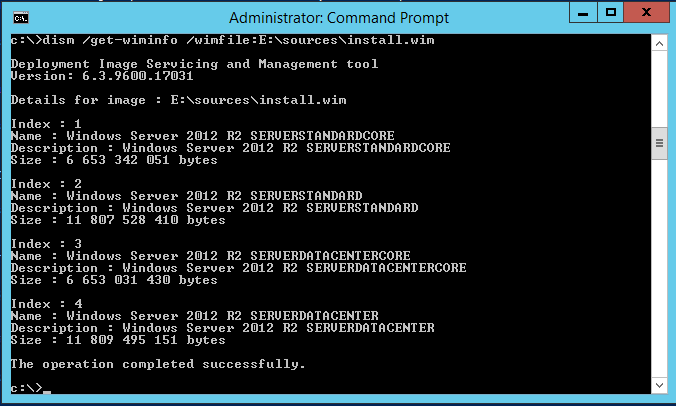
If you need to add drivers to all Windows Server editions contained in the wim file, these operations must be performed for all indexes of OS versions that the command returned:
dism /get-wiminfo /wimfile:d:\install.wim
In addition to driver integration, it is usually necessary to inject security updates to the Windows image to be installed (How to add updates into the Windows installation image). This will increase the security of your OS immediately after the installation. It remains to write the resulting installation image to the DVD disk or USB flash drive or convert it to the ISO image.
Update drivers in Windows 10
Before you begin
Driver updates for Windows 10, along with many devices, such as network adapters, monitors, printers, and video cards, are automatically downloaded and installed through Windows Update. You probably already have the most recent drivers, but if you’d like to manually update or reinstall a driver, here’s how: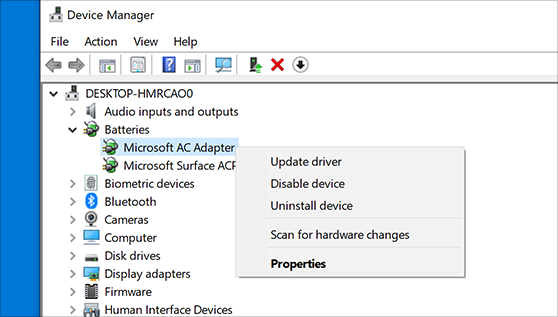
Update the device driver
In the search box on the taskbar, enter device manager, then select Device Manager.
Select a category to see names of devices, then right-click (or press and hold) the one you’d like to update.
Select Search automatically for updated driver software.
Select Update Driver.
If Windows doesn’t find a new driver, you can try looking for one on the device manufacturer’s website and follow their instructions.
Reinstall the device driver
In the search box on the taskbar, enter device manager, then select Device Manager.
Right-click (or press and hold) the name of the device, and select Uninstall.
Restart your PC.
Windows will attempt to reinstall the driver.
More help
If you can’t see the desktop and instead see a blue, black, or blank screen, see Troubleshoot blue screen errors or Troubleshoot black or blank screen errors.
Developing, Testing, and Deploying Drivers
The Windows driver development environment and the Windows debuggers are integrated into Microsoft Visual Studio. In this integrated driver development environment, most of the tools you need for coding, building, packaging, deploying, and testing a driver are available in the Visual Studio user interface.
To set up the integrated development environment, first install Visual Studio and then install the WDK. You can find information about how to get Visual Studio and the WDK on the WDK setup and download page. The Debugging Tools for Windows are included with the WDK installation.
The WDKВ uses MSBuild.exe, which is available both in the Visual Studio user interface and as a command-line tool. Drivers created in the Visual Studio environment use Project and Solution files to describe a project or group of projects. The Visual Studio environment provides a tool for converting legacy Sources and Dirs files to Project and Solution files.
The Visual Studio environment provides templates for:
- New drivers
- Driver packages
- New tests
- Enhancement of existing tests
- Custom driver deployment scripts
In the Visual Studio environment, you can configure the build process so that it automatically creates and signs a driver package. Static and run-time analysis tools are available in Visual Studio. You can configure a target computer for testing your driver and automatically deploy your driver to the target computer each time you rebuild. You can choose from an extensive set of run-time tests, and you can write your own tests.
The topics in this section show you how to use Visual Studio to perform several of the tasks involved in driver development, deployment, and testing.
Additional Videos
You’ll find videos on the following pages in the Windows driver docs:
Add and Remove Drivers to an offline Windows Image
You can use DISM to install or remove driver (.inf) files in an offline Windows or WinPE image. You can either add or remove the drivers directly by using the command prompt, or apply an unattended answer file to a mounted .wim, .ffu, .vhd, or .vhdx file.
When you use DISM to install a device driver to an offline image, the device driver is added to the driver store in the offline image. When the image is booted, Plug and Play (PnP) runs and associates the drivers in the store to the corresponding devices on the computer.
To add drivers to a WindowsВ 10 image offline, you must use a technician computer running WindowsВ 10, Windows ServerВ 2016, or Windows Preinstallation Environment (WinPE) for WindowsВ 10. Driver signature verification may fail when you add a driver to a WindowsВ 10 image offline from a technician computer running any other operating system.
To learn how to add a driver on a running Windows PC, see Add a driver online in audit mode or Install a plug and play device. To learn how to add a driver to a PC running WinPE, see Drvload command line options.
Driver types
- .inf-style drivers: Many drivers include an information file (with an .inf extension) to help install the driver. These can be installed using tools described in this topic.
- .exe-style drivers: Drivers without an .inf file often must be installed like typical Windows desktop applications. To learn how to add these, see Add a driver online in Audit Mode
- Boot-critical drivers: Graphics and storage drivers may sometimes need to be added to the Windows image (as shown in this topic), as well as the Windows PE image, and in the Windows recovery (WinRE) image.
Add drivers to an offline Windows image
To add drivers to an offline image, you have to mount an image prior to adding drivers.
If you’re adding drivers to a WinPE image, you can add them to the WinPE image in the output folder you specified when you ran copype, for example: C:\WinPE_amd64\media\sources\boot.wim . This ensures that drivers will be included in WinPE each time you build WinPE media from that folder.
- Mount a Windows image. For example:
- Add a driver to the image.
To install all of the drivers from a folder and all its subfolders, point to the folder and use the /Recurse option.
To see all DISM driver servicing command line options, see DISM driver servicing command-line options.
Using /Recurse can be handy, but it’s easy to bloat your image with it. Some driver packages include multiple .inf driver packages, which often share payload files from the same folder. During installation, each .inf driver package is expanded into a separate folder. Each individual folder has a copy of the payload files. We’ve seen cases where a popular driver in a 900MB folder added 10GB to images when added with the /Recurse option.
To install an unsigned driver, use /ForceUnsigned to override the requirement that drivers installed on X64-based computers must have a digital signature.
- Check to see if the driver was added. Drivers added to the Windows image are named Oem*.inf. This guarantees unique naming for newly added drivers. For example, the files MyDriver1.inf and MyDriver2.inf are renamed Oem0.inf and Oem1.inf.
- Commit the changes and unmount the image.
Remove drivers from an offline Windows image
- At an elevated command prompt, mount the offline Windows image:
- Remove a specific driver from the image. Multiple drivers can also be removed on one command line.
Removing a boot-critical driver package can make the offline Windows image unbootable. For more information, see DISM Driver Servicing Command-Line Options. пїЅ
- Commit the changes and unmount the image.
Add drivers to an offline Windows image by using an unattended answer file
- Gather the device driver .inf files that you intend to install on the Windows image.
All drivers in the directory and subdirectories that are referenced in the answer file are added to the image. You should manage the answer file and these directories carefully to address concerns about increasing the size of the image with unnecessary driver packages.
- Use WindowsВ System Image Manager (WindowsВ SIM) to create an answer file that contains the paths to the device drivers that you want to install.
- Add the Microsoft-Windows-PnpCustomizationsNonWinPE\DriverPaths\PathAndCredentials\Credentials component to your answer file in the offlineServicing configuration pass.
For each location that you intend to access, add a separate PathAndCredentials list item by right-clicking on DriverPaths in the Answer File pane and clicking Insert New PathAndCredentials.
See Configure components and settings in an answer file for information on how to modify an answer file.
- For each path in Microsoft-Windows-PnpCustomizationsNonWinPE , specify the path to the device driver and the credentials that are used to access the file, if the file is on a network share.
When you include multiple device driver paths by adding multiple PathAndCredentials list items, you must increment the value of Key for each path. For example, you can add two separate driver paths where the value of Key for the first path is equal to 1 and the value of Key for the second path is equal to 2.
- Save the answer file and exit WindowsВ SIM. The answer file must resemble the following sample.
- Mount the Windows image that you intend to install the drivers to by using DISM:
If you’re working with a VHD or FFU, specify /Index:1 .
- Apply the answer file to the mounted Windows image:
For more information about how to apply an answer file, see DISM Unattended Servicing Command-Line Options.
The .inf files referenced in the path in the answer file are added to the Windows image.
- Check to see if the driver was added. Drivers added to the Windows image are named Oem*.inf. This guarantees unique naming for newly added drivers. For example, the files MyDriver1.inf and MyDriver2.inf are renamed Oem0.inf and Oem1.inf.
For example, type:
- Unmount the .wim file and commit the changes. For example, type:
If you need drivers for WinPE to see the local hard disk drive or a network, you must use the windowsPE configuration pass of an answer file to add drivers to the WinPE driver store and to reflect boot-critical drivers required by WinPE. For more information, see Add Device Drivers to Windows During Windows Setup.


