Домашний linux сервер своими руками
Хочется поделиться с хабросооществом информацией о том как я собирал домашний сервер.

Из софта на домашнем сервере будет «крутиться» следующий набор:
- torrent клиент с web-мордой
- DHCP — раздаем ip адреса и сетевые настройки
- TFTP — для сетевой загрузки
- OpenVPN — для хождения в сеть с нетбука из недоверенных сетей
- FTP/Samba/NFS — сетевые шары для доступа с домашних машин
- Radius — для WPA2 авторизации
- DigiTemp — мониторинг домашней температуры
Аппаратная часть
При выборе аппаратной части, вариантов было несколько:
- старенький комп
- самосбор на базе mini-ITX
- тонкий клиент HP T5000
- тонкий клиент на базе Neoware CA2
Первый вариант был сразу же отброшен из-за шума, пыли и энергопотребления. Второй был заказан, пока шли комплектующие, я успел передумать (захотелось шум и энергопотребление свести до минимума). В итоге, на Ebay были куплены тонкие клиенты HP t5000 и Neoware CA2. Месяц спустя пришли тонкие клиенты и из двух, после долгих размышлений, был выбран Neoware CA2. В него идеально поместился 2.5′ HDD и вторая сетевая карта.
После допиливания, в буквальном смысле, Neoware CA2 я принялся ставить на него Ubuntu 9.10 с офисного TFTP сервера. Установку производил самую минимальную. Если бы не было набора для сетевой установки, ставил бы Debian с USB CD-ROM и netinstall диска. Сам я ярый фанат RHEL/CentOS, но на домашний сервер решил ставить что-то из debian семейства, для расширения кругозора.
Torrent клиент и вебморда
Теперь перейдем к установке torrent клиента и вебморды. Была выбрана связка rtorrent + rutorrent, установка из репозитариев была отметена сразу, т.к. «родной» пакет был собран без xmlrpc-c который расширяет функционал rutorrent. Ниже фактически, скрипт для авто-установки rtorrent+rutorrent+lighttpd+php.
Устанавливаем всё что необходимо для компиляции xmlrpc-c, libtorrent, rtorrent
apt-get install checkinstall subversion build-essential make autoconf autotools-dev automake libtool libcurl4-openssl-dev libsigc++-2.0-dev pkg-config libncurses5-dev
apt-get remove rtorrent libtorrent11 libxmlrpc-c3 libxmlrpc-c3-dev libxmlrpc-core-c3 libxmlrpc-core-c3-dev
Компилируем и «заворачиваем» в .deb пакет xmlrpc-c, libtorrent, rtorrent
svn co xmlrpc-c.svn.sourceforge.net/svnroot/xmlrpc-c/advanced xmlrpc-c
cd xmlrpc-c
./configure —prefix=/usr && make && checkinstall -D
cd ..
wget libtorrent.rakshasa.no/downloads/libtorrent-0.12.6.tar.gz
tar zxfv libtorrent-0.12.6.tar.gz
cd libtorrent-0.12.6
rm -f scripts/
./autogen.sh && ./configure —prefix=/usr && make && checkinstall -D
cd ..
wget libtorrent.rakshasa.no/downloads/rtorrent-0.8.6.tar.gz
tar zxfv rtorrent-0.8.6.tar.gz
cd rtorrent-0.8.6
rm -f scripts/
./autogen.sh && ./configure —with-xmlrpc-c —prefix=/usr && make && checkinstall -D
К сожалению, rtorrent не умеет работать в режиме daemon, по этому будем использовать screen
apt-get install screen -y
wget libtorrent.rakshasa.no/raw-attachment/wiki/RTorrentCommonTasks/rtorrentInit.sh —output-document=/etc/init.d/rtorrent
chmod +x /etc/init.d/rtorrent
sed -i ‘s/»user»/»torrents»/’ /etc/init.d/rtorrent
update-rc.d rtorrent defaults
useradd -d /torrents -m torrents
Создаем конфиг и папки для сессий и готовых торрент закачек, после чего стартуем rtorrent.
mkdir /torrents/.rtorrent_session
cat >> /torrents/.rtorrent.rc
Теперь займемся вебмордой rutorrent. Для работы rutorrent необходим вебсервер и интерпретатор php.
apt-get install lighttpd php5-cgi php5-cli php5-curl curl -y
lighty-enable-mod fastcgi
echo ‘server.modules += ( «mod_scgi» )’ >> /etc/lighttpd/lighttpd.conf
cat >> /etc/lighttpd/lighttpd.conf
( «127.0.0.1» =>
(
«host» => «127.0.0.1»,
«port» => 5000,
«check-local» => «disable»
)
)
)
EOF
/etc/init.d/lighttpd force-reload
Вебсервер готов, теперь будем ставить rutorrent и несколько полезных плагинов к нему.
cd /var/www/
svn checkout rutorrent.googlecode.com/svn/trunk/rutorrent
cd /var/www/rutorrent/plugins/
svn checkout rutorrent.googlecode.com/svn/trunk/plugins/tracklabels
svn checkout rutorrent.googlecode.com/svn/trunk/plugins/cookies
svn checkout rutorrent.googlecode.com/svn/trunk/plugins/autotools
svn checkout rutorrent.googlecode.com/svn/trunk/plugins/erasedata
chown -R www-data:www-data /var/www/
Теперь можно заходить по server_ip/rutorrent и начинать пользоваться.
Теперь установим DHCP сервер и создадим для него конфиг таким образом чтобы клиенты получали:
router 192.168.1.1
dns сервер 8.8.8.8
сервер времени time.nist.gov
tftp сервер 192.168.1.1
и для примера фиксированная выдача 192.168.1.100 клиенту с MAC-адресом 00:1B:FC:33:F0:25
aptitude install dhcp3-server
cat >> /etc/dhcp3/dhcpd.conf
строчки с option-150 нужны для моего VoIP телефона Cisco 7940.
TFTP и сетевая установка
aptitude install xinetd atftpd atftp
cat >> /etc/xinetd.d/tftp
Теперь проверим, работает ли tftp сервер
root@dvr:
# echo bla > /tftpboot/123
root@dvr:
# atftp 127.0.0.1
tftp> get 123
tftp>
root@dvr:
# cat 123
bla
Всё нормально, теперь создадим netinstall наборы для нескольких ОС: Ubuntu karmic, Ubuntu lucid, Debian lenny, Debian sid, Debian squeeze, Fedora 13, CentOS 5.5, Mandriva 2010.0, Suse 11.2, Slackware 13.1, Hardware Detection Tool, memtest и MHDD. Для этого предлагаю использовать слегка модифицированный скрипт который я взял с HowtoForge.
apt-get install lftp -y
wget itblog.su/tftpboot_installs.sh
bash tftpboot_installs.sh
Теперь добавим SystemRescueCd в PXE меню
wget «http://downloads.sourceforge.net/project/systemrescuecd/sysresccd-x86/1.6.3/systemrescuecd-x86-1.6.3.iso?use_mirror=citylan»
mount -o loop systemrescuecd-x86-1.6.1.iso /mnt/
cp /mnt/sysrcd.* /var/www/
cp /mnt/isolinux/initram.igz /tftpboot/
cp /mnt/isolinux/rescuecd /tftpboot/
cat >> /tftpboot/pxelinux.cfg/default
Без особого труда в это меню можно добавить продукты Acronis, инсталляцию и запуск Windows XP и прочее.
Вот так будет выглядеть наше меню: 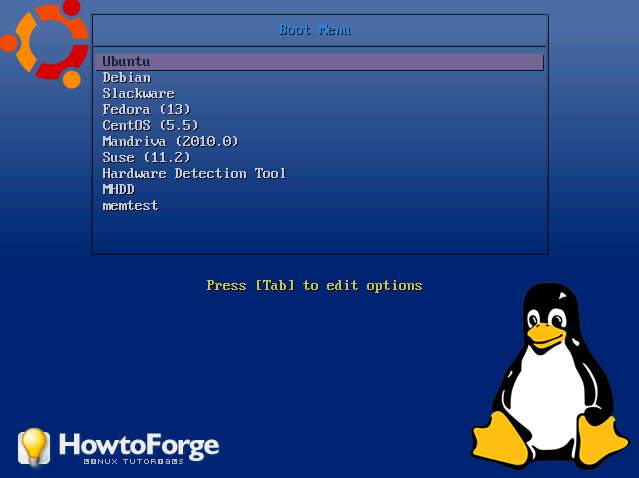
Продолжение в следующей части. А именно:
- OpenVPN сервер для «хождения» в сеть из не доверенных сетей (например из гостиницы)
- FTP/Samba/NFS сетевые шары
- Radius для авторизации wi-fi клиентов
- DigiTemp зачатки умного дома, мониторинг температуры в квартире и за окном
- festival — говорящий будильник
- бакапы с хостинга
и подытожит статью скрипт который всё это установит в «два клика».
С удовольствием выслушаю замечания и дополнения.
Источник
How linux server configure
Linux Server Configuration
This is a set of instructions on how to set up a Ubuntu Linux server to host a simple web application built with Flask.
The instructions are written specifically for hosting an app called Nuevo México on an Amazon Lightsail instance but can easily be adapted to work for an alternative application and/or server provider.
1. Details specific to the server I set up
The IP address is 34.207.77.81.
The SSH port used is 2200 .
2. Software to install during the configuration
- Apache2
- mod_wsgi
- PostgreSQL
- git
- pip
- virtualenv
- httplib2
- Python Requests
- oauth2client
- SQLAlchemy
- Flask
- libpq-dev
- Psycopg2
3. Configuration steps
Create an instance with Amazon Lightsail
Sign in to Amazon Lightsail using an Amazon Web Services account
Follow the ‘Create an instance’ link
Choose the ‘OS Only’ and ‘Ubuntu 16.04 LTS’ options
Choose a payment plan
Give the instance a unique name and click ‘Create’
Wait for the instance to start up
Connect to the instance on a local machine
Note: While Amazon Lightsail provides a broswer-based connection method, this will no longer work once the SSH port is changed (see below). The following steps outline how to connect to the instance via the Terminal program on Mac OS machines (this can also be done on a Windows machine with a program such as PuTTY).
Download the instance’s private key by navigating to the Amazon Lightsail ‘Account page’
Click on ‘Download default key’
A file called LightsailDefaultPrivateKey.pem or LightsailDefaultPrivateKey-YOUR-AWS-REGION.pem will be downloaded; open this in a text editor
Copy the text and put it in a file called lightrail_key.rsa in the local
Log in with the following command: ssh -i
/.ssh/lightrail_key.rsa ubuntu@XX.XX.XX.XX , where XX.XX.XX.XX is the public IP address of the instance (note that Lightsail will not allow someone to log in as root ; ubuntu is the default user for Lightsail instances)
Upgrade currently installed packages
Notify the system of what package updates are available by running sudo apt-get update
Download available package updates by running sudo apt-get upgrade
Configure the firewall
Start by changing the SSH port from 22 to 2200 (open up the /etc/ssh/sshd_config file, change the port number on line 5 to 2200 , then restart SSH by running sudo service ssh restart ; restarting SSH is a very important step!)
Check to see if the ufw (the preinstalled ubuntu firewall) is active by running sudo ufw status
Run sudo ufw default deny incoming to set the ufw firewall to block everything coming in
Run sudo ufw default allow outgoing to set the ufw firewall to allow everything outgoing
Run sudo ufw allow ssh to set the ufw firewall to allow SSH
Run sudo ufw allow 2200/tcp to allow all tcp connections for port 2200 so that SSH will work
Run sudo ufw allow www to set the ufw firewall to allow a basic HTTP server
Run sudo ufw allow 123/udp to set the ufw firewall to allow NTP
Run sudo ufw deny 22 to deny port 22 (deny this port since it is not being used for anything; it is the default port for SSH, but this virtual machine has now been configured so that SSH uses port 2200 )
Run sudo ufw enable to enable the ufw firewall
Run sudo ufw status to check which ports are open and to see if the ufw is active; if done correctly, it should look like this:
Update the external (Amazon Lightsail) firewall on the browser by clicking on the ‘Manage’ option, then the ‘Networking’ tab, and then changing the firewall configuration to match the internal firewall settings above (only ports 80 (TCP), 123 (UDP), and 2200 (TCP) should be allowed; make sure to deny the default port 22 )
Now, to login (on a Mac), open up the Terminal and run:
/.ssh/lightrail_key.rsa -p 2200 ubuntu@XX.XX.XX.XX , where XX.XX.XX.XX is the public IP address of the instance
Note: As mentioned above, connecting to the instance through a browser now no longer works; this is because Lightsail’s browser-based SSH access only works through port 22 , which is now denied.
Create a new user named grader
Run sudo adduser grader
Enter in a new UNIX password (twice) when prompted
Fill out information for the new grader user
To switch to the grader user, run su — grader , and enter the password
Give grader user sudo permissions
Run sudo visudo
Search for a line that looks like this:
root ALL=(ALL:ALL) ALL
Add the following line below this one:
grader ALL=(ALL:ALL) ALL
Save and close the visudo file
To verify that grader has sudo permissions, su as grader (run su — grader ), enter the password, and run sudo -l ; after entering in the password (again), a line like the following should appear, meaning grader has sudo permissions:
Allow grader to log in to the virtual machine
Run ssh-keygen on the local machine
Choose a file name for the key pair (such as grader_key)
Enter in a passphrase twice (two files will be generated; the second one will end in .pub)
Log in to the virtual machine
Switch to grader ‘s home directory, and create a new directory called .ssh (run mkdir .ssh )
Run touch .ssh/authorized_keys
On the local machine, run cat
Copy the contents of the file, and paste them in the .ssh/authorized_keys file on the virtual machine
Run chmod 700 .ssh on the virtual machine
Run chmod 644 .ssh/authorized_keys on the virtual machine
Make sure key-based authentication is forced (log in as grader , open the /etc/ssh/sshd_config file, and find the line that says, ‘# Change to no to disable tunnelled clear text passwords’; if the next line says, ‘PasswordAuthentication yes’, change the ‘yes’ to ‘no’; save and exit the file; run sudo service ssh restart )
Log in as the grader using the following command:
/.ssh/grader_key -p 2200 grader@XX.XX.XX.XX
Note that a pop-up window will ask for grader ‘s password.
Configure the local timezone to UTC
Run sudo dpkg-reconfigure tzdata , and follow the instructions (UTC is under the ‘None of the above’ category)
Test to make sure the timezone is configured correctly by running date
Install and configure Apache
Run sudo apt-get install apache2 to install Apache
Check to make sure it worked by using the public IP of the Amazon Lightsail instance as as a URL in a browser; if Apache is working correctly, a page with the title ‘Apache2 Ubuntu Default Page’ should load
Install the mod_wsgi package (which is a tool that allows Apache to serve Flask applications) along with python-dev (a package with header files required when building Python extensions); use the following command:
sudo apt-get install libapache2-mod-wsgi python-dev
Make sure mod_wsgi is enabled by running sudo a2enmod wsgi
Install PostgreSQL and make sure PostgreSQL is not allowing remote connections
Install PostgreSQL by running sudo apt-get install postgresql
Open the /etc/postgresql/9.5/main/pg_hba.conf file
Make sure it looks like this (comments have been removed here for easier reading):
Make sure Python is installed
Python should already be installed on a machine running Ubuntu 16.04. To verify, simply run python . Something like the following should appear:
Create a new PostgreSQL user named catalog with limited permissions
PostgreSQL creates a Linux user with the name postgres during installation; switch to this user by running sudo su — postgres (for security reasons, it is important to only use the postgres user for accessing the PostgreSQL software)
Connect to psql (the terminal for interacting with PostgreSQL) by running psql
Create the catalog user by running CREATE ROLE catalog WITH LOGIN;
Next, give the catalog user the ability to create databases: ALTER ROLE catalog CREATEDB;
Finally, give the catalog user a password by running \password catalog
Check to make sure the catalog user was created by running \du ; a table of sorts will be returned, and it should look like this:
Exit psql by running \q
Switch back to the ubuntu user by running exit
Create a Linux user called catalog and a new PostgreSQL database
Create a new Linux user called catalog :
- run sudo adduser catalog
- enter in a new UNIX password (twice) when prompted
- fill out information for catalog
Give the catalog user sudo permissions:
run sudo visudo
search for a line that looks like this: root ALL=(ALL:ALL) ALL
add the following line below this one: catalog ALL=(ALL:ALL) ALL
save and close the visudo file
to verify that catalog has sudo permissions, su as catalog (run sudo su — catalog ), and run sudo -l
after entering in the UNIX password, a line like the following should appear (meaning catalog has sudo permissions):
While logged in as catalog , create a database called catalog by running createdb catalog
Run psql and then run \l to see that the new database has been created
Switch back to the ubuntu user by running exit
Install git and clone the catalog project
Run sudo apt-get install git
Create a directory called ‘nuevoMexico’ in the /var/www/ directory
Change to the ‘nuevoMexico’ directory, and clone the catalog project:
sudo git clone https://github.com/bencam/nuevo-mexico.git nuevoMexico
Note: the «nuevoMexico» part at the end simply changes the directory name for the repository to ‘nuevoMexico’ instead of the default ‘nuevo-mexico’; this avoids problems later on as Apache does not like hyphens very much
Change the ownership of the ‘nuevoMexico’ directory to ubuntu by running (while in /var/www):
sudo chown -R ubuntu:ubuntu nuevoMexico/
Change to the /var/www/nuevoMexico/nuevoMexico directory
Change the name of the application.py file to __init__.py by running mv application.py __init__.py
In __init__.py, find line 508:
Change this line to:
Delete, rename, or move the database_setup.py file to another directory
Rename the database_setup_postgres.py file to database_setup.py
Note: the default database for the neuvo-mexico application is SQLite. The original database_setup.py file in the repository is configured for a SQLite database, and the database_setup_postgres.py file is configured for PostgreSQL (only one change must be made to the file; see the «Switch the database in the application from SQLite to PostgreSQL» section below).
The name of the database_setup_postgres.py file is changed to database_setup.py in order to reflect the database_setup import statements in the __init__.py and populator.py files.
Add client_secrets.json and fb_client_secrets.json files
Authenticate login through Google:
Create a new project on the Google API Console
Create an OAuth Client ID (under the Credentials tab), and make sure to add http://XX.XX.XX.XX and http://ec2-XX-XX-XX-XX.compute-1.amazonaws.com as authorized JavaScript origins
Create a file called client_secrets.json in the /var/www/nuevoMexico/nuevoMexico/ directory
Google will provide a client ID and client secret for the project; download the JSON file, and copy and paste the contents into the client_secrets.json file
Add the client ID to line 16 of the templates/login.html file in the project directory
Add the complete file path for the client_secrets.json file in lines 33 and 63 in the __init__.py file; change it from ‘client_secrets.json’ to ‘/var/www/nuevoMexico/nuevoMexico/client_secrets.json’
Authenitcate login through Facebook:
Add the ‘Facebook Login’ product, and put http://XX.XX.XX.XX/ and http://ec2-XX-XX-XX-XX.compute-1.amazonaws.com/ as the Valid OAuth redirect URIs
Create a file called fb_client_secrets.json file in the /var/www/nuevoMexico/nuevoMexico/ directory
Paste the following into the fb_client_secrets.json file:
Add the Facebook App ID to line 61 of the templates/login.html file in the project directory
Add the complete file path for the fb_client_secrets.json file in lines 186 and 188 in the __init__.py file; change it from ‘fb_client_secrets.json’ to ‘/var/www/nuevoMexico/nuevoMexico/fb_client_secrets.json’
Set up a vitual environment and install dependencies
Start by installing pip (if it isn’t installed already) with the following command:
sudo apt-get install python-pip
Install virtualenv with apt-get by running sudo apt-get install python-virtualenv
Change to the /var/www/nuevoMexico/nuevoMexico/ directory; choose a name for a temporary environment (‘venv’ is used in this example), and create this environment by running virtualenv venv (make sure to not use sudo here as it can cause problems later on)
Activate the new environment, venv , by running . venv/bin/activate
With the virtual environment active, install the following dependenies (note: with the exception of the libpq-dev package, make sure to not use sudo for any of the package installations as this will cause the packages to be installed globally rather than within the virtualenv):
pip install httplib2
pip install requests
pip install —upgrade oauth2client
pip install sqlalchemy
pip install flask
sudo apt-get install libpq-dev (Note: this will install to the global evironment)
pip install psycopg2
In order to make sure everything was installed correctly, run python __init__.py ; the following (among other things) should be returned:
* Running on http://127.0.0.1:5000/ (Press CTRL+C to quit)
Deactivate the virtual environment by running deactivate
Set up and enable a virtual host
Create a file in /etc/apache2/sites-available/ called nuevoMexico.conf
Add the following into the file:
Note: the Options -Indexes lines ensure that listings for these directories in the browser is disabled.
Run sudo a2ensite nuevoMexico to enable the virtual host
The following prompt will be returned:
Run sudo service apache2 reload
Write a .wsgi file
Apache serves Flask applications by using a .wsgi file; create a file called nuevoMexico.wsgi in /var/www/nuevoMexico
Add the following to the file:
Resart Apache: sudo service apache2 restart
Switch the database in the application from SQLite to PostgreSQL
Replace line 38 in __init__.py, line 85 in database_setup.py, and line 7 in populator.py with the following:
Disable the default Apache site
At some point during the configuration, the default Apache site will likely need to be disabled; to do this, run sudo a2dissite 000-default.conf
The following prompt will be returned:
Run sudo service apache2 reload
Change the ownership of the project direcotries
Change the ownership of the project directories and files to the www-data user (this is done because Apache runs as the www-data user); while in the /var/www directory, run:
Note: if changes need to be made to the project files after the ownership of the directories has been switched to www-data , it is best to edit files as the www-data user; do this with the following command:
(Note: vim can be replaced here with nano or another text editor.)
Set up the database schema and populate the database
While in the /var/www/nuevoMexico/nuevoMexico/ directory, activate the virtualenv by running . venv/bin/activate
Then run python populator.py
Deactivate the virtualenv (run deactivate )
Resart Apache again: sudo service apache2 restart
Now open up a browser and check to make sure the app is working by going to http://XX.XX.XX.XX or http://ec2-XX-XX-XX-XX.compute-1.amazonaws.com
5. A few helpful commands to know
Below is a list of commands that could be useful while setting up the server.
lsb_release -a
Find out what version of Ubuntu is running
whoami
Find out which user you are logged in as
>> import flask
>> flask.__version__
Find out which version of Flask is installed (run this within Python)
sudo service apache2 restart
Restart Apache (use this to make sure updates are reflected on the app)
virtualenv —version
Find out which verison of virtualenv is running
which python
Find out where Python has been installed
(Note: this is especially useful when making sure that the virtualenv is working correctly; when the virtualenv is activated and set up correctly, running which python should not return /usr/bin/python but rather the file path to the directory where the virtualenv is located)
vi + /var/log/apache2/error.log
View Apache error logs, and open the file starting with the last line (note: vi can be replaced here with nano or another text editor)
sudo rm -rf INSERT_NAME_OF_VIRTUALENV_HERE
Delete a virtualenv and all of it’s directories (be careful; this can’t be undone)
dropdb INSERT_NAME_OF_DATABASE
Drop (delete) a PostgreSQL database; this is helpful if changes are made to the database_setup.py file; the current database should always be dropped and a new one created (run this command while logged in as the catalog user)
sudo apachectl stop and sudo apachectl start
Stop and start Apache; stopping Apache breaks the database session, which makes it possible to drop a database
4. Some potentially useful information while configuring the server
Rebooting the virtual machine
When logging in to the virtual machine, the following prompt may appear:
To restart the machine, simply run sudo reboot
Note: it is important to keep in mind, that whenever the machine is rebooted, all information in RAM will disappear, the SSH session will end, and the machine will be offline for several minutes.
After waiting a few minutes, SSH back into the machine as normal
Dropping and recreating a database
At some point in the configuration, it may be necessary to drop the catalog database and recreate it. Here is one way to do that:
Stop Apache by running sudo apachectl stop
Switch to the postgres user and enter psql: sudo -u postgres psql
Drop the current database (which is presumably called ‘catalog’): drop database catalog;
Recreate the database: create database catalog owner catalog;
Exit PostgreSQL and psql (run exit )
Activate the virtual environmen: . venv/bin/activate
Run python populator.py
Deactivate the virtual environment ( deactivate )
Start Apache: sudo apachectl start
Setting up SQLAlchemy logging
At some point in the configuration, viewing logged SQLAlchemy information and errors may be userful. To do this, simply add the following into the imports section of the __init__.py file:
The SQLAlchemy logs will be added to the /var/log/apache2/error.log file.
Fixing sudo: unable to resolve host ip-XX-XX-XX-XX error
Open the /etc/hostname file (/etc/hostname contains the name of the machine)
Copy the file (it should say nothing more than ip-10-20-29-203 , for example)
Paste this into the first line of the /etc/hosts file, and add the following before it:
To be clear: the first line of the file should look like something this:
127.0.0.1 localhost localhost.localdomain ip-10-20-29-203 )
Run sudo hostname to make sure it worked; if it worked, something such as ip-10-20-29-203 will be returned
Fixing a servername error with Apache
When installing Apache, the following error may appear:
To fix this, open up the /etc/apache2/apache2.conf file
Add in the following line at the end of the file:
Restart Apache by running sudo service apache2 restart
If it did not work, the same error message will appear when restarting Apache
Note: this change will be overwritten when Apache is updated.
Below is a list of sources I used to complete this project.
Kill the Yak tutorial for using PostgreSQL with Flask or Django
The Hitchhiker’s Guide to Python guide on virtualenv
Flask documentation on virtualenv
tutorialspoint tutorial on creating a database with PostgreSQL
tutorialspoint tutorial on how to drop a PostgeSQL database
SQLAlchemy documentation on cascade delete
SQLAlchemy documentation on one-to-many relationships
Flask documenation on making a virtualenv work with mod_wsgi
Techarena51 tutorial on one-to-many relationships with SQLAlchemy and Flask
SLQAlchemy documentation on error logging
Udacity forum posts: firewall configuration, logging in as grader, PostgreSQL roles, more on PostgreSQL roles, switching from SQLite to PostgreSQL, more on switching from SQLite to PostgreSQL, virtualenv packages, Apache errors, disabling the default Apache site, more on switching from SQLite to PostgreSQL, Amazon Lightsail URL, firewall configuration, virtualenv, reloading PostgreSQL, populating the PostgreSQL database, create_engine line for PostgreSQL, client_secrets.json error, more on populating the PostgreSQL database, preventing the .git directory from being accessible in the browser, more on the .git directory, Google login issues, alternate Amazon Lightsail URL, cascade delete, more on cascade delete, virtualenv and mod_wsgi and SQLAlchemy errors, upgrading the Facebook login script to match the current version
Stack Overflow and related question-and-answer posts: unable to resolve host error, system restart required issue, servername error with Apache, which version of Flask, installing psycopg2 by installing libpq-dev, understanding Apache errors, reload PostgreSQL, the difference between reload and restart, hyphens and Apache, using pip with sudo, more on pip and sudo, virtualenv and sudo, removing packages with apt-get, loggin in as www-data, more on www-data, www-data and chown, changing permissions, more on chown, git clone options, cascade delete, psql queries, cascade delete, SQLAlchemy backref, SQLAlchemy error logging
About
Instructions on how to set up a Ubuntu Linux server to host a simple web application built with Flask
Источник


