- How to remove entries from the Remote Desktop Connection Computer box
- Remove entries in the Windows Remote Desktop Connection client
- Remove entries in the Mac Remote Desktop Connection client
- Удаление Windows 7 c компьютера
- Способы удаления
- Способ 1: Форматирование раздела
- Способ 2: «Конфигурация системы»
- Password Recovery
- How do I remove bing from my computer. Windows 10
- Replies (27)
How to remove entries from the Remote Desktop Connection Computer box
This article describes how to remove entries from the Remote Desktop Connection Computer box.
Original product version: В Windows Server 2012 R2
Original KB number: В 312169
This section, method, or task contains steps that tell you how to modify the registry. However, serious problems might occur if you modify the registry incorrectly. Therefore, make sure that you follow these steps carefully. For added protection, back up the registry before you modify it. Then, you can restore the registry if a problem occurs. For more information about how to back up and restore the registry, see How to back up and restore the registry in Windows.
After you use the Remote Desktop Connection tool to connect to another computer, the name of the computer is added to the Remote Desktop Connection Computer box. It’s easy for you to quickly select the same computer at a later time. However, the tool doesn’t provide a way to clear the list of computers or remove one or more entries from the Computer box.
Remove entries in the Windows Remote Desktop Connection client
To remove entries from the Remote Desktop Connection Computer box in the Windows Remote Desktop Connection client, start Registry Editor, and then select this registry key:
HKEY_CURRENT_USER\Software\Microsoft\Terminal Server Client\Default
Entries appear as MRUnumber, and are visible in the right pane. To delete an entry, right-click it, and then select Delete.
Remove entries in the Mac Remote Desktop Connection client
To remove entries from the Remote Desktop Connection Computer box in the Mac Remote Desktop Connection client, delete the Users:Username:Library:Preferences:Microsoft:RDC Client:Recent Servers file.
The list of all destination connections (including previous connections) are stored in an MRUnumber value in the following registry key:
HKEY_CURRENT_USER\Software\Microsoft\Terminal Server Client\Default
Every new connection is given the value of MRU0, and the other values are then sequentially moved down in number. The MRU value can contain a Fully Qualified Domain Name (FQDN) or an IP address of the computer to which you connect. For example:
Удаление Windows 7 c компьютера

Рано или поздно наступает момент, когда пользователю нужно удалить свою операционную систему. Причиной этому может быть то, что она начала лагать или морально устарел и требуется поставить более новую ОС, которая отвечает последним веяниям. Давайте разберемся, как с помощью различных методов можно удалить Windows 7 c ПК.
Способы удаления
Выбор конкретного способа удаления в первую очередь зависит от того, сколько операционных систем установлено на вашем ПК: одна или больше. В первом случае для того, чтобы добиться поставленной цели, лучше всего использовать форматирование раздела, на котором установлена система. Во втором можно применить внутренний инструмент Виндовс под названием «Конфигурация системы» для удаления другой ОС. Далее мы подробно рассмотрим, как снести систему обоими вышеуказанными способами.
Способ 1: Форматирование раздела
Способ с применением форматирование раздела хорош тем, что позволяет удалить старую операционную систему без остатка. Это гарантирует, что при установке новой ОС старые баги в неё не вернутся. В то же время нужно помнить, что при использовании данного метода будет уничтожена вся информация, которая находится в форматируемом томе, а поэтому при необходимости важные файлы нужно перенести на другой носитель.
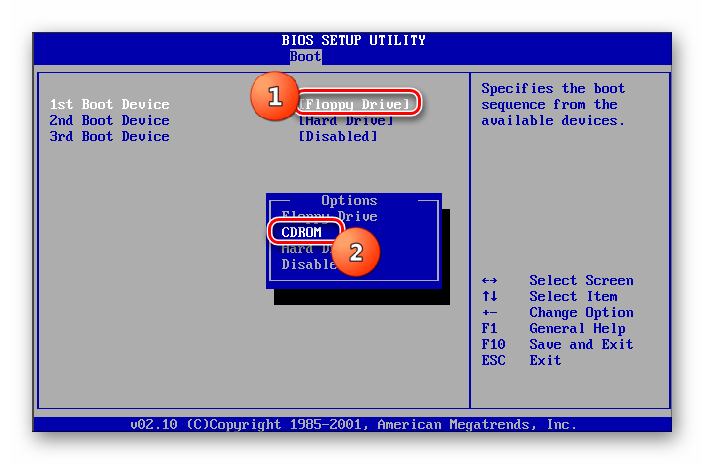
- Удаление Виндовс 7 путем форматирования можно произвести при помощи установочной флешки или диска. Но прежде нужно настроить BIOS так, чтобы загрузка производилась именно с нужного устройства. Для этого перезагрузите ПК и при повторном включении сразу же после акустического сигнала зажмите кнопку перехода в БИОС. У разных компьютеров она может отличаться (чаще всего Del или F2), но её название вы сможете увидеть внизу экрана при загрузке системы.
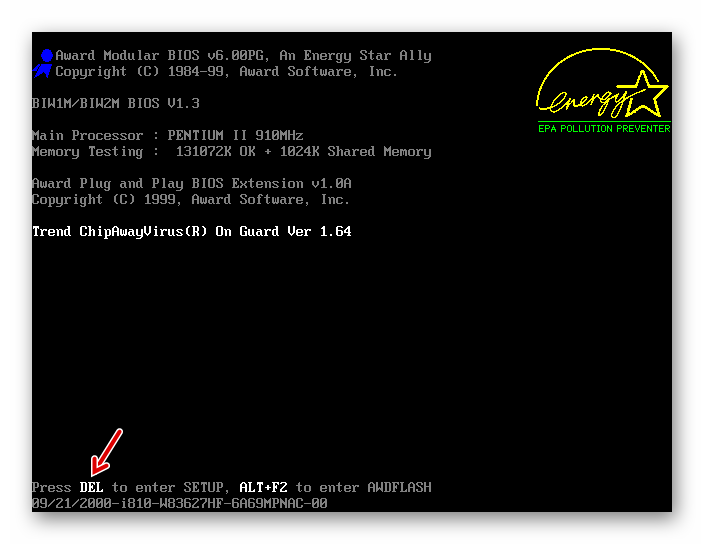
После того как будет открыт интерфейс BIOS, необходимо переместиться в раздел, где производится выбор загрузочного устройства. Чаще всего в составе своего наименования этот раздел имеет слово «Boot», но возможны и другие варианты.

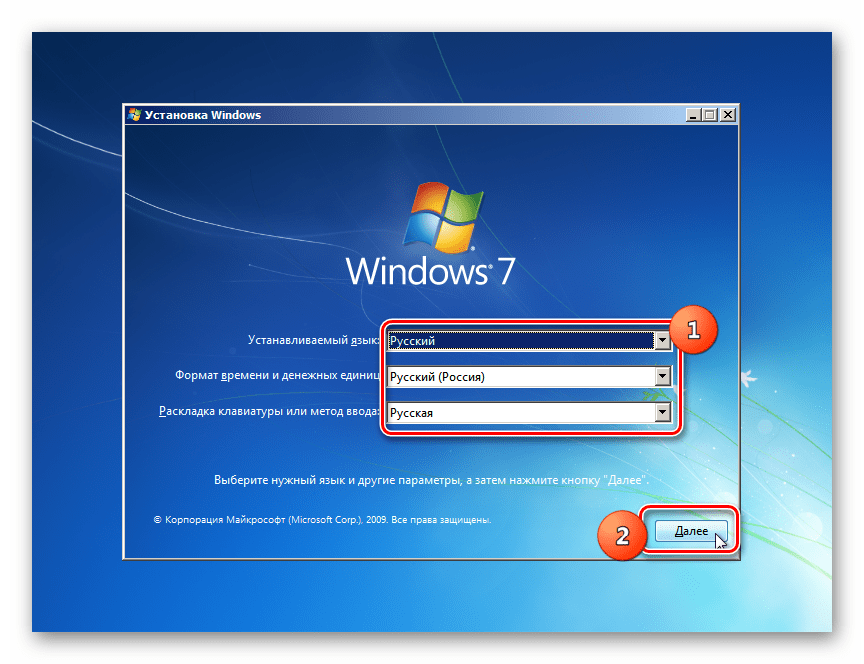
После этого компьютер перезагрузится и запустится уже с того загрузочного носителя, на котором установлен дистрибутив Виндовс. Прежде всего, откроется окно, где нужно выбрать язык, раскладку клавиатуры и формат времени. Установите оптимальные для себя параметры и жмите «Далее».
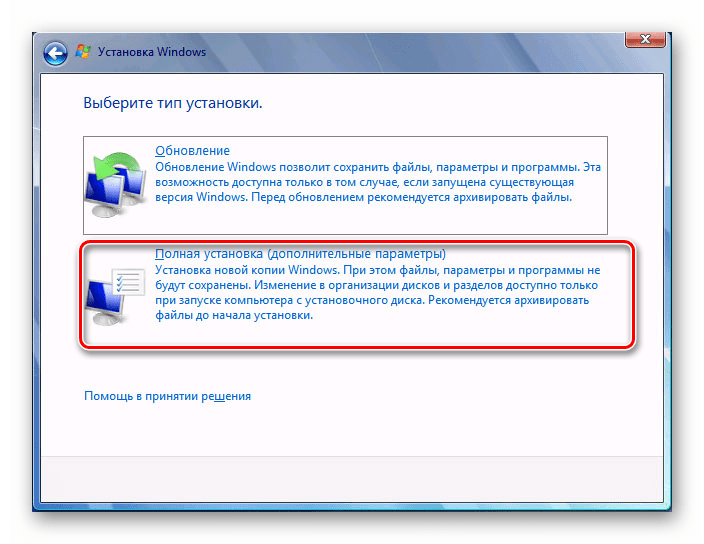
В следующем окне жмите на кнопку «Установить».

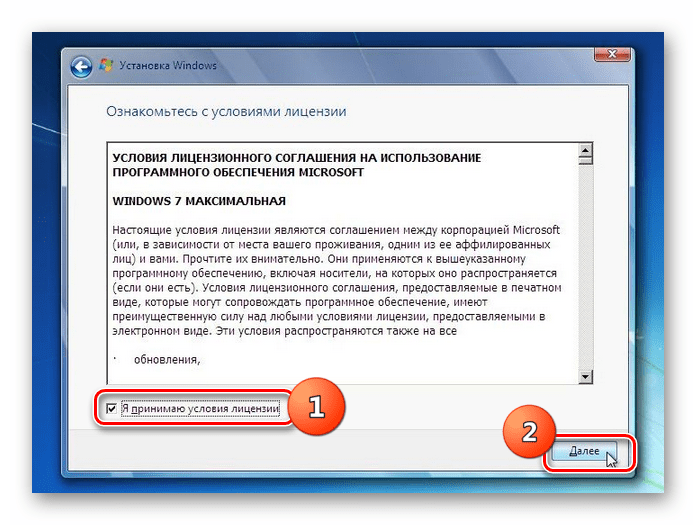
Далее открывается окно с лицензионным соглашением. Если вы просто желаете удалить Виндовс 7 без последующей установки данной операционной системы, то ознакомление с ним необязательно. Просто установите отметку в чекбокс и нажимайте «Далее».
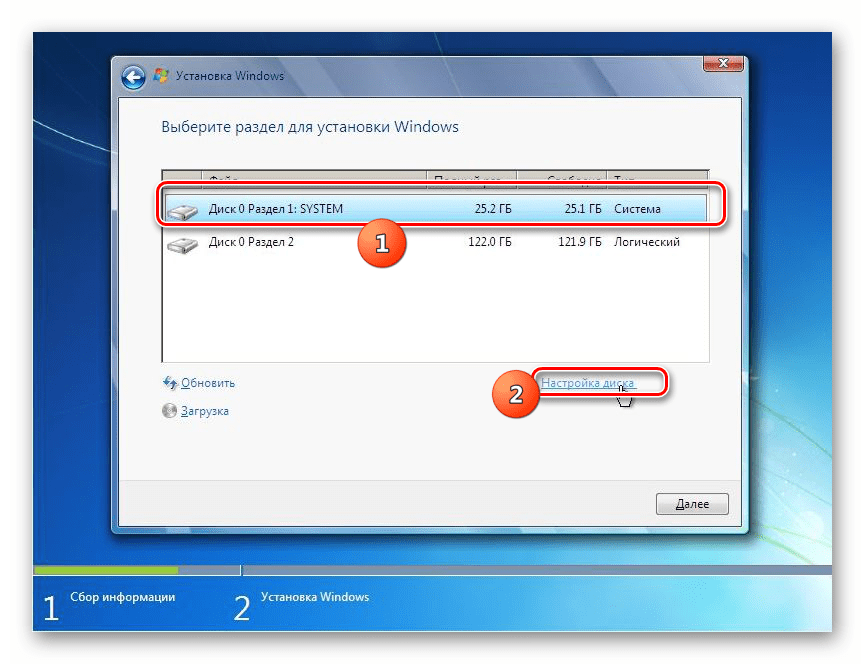
Далее откроется оболочка, где нужно выделить раздел HDD с той ОС, которую требуется удалить. Напротив названия этого тома обязательно должен стоять параметр «Система» в столбце «Тип». Щелкайте по надписи «Настройка диска».
В открывшемся окне настройки снова выделяйте этот же раздел и жмите по надписи «Форматировать».
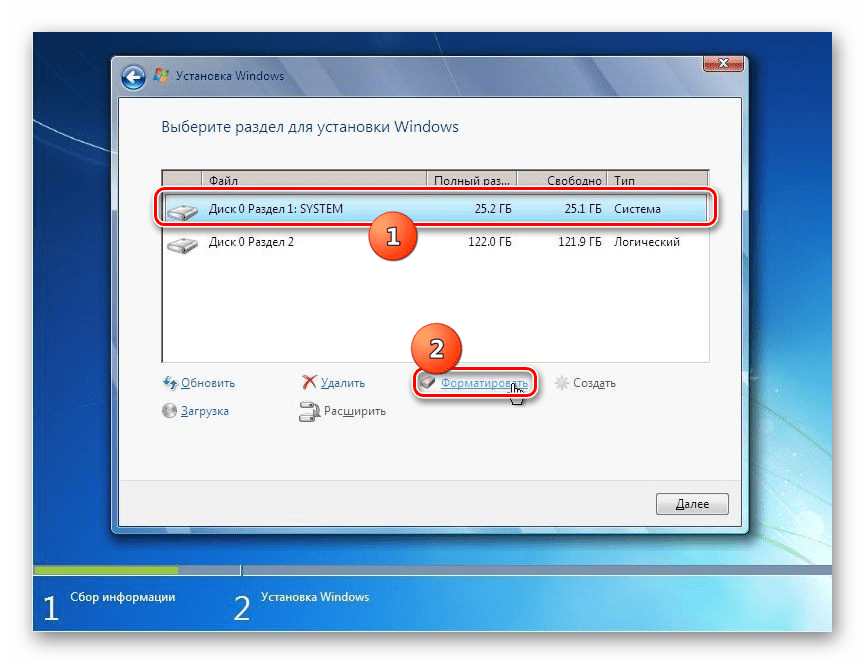
Откроется диалоговое окошко, где будет представлена информация о том, что все данные, которые содержит выбранный раздел, будут безвозвратно удалены. Вам следует подтвердить свои действия, кликнув «OK».
Способ 2: «Конфигурация системы»
Удалить Виндовс 7 можно также при помощи такого встроенного инструмента, как «Конфигурация системы». Правда, нужно учесть, что этот способ подойдет только в том случае, если на вашем ПК установлено несколько ОС. При этом та система, которую вы хотите удалить, не должна быть в данный момент активна. То есть обязательно необходимо произвести запуск компьютера из-под другой ОС, иначе ничего не выйдет.
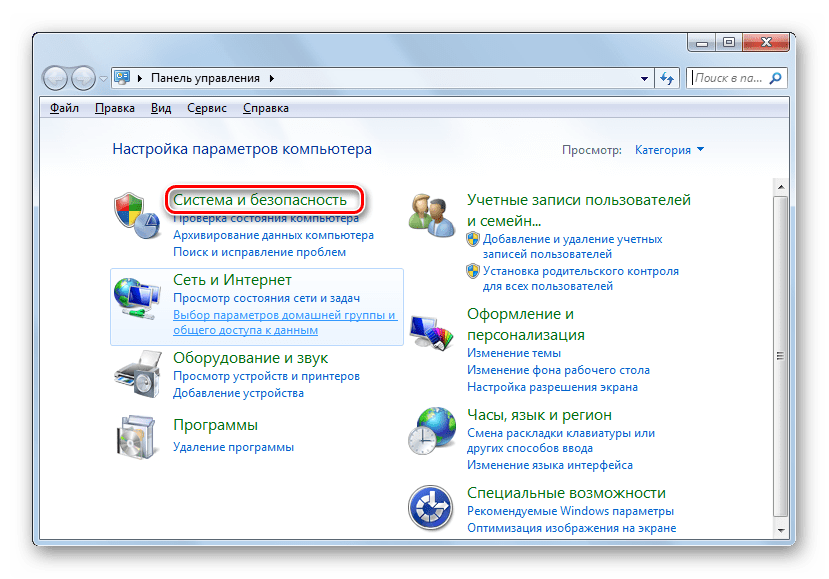
- Щелкайте «Пуск» и переходите в «Панель управления».

Далее заходите в область «Система и безопасность».
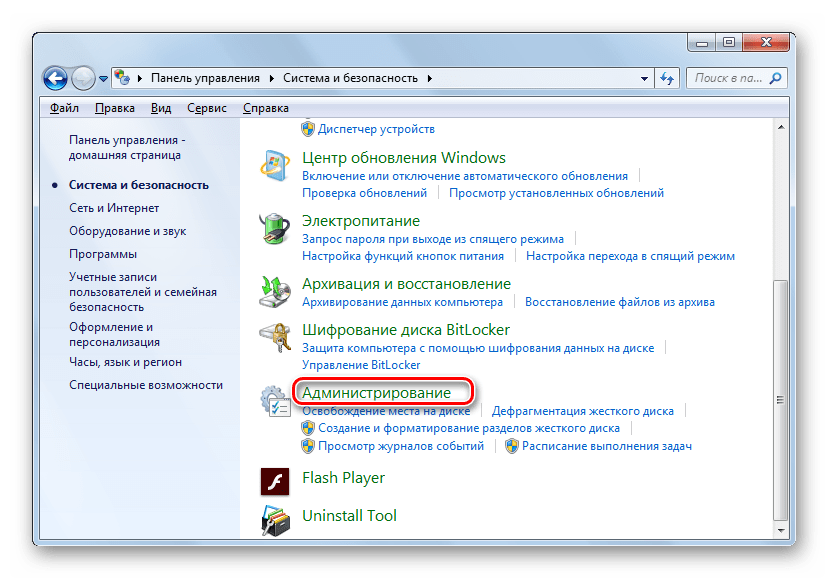
В перечне утилит отыщите название «Конфигурация системы» и щелкните по нему.
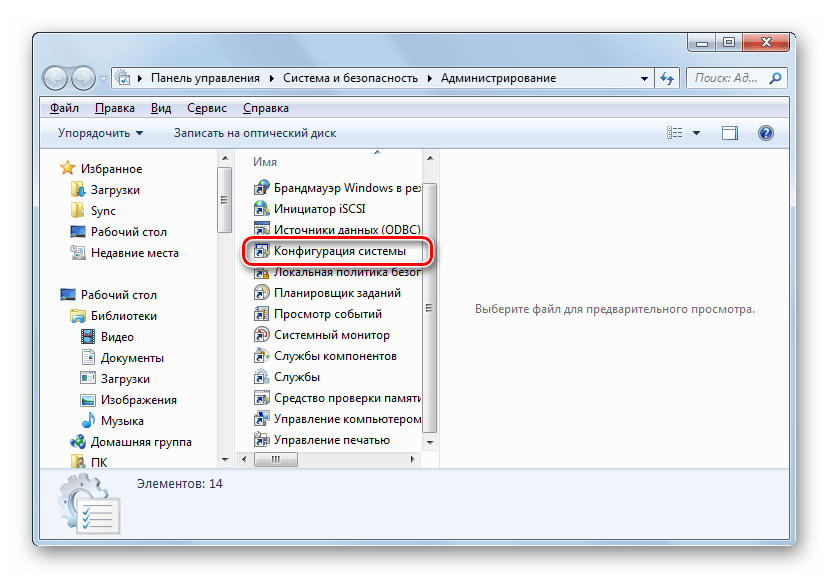
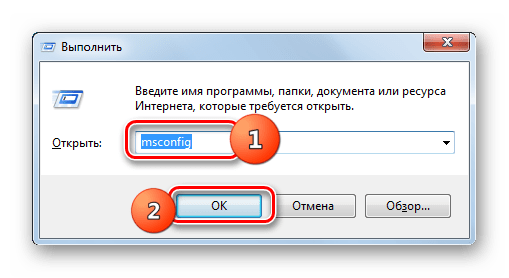
Запустить этот инструмент можно также через окно «Выполнить». Наберите Win+R и вбейте команду в открывшееся поле:
Затем нажимайте «OK».
Откроется окно «Конфигурации системы». Перемещайтесь в раздел «Загрузка» путем щелчка по соответствующей вкладке.

Запустится окно со списком установленных операционных систем на данном ПК. Требуется выделить ту ОС, которую вы хотите удалить, а потом последовательно нажать кнопки «Удалить», «Применить» и «OK». Следует заметить, что ту систему, с помощью которой вы работаете в данный момент с компьютером, снести не получится, так как соответствующая кнопка не будет активной.

После этого откроется диалоговое окошко, в котором будет предложение о перезапуске системы. Закройте все активные документы и приложения, а затем нажмите «Перезагрузка».
Выбор конкретного способа удаления Виндовс 7 зависит в первую очередь от того, сколько операционных систем установлено на вашем ПК. Если ОС только одна, то проще всего удалить её при помощи установочного диска. Если же их несколько, существует ещё более простой вариант деинсталляции, который предполагает использование системного инструмента «Конфигурация системы».
Password Recovery
How do I remove a computer from a domain that no longer exists? Or unjoin and rejoin the domain without resetting user profile? In this tutorial we’ll show you 3 methods to remove Windows 10 computer from domain. Before getting started, you need to log on to Windows 10 with local administrator account instead of domain account. If you couldn’t remember the password, PCUnlocker can be of help.
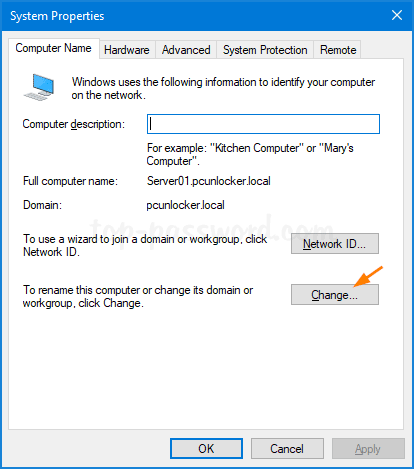
Method 1: Remove Windows 10 Computer from Domain Using System Properties
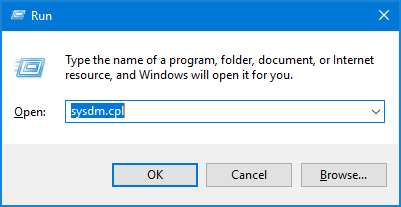
- Press the Windows key + R on the keyboard, then type sysdm.cpl in the Run box and press Enter.
When the System Properties window opens, click on the Change button at the bottom of the “Computer Name” tab.
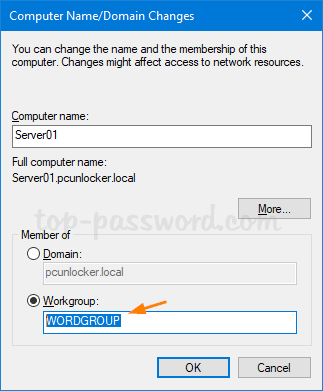
Select the Workgroup radio button, enter a workgroup name you want to be a member of after unjoining the domain. Click OK.
Click OK when prompted.
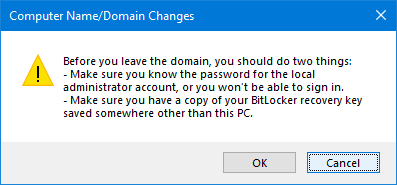
You will be asked to restart the computer so that changes can be applied.
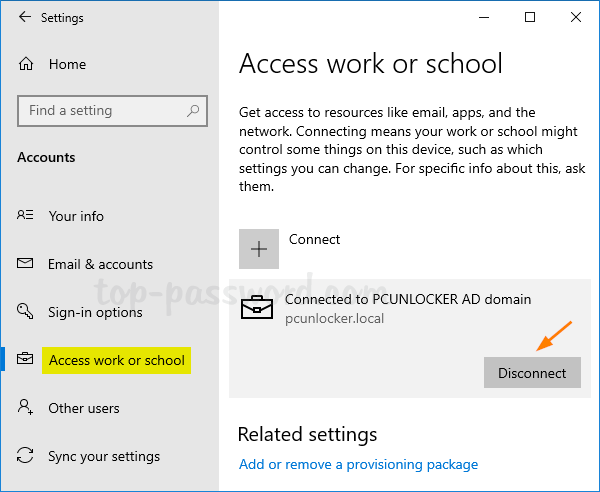
Method 2: Remove Windows 10 Computer from Domain Using Settings App
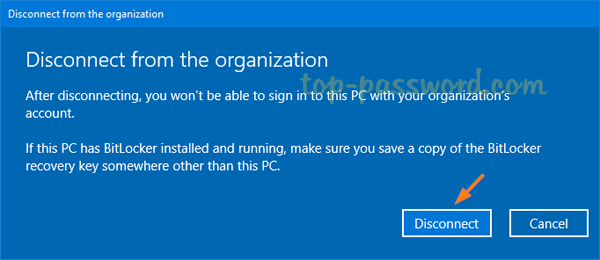
- Open the Settings app and navigate to Accounts ->Access work or school. On the right pane, click the icon labeled Connected to (your domain) AD domain, and then click Disconnect.
Click on Yes to confirm.

When the “Disconnect from the organization” prompt appears, click on Disconnect.
Method 3: Remove Windows 10 Computer from Domain Using PowerShell
- Open the Windows PowerShell with admin rights, type the following command to unjoin the domain.
Remove-Computer -UnjoinDomaincredential Domain_Name\Administrator -PassThru -Verbose -Restart -Force
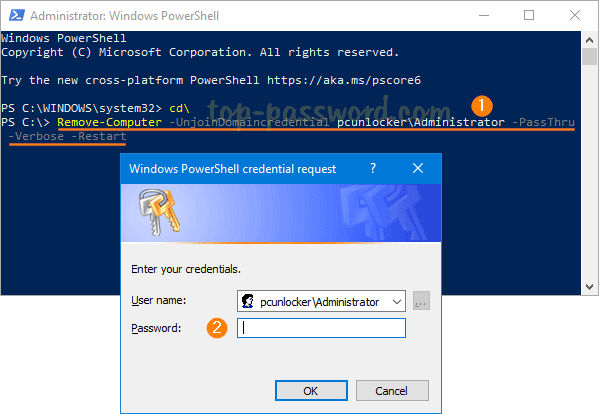
Enter the domain administrator password when prompted, and click OK.
You’ll see a warning: After you leave the domain you will need to know the password of the local administrator account to log onto this computer. Type Y to continue.

How do I remove bing from my computer. Windows 10
How do I remove bing from my computer? Windows 10
Replies (27)
* Please try a lower page number.
* Please enter only numbers.
* Please try a lower page number.
* Please enter only numbers.
My name is Andre Da Costa; an Independent Consultant, Windows Insider MVP and Windows & Devices for IT MVP. I’m here to help you with your problem.
You can change your default search engine in Edge if thats your browser, but services such as Cortana (which you can turn off) requires Bing.
If you want to adjust the privacy settings in Windows 10, here are steps to do so:
Information in the above link is sourced from a trusted Microsoft MVP blog.
Loading your favorite search engine in the Edge web browser: Google or DuckDuckGo:
16 people found this reply helpful
Was this reply helpful?
Sorry this didn’t help.
Great! Thanks for your feedback.
How satisfied are you with this reply?
Thanks for your feedback, it helps us improve the site.
How satisfied are you with this reply?
Thanks for your feedback.
Hello
I’m Peter F independent Advisor
Click the Start button.
Type Cortana in the Search field.
Click Cortana & Search settings.
Type Cortana in the Search field. Click Cortana & Search settings.
Click the switch beneath Cortana can give you suggestions, reminders, alerts, and more at the top of the menu so that it turns off.
Click the switch beneath Search online and include web results so that it turns off.
I hope it helps
6 people found this reply helpful
Was this reply helpful?
Sorry this didn’t help.
Great! Thanks for your feedback.
How satisfied are you with this reply?
Thanks for your feedback, it helps us improve the site.
How satisfied are you with this reply?
Thanks for your feedback.
My name is Mays and I am an Independent Consultant. I would love to help you today.
Steps for removing Bing from search bar: In Search type “Cortana & Search Settings” and hit enter.
Steps for removing Bing from the Browser. Open Internet Explorer and click on the Gear icon. Click on the ‘Manage add-ons’ option.
Let me know if the information has been useful to solve your Problem.
1 person found this reply helpful
Was this reply helpful?
Sorry this didn’t help.
Great! Thanks for your feedback.
How satisfied are you with this reply?
Thanks for your feedback, it helps us improve the site.
How satisfied are you with this reply?
Thanks for your feedback.
You should not try to remove Bing as it is tied into the OS at many levels. However you do not have to use it, If you have a Bing Icon in the taskbar just right click it and select «Unpin from taskbar».
How to Disable Bing from the Start Menu Reply
3 people found this reply helpful
Was this reply helpful?
Sorry this didn’t help.
Great! Thanks for your feedback.
How satisfied are you with this reply?
Thanks for your feedback, it helps us improve the site.
How satisfied are you with this reply?
Thanks for your feedback.
![]()
I am an Independent Advisor.
Bing is Microsoft’s search engine of choice and integrated into the system with Cortana.
Have you been experiencing issues with Bing?
There are several things you may do.
1. If Bing is the Home Page, follow these steps to change Home Page.
https://www.computerhope.com/issues/ch000577.htm
2. How to Disable Cortana and Bing Search in Start Menu
https://mspoweruser.com/how-to-disable-cortana-.
Note: This is a non-Microsoft website. The page appears to be providing accurate, safe information. Watch out for ads on the site that may advertise products frequently classified as a PUP (Potentially Unwanted Products). Thoroughly research any product advertised on the site before you decide to download and install it.
1 person found this reply helpful
Was this reply helpful?
Sorry this didn’t help.
Great! Thanks for your feedback.
How satisfied are you with this reply?
Thanks for your feedback, it helps us improve the site.


