- How to edit or add Metadata to Photos & Video files in Windows 10
- How to add Metadata to Photos & Video files
- How to Add or Remove Extension of File Type in Windows 10
- How to Add Extension of File Type in Windows 10
- How to Add Hidden Extension of File Type in Windows 10 for Security Purpose
- How to Add or Remove Shortcut word after File Name in Windows 10
- Remove Shortcut word after File
- Add Shortcut word after File
- How to TAG files in Windows 10 & use it to make File Search efficient
- What are Tags in Windows
- How to TAG files in Windows 10
- How to add Tags to Multiple Files
- How to Search for Files using Tags
- Which File Formats are supported for Tags?
- Related Posts
- How to disable Windows Mobility Centre in Windows 10
- How to disable Steps Recorder in Windows 10
- How to Paste as Plain Text in Windows 10
- [email protected]
How to edit or add Metadata to Photos & Video files in Windows 10
If your photo or video doesn’t have the proper metadata, you can add or edit them in Windows 10. Here is how to add Metadata to Photos & Video files in Windows 10. You can do that with and without using any third-party software.
Metadata helps you find out all the information about an image. For example, when it was captured, which camera used to capture the photograph, what date/time it was, what was the ISO, shutter speed, etc. and many more. Some information depends on the type of file (photo or video), but you can find quite similar options in both cases.
When you capture a photo using your mobile or a digital camera, all that information gets saved automatically based on the camera settings. However, if your images do not have such metadata and you need to insert or edit the EXIF data of your image and video.
How to add Metadata to Photos & Video files
To add metadata to photos and video files in Windows 10, follow these steps-
- Get the original file and right-click on it.
- Select Properties from the list.
- Go to the Details tab.
- Click on the items you want to edit.
- Start writing your additional metadata or information.
- Click Apply to save the edit.
First, you need to get the original file. Although a copied version might work as well, it may not carry as much information as the original file. Then right-click on the file and select the Properties option.
Now, switch to the Details tab where you can find all the existing metadata of your image or video. It is the same tab from where this is possible to remove personal information from photos, files, etc. in Windows 10.
After that, click on the respective position in the Value column. It may or may not already have some information, but it should be editable when you click the present value.
For your information, you can add or edit this information-
- Title
- Subject
- Rating
- Tags
- Comments
- Authors
- Date/Time
- Image ID
- Date acquired
- Copyright
- Camera maker
- Camera model
- ISO
- Metering mode
- Flash mode
- Etc.
Some options may be different for photos and videos.
After adding all the details to your image or video file, you need to save it so that it can carry that metadata all the time. Click the Apply and OK buttons.
How to Add or Remove Extension of File Type in Windows 10
In this tutorial, you will read How to Add or Remove Extension of File Type in Windows 10. You will come across three sections in this post where the first will have the tips to display the file type extensions for the known files. The second section consists the steps to add the Hidden file extensions. And the last section will guide you to add or remove Shortcut name (prefix) extension in shortcut created files in Windows 10.
What Are File Name Extensions?
You find a group of characters at the end of each of your Files everywhere. This could be .jpg, or .png, or .doc or .txt or any other. These are none other than File Name Extensions and tell that which types of files these are.
Why Are File Name Extensions so important?
When you meet a malicious threat the main thing you need to know is which type of file is damaging your PC so that you can rectify the issues or take a precautionary measure to avoid this kind of attack in the future. So, Microsoft should make this feature available by default because as the extensions are hidden you will never get to know the file type. But I infer they have emphasized on the clean interface rather than security.
You may like to read:
How to Add Extension of File Type in Windows 10
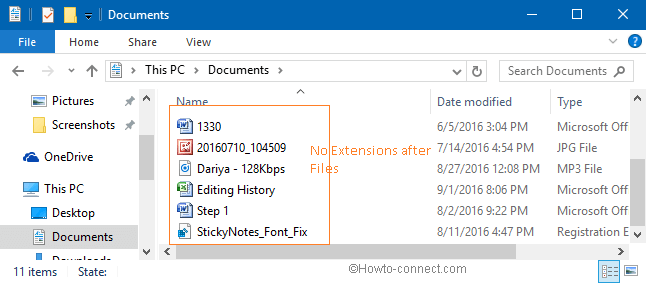
Just like previous editions, Windows 10 also refuses to show Extension of File Type in Windows 10 of the known files by default. The main reason of the hidden file extensions is to refrain user’s mind from confusion with the exhibition of different types of extension. But Windows 10 always gives you the chance to display the file extensions like avi, doc, exe, mp3, txt and a lot more.
Steps to follow:
- Open This PC.
- On the top, click View.

- A new ribbon arrives. Take your attention to the extreme right corner of the ribbon and click Options.
- A new window of Folder Options arrives on your screen.
- Get into the View tab.
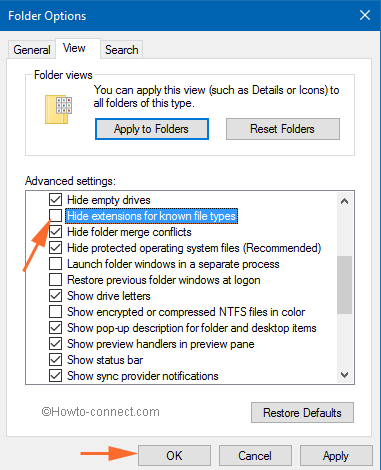
- Beneath the Advanced settings section, go to the Hide extensions for known file types option.
- Clear the checkbox of the option and click Apply and Ok buttons.
- Now, you can see the file extensions of the known files.
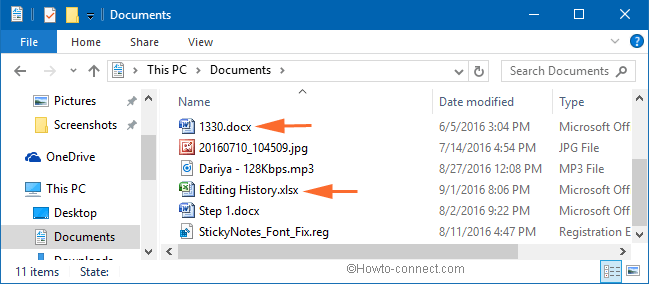
After the completion of the above process, Windows starts showing the Extension of File Type in Windows 10 and you can easily figure out the individual file type.
How to Add Hidden Extension of File Type in Windows 10 for Security Purpose
After you clear the checkbox Hide extensions for known file types in Folder Options, Windows 10 will display most of the file extensions leaving behind some of the system reserved file extensions like URL (internet shortcuts), lnk (file shortcuts). These file extensions are not displayed in File Explorer and are tucked away by default through Registry keys.
NeverShowExt is the Registry key which when set for any Extension of File Type in Windows 10 in Registry Editor, disallows the same file extension to display in File Explorer. There are certain file extensions which are always kept hidden in File Explorer. They are –
URL (Internet Shortcut)
PIF (MS-DOS Program Shortcut)
SCF (Windows Explorer Command)
SHS (Shell Scrap Object)
SHB (Document Shortcut)
XNK (Exchange Folder Shortcut)
The above-referred file types hold NeverShowExt strings in the Registry Editor which restrict them from displaying their file extensions. And hence, this type of behavior brings harm to your computer. Suppose anyone creates a harmful program and change its name to example.txt.url. And as per Windows nature, the URL extension will not be shown and you would assume it to be a txt file and attempt to open it and thus brings threats to your computer. So, your big concern would be to solve the problem.
For the hidden file types, you need to remove the NeverShowExt string in Registry Editor and then only you can see the file extensions.
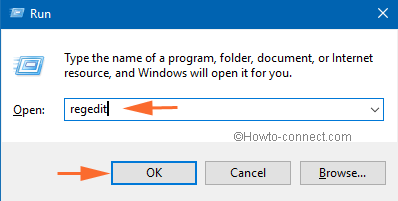
- Hit Windows and R keys cumulatively to see the Run command dialog box.
- Type Regedit and press Enter key.
- If UAC prompts up, click Yes button.
- Click Edit followed by Find in the menu bar.
- Or you can also use the shortcut keys Ctrl + F.
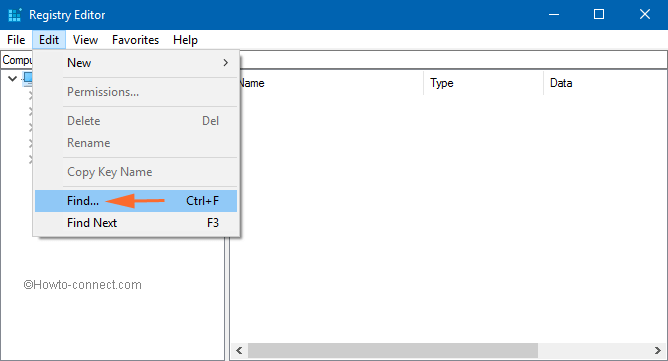
- A Find box appears now.
- In the Find what space, type NeverShowExt and hit Enter.
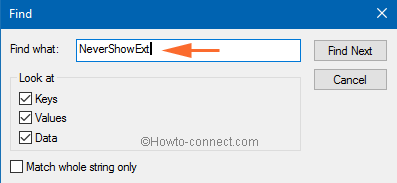
- The search begins and the first string of NeverShowExt will be demonstrated in the Registry Editor window.
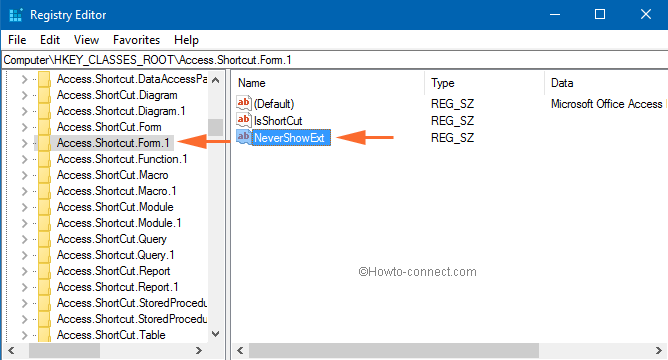
- In Registry Editor, you will see many NeverShowExt strings but you are advised to delete the strings of the preferred keys. Take precautions before deleting the strings because you might see it in other types like the library, account picture, and things like that.
- So before deleting, take a backup of the respective key. Right-click on the key and choose Export.

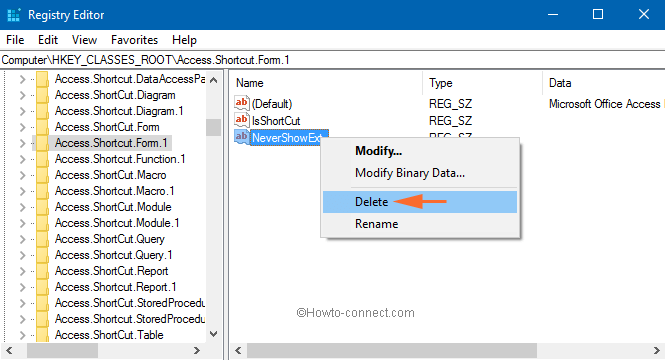
- Now, get to the right pane of the key and select NeverShowExt string and hit Delete key or right-click on the string and click Delete option.
- To see the next available NeverShowExt string, press F3 key.
- Delete the string of the key if needed.
- After the process is over, restart your Windows 10 computer and see the file extensions.
How to Add or Remove Shortcut word after File Name in Windows 10
When you perform a right-click on a folder, file or even a drive, the context menu displays you some of the commands. If you choose to select Create shortcut or Send to Desktop commands, a shortcut of the same folder, file or drive will be created in the Desktop and it will exhibit the filename along with the Shortcut word (prefix) at its end. You can add or remove it.
You need to download .bat file to either add or remove the Shortcut word after the afresh created shortcuts.
Remove Shortcut word after File
- Click the below link and download the file.
- Try to save the .bat file in an easily navigated location.
- Get to the location where you have saved it and double click on the .bat file.
- Now, your screen will blink. Create a new shortcut and you can see the Shortcut name extension is turn on.
Note: This is turned on by default.
Add Shortcut word after File
- Download the .bat file from the following link.
- Go to the downloaded file and double click the .bat file.
- Here also your screen will blink. Create a new shortcut to see if the Shortcut name extension is still on or not.
Note: The changes are applied to the shortcuts created after turning on or off the Shortcut name extension. Shortcut name extension of the shortcuts created prior to the change will not be affected.
How to TAG files in Windows 10 & use it to make File Search efficient
While Windows 10 has a powerful search inbuilt into the system, especially with Cortana which allows you to search smartly using filters like music, images, PDF and so on. One of the most underrated, but efficient way to search files easily is using TAGS. Its a feature in Windows available from a very long time, but not much used.
In this post, I am going to talk about how you can use Tags to quickly find files which are important to you and use it with Cortana search box to make it even better.
What are Tags in Windows
These are metadata which can be associated with files, and they are part of Properties. Windows 10 Search indexes Properties, which makes it possible for these tags to be searched.
Why should You be using Tags? When the different type of files fall into multiple categories, and projects, and belongs to multiple persons, tags make sense. You can keep them organized into different folders, but when you put tags, you see them in one window.
How to TAG files in Windows 10
- Select a file, right-click, and open Properties.
- Switch to Details tab, and look for property Tags.
- Select the empty place right beside it, and it will convert to the text box.
- Here you can input one or multiple tags. In case you want to add multiple tags, add a semicolon between each of them.Once done, hit enter and click on OK button.
If you use Microsoft Office, you can add tags to word files on the fly while saving it. Open the Office document > Info tab and you will see the Properties there.
You will be able to easily add Tags here.
How to add Tags to Multiple Files
- Using CTRL key, select multiple files within the same directory.
- Right click > Properties > Details tab.
- Add your tags just like above, and then click OK.
- All those tags will be applied to those files.
How to Search for Files using Tags
That was the tough part, but searching is much easier. Windows 10 Indexing works almost instantly, and to search files with the tags you added to them, just type in Cortana Search box, and switch to Documents tag. Cortana does offer Document filtered search as soon as you click the search box.
While the search result is pretty quick, if you have tones of the file with similar tags, you should make use of the Filter option. Here you can narrow down your search results by type. It supports file types like Image, Folder, Emails, Person, Setting, Videos, Apps and so on.
Which File Formats are supported for Tags?
The sad thing about Windows tags is they are limited to very few formats like images, Office documents and so on. So when you right click on PDF files or a text file, you will not see an option to add tags. But you can use File Meta Association Manager to enable Tags for unsupported files.
TIP: You can rename and tag music files quickly with TagScanner.
Date: March 27, 2018 Tags: Features, Search
Related Posts
How to disable Windows Mobility Centre in Windows 10

How to disable Steps Recorder in Windows 10
How to Paste as Plain Text in Windows 10
[email protected]
Ashish is a veteran Windows, and Xbox user who excels in writing tips, tricks, and features on it to improve your day to day experience with your devices.


