- Windows Tips: Allow or Block Non-Store Apps to Install on Windows 10
- Background
- How to Block Windows 10 from Installing Non-Store Apps
- How to Allow Non-Store Apps to Install on Windows 10
- Conclusion
- How to change the download location in Windows 10, 8, 7
- Change default download location on PC
- How do I change the default save location in Windows 10?
- Run a System Scan to discover potential errors
- How to allow apps through firewall on Windows 10
- Allow apps through firewall on Windows 10
- How to enable Windows 10 to sideload apps
- How to allow Windows 10 to sideload apps on your computer
- More Windows 10 resources
- Add the best VR headset to your Microsoft Flight Simulator experience
- The Dell XPS 15 is our choice for best 15-inch laptop
- Halo: MCC’s live service elements make it better, not worse
- These are the best PC sticks when you’re on the move
Windows Tips: Allow or Block Non-Store Apps to Install on Windows 10
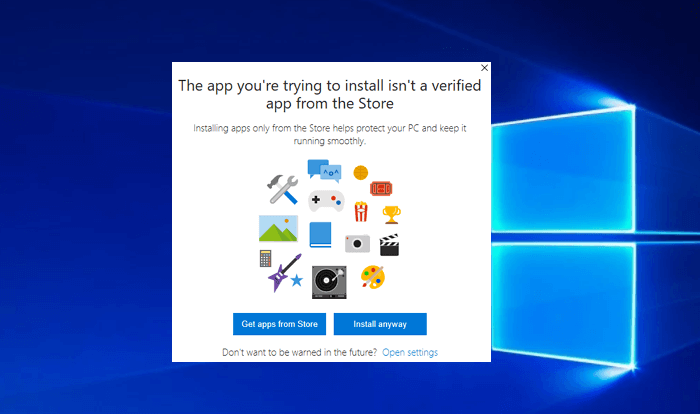
When you receive a pop-message, warning you that «You can only install apps from Microsoft Store» or «The app you’re trying to install isn’t a verified app from the Store», like the blow listed image, it doesn’t mean that you can only do as what your PC told you.В
To resolve this problem, you can first follow this page to learn some background information and disable or enable Windows 10 to install non-Store apps with provided solutions here:
Background
Microsoft firstly tested the feature of preventing non-Windows 10 Store apps to install on PC in February 2017 and added it into Windows Insiders on March 20, 2017. With the final rollout of Windows 10 Creators, this new feature is able to warn and block users whenever they attempt to install an app fromВ unknown resources outside the Windows Store. This feature continuously exists in all of the following versions of Windows 10 — 1703, 1709, 1803, 1809 and the latest Windows 10 OS.
With this feature embedded in Windows 10, you can fully control the apps by blocking non-Store apps or allowing Windows 10 to install apps from third-party platforms. You can either download and install apps from anywhere by default or stop apps from unknown sources harming your PC or negatively impacting your data.
So how to block or allow Windows 10 to install apps that are from unknown resources? In the following guide, you’ll learn steps to enable Windows 10 get apps from desired sources — Windows Store or other platforms.
How to Block Windows 10 from Installing Non-Store Apps
On Windows 10 Creators, or the following new Windows 10 OS, you can apply tips in the following steps to block non-Store apps from being installed on the desktop:
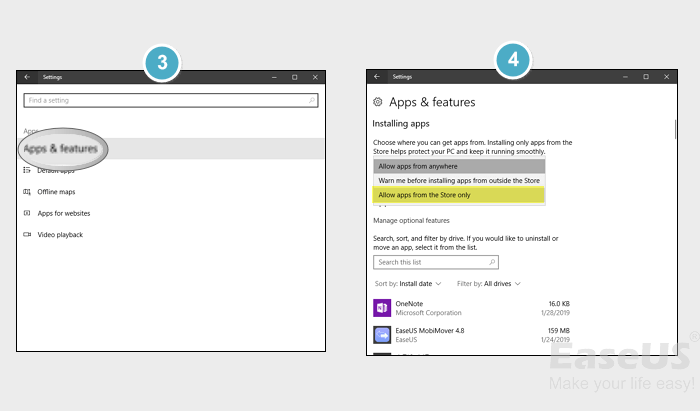
Step 1: Open Settings > Apps.

Step 2: Click Apps & features > Select «Allow apps from the Store only» option under Installing apps.
When you complete the steps, Windows system will automatically keep all changes without restarting your PC. And now, you can only install apps from the Store.В
Sometimes, when you fail to get a desirable application from the Windows Store, you may want to download and install it from a third-party platform. And then you’ll need to follow the tips below to allow Windows 10 non-Store apps.
How to Allow Non-Store Apps to Install on Windows 10
Step 1: Open Settings and click Apps.
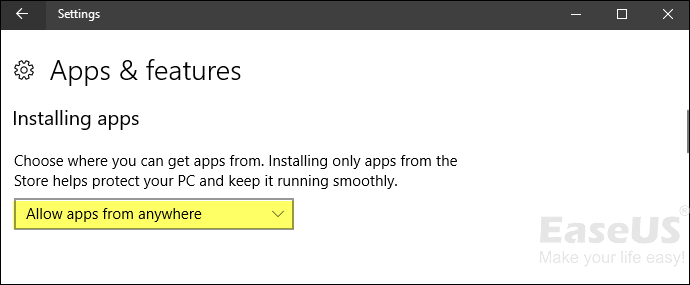
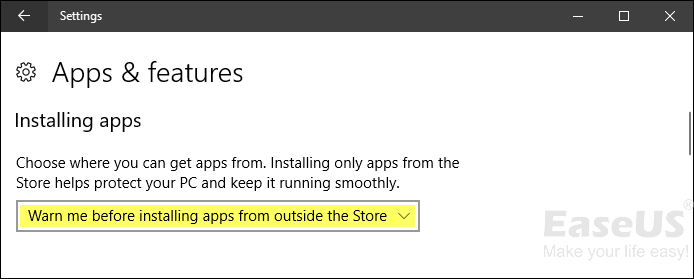
Step 2: Select the right option to allow Windows 10 install apps that are outside the Windows Store.
Allow apps from anywhere: This means you can install any apps from any source.
Warm me before installing apps from outside the Store: This means that you’ll be able to install both apps from inside and outside the Windows Store. When you install a non-Store app, Windows will show a warning notice to show you that the app isn’t from the Store.
When you have followed all the steps in this guide, you can install applications as many as you need from any platform.
Also, you can revert the changes with the same steps as mentioned above whenever you need.
Conclusion
This feature indeed plays a significant role in Windows 10 to protect the Windows OS and users’ data by getting apps from the Store rather than unknown sources as installing apps from the Internet and other platforms can cause a serious issue.
If you are a technology enthusiast or professional tech lover who can tell a real and fake app, you can allow Windows 10 to install apps from the Internet or other sources.
If you are a regular user who often has troubles in identifying an official app, and even install some malware or a poorly designed app, your best choice is to block Windows 10 from installing non-Store apps.
For more Windows 10 tips and solutions to most ordinary Windows 10 problems and errors, follow and visit How-toВ and Computer-instruction pages on EaseUS website.
How to change the download location in Windows 10, 8, 7


- Download Restoro PC Repair Tool that comes with Patented Technologies (patent available here).
- Click Start Scan to find Windows issues that could be causing PC problems.
- Click Repair All to fix issues affecting your computer’s security and performance
- Restoro has been downloaded by 0 readers this month.
Has it ever happened to you that when trying to download a file, folder or perhaps a program in Windows 8, Windows 7 or Windows 10, you didn’t had enough free disk space to do so ?Well, this is mainly because Windows 8, 7 and Windows 10, like any other Microsoft operating systems, have the default download location folder set in your C:/ drive where you also have your operating system. This is the reason why, most probably, you won’t have that much space available.
Tn the tutorial below, you’ll learn how easy it is to change the download location in Windows 8, 7 or Windows 10 in only five minutes of your time. Also, you can change the download location folder even when the message pops up saying that you don’t have enough free disk space on the partition. So, without wasting any more time, let’s begin the tutorial and set our new directory for our downloaded items.
Change default download location on PC
- After you power up the Windows 7, 8 or Windows 10 PC, you will have to left click on the desktop icon you will have in the start screen.
- Now after you get to your desktop feature right click on the “Windows Explorer” icon presented in the lower left side of the screen.
- Now from the menu that pops up you will need to left click on the “Desktop” icon.
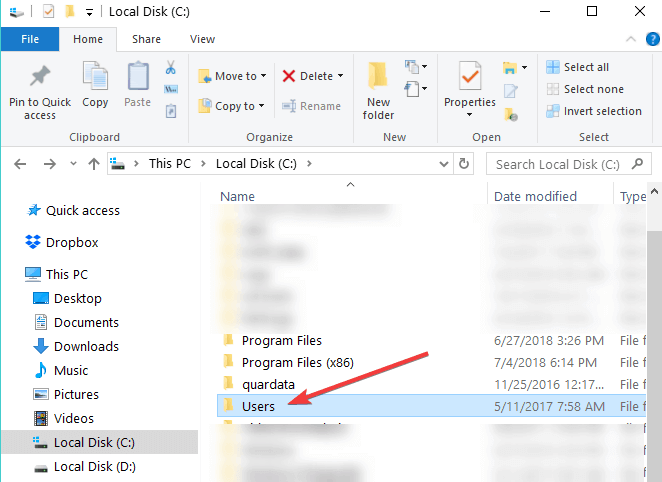
Note: You can also access the “Desktop” by double clicking (left clicking) on My Computer or This PC (depending on your OS version) and after the window with “My Computer” is opened you can left click on the “Desktop” icon in the left side of the screen. - Now, after you selected the “Desktop”, some icons will be shown in the right side of the window and you will need to double click (left click) on the folder with the name of your account.

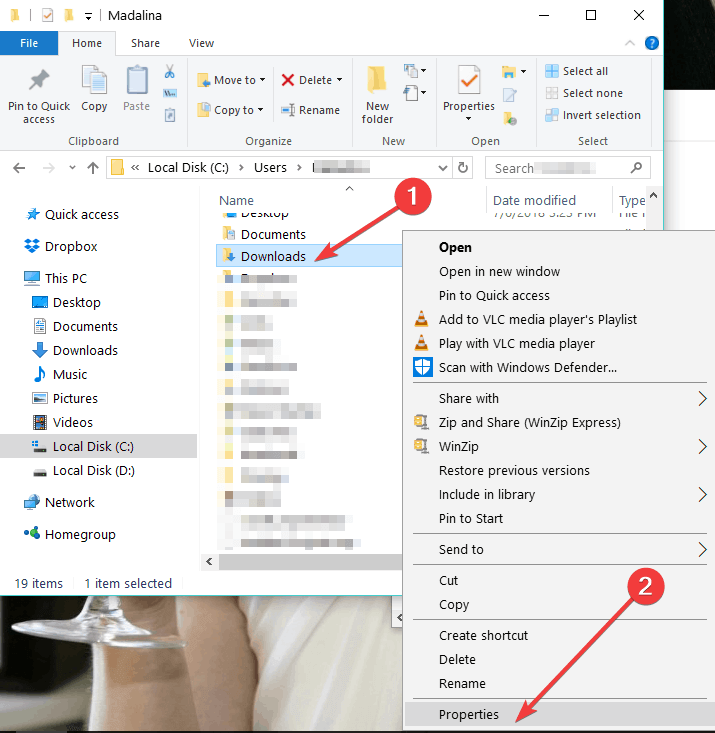
- In the folder you opened that had your account name, you will have to right click on “Downloads” folder presented there.
- After you right clicked the “Downloads” folder you will need to left click on “Properties”.
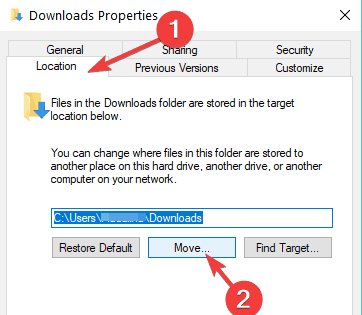
- Now that the “Properties” window is open, you will need to left click on the “Location” tab presented in the upper side of that window.
- Now that you have selected the “Location” tab you can see the path where the download items are going .
- Left click on the “Move…” button you have under the specified path.
- Now after you left clicked on “Move…” you will have to write there yourself the drive where you want your items to be downloaded and also in which folder.
Note: If the folder you have written does not exist after you left click on the “Apply” button situated in the lower right side of the screen you will be asked if you want to create that download folder and you will left click on “OK” to confirm. - Another “Move folder” window will appear which it will show you the old and the new location where you will have to left click on the “Yes” button situated in the lower right side of the screen.
- Now, you will have to left click on the “OK” button in the “Download Properties” window.
- Go to your new location where you selected to download your files and check if Windows 7, 8 or Windows 10 system has made a “Downloads” folder there.
Note: Reboot your Windows 7, 8 or Windows 10 device if it hasn’t created the “Downloads” folder to the new directory and check again after power up.
- RELATED: Can’t rename folders in Windows 10 [Fix]
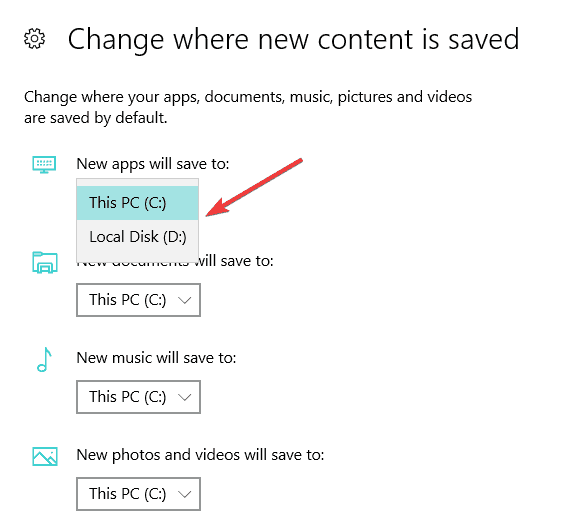
How do I change the default save location in Windows 10?
If Windows 10 is your OS of choice, you can also change the download folder save location from the Settings page:
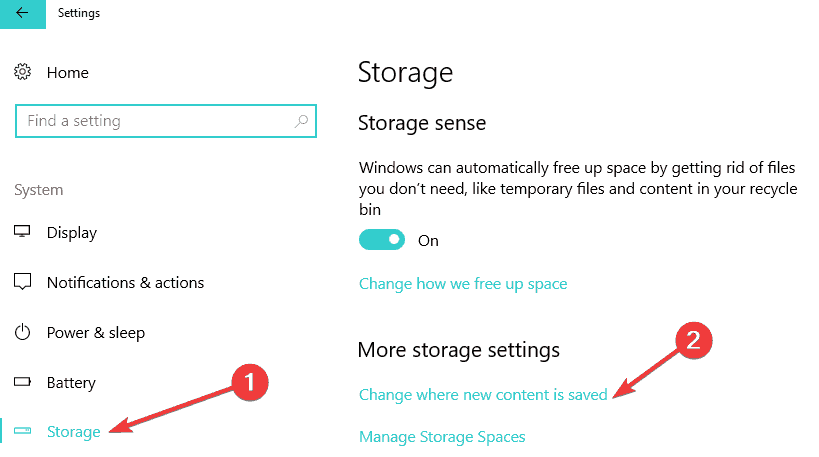
- Go to Settings > System > select Storage
- Now, click on the option ‘Change where new content is saved’
- Set your preferred download location for each item category.
Run a System Scan to discover potential errors


So, now you can go and download your files or programs in Windows 7, 8 or Windows 10 without having to worry about the download location. Share your thoughts on this article in the comments below and feel free to list your suggestions on what we can do to help you further in your Windows 7, 8 or Windows 10 computer.
Also, the location where a Windows 10 update is saved on your computer is tricky, but for that, you can check this fresh guide here on where’s the default download folder for the Windows 10 versions.
RELATED STORIES TO CHECK OUT:
How to allow apps through firewall on Windows 10
Sometimes the firewall will block trusted apps from accessing the internet, but on Windows 10 is super easy to change the settings to manually allow apps through the firewall — Here’s how to perform the task.

Windows 10 comes with several security features to keep your device and data protected against unauthorized access, malware, and other attacks, including a powerful built-in firewall, known as Windows Defender Firewall.
Although the Windows Defender Firewall does a pretty good job managing which applications and features are allowed to connect through the network, sometimes you may need to allow or deny an apps manually.
In this guide, you’ll learn the steps to allow or deny apps access through the firewall on Windows 10.
Allow apps through firewall on Windows 10
To allow an app through the Windows 10 firewall, use these steps:
Open Windows Security.
Click on Firewall & network protection.
Click the Allow an app through firewall link.
 Windows Defender Security Center firewall settings
Click the Change settings button.
Check the app or feature you want to allow through the firewall on Windows 10.
 Allow apps through firewall on WIndows 10
Check on which type of networks an app can access the network:
- Private — Allows the app access to the network at home or work.
- Public — Allows the app access to the network at a public place, such as on a coffee shop.
Click the OK button.
Once you complete the steps, the app will now access the network freely.
If you want to block an app through the firewall, you can follow the same instructions, but on step No. 5, make sure to clear the check mark for the app or feature you want to deny access to the network.
This guide focuses to configure the Windows 10 firewall, but in the case that you have another security solution, make sure to check your vendor support website for specific instructions.
We may earn commission for purchases using our links to help keep offering the free content. Privacy policy info.
All content on this site is provided with no warranties, express or implied. Use any information at your own risk. Always backup of your device and files before making any changes. Privacy policy info.
How to enable Windows 10 to sideload apps

On Windows 10, Microsoft continues to push its new modern app platform, which the company wants you to get primarily from the Windows Store. However, similar to other platforms like Android, you’re also allowed to sideload apps outside the Store.
If you’re unfamiliar with the term «sideload», in Windows 10 it means the process of installing apps on your computer that hasn’t gone through the certification process to appear in the Store and to run on a Windows device.
The operating system by default blocks you from sideloading apps. The main reason is to protect you and your computer, as getting certified apps from the Store ensures that you’re getting a good app that won’t harm your device and it’ll do what the developer says it will do.
However, there is number of good reasons to install apps outside the Store. Perhaps you’re a developer, or you have a friend who is a developer and wants you to test an app before submitting it to the Store. It could also happen that you come across an app that leaked onto the web, and you want to try, or the fact that there a lot of apps available outside of the Windows Store.
In this Windows 10 guide, we’ll walk you through the steps to allow the operating system to sideload Universal Windows Platform (UWP) apps on your computer.
How to allow Windows 10 to sideload apps on your computer
- Open Settings.
- Click on Update & security.
- Click on For developers.
Under «Use developer features,» select the Sideload apps option.

Click Yes to confirm the risks involved running an app outside the Windows Store.

You may have noticed that there is a «Developer mode» option too, both the «Sideload apps» and «Developer mode» will allow you to sideload apps, with the difference that the «Developer mode» will also enable other developer specific features.
It’s important to note that it’s not recommended to sideload apps as there is danger involve that could expose and harm your device. If you must sideload apps, you should only install those from a trusted source.
While we’re focusing this guide for the desktop version of Windows 10, you can also use these instructions to enable Windows 10 Mobile to sideload apps on your phone.
More Windows 10 resources
For more help articles, coverage, and answers on Windows 10, you can visit the following resources:
![]()
Add the best VR headset to your Microsoft Flight Simulator experience
Microsoft Flight Simulator is an impressive game on a standard 2D monitor, but have you experienced it within VR? Grab one of these headsets and take off.
![]()
The Dell XPS 15 is our choice for best 15-inch laptop
For a lot of people, a 15-inch laptop is a perfect size that offers enough screen for multitasking, and in a lot of cases, some extra performance from powerful hardware. We’ve rounded up the best of the best at this size.
![]()
Halo: MCC’s live service elements make it better, not worse
Halo: The Master Chief Collection is more popular than ever, but some fans don’t agree with the live service approach 343 Industries has taken with it. Here’s why those elements are, at the end of the day, great for the game and for Halo overall.
![]()
These are the best PC sticks when you’re on the move
Instant computer — just add a screen. That’s the general idea behind the ultra-portable PC, but it can be hard to know which one you want. Relax, we have you covered!


