- Бэкап Linux и восстановление его на другом железе
- 1. Создание бэкапа
- Восстановление бэкапа на другом железе
- How To Backup Your Entire Linux System Using Rsync
- Introduction
- Backup your entire Linux system using Rsync
- 11 Best Backup Tools for Linux
- Rsync
- Timeshift
- Bacula
- Amanda
- Cloud Berry Backup
- Clonezilla
- Back in Time
- BackupNinja
- BackupPC
- Fwbackups
- Burp
- Déjà Dup
- CONCLUSION
- About the author
- Sidratul Muntaha
Бэкап Linux и восстановление его на другом железе
Я работаю в организации с маленьким штатом, деятельность тесно связана с IT и у нас возникают задачи по системному администрированию. Мне это интересно и частенько я беру на себя решение некоторых.
На прошлой неделе мы настраивали FreePBX под debian 7.8, нанимали фрилансера. В процессе настройки оказалось, что сервер (да, я так называю обычный PC) не хочет грузится с HDD при подключенных USB 3G модемах, которые мы используем для звонков на мобильные, колупание BIOSа не помогло. Непорядок. Решил, что нужно перенести его на другую железяку. Так появилось сразу две связанные задачи:
- сделать бэкап сервера;
- восстановить бэкап на другом железе.
Гугление не дало внятных ответов, как это сделать, пришлось собирать информацию кусками и пробовать. Всякие acronis’ы отбросил сразу, ибо не интересно.
Опыт общения с linux-системами у меня небольшой: настройка VPN сервера на open-vpn, ftp-сервера и еще пара мелочей. Сам себя я характеризую как человека умеющего читать маны и править конфиги 🙂
Ниже я описываю свой частный случай и почему я поступил именно так. Надеюсь, новичкам будет полезно, а бородатые админы улыбнутся вспомнив молодость.
Начинаем копать теорию:
Второй способ требует наличия внешнего жесткого диска объемом не меньше раздела, который архивируем. Да и что с ним потом делать, непонятно, хранить на полочке? Остановился на tar, чуть сложнее в реализации, нужно будет создать MBR, но время создания/восстановления архива существенно меньше, хранить бэкап проще, полтора гига можно закинуть в облако и скачать, когда будет нужно. Записывать его можно на ту же live-флэшку, с которой буду грузиться.
Итак, план действия:
1. Создание бэкапа
Грузимся с live-флэшки, у меня это debian-live-7.8.0-amd64-standard.
Переключаемся на root:
Монтируем раздел, который будем архивировать, у меня это sda1, чтобы случайно не наломать дров, монтируем только для чтения. Посмотреть все свои разделы можно при помощи команд ls /dev | grep sd или df -l
Наша флэшка уже примонтирована, но в режиме только чтения, нужно перемонтировать для чтения-записи, чтобы писать туда бэкап.
Все готово для создания архива
Здесь у нас параметры: c — создать архив, v — выводить информацию о процессе, z — использовать сжатие gzip, p — сохраняем данные о владельцах и правах доступа, f — пишем архив в файл, путь к файлу, —exclude — исключаем из архива каталог (я исключил каталоги с записями разговоров и каталог с бэкапами FreePBX), /mnt/ — каталог, который архивируем.
Ждем… у меня вся подготовка и создание архива заняли 10 минут. Будь флэшка быстрее, уложился бы в 7-8 минут.
Складываем архив в надежное место за пределами офиса.
Восстановление бэкапа на другом железе
2. Размечаем диск, создаем файловую систему
Грузимся с live-флэшки, у меня все та же debian-live-7.8.0.
Переключаемся на root:
Размечаем диск. Мне понравилась утилита с псевдографическим интерфейсом cfdisk. Там все просто и понятно.
Удаляем все имеющиеся разделы. Я создал два новых раздела, один на 490 Gb под / (sda1) и 10 Gb под swap (sda2) в конце диска, т.к. он практически не будет задействован. Проверим типы разделов. Который под систему должен иметь тип 83 Linux, второй — 82 Linux swap / Solaris. Помечаем системный раздел загрузочным (bootable), сохраняем изменения и выходим.
Cоздаем файловую систему на первом разделе.
3. Распаковываем архив.
Монтируем отформатированный раздел
Распаковываем архив прямо с флэшки
Параметр —same-owner — сохраняет владельцев у распаковываемых файлов, x — извлекаем из архива, v — выводить информацию о процессе, p — сохраняем права доступа, f — указываем файл, который распаковываем, C — распаковываем в категорию.
4. Создаем MBR на новом диске.
Чтобы корректно создать загрузочную запись, монтируем рабочие каталоги к нашему будущему root-каталогу, у меня это /mnt. Каталоги /dev и /proc сейчас используются live-системой, используем параметр bind, чтобы они были доступны сразу в двух местах:
Переключаемся на новую систему используя chroot:
Делаем swap-раздел для новой системы:
Подключаем его же:
Чтобы grub работал, нужно указать ему правильные UUID разделов в fstab, сейчас там прописаны разделы предыдущей системы:
Открываем второй терминал (Alt+F2) под root:
И видим текущие UUID разделов.
Вручную переписываем их в fstab переключаясь между Alt+F1 и Alt+F2. Да, муторно, но попытки копировать занимали у меня больше времени, чем переписывание. Сохраняем fstab.
Устанавливаем grub2. У меня один физический диск, поэтому ставим его на sda:
На чистый диск должно встать без ошибок. Обновляем информацию из fstab:
Возвращаемся в Live-систему:
Размонтируем все каталоги:
Если вылазят процессы, которые используют эти каталоги, убиваем их используя fuser.
Все, поехали. Грузимся с жесткого диска:
Здесь статья должна была закончиться, но у меня возникли проблемы с подключением к интернету. Сервер видит сеть, видит компьютеры в ней, но в интернет не ходит… а это как бы важно для телефонии.
5. Тестирование и устранение неполадок.
Показывет интерфейсы eth1 и lo, гугление сказало, что gateway можно прописать только подключению eth0, остальные рассчитаны только на работу внутри сети.
Похоже, отсутствие eth0 вызвано способом переноса системы. Находим файл, который отвечает за нумерацию интерфейсов, смотрим туда:
Действительно, там два активных интерфейса, определенных MAC’ами. Комментируем первый, второму прописываем eth0.
Перезапуск /etс/init.d/networking не помог, поэтому перезагружаемся:
Подключаем донглы, проверяем, все работает.
Спасибо за внимание.
Источник
How To Backup Your Entire Linux System Using Rsync
In this brief tutorial, let me explain how to backup your entire Linux system using Rsync utility. This method will work on almost all Linux systems that have rsync installed.
Introduction
The other day I wanted to reinstall one of my virtual machine which was running with Ubuntu 16.04 LTS server. Before reinstalling it, I tried to backup the entire system.
While searching for an easiest way to do this, I found an easiest solution in Arch Linux wiki. I never thought that it was going to be that much simple.
I copied my entire root (/) tree with Rsync using a single line command. Yes, it is just a one-liner command. While there are so many tools to backup your systems, I find this method super easy and convenient, at least to me.
Also, this method is way better than disk cloning with dd command. Because It doesn’t matter if your hard drive is different size, or use different filesystem. It will work regardless of hard disk’s size and the underlying file system.
Backup your entire Linux system using Rsync
First, insert your backup medium (USB thumb drive or External hard disk). Then find the drive letter using ‘fdisk -l’ command. In my case, my Pen drive id is /dev/sdb1.
Mount your drive to any location of your choice. I am going to mount it under /mnt.
To backup the entire system, all you have to do is open your Terminal and run the following command as root user:
This command will backup the entire root ( / ) directory, excluding /dev, /proc, /sys, /tmp, /run, /mnt, /media, /lost+found directories, and save the data in /mnt folder.
Let us break down the above command and see what each argument does.
- rsync — A fast, versatile, local and remote file-copying utility
- -aAXv — The files are transferred in «archive» mode, which ensures that symbolic links, devices, permissions, ownerships, modification times, ACLs, and extended attributes are preserved.
- / — Source directory
- —exclude — Excludes the given directories from backup.
- /mnt — It is the backup destination folder.
Important note: Please be mindful that you must exclude the destination directory, if it exists in the local system. It will avoid the infinite loop.
If you want to preserve hard links, just include -H flag in the above command. Please note that it consumes more memory.
To restore the backup, just reverse the source and destination paths in the above command.
Please be mindful that this is suitable for local and stand-alone systems only. If your system is being actively accessed by some other systems on the network, it is not a better solution.
Because, the contents of the systems might be constantly updated every minute, and some files may change during the rsync process.
Say for example, when rsync will reach the file 2, the contents of the previous file (File 1) might be changed. This will leave you with a dependency error when you will need to use that backup.
In such cases, a snapshot-based backup is the better approach. Because the system will get «froze» before the backup process starts and get it «unfreeze» when the backup process finishes, so all the files are consistent.
Источник
11 Best Backup Tools for Linux
In the case of Linux systems, there are a number of available backup solutions that offer professional grade support and performance.
These tools are essentially software that make a copy of important files in a safer place. There are numerous scenarios where such a tool can save the day. For example, whenever you are upgrading your system or installing a major component, things are too easy to go wrong. In that case, a system backup would save you from any problem.
Here are some of the best backup tools for Linux.
Rsync
This is a command line tool for Linux systems. No need to fear as there’s also a graphical interface of the tool – Grsync. Expert admins are able to get the maximum out of it. For general users, it’s better to go with its graphical interface version. Besides Grsync, there’s another front-end tool to make rsync work – Luckbackup.
For advanced usage, the command line version is more useful as it allows more versatility for automation and scripting. We’ve already covered a great tutorial on using rsync for performing auto backup.
Timeshift
For Linux Mint users, Timeshift is a tremendously powerful tool that can save a lot of time in terms of system backup. This tool is also available for other Linux systems. If you’re not a Linux Mint user, then you also have the option to secure your system with Timeshift. Timeshift was also featured on Linux Hint. Take a look at backing up and restoring your Linux system with Timeshift. It is advertised on the Timeshift website as a tool that will be familiar to Mac users with the proprietary Time Machine tool.
Bacula
Bacula is an enterprise grade open-source backup tool. It is a client server system that can run on a small home system or a large enterprise wide backup deployment. Its task doesn’t require any intervention from any computer operator or system admin. Bacula is able to work with a wide range of pro backup devices and even with tape libraries. This tool is accessible via command line, web interface or GUI. The back-end is a catalog of info that the tool stores in MySQL, SQLite or PostgreSQL. If you come from using a commerical backup and restore tool, you will be at home with the free and open source Bacula solution
Other features of Bacula include: Catalog Services, Ability to find and repair damaged files, TLS authentication, compression and accurate backup, writing to multiple volumes, virtual backup and duplicate job control and a Monitoring UI.
Amanda
It’s another awesome open-source tool for backup on Linux written in C and Perl. Originally developed at University of Maryland and now homed at Amanda.org and Sourceforge. Amanda is also available for other platforms like UNIX and Windows. The tool supports native backup facilities and formats that can even perform backup on Linux system. You can also use Amanda if you wish to make a backup from several machines that are on a network.
Other features of Amanda include: Intelligent scheduling, auto data retention and deposition policy, rapid installer, backup fault tolerance, flexible media options, tape management, encryption, and integration with Kerberos.
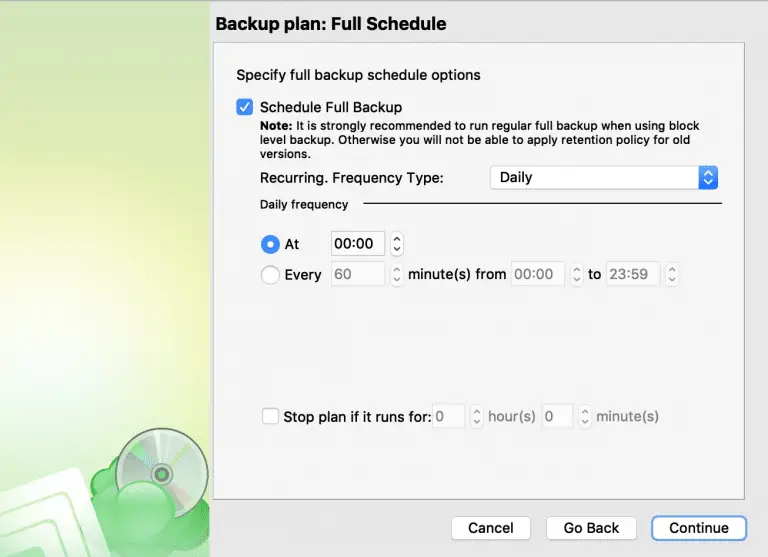
Cloud Berry Backup
Brought to you by CloudBerry Labs, this solution comes in a Freemium model with a free version and an enhanced paid version both for Linux operating systems. The solution will backup a linux system to the cloud of your choice. You can use the Command Line Interface or the WebUI to perform full or incremental backup jobs. Schedule Backups and retention policies based on a calendar and get notified via email for successful backup jobs or errors. Encryption and compression are available in the paid version. Now having a limited space for backup’s is not a problem by leveraging commodity cloud storage you can control.
Clonezilla
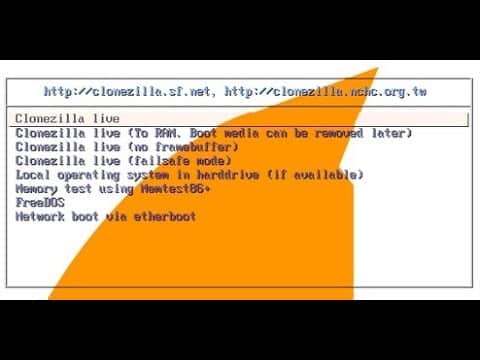
The main mechanism of this software includes cloning and imaging partitions, udpcast etc. Clonezilla comes up in 2 different variation – one for the general users (Clonezilla live) and another for server usage (Clonezilla SE). As the name implies it is focused on system images and system cloning, but in addition Clonezilla is suitable as a backup and restore tool as well.
Other features of Clonezilla include: entire disk/partition saving and restoring, image encryption, imaging and cloning tuning, single image to multiple devices restoring, unattended mode, multiple file system support
Back in Time
Just the name suggests, this tool is able to send your system and/or your file(s) and directory(s) back in time! Its a simple tool written in Qt and Python. In reality, the tool takes a snapshot of your target file/directory into the backup directory. You can easily set the backup frequency. Its available in Ubuntu PPA, Arch repos or build from source. On the project website it claims: “Back In Time – A simple backup tool for Linux“.
BackupNinja
This is a powerful reinforcement backup tool for Linux users. This tool allows plain reinforcement action design documents. The tool can hang the documents in “/etc/backup.d/”. The processes this tool perform are secure, remote and provides incremental reinforcements over a system.
Other features include: email alarms, works with virtual Linux servers, schedule reinforcements
BackupPC
BackupPC’s home page claims it is a “high-performance, enterprise-grade backup system”. This tool doesn’t require any client-side software for running the entire process. This tool also features full file compression and doesn’t use much disk space. Other features include: highly flexible, huge documentation, full set of restore option, extremely powerful web UI.
Fwbackups
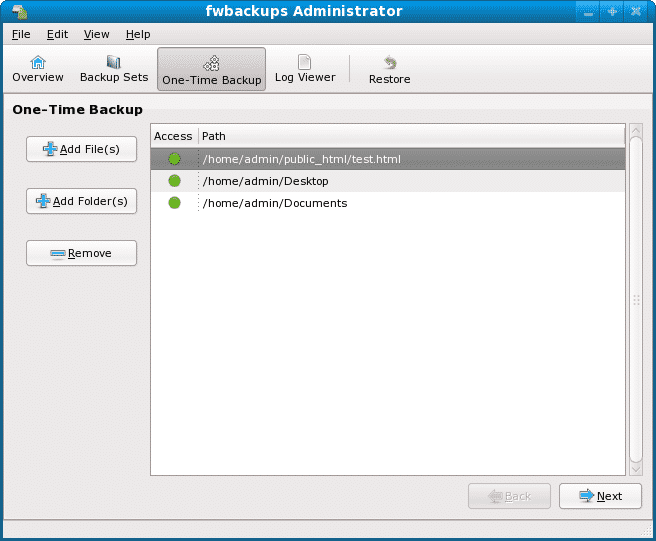
Here is another free and open-source tool for backing up your file(s) and directory(s). The tool features a really simple and self-explanatory interface. This tool is cross-platform and boasts of high user satisfaction rate.
Other features include: excellent and simple interface, remote backup, entire file backup, exclude file(s) and/or directories or backup the entire system. This is a fairly straightforward and simple toolset that does not claim to be enterprise grade.
Burp
Burp is a feature rich, free and open-source tool for backup. This tool is able to take snapshots of both the Linux and Windows system, it is network speed and disk space optimized for high performance. It can utilize either rsync or a specialized de-duplication algorithm for efficiency.
Features include: resuming interrupted backups, schedule backups, backup and restore file(s), directories, hardlinks, symlinks, nodes, permissions and timestamps as well, advanced network compression and throttling, delta differencing, encryption, scheduling, automated retention periods, and notifications.
Déjà Dup
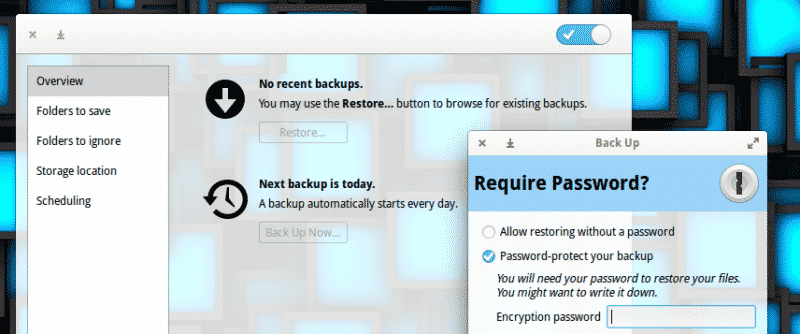
If you’re in search for a simple backup tool, then Déjà Dup is a perfect choice. In fact, this tool is also able to cloud backup your files and directories to cloud services like Google Drive and Nextcloud. That’s a really good feature.
Other features include: duplicity as the backend, compression and encryption of data, incremental backups, scheduling backups.
CONCLUSION
To safely backup your Linux system(s) you won’t need to shell out big bucks or use a proprietary system with all these FOSS options above. Be safe.
About the author

Sidratul Muntaha
Student of CSE. I love Linux and playing with tech and gadgets. I use both Ubuntu and Linux Mint.
Источник


