- How to Boot From a CD, DVD, or BD Disc
- Boot from a disc to start diagnostic, setup, and other offline tools
- How to Boot From a CD, DVD, or BD Disc
- What to Do If the Disc Won’t Boot
- How to Boot From a USB Device
- Make your PC boot from a USB flash drive or external hard drive
- How to Boot From a USB Device
- What to Do When the USB Device Won’t Boot
- Boot Disk – Guide for Windows XP, Vista, 7, 8, 8.1, 10
- What is a boot disk
- Download boot disk
- Create boot disk for Windows XP
- Create boot disk for Windows Vista
- Prerequisites
- Creating a boot disk
- Create boot disk for Windows 7
- Create boot disk for Windows 8/8.1/10
- Create the disk as a CD/DVD
- Create a boot disk as a USB drive
- More Information
- Support Links
- Applicable Systems
How to Boot From a CD, DVD, or BD Disc
Boot from a disc to start diagnostic, setup, and other offline tools
:max_bytes(150000):strip_icc()/tim-fisher-5820c8345f9b581c0b5a63cf.jpg)
You might have to boot from a CD, DVD, or BD to run certain kinds of testing or diagnostic tools, like memory testing programs or bootable antivirus software.
Booting from a disc is operating system independent, meaning that it’s the same in Windows 7 as it is in Windows 10, or Windows 8, etc.
How to Boot From a CD, DVD, or BD Disc
When you boot from a disc, what you’re actually doing is running your computer with whatever small operating system is installed on the disc. When you start your computer normally, you’re running with the OS installed on your hard drive, like Windows, Linux, etc.
:max_bytes(150000):strip_icc()/ldf-eplus-gettyimages-56a6f9d93df78cf772913aa6.jpg)
Change the boot order in BIOS so the CD, DVD, or BD drive is listed first. Some computers are already configured this way but many are not.
If the optical drive is not first in the boot order, your PC will start «normally» (i.e., it’ll boot from your hard drive) without even looking at what might be in your disc drive.
After setting your optical drive as the first boot device in BIOS, your computer will check that drive for a bootable disc each time your computer starts. Leaving your PC configured this way shouldn’t cause problems unless you plan on leaving a disc in the drive all the time.
See How to Boot From a USB Device instead of this tutorial if what you’re really after is configuring your PC to boot from a flash drive or other USB storage device. The process is fairly similar to booting from a disc but there are a few extra things to consider.
Insert the CD, DVD, or BD into your disc drive.
How do you know if a disc is bootable? The easiest way to find out if a disc is bootable is to insert it into your drive and follow the remainder of these instructions. Most operating system setup CDs and DVDs are bootable, as are many advanced diagnostic tools like the ones discussed above.
Programs downloadable from the internet that are intended to be bootable discs are usually made available in the ISO format, but you can’t just burn an ISO to the disc as you can other files. See How to Burn an ISO Image File for more on that.
Restart your computer—either properly from within Windows or via your reset or power button if you’re still in the BIOS menu.
Watch for a Press any key to boot from CD or DVD. message.
When booting from a Windows setup disc, and occasionally other bootable discs as well, you may be prompted with a message to press a key to boot from the disc. For the disc boot to be successful, you’ll need to do this during the few seconds that the message is on the screen.
If you do nothing, your computer will check for boot information on the next boot device in the list in BIOS (see Step 1), which will probably be your hard drive.
Most bootable discs don’t prompt for a keypress and will start immediately.
Your computer should now boot from the CD, DVD, or BD disc and the software stored on it will begin.
What happens now depends on what the bootable disc was for. If you’re booting from a Windows 10 DVD, the Windows 10 setup process will begin. If you’re booting from a Slackware Live CD, the version of the Slackware Linux operating system you’ve included on the CD will run. A bootable AV program will start the virus scanning software. You get the idea.
Follow these really easy steps to boot from a disc, a process that usually takes around 5 minutes:
What to Do If the Disc Won’t Boot
If you tried the above steps but your computer still isn’t booting from the disc properly, check out some of the tips below.
Recheck the boot order in BIOS (Step 1). Without a doubt, the number one reason a bootable disc won’t boot is because BIOS isn’t configured to check the CD/DVD/BD drive first. It can be easy to exit BIOS without saving the changes, so be sure to watch for any confirmation prompts before exiting.
Do you have more than one optical drive? Your computer probably only allows for one of your disc drives to be booted from. Insert the disc into the other drive, restart your computer, and see what happens then.
Clean the disc. If the disc is old or dirty, as many Windows Setup CDs and DVDs are by the time they’re needed, clean it. A clean disc could make all the difference.
Burn a new CD/DVD/BD. If the disc is one you created yourself, like from an ISO file, then burn it again. The disc may have errors on it that re-burning could correct. We’ve seen this happen more than once.
How to Boot From a USB Device
Make your PC boot from a USB flash drive or external hard drive
:max_bytes(150000):strip_icc()/ryanperiansquare-de5f69cde760457facb17deac949263e-180a645bf10845498a859fbbcda36d46.jpg)
There are lots of reasons you might want to boot from a USB device, like an external hard drive or a flash drive, but it’s usually so you can run special kinds of software.
When you boot from a USB device, what you’re doing is running your computer with the operating system installed on the USB device. When you start your computer normally, you’re running it with the operating system installed on your internal hard drive—Windows, Linux, etc.
Time Required: Booting from a USB device usually takes 10–20 minutes, but it depends a lot on if you have to make changes to how your computer starts up.
How to Boot From a USB Device
Follow these easy steps to boot from a flash drive, an external hard drive, or some other bootable USB device.
:max_bytes(150000):strip_icc()/how-to-boot-from-a-usb-device-2626091-D-v1-5b1183bd04d1cf00371e7aeb.png)
If the USB boot option is not first in the boot order, your PC will start «normally» (i.e., boot from your hard drive) without even looking at any boot information that might be on your USB device.
The BIOS on most computers lists the USB boot option as USB or Removable Devices, but some confusingly list it as a Hard Drive option, so be sure to dig around if you’re having trouble finding the right one to choose.
After setting your USB device as the first boot device, your computer will check it for boot information each time your computer starts. Leaving your computer configured this way shouldn’t cause problems unless you plan on leaving the bootable USB device attached all the time.
Attach the USB device to your computer via any available USB port.
:max_bytes(150000):strip_icc()/usb-plug-5c433f4546e0fb0001f804f1.jpg)
Creating a bootable flash drive or configuring an external hard drive as bootable is a task in itself. Chances are you made it to these instructions here because you know whatever USB device you have should be bootable after properly configuring BIOS.
See our How to Burn an ISO File to a USB Drive tutorial for general instructions on doing exactly that, which tends to be the reason most people need to figure out how to boot from one.
Since you’re not actually inside of the operating system at this point, restarting isn’t the same as using normal restart buttons. Instead, BIOS should explain which key to press—such as F10—to save the boot order changes and restart the computer.
Watch for a Press any key to boot from external device. message.
:max_bytes(150000):strip_icc()/boot-from-usb-message-57c76dae3df78c71b65d7c9e.png)
You may be prompted with a message to press a key on some bootable devices before the computer boots from the flash drive or another USB device.
If this happens, and you do nothing, your computer will check for boot information on the next boot device in the list in BIOS (see Step 1), which will probably be your hard drive.
Most of the time, when trying to boot from a USB device, there is no key-press prompt. The USB boot process usually starts immediately.
Your computer should now boot from the flash drive or USB based external hard drive.
What happens now depends on what the bootable USB device was intended for. If you’re booting from Windows 10, Windows 8, or Windows 7 installation files on a flash drive, the operating system setup will begin. If you’re booting from a DBAN flash drive you created, it will start. You get the idea.
What to Do When the USB Device Won’t Boot
If you tried the above steps, but your computer didn’t boot from the USB device, check out some of the tips below. There are several places that this process can get hung up at.
Recheck the boot order in BIOS (Step 1). The number one reason a bootable flash drive or another USB device won’t boot is that BIOS isn’t configured to check the USB port first.
Didn’t find a «USB Device» boot order listing in BIOS? If your computer was manufactured around 2001 or before, it might not have this ability.
If your computer is newer, check for some other ways that the USB option might be worded. In some BIOS versions, it’s called «Removable Devices» or «External Devices.»
Remove other USB devices. Other connected USB devices, like printers, external media card readers, etc., could be consuming too much power or causing some other problem, preventing the computer from booting from a flash drive or another device. Unplug all other USB devices and try again.
Or, if you have multiple bootable devices plugged in at once, the computer might simply be booting to the wrong device, in which case the easiest fix would be to remove all USB storage devices but the one you want to use right now.
Copy the files to the USB device again. If you created the bootable flash drive or external hard drive yourself, which you probably did, repeat whatever steps you took again. You may have made a mistake during the process.
See How to Burn an ISO File to USB if you started with an ISO image. Getting an ISO file onto a USB drive, like a flash drive, isn’t as easy as just expanding or copying the file there.
Switch to another USB port. The BIOS on some motherboards only checks the first few USB ports. Switch to another USB port and restart your computer.
Update your motherboard’s BIOS. If your computer is ancient, the BIOS version running on the motherboard may not support booting directly from a USB device. Try flashing the BIOS and checking again for this feature.
Boot Disk – Guide for Windows XP, Vista, 7, 8, 8.1, 10
This guide is about boot (or startup) disks for the following Windows versions: Windows XP, Vista, 7, 8, 8.1 or 10.
What is a boot disk
A boot disk (or a startup disk) is a recovery media (CD, DVD or floppy disk for older Windows versions) that you can use to start Windows, if it became damaged or corrupted somehow.
The term “boot disk” was mostly used in connection with Windows XP (and older versions) and, in some cases, with Windows Vista. For Windows 7, Windows 8 and Windows 10 the “boot disk” term is mostly replaced with the term “recovery disk” (sometimes also named as a “repair disk” or “restore disk”).
NeoSmart Technologies has extensive guides on how to create recovery media for all major PC manufacturers that have their own software for recovery procedures and a recovery disk for all Windows versions (XP, Vista, 7, 8, 10).
If you have a computer from any of the following manufacturers, read that guide too. Most PC manufacturers with computers that have Windows installed also have a recovery partition that you can make use of to restore or repair your computer. Some older models had only a recovery disk (as a CD, DVD etc.) or only the recovery partition.
Our list of recovery media guides for specific PC manufacturers: Dell (including the guide on the recovery partition), Acer, Asus, Gateway, Toshiba, HP, Lenovo.
A boot or startup disk is not an installation disk! You can not use a boot disk to install Windows. To install Windows, use your original Windows installation disk.
You can use the following formats to create a disk:
- CD or diskette (floppy disk) for Windows XP
- CD or DVD for Windows Vista
- CD or DVD for Windows 7
- CD or DVD or USB for Windows 8
- USB for Windows 8.1 or Windows 10
Download boot disk
If you aren’t able to boot into Windows or don’t access to the recovery partition to create a system recovery disk, you can use our recovery and repair disk Easy Recovery Essentials to repair and restore your computer.
Easy Recovery Essentials is compatible with the following Windows versions: Windows 10, Windows 8 or 8.1, Windows 7, Windows Vista, Windows XP or Windows Server 2003, 2008 and 2012.
Features of Easy Recovery Essentials include:
- Automatically find and fix boot errors
- Works even when you can’t get into Windows
- Recover from virus infections
- Restore your PC to a working state
- Access and backup your important data
- Advanced tools for IT experts
Easy Recovery Essentials is an ISO download image ready to be burned directly to a CD, DVD or a USB flash drive.
With Easy Recovery Essentials you can:
- Find and fix errors automatically with Automated Repair
- Recover your PC from infections with the built-in antivirus
- Restore your PC to a working state
- Access and backup your most important data (like documents, pictures, music, videos and so on)

Screenshot of Easy Recovery Essentials
Note: Easy Recovery Essentials can not be used to install or reinstall Windows.
Windows XP users
Easy Recovery Essentials can be used as a boot disk (or recovery disk) for computers with Windows XP installed to repair the computer, including the full list of Windows XP editions with Service Packs installed:
- Microsoft Windows XP SP1 (Service Pack 1)
- Microsoft Windows XP SP2 (Service Pack 2)
- Microsoft Windows XP SP3 (Service Pack 3)
It’s compatible with both the Home and Professional editions of Windows XP:
- Microsoft Windows XP Home
- Microsoft Windows XP Professional
Windows Vista users
Easy Recovery Essentials works with Windows Vista computers and the version for the x86 and x64 platforms. It works with all Windows Vista editions, including the 32-bit and 64-bit editions:
- Microsoft Windows Vista Ultimate (32-bit and 64-bit editions)
- Microsoft Windows Vista Enterprise (32-bit and 64-bit editions)
- Microsoft Windows Vista Business (32-bit and 64-bit editions)
- Microsoft Windows Vista Home Premium (32-bit and 64-bit editions)
- Microsoft Windows Vista Home Basic (32-bit and 64-bit editions)
- Microsoft Windows Vista Starter (32-bit edition)Note: Windows Vista Starter doesn’t have a 64-bit edition.
It’s compatible with the available Service Packs of Windows Vista:
- Microsoft Windows Vista Service Pack 1 (SP1)
- Microsoft Windows Vista Service Pack 2 (SP2)
Windows 7 users
Easy Recovery Essentials is compatible with Windows 7 and supports both x86 and x64 platforms and is compatible with the full list of Windows 7 editions, including the 32-bit and the 64-bit:
- Microsoft Windows 7 Ultimate (32-bit and 64-bit editions)
- Microsoft Windows 7 Enterprise (32-bit and 64-bit editions)
- Microsoft Windows 7 Professional (32-bit and 64-bit editions)
- Microsoft Windows 7 Home Premium (32-bit and 64-bit editions)
- Microsoft Windows 7 Home Basic (32-bit and 64-bit editions)
- Microsoft Windows 7 Starter (32-bit edition)Note: Windows 7 Starter is only available in the 32-bit edition.
It’s compatible with the Service Pack 1 for Windows 7:
- Microsoft Windows 7 Service Pack 1 (SP1)
Windows 8 or 8.1 users
You can use Easy Recovery Essentials as a boot or startup disk (now known as a recovery media) for computers with Windows 8/8.1 installed to repair or restore your computer.
It supports the x86 and x64 platforms and all the Microsoft Windows 8 editions (8 and 8.1), including the 32-bit and the 64-bit editions:
- Microsoft Windows 8 (32-bit and 64-bit editions)
- Microsoft Windows 8.1 (32-bit and 64-bit editions)
Windows 10 users
You can use Easy Recovery Essentials as a boot or startup disk (now known as a recovery media) for computers with Windows 10 installed to repair or restore your computer.
Create boot disk for Windows XP
The original Windows XP installation CD itself acts as a boot or startup disk that you can use and run Recovery Console (Command Prompt) to repair your computer with.
If you already have the installation CD, follow these steps to boot into Recovery Console and the Command Prompt of Windows XP:
- Insert the CD in the disk drive and restart your computer
- Press any key, when prompted to boot from the CD
- Press R to open Recovery Console, at the “Welcome to Setup” screen
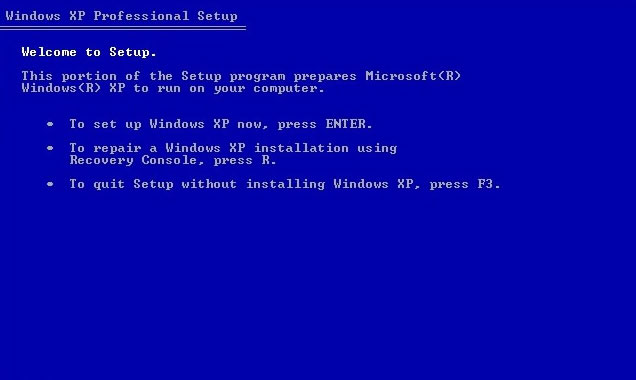
Windows XP Press R for Recovery Console
If you don’t have the CD, you can create a bootable diskette if your computer has a floppy disk drive to boot into MS-DOS. You need to be able to boot into Windows XP to create this diskette.
To create the boot diskette for Windows XP, follow these steps:
- Insert a diskette in your computer’s floppy disk drive
- Go to My Computer
- Right click on A:\ , this is usually the drive letter that holds the diskette
- Click Format
- Check the “Create an MS-DOS startup disk” option
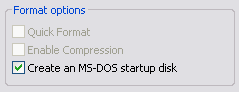
Create MS-DOS startup disk option
Once you have the diskette created, follow these instructions to use it when you need it:
- Make sure the disk is in write-protect mode
- Insert the disk in the floppy disk
- Restart your computer
- Follow the instructions on the screen as you boot the system from the diskette
You can also create a set of setup/boot disks that will allow you to bypass the need for a bootable CD-ROM (and then continue a reinstallation of Windows XP) by following these instructions:
- Download the setup program file for the Windows XP you have installed:
- Windows XP Home Edition with Service Pack 2
- Windows XP Professional with Service Pack 2
- Extract the files
- Type the drive where your floppy disks is – example: A: – and hit Enter when you receive this message:
- Insert the first blank disk in the floppy drive when you receive this message:
- Continue with the process until all 6 disks are created
- Boot from the first created diskette. Make sure you have the installation CD at hand to be used during a reinstallation process.
Create boot disk for Windows Vista
If you already have the Windows Vista installation disk, you can use it to recover or restore your computer.
If not, go to the Create the disk section instructions to learn how you can create the disk (read Prerequisites before).
If you don’t have the installation disk and can’t boot into Windows, go to Download boot disk and use Easy Recovery Essentials’ Automated Repair function to fix boot errors automatically.
To repair your computer, if you have the Windows Vista installation disk, follow these steps:
- Insert the disk
- Restart your computer
- Press any key to start Windows from the disk. If the “Press any key” message doesn’t appear, please check your BIOS settings as you need to boot from the DVD first.

If you don’t have the installation disk, but your computer has the recovery options preinstalled, you can follow these steps:
- Restart your computer. Remove all CDs, DVDs or USB flash drives from your computer first.
- Press and hold the F8 key as your computer boots up. You need to press this key before the Windows Vista logo appears on your screen.
- At the Advanced Boot Options screen, select Repair your computer.
If the “Repair your computer” option isn’t available, your computer doesn’t have any recovery options preinstalled. If so, go to Download boot disk.
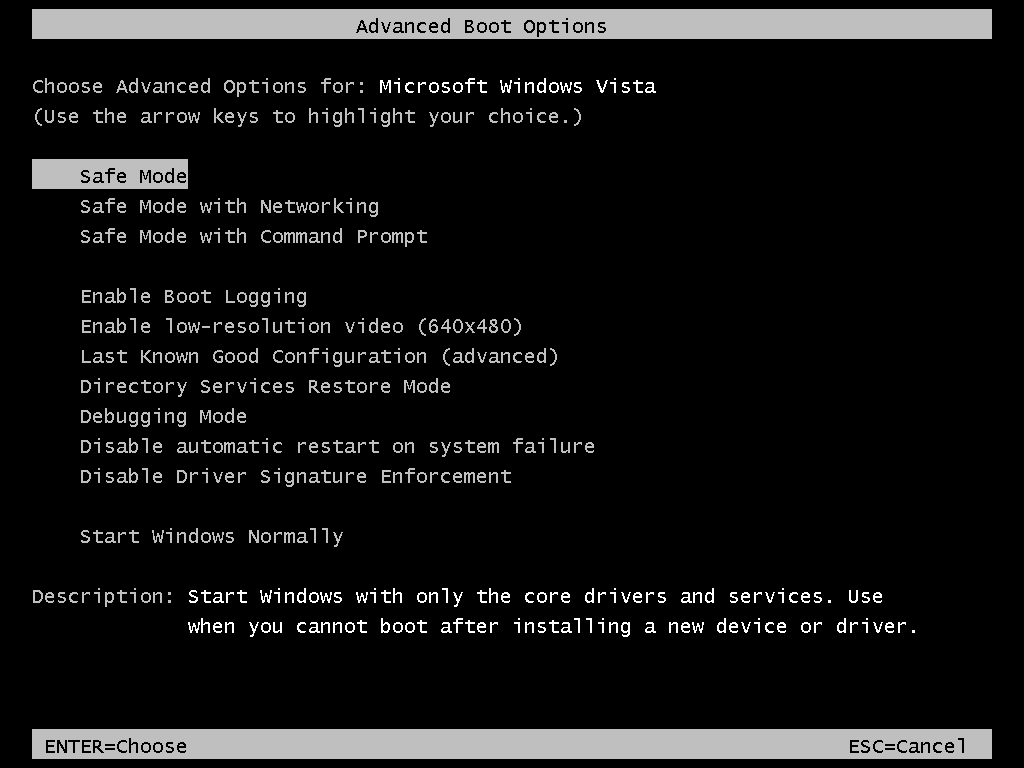
The Advanced Boot Options screen in Windows Vista
If you want to create a boot disk, follow the instructions from Prerequisites and then the Create the disk instructions.
Prerequisites
You must verify what version of Windows Vista you have before you create the boot or startup disk. If you have any Service Packs installed, you need the recdisc.exe file from the System32 folder to be from a Windows Vista system without any Service Packs (SP) installed.
To verify this, follow these steps:
- Go to Control Panel
- Click on System
- Go to the System type section
- Check if you run a “32-bit” Windows Vista or a “64-bit” Windows Vista
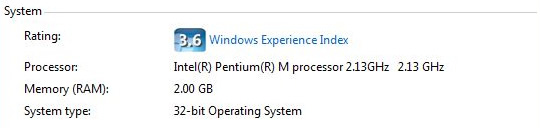
Windows Vista System Type
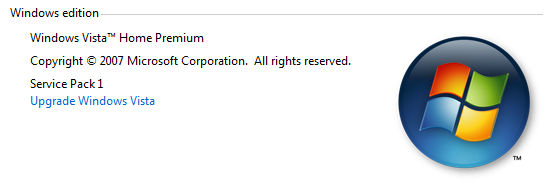
The Windows Vista – Windows Edition section
If you have the Windows Vista with Service Pack 1 (SP1) or Service Pack 2 (SP2) installed, you need to replace the recdisc.exe file.
Your Windows Vista has SP1 or SP2 installed only if it’s mentioned in the Windows edition section, above the “System type” section.
If you have a Service Pack installed, follow these steps to replace the recdisc.exe file before you continue with the Create the disk section steps:
- Copy an original recdisc.exe file from a Windows Vista without SP. This file will be replaced with your current recdisc.exe.
- Copy this file to your Desktop
- Right-click on the file > Properties
- Go to the General tab
- Click Unblock. If this option – Unblock – doesn’t exist in the General tab, skip this step.
- Click OK
- Go to C:\Windows\System32\ (from My Computer > C:\ > Windows > System32)
- Find the recdisc.exe file from this folder
- Make sure you have permissions to make modifications to this file. Right-click on this file > Properties
- To have a backup of your original recdisc.exe file, rename it to recdisc.exe.backup or similar
- Go to the copied recdisc.exe file and copy it (Right-click > Copy)
- Paste it in the System32 folder, to overwrite your current recdisc.exe file
- If you didn’t renamed the original file, confirm that you want to replace it (click Copy and Replace, when prompted)
Once these steps have been completed, move to Create the disk below to create the boot/startup disk for Windows Vista.
Creating a boot disk
Please read Prerequisites above before continuing with these instructions.
These steps allow you to create the boot or startup disk (a recovery media) for Windows Vista that you can use in emergency cases.
- At Start, type recdisc.exe in the search field
- When the search results appears, click on the top result item
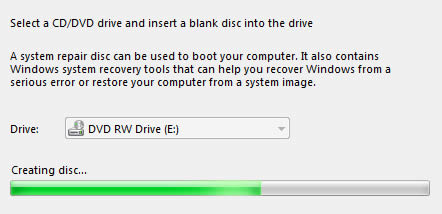
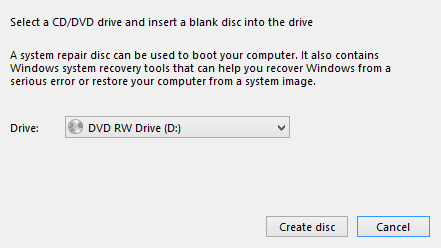
- Insert a blank DVD in the disk tray. You can use CDs or DVDs for this
- Select the disk drive from the “Drive:” list
- Click Create disc. If after clicking Create disc, the system shows a message about the installation disk – Insert Windows installation disc – you need the original installation disk as your version of Windows Vista is missing the necessary files to continue with the process.
- Wait for the recdisc.exe utility software to finish the procedure
- Click Close, at the “Using the system repair disc” screen
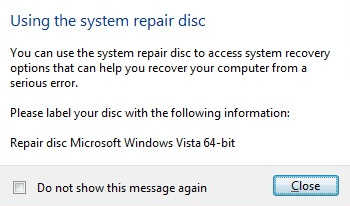
Windows Vista – Using the system repair disc
Create boot disk for Windows 7
If you already have the original installation DVD of Windows 7, you can use that DVD as the boot disk to repair your computer.
If you want to repair your computer and have the installation disk at hand, follow these steps to boot into the System Recovery Options of your computer:
- Insert the installation disk (DVD or USB flash drive)
- Restart your computer
- Press any key to boot from the disk, when prompted
- Choose your language preferences
- Click Next
- Click Repair your computer
If you don’t have the installation disk, but your system has the system recovery options pre-installed, follow these steps:
- Remove all CDs, DVDs and USB flash drives from your computer
- Restart the computer
- Press and hold the F8 key as your computer boots. You must press and hold the F8 key before the Windows 7 logo appears.
- Select Repair your computer, at the Advanced Boot Options screen
If the “Repair your computer” option isn’t listed, it means that your Windows 7 version doesn’t have the necessary files for this procedure. If so, go to Download boot disk.

Advanced Boot Options on Windows 7
You can create the boot disk for Windows 7 by following these steps:
- Boot into Windows 7 and login as an administrator or any user who has administrative rights to the system
- Insert a blank DVD in the disk tray
- At Start, type recdisc.exe in the Search field
- Click on the first result, the recdisc.exe item. It should usually be the first result item available.
- If the “Create a system repair disc” screen doesn’t show up, follow these steps instead:
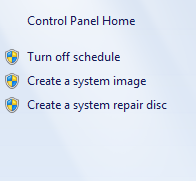
- Go to Control Panel
- Go to Backup and Restore
- Click on Create a system repair disc

Windows 7 – Create a system repair disc item
Windows 7 – Create disc progress bar
Create boot disk for Windows 8/8.1/10
In Windows 8 or 8.1, you can refresh, reset or restore your computer. These three actions have different outcomes:
- Refresh will not affect your files. Windows 8/8.1 will reinstall any applications you installed and create a copy of these applications on your desktop. Even so, backup your data before you do a refresh.
- Reset will remove all your personal files and delete any settings or configuration you did on your computer.
- Restore will restore your computer to an earlier point in time, if System Restore is available and enabled.By default, Windows 8/8.1 creates restore points whenever you install new applications or do Windows updates. If you haven’t disabled System Restore, restoring your computer via this utility should work.
If you want to create the boot disk, find the instructions below:
- If you have Windows 8, not 8.1, follow Create the disk as a CD/DVD
- If you have Windows 8.1, not 8.0, follow Create the disk as a USB drive. For Windows 8.1 you can only use USB drivers to create the disk.
Refresh
How to refresh the Windows 8 or 8.1 on your computer:
- Boot your computer
- Go to Settings
- Go to Change PC Settings
- Click Update and recovery
- Click Recovery
- Find the Refresh your PC without affecting your files section
The Refresh your PC option in Windows 8
Reset
How to reset Windows 8 or Windows 8.1:
- Boot your computer
- Go to Settings
- Go to Change PC Settings
- Click on Update and recovery
- Click on Recovery
- At the Remove everything and reinstall Windows section, click on the Get started button
The Remove everything option in Windows 8
Restore
For information on how to restore a Windows 8 or Windows 8.1 system, follow our instructions from the guide we did on Windows System Restore here.
Create the disk as a CD/DVD
If you have Windows 8, and not 8.1, you can use CDs or DVDs to create the boot disk (now commonly known as a recovery media):
- Boot into Windows 8 and log in with an administrator account
- Unplug any USB flash drives
- Insert a blank CD or DVD. It’s recommended that you use DVDs, and not CDs, as you will need lots of CDs in the process, if you choose the CD option
- Press the Windows and R key to open the Charm Bar. Or go to the Run utility.
- Type recdisc
- If the “Create a system repair” screen doesn’t appear, follow these steps instead:
- Open Control Panel
- Go to Recovery
- Click on Create a recovery drive
- Click Next
- Click Create a system repair disc with a CD or DVD instead to create the disc as a CD or DVD and not as a USB flash drive, at the “Connect a USB flash drive” screen
- Select the CD/DVD drive from the list
Windows 8 – Select CD for System Repair
Create a boot disk as a USB drive
These steps are for Windows 8.1 users which can only use USB flash drives to create the boot/startup disk. You need a USB drive with at least 256 MB in size, blank.
To create the disk, follow these steps:
- Boot into Windows 8.1
- Press the Windows + R key to open the Charm Bar
- Type RecoveryDrive.exe
- Select Create a recovery drive
- If the Recovery Drive utility doesn’t appear, follow these steps instead:
- Go to Control Panel
- Go to Recovery
- Click Create a recovery drive
- Click Next
- Click Next, at the Create a recovery drive screen
- Select the USB drive from the list
- Click Next
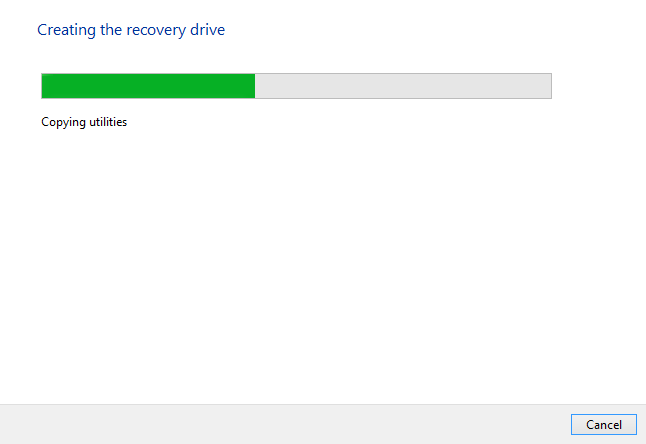
- Click Create
- Wait for the software to finish
Windows 8 – Create disc progress bar
More Information
Support Links
It’s an easy-to-use and automated diagnostics disk. It’s available for Windows 8, Windows 7 and Windows Vista. It’s also available for Windows XP and Windows Server.
Read more at Windows Recovery Disks.
- The NeoSmart Support Forums, member-to-member technical support and troubleshooting.
- Get a discounted price on replacement setup and installation discs: Windows XP, Windows Vista, Windows 7, Windows 8, Windows 10.
- Windows XP (all editions)
- Windows Vista (all editions)
- Windows 7 (all editions)
- Windows 8 (all editions)
- Windows 8.1 (all editions)
- Windows 10 (all editions)
Applicable Systems
This Windows-related knowledgebase article applies to the following operating systems: