- How to Build Linux Kernel From Scratch Home » Security » How to Build Linux Kernel From Scratch The Linux Kernel is the foundation of the Unix-like operating systems. The kernel is responsible for communication between hardware and software and the allocation of available resources. All Linux distributions are based on a predefined kernel. But, if you want to disable several options and drivers or try experimental patches, you need to build a Linux kernel. In this step-by-step guide, you will learn how to build and compile a Linux kernel from scratch. A system running Linux Access to the terminal/command line A user account with sudo/root privileges 12GB of available space on the hard drive Building Linux Kernel The process of building a Linux kernel takes seven easy steps to complete. However, the procedure requires a significant amount of time to complete, depending on the system speed. Follow the steps below to build the latest Linux kernel at the time of writing this article. Note: If the version on the kernel website does not match the one from the steps below, use these commands and replace the kernel version number. Step 1: Download the Source Code 1. Visit the official kernel website and download the latest kernel version. The downloaded file contains a compressed source code. 2. Open the terminal and use the wget command to download the Linux kernel source code: The output shows the “saved” message when the download completes. Step 2: Extract the Source Code When the file is ready, run the tar command to extract the source code: The output displays the extracted kernel source code: Step 3: Install Required Packages Install additional packages before building a kernel. To do so, run this command: The command we used above installs the following packages: Package Package description git Tracks and makes a record of all changes during development in the source code. It also allows reverting the changes. fakeroot Packaging tool that makes the fake root environment. build-essential Installs development tools such as C, C++, gcc, and g++. ncurses-dev Programming library that provides API for the text-based terminals. xz-utils Provides fast file compression and decompression. libssl-dev Supports SSL and TSL that encrypt data and make the internet connection secure. bc (Basic Calculator) A mathematical scripting language that supports the interactive execution of statements. flex (Fast Lexical Analyzer Generator) Generates lexical analyzers that convert characters into tokens. libelf-dev Issues a shared library for managing ELF files (executable files, core dumps and object code) bison GNU parser generator that converts grammar description to a C program. Step 4: Configure Kernel The Linux kernel source code comes with the default configuration. However, you can adjust it to your needs. To do so, follow the steps below: 1. Navigate to the linux-5.9.6. directory using the cd command: 2. Copy the existing configuration file using the cp command: 3. To make changes to the configuration file, run the make command: The command launches several scripts, which then open the configuration menu: 4. The configuration menu includes options such as firmware, file system, network, and memory settings. Use the arrows to make a selection or choose HELP to learn more about the options. When you finish making the changes, select SAVE, and then exit the menu. Note: Changing settings for some options can lead to a non-functional kernel. If you are unsure what to change, leave the default settings. Step 5: Build the Kernel 1. Start building the kernel by running the following command: The process of building and compiling the Linux kernel takes some time to complete. The terminal lists all Linux kernel components: memory management, hardware device drivers, filesystem drivers, network drivers, and process management. 2. Install the required modules with this command: 3. Finally, install the kernel by typing: The output shows done when finished: Step 6: Update the Bootloader (Optional) The GRUB bootloader is the first program that runs when the system powers on. The make install command performs this process automatically, but you can also do it manually. 1. Update the initramfs to the installed kernel version: 2. Update the GRUB bootloader with this command: The terminal prints out the process and confirmation message: Step 7: Reboot and Verify Kernel Version When you complete the steps above, reboot the machine. When the system boots up, verify the kernel version using the uname command: The terminal prints out the current Linux kernel version. In this step-by-step guide, you learned how to build a Linux kernel from scratch and install the required packages. If you follow the instructions carefully, the process will complete successfully on your Linux machine. The Linux kernel has a modular design. Functionality is extendible with modules or drivers. Learn how to use the modprobe command to add or remove modules on Linux. Источник How to Build Linux Kernels The Linux Kernel is Very Different from Services and User Applications The Linux kernel is the core of the operating system itself. The kernel directly detects and controls the hardware. It controls the running processes: creating those processes, allocating memory and CPU cycles, and enforcing permissions on files, devices, network sockets, and inter-process communication. It does not include the network services or other privileged processes, and all user programs are certainly not part of it (although those services and other processes can only run with the kernel’s assistance). The boot loader loads the kernel memory and starts it, and the kernel remains resident in memory until it shuts the system down. As for what the user does from the command line, through the graphical user interface, or through scheduled jobs, those are processes which run in what is called «user space», where all addresses are virtual and processes run only in the ways the kernel allows. A process cannot access hardware directly as it is only has virtual addresses. The kernel, however, runs in «kernel space» and directly accesses hardware through physical addresses. When a process wants to utilize hardware, it does so through the kernel. This is subject to the kernel’s enforcement of ownership and access permission, and the kernel’s mapping between the virtual address space of the process and the physical address space of the hardware. The user process asks to open and read the content of a file by using the open() system call. Kernel modules for hardware (SATA controller chipset, disk block devices) and software (Ext4/XFS/BtrFS file systems) functionality are involved, but the user process only sees the open() system call interface. Similarly, a user process request to establish a connection to a network service on another machine through the socket() system call ultimately involves hardware (Ethernet chipset) and software (IP and TCP protocols) functionality. Upgrading the Kernel, Versus Upgrading Applications For the most part, these are entirely separate. Yes, it is important to keep both your kernel and your applications patched and up to date. But you don’t have to update user applications when you update the kernel, or vice-versa. I had to hedge by saying «For the most part» because some applications are sensitive to kernel version. However, these applications that deal with kernel data structures are used only by system administrators, not by ordinary users. These applications handle tasks like testing or manipulating packet filtering rules, creating and repairing file systems, configuring IP addresses and netmasks, and other kernel-related tasks. See the file /usr/src/linux/Documentation/Changes for the list of sensitive programs, their required versions for that specific kernel release, and the commands to run to discover which versions you have. Do You Need to Build a Kernel? The answer very likely is «No»! If there is a security hole in the kernel, or a significant performance improvement becomes available, your distribution should provide an update package soon. However, building and running a custom kernel teaches you a great deal about how the system boots, how to do troubleshooting, and about the myriad capabilities of the operating system. Let’s build our own kernel! Overview of the Steps This is a sizeable project, so let’s start with a quick overview of the steps: First, download the kernel source, which will be a large compressed tar archive file. Make sure to verify its digital signature! We want to be certain that we’re running the real Linux operating system, not something with back doors installed by the bad guys. Since the kernel itself is the ultimate mechanism for access control, a subverted kernel is the ultimate software exploit. A digital signature verifies the data integrity and the identity of the provider of the source archive. Second, install the kernel source in /usr/src/linux/ . Third, configure a new kernel build. The only approach that makes sense is to start with a useful kernel configuration file, the configuration for the kernel currently running on your hardware is the obvious choice. With that as a starting point, you may need to make some changes. Finally, build the new kernel defined by that configuration and install it. All of this should just simply work, but just in case we will keep our current kernel as a backup alternative. Now that you see where we’re going with this, let’s get started! Obtain the kernel source and understand the Linux kernel version numbers The kernel source itself is available from kernel.org You will need the kernel tar archive file, a rather large file named something like: linux-release.tar.xz and the corresponding very small digital signature file: linux-release.tar.sign where release is either two or three numbers separated by dots, something like 4.18 or 4.18.6 Uncompress the large tar archive file and verify the digital signature. Do not proceed until you have successfully verified the signature, indicating that you have the real source code from the Linux kernel organization. You need to understand the Linux release numbering scheme. You will see kernel releases with both two and three numbers. The two-number version represents the release in terms of potential capabilities. They increment as 3.0, 3.1, 3.2, and so on. It rolls over at a fairly arbitrary point. It went from 2.xx to 3.0 at the first release after the 20th anniversary of the public release of Linux in August, 2012. Then Linus Torvalds decided to do that more often, and in early 2015 it went from 3.19 to 4.0. The 4.0 kernel release includes more features, more modules or device drivers, than 3.19. The 3.19 release in turn included more features than 3.18. These new features might be for hardware, like new network interfaces based on recently developed chipsets. Or they might be software modules, possibly new options for networking protocols or file systems. The third number, if present, represents bug fixes. The 3.19.1 release includes patches to some bugs discovered in the 3.19 release. In turn, the 3.19.2 release includes more patches, the 3.X.Y releases are cumulative bug fixes to 3.X. And, of course, the 3.19 series includes all the bug fixes in the 3.18 series. The kernel organization has strict rules: 4.X.Y releases must be bug fixes only, no sneaking new features into the kernel before the 4.(X+1) release! And the fixes should be small, involving 100 lines or less of C code. You could imagine the releases laid out in a grid: Release ↓ Bug fixes → 3.17 3.17.1 3.17.2 3.17.3 3.17.4 3.17.5 . 3.18 3.18.1 3.18.2 3.18.3 3.18.4 3.18.5 . 3.19 3.19.1 3.19.2 3.19.3 3.19.4 3.19.5 . 4.0 4.0.1 4.0.2 4.0.3 4.0.4 4.0.5 . 4.1 4.1.1 4.1.2 4.1.3 4.1.4 4.1.5 . . . 4.17 4.17.1 4.17.2 4.17.3 4.17.4 4.17.5 . 4.18 4.18.1 4.18.2 4.18.3 4.18.4 . 4.19 . The actual grid would be enormous. There may be a hundred or more bug fix releases an older release, and before 3.X there was 0.X, 1.X, and 2.X major release series. So, which version do you need? That depends on your hardware — the latest 3.X.Y should be fine, but you may not really need the very latest if the recent feature additions and bug fixes were in drivers for hardware you don’t own. Server hardware tends to be conservative. Unless you just bought new server motherboards, an older release is likely just fine as far as hardware support goes. Performance improvements in software modules (TCP, file systems) are much more likely to interest you. Laptop / notebook hardware evolves much more quickly. Recent portable systems are likely to include WLAN or Bluetooth (and possibly even Ethernet) chipsets not supported in the older kernel releases included in more conservative distributions. Now, having decided on some 3.X release to include all the features you need, do you really need the very latest 3.X.Y set of bug fixes? This sounds dangerous, but not necessarily. This is because many of those bug fixes apply to modules for hardware you don’t own, therefore modules you will not use. My suggestion is to use the latest 3.X.Y available at the time, but then not to try to always upgrade to every bug-fix release that comes out after that. Watch the advisories, see when it makes sense to upgrade. By the time you need to go to a newer 3.X.Y, a kernel in a later 3.X series would likely be a better choice. Make absolutely certain that you really have the kernel source You do not want to run some hacker’s operating system instead of the real kernel! You must verify both the integrity of the data you just downloaded and the identity of its source. In other words, is it really the kernel source, and did it really come from the Linux kernel organization? To be safe, you need to check the digital signature with GNU Privacy Guard (GnuPG) or similar. See the digital signature section of my «Just Enough Cryptography» pages for an explanation of what digital signatures are. See the page on verifying digital signatures to learn how to apply this technology. Verification is vital, but an explanation right here would make this page at least as much about digital signatures as about building Linux kernels! Really, go look at that other page, this page will be right here waiting for you when you get back. Install the kernel source From here forward, I will use oldrelease and release to stand for, well, whatever your old and new releases will be! You will have to think just a little. You need to do some steps as root here, so become root with the su command. If you are using Ubuntu or a derivative, use sudo bash to get a root shell. Your distribution or earlier work by yourself or other administrators may have already installed kernel source under a directory named /usr/src/linux-oldrelease with a symbolic link pointing to it. Find out, and if necessary, remove that link: Extract the kernel source with the following. You must be in the right directory, /usr/src, and I leave it up to you to figure out where you put that downloaded archive file. I mean, really, if you can’t keep track of where you put a downloaded file then you have no business trying to build a kernel. But my experience tells me that I need to put two commands here to keep some people from making horrible messes of things: Recreate the symbolic link, so that other software can be compiled on your system. If you’re really curious, software making calls to system libraries need to find the include files under /usr/src/linux/include and this will support that. Or just take my word for it, this is important: The tar archive may have created files owned by some random UID other than 0, meaning root. This is not good! Fix it and make sure that everything has worked so far: You should see something like the following: Now, just to be safe, let’s remove any stale object files inappropriately cluttering your source tree, so we can build a fresh clean kernel: Install an initial kernel configuration file From here on, we will just rely on /usr/src/linux to be set up and pointing to the new source tree, making the pathnames a little simpler if we need to mention them. However, almost everything should be done in the directory /usr/src/linux and so there is little need to mention full path names! There are thousands of choices to be made when configuring a kernel build, and if you just dive in and start answering them you probably will not get enough of them right to produce a kernel that boots. However, you are running some kernel that boots and runs on your hardware. I would presume that it is probably of an earlier release if you are like most people who would read this page, but its configuration would be a good starting point. The very best solution would be to ask the running kernel how it is configured. That way you would get the truth. So, try that: If that didn’t work, maybe your kernel supports this but only as a loadable module. So, let’s try loading that module and asking again: If that worked, great, move on to the next step. If it did not work, you will need to find a configuration file that your distribution should have stored somewhere on the system. Try this while paying attention to the available file name or names. Pick the latest if you have a choice: Red Hat has been known to hide the configuration files in other places: If all else fails: Or, worse yet, try the following, where CONFIG_EXPERIMENTAL is a configuration variable set in the file regardless of architecture. You will probably find that string in other files so you will need to think a little about what you find. You need to somehow install something appropriate as /usr/src/linux/.config , otherwise the rest of this project will fail. Configure a kernel build Let’s say that you would like your new kernel to describe itself as version 4.X.Y-whatever instead of plain old 4.X.Y when someone runs the command $ uname -r or $ uname -a The trick is to edit the file Makefile and change the EXTRAVERSION line in its opening to the following. Do not change the VERSION , PATCHLEVEL , or SUBLEVEL values! Leave those numbers alone. Be careful — you must be very conservative in what you use for the EXTRAVERSION field! The string needs to be fairly short and contain nothing but letters, numbers, «.» and «-» and «_». Any other punctuation marks or white space will cause horrible problems later. Also be careful to not add any white space to the ends of the lines, some very literal-minded scripts will process the Makefile. Best practice: Leave this alone unless you know what you’re doing! But if you do change EXTRAVERSION : Start the string with «-«. Total length must be no more than 16 characters. Other characters must be limited to letters, digits, and the three punctuation marks «.», «-«, and «_». No white space at the end of the line! Now you are ready for the fun part! You are finally ready to run the kernel build configuration tool. I am being a little fussy by saying «kernel build configuration» instead of «kernel configuration», but that is what you are doing. You are specifying how to build a kernel, as we do with Linux and BSD. You are not configuring pre-existing kernel modules as you might do with Solaris. The more friendy interface is started like this: However, that may require some Gnome or GTK packages that you haven’t installed, and either you haven’t set up YUM or urpmi to make installation easy or you just don’t want to add those packages. In that case try the following. If this doesn’t work either, then it’s time to install those packages. The terminal emulator where you ran that command will have lots of output, including some error messages about setting kernel variables that were not defined and perhaps about specified settings for kernel variables that do not exist. Don’t panic! Remember what you did — you started with the configuration of an older kernel to build a newer one. The kernel feature set changes from version to version, and so we expect to see these rather mild warning messages. I believe that it only makes sense to build the kernel configuration into the kernel itself. Do this: Under General Setup select: Kernel .config support and then select: Enable access to .config through /proc/config.gz If you build it into the monolithic kernel (shown as a check mark in the configuration tool) it will always be there. If you build it as a loadable module then it will only appear when the appropriate module is loaded, you will need to first do something like this: # modprobe ikconfig and then the kernel data structure will appear as /proc/config.gz . I would suggest simply building this into the monolithic kernel so the configuration is always available. Make sure that all the available Netfilter modules will be built. This is where I have most often run into trouble. NAT or Network Address Translation functionality might have been moved into a new module, if you don’t also build that module then iptables address translation won’t work. Find the Netfilter modules in: Networking support Networking options Networking packet filtering framework (Netfilter) Expand all those categories and build everything that isn’t marked as OBSOLETE or DEPRECATED. Here’s how to check if you missed any Netfilter modules. The following example is OK as the first unselected option is for kernel developers, and the next two are marked «OBSOLETE» or «DEPRECATED» in the feature tree: Your configuration should otherwise be pretty close to what you want, and in many or even most cases it would be reasonable to just save the settings at that point and exit the tool. However, you probably should explore the kernel configuration just to learn about how many things the Linux kernel can support. Just try not to do anything terribly silly like disabling support for your hard drive controller. Unless you really do want a kernel that will not boot. Save and exit when you have finished exploring. Build your new kernel This is much easier than many people expect. Start by seeing the list of available build targets: There are two main ways of doing this. The traditional method builds a monolithic kernel and a huge collection of load modules, and a later step easily puts them all into their proper locations. Alternatively, you could build an RPM package. Traditional build Start building the monolithic kernel and loadable modules: If you have multiple CPU cores, you might use the -jN option to allow multiple simultaneous processes. For example, if you have four cores, this may finish almost four times as quickly: Package build However, wouldn’t it be better to include your kernel in your configuration management? This is easier when you build the kernel as a package. Let’s build both source and binary RPM packages. Add -jN as appropriate: Now be patient. Go get some coffee or make a pot of tea. Or maybe get lunch. This will take a while. Probably an hour or more on a single core. On a system with an AMD Phenom II X4 965 processor with 4 cores, below is the CPU core utilization both without and with the -j4 option. $ xosview -mem -page -swap -ints +net & $ make all $ xosview -mem -page -swap -ints +net & $ make -j4 all Here are the timing results of kernel builds with different numbers of cores in use. As for the times: real = Total elapsed time, what the clock on the wall would show. user = Time spent running user processes. This is the total time the CPUs spent doing the actual computation. system = Time spent running kernel processes. For this task, this value will be file system I/O. Compilation is done by user processes, the kernel does disk I/O. Solid-state disks can speed this up. Platform Command Time Intel Core 2 Duo 2 cores (using 1) Intel Core 2 Duo 2 cores (using 2) Intel i7 4 cores (using 1) Intel i7 4 cores (using 2) Intel i7 4 cores (using 4) The i7 CPU goes faster than the Core 2 CPU, the single-core build takes less than half as much user time (that is, actual computation) on the i7. The Intel i7 platform has much faster disks, with an 8 GB solid-state disk in front of a faster mechanical disk. Look at how much less system time (file system I/O) is needed! Only about 20-25% of the required system time, so the i7 platform’s disks are four to five times as fast. So, the system and real (wall-clock) times can’t be directly compared between the Intel Core 2 Duo and the Intel i7. Yes, the total user and system times increase slightly with an increase in the number of cores in use. I believe this is because some things are needlessly re-compiled: a compilation has started on one core, it isn’t finished yet, and so it is also started on another core. Someone asked me about the additional electrical power consumption associated with BOINC volunteer grid computing system. Measuring the mains power being supplied to the system case I found the following on a system with an AMD Phenom II X4 965 CPU, 8 GB RAM, one 2 TB SATA drive, two 1 TB SATA drives, and a 500 GB PATA drive: Power System state 102 W Booted to text console, no processing 200-209 W Building a kernel with -j4 option to use all four cores 207-228 W Running BOINC Since my home uses electrical heat, during the time of the year when some heating is needed it might as well come from the system case instead of the heating registers. Install your new kernel This is much easier than it used to be. It hasn’t been difficult for some time, but some people are still scared off by criticisms that haven’t been appropriate for ages now. If you did a traditional build: You need just two commands, one to install the module hierarchy and the other to create the initial ram disk image and install it and the kernel. The second step also reconfigures the GRUB boot loader. The resulting collection of modules will be quite large, around 2 GB, because the modules include debugging symbols. You can strip those out by using the following sequence instead. This results in the same set of modules occupying just 130-150 MB: Set INSTALL_MOD_STRIP as an environment variable to avoid specifying it on the command line. However, if you have enabled module signature verification, where the kernel only loads a module after checking its digital signature, do not strip the modules. See Documentation/admin-guide/module-signing.rst for the details. The configuration option is MODULE_SIG within the «Enable loadable module support» section. If you built a package: First, let’s see what got built: Let’s be cautiously confident — our new kernel is almost certainly going to work! But just in case it doesn’t, we don’t want to remove our existing and functioning kernel. So, we need to simply install the new kernel, leaving the old one in place, as opposed to doing it as an upgrade and removing the old one. Something like this, modified as needed to reflect your architecture and kernel release: That should have built and installed an «initrd», an initial RAM disk image, and then modified the boot loader. That sounds awfully complicated, and it used to be. Now it should be done by post-install scripts build into the RPM package. If it wasn’t done, you can do it with one long command: Modify the boot loader, if necessary The kernel build process will handle this for you if you do it correctly. In a traditional build, the make install step handles this. In a package build, the RPM package should include post-install scripts to handle this. See my How Linux Boots page for details on the GRUB boot loader and its configuration. If you’re doing this on an Alpha, ignore all this about GRUB and modify /etc/aboot.conf and then go see my page specifically about building kernels on Alphas for some further details. Reboot and Enjoy! You didn’t do anything silly like get rid of your functional old kernel, right? Or configure your boot loader in such a way that it isn’t available? Did you?? If so, you may need to boot your system from rescue media and install a functioning kernel. Keeping Track of Your Work! You should have made the very reasonable choice of asking for the kernel’s configuration, the .config file, to be built into the kernel and made available as /proc/config.gz. That means that all you have to keep track of is your kernel release and a copy of your .config file, a file of a little over 100 kbytes, about a quarter of that if compressed with gzip . Now Let’s Explore Your New Kernel! Click here to explore Linux kernel details. Источник
- Building Linux Kernel
- Step 1: Download the Source Code
- Step 2: Extract the Source Code
- Step 3: Install Required Packages
- Step 4: Configure Kernel
- Step 5: Build the Kernel
- Step 6: Update the Bootloader (Optional)
- Step 7: Reboot and Verify Kernel Version
- How to Build Linux Kernels
- The Linux Kernel is Very Different from Services and User Applications
- Upgrading the Kernel, Versus Upgrading Applications
- Do You Need to Build a Kernel?
- Overview of the Steps
- Obtain the kernel source and understand the Linux kernel version numbers
- Make absolutely certain that you really have the kernel source
- Install the kernel source
- Install an initial kernel configuration file
- Configure a kernel build
- Build your new kernel
- Traditional build
- Package build
- Install your new kernel
- If you did a traditional build:
- If you built a package:
- Modify the boot loader, if necessary
- Reboot and Enjoy!
- Keeping Track of Your Work!
- Now Let’s Explore Your New Kernel!
How to Build Linux Kernel From Scratch
Home » Security » How to Build Linux Kernel From Scratch
The Linux Kernel is the foundation of the Unix-like operating systems. The kernel is responsible for communication between hardware and software and the allocation of available resources.
All Linux distributions are based on a predefined kernel. But, if you want to disable several options and drivers or try experimental patches, you need to build a Linux kernel.
In this step-by-step guide, you will learn how to build and compile a Linux kernel from scratch.

- A system running Linux
- Access to the terminal/command line
- A user account with sudo/root privileges
- 12GB of available space on the hard drive
Building Linux Kernel
The process of building a Linux kernel takes seven easy steps to complete. However, the procedure requires a significant amount of time to complete, depending on the system speed.
Follow the steps below to build the latest Linux kernel at the time of writing this article.
Note: If the version on the kernel website does not match the one from the steps below, use these commands and replace the kernel version number.
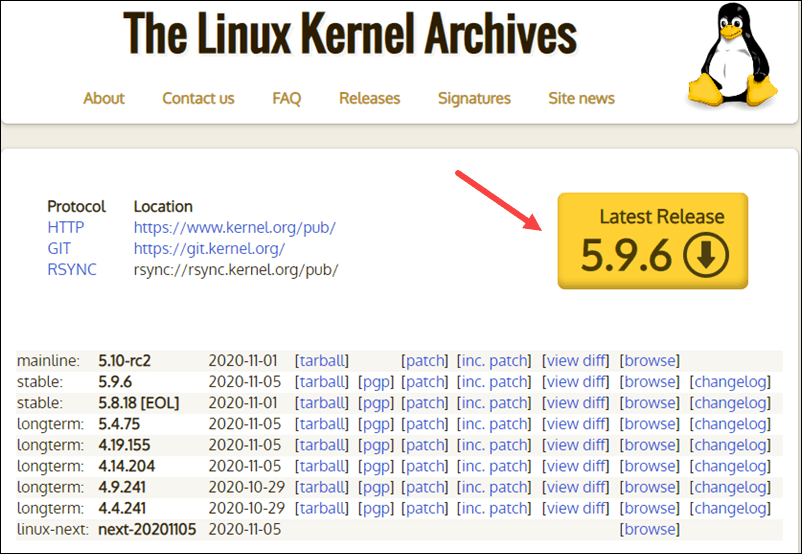
Step 1: Download the Source Code
1. Visit the official kernel website and download the latest kernel version. The downloaded file contains a compressed source code.
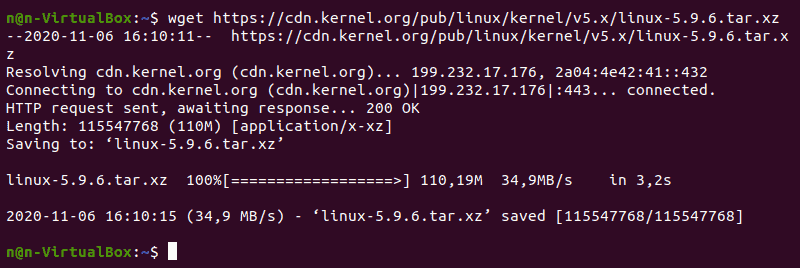
2. Open the terminal and use the wget command to download the Linux kernel source code:
The output shows the “saved” message when the download completes.
Step 2: Extract the Source Code
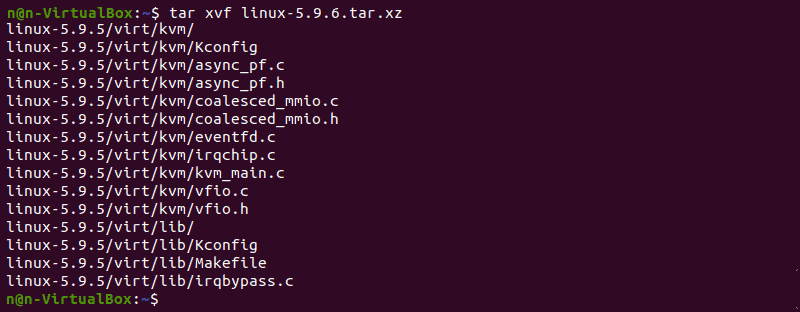
When the file is ready, run the tar command to extract the source code:
The output displays the extracted kernel source code:
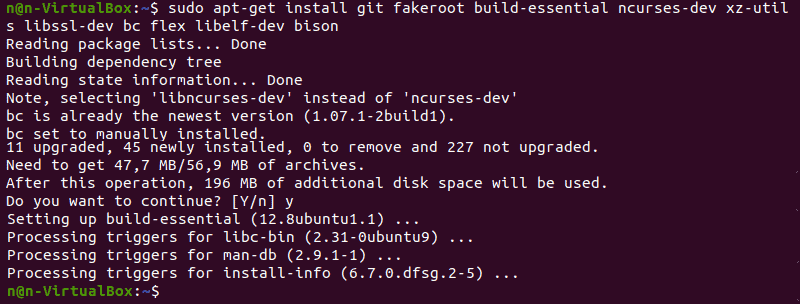
Step 3: Install Required Packages
Install additional packages before building a kernel. To do so, run this command:
The command we used above installs the following packages:
| Package | Package description |
| git | Tracks and makes a record of all changes during development in the source code. It also allows reverting the changes. |
| fakeroot | Packaging tool that makes the fake root environment. |
| build-essential | Installs development tools such as C, C++, gcc, and g++. |
| ncurses-dev | Programming library that provides API for the text-based terminals. |
| xz-utils | Provides fast file compression and decompression. |
| libssl-dev | Supports SSL and TSL that encrypt data and make the internet connection secure. |
| bc (Basic Calculator) | A mathematical scripting language that supports the interactive execution of statements. |
| flex (Fast Lexical Analyzer Generator) | Generates lexical analyzers that convert characters into tokens. |
| libelf-dev | Issues a shared library for managing ELF files (executable files, core dumps and object code) |
| bison | GNU parser generator that converts grammar description to a C program. |
Step 4: Configure Kernel
The Linux kernel source code comes with the default configuration. However, you can adjust it to your needs. To do so, follow the steps below:
1. Navigate to the linux-5.9.6. directory using the cd command:
2. Copy the existing configuration file using the cp command:

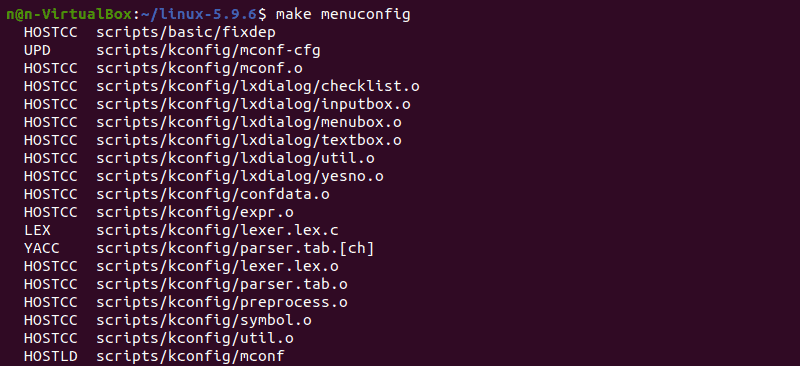
3. To make changes to the configuration file, run the make command:
The command launches several scripts, which then open the configuration menu:
4. The configuration menu includes options such as firmware, file system, network, and memory settings. Use the arrows to make a selection or choose HELP to learn more about the options. When you finish making the changes, select SAVE, and then exit the menu.
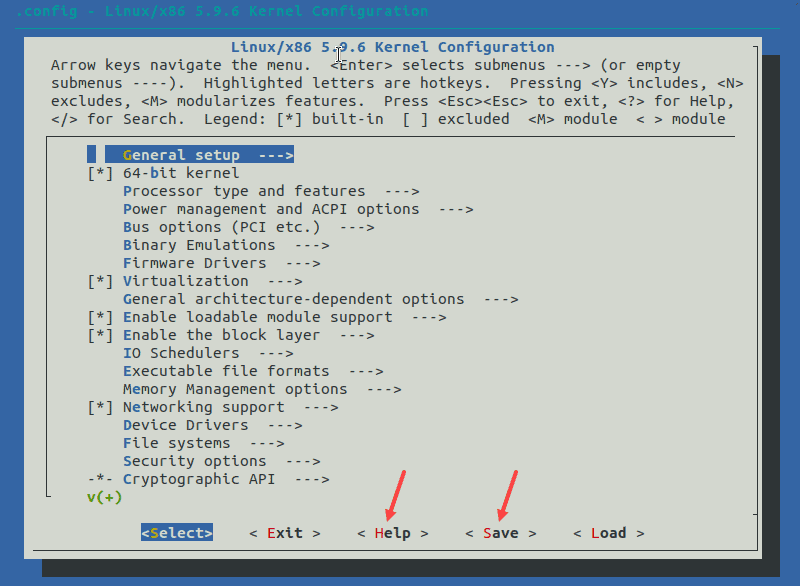
Note: Changing settings for some options can lead to a non-functional kernel. If you are unsure what to change, leave the default settings.
Step 5: Build the Kernel
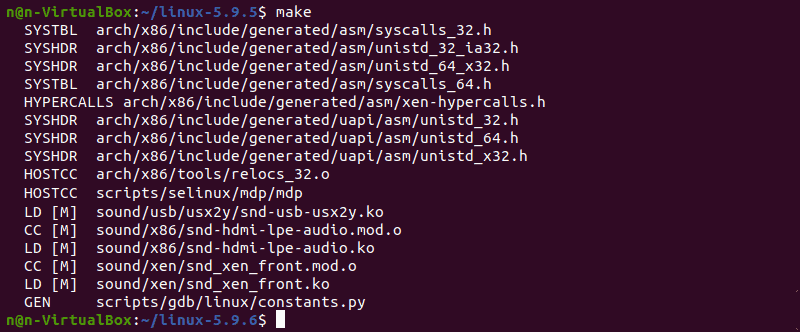
1. Start building the kernel by running the following command:
The process of building and compiling the Linux kernel takes some time to complete.
The terminal lists all Linux kernel components: memory management, hardware device drivers, filesystem drivers, network drivers, and process management.
2. Install the required modules with this command:
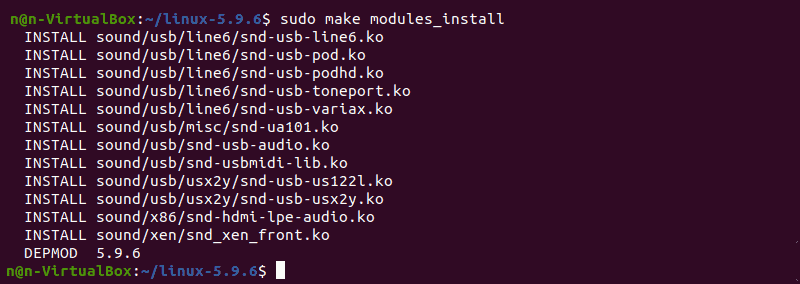
3. Finally, install the kernel by typing:
The output shows done when finished:

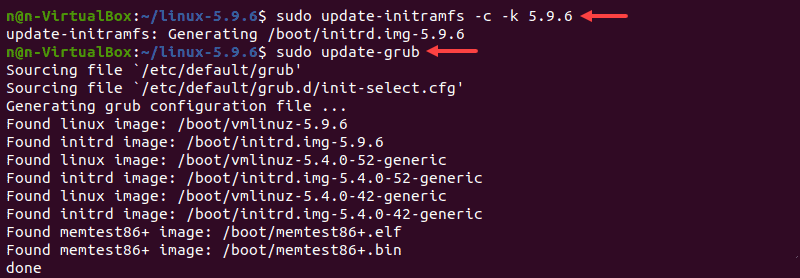
Step 6: Update the Bootloader (Optional)
The GRUB bootloader is the first program that runs when the system powers on.
The make install command performs this process automatically, but you can also do it manually.
1. Update the initramfs to the installed kernel version:
2. Update the GRUB bootloader with this command:
The terminal prints out the process and confirmation message:
Step 7: Reboot and Verify Kernel Version
When you complete the steps above, reboot the machine.
When the system boots up, verify the kernel version using the uname command:
The terminal prints out the current Linux kernel version.

In this step-by-step guide, you learned how to build a Linux kernel from scratch and install the required packages.
If you follow the instructions carefully, the process will complete successfully on your Linux machine.
The Linux kernel has a modular design. Functionality is extendible with modules or drivers. Learn how to use the modprobe command to add or remove modules on Linux.
Источник
How to Build Linux Kernels
The Linux Kernel is Very Different from Services and User Applications
The Linux kernel is the core of the operating system itself. The kernel directly detects and controls the hardware. It controls the running processes: creating those processes, allocating memory and CPU cycles, and enforcing permissions on files, devices, network sockets, and inter-process communication. It does not include the network services or other privileged processes, and all user programs are certainly not part of it (although those services and other processes can only run with the kernel’s assistance). The boot loader loads the kernel memory and starts it, and the kernel remains resident in memory until it shuts the system down.
As for what the user does from the command line, through the graphical user interface, or through scheduled jobs, those are processes which run in what is called «user space», where all addresses are virtual and processes run only in the ways the kernel allows. A process cannot access hardware directly as it is only has virtual addresses. The kernel, however, runs in «kernel space» and directly accesses hardware through physical addresses.
When a process wants to utilize hardware, it does so through the kernel. This is subject to the kernel’s enforcement of ownership and access permission, and the kernel’s mapping between the virtual address space of the process and the physical address space of the hardware. The user process asks to open and read the content of a file by using the open() system call. Kernel modules for hardware (SATA controller chipset, disk block devices) and software (Ext4/XFS/BtrFS file systems) functionality are involved, but the user process only sees the open() system call interface.
Similarly, a user process request to establish a connection to a network service on another machine through the socket() system call ultimately involves hardware (Ethernet chipset) and software (IP and TCP protocols) functionality.
Upgrading the Kernel, Versus Upgrading Applications
For the most part, these are entirely separate. Yes, it is important to keep both your kernel and your applications patched and up to date. But you don’t have to update user applications when you update the kernel, or vice-versa.
I had to hedge by saying «For the most part» because some applications are sensitive to kernel version. However, these applications that deal with kernel data structures are used only by system administrators, not by ordinary users. These applications handle tasks like testing or manipulating packet filtering rules, creating and repairing file systems, configuring IP addresses and netmasks, and other kernel-related tasks.
See the file /usr/src/linux/Documentation/Changes for the list of sensitive programs, their required versions for that specific kernel release, and the commands to run to discover which versions you have.
Do You Need to Build a Kernel?
The answer very likely is «No»! If there is a security hole in the kernel, or a significant performance improvement becomes available, your distribution should provide an update package soon.
However, building and running a custom kernel teaches you a great deal about how the system boots, how to do troubleshooting, and about the myriad capabilities of the operating system.
Let’s build our own kernel!
Overview of the Steps
This is a sizeable project, so let’s start with a quick overview of the steps:
First, download the kernel source, which will be a large compressed tar archive file. Make sure to verify its digital signature! We want to be certain that we’re running the real Linux operating system, not something with back doors installed by the bad guys. Since the kernel itself is the ultimate mechanism for access control, a subverted kernel is the ultimate software exploit. A digital signature verifies the data integrity and the identity of the provider of the source archive.
Second, install the kernel source in /usr/src/linux/ .
Third, configure a new kernel build. The only approach that makes sense is to start with a useful kernel configuration file, the configuration for the kernel currently running on your hardware is the obvious choice. With that as a starting point, you may need to make some changes.
Finally, build the new kernel defined by that configuration and install it. All of this should just simply work, but just in case we will keep our current kernel as a backup alternative.
Now that you see where we’re going with this, let’s get started!
Obtain the kernel source and understand the Linux kernel version numbers
The kernel source itself is available from kernel.org
You will need the kernel tar archive file, a rather large file named something like:
linux-release.tar.xz
and the corresponding very small digital signature file:
linux-release.tar.sign
where release is either two or three numbers separated by dots, something like 4.18 or 4.18.6
Uncompress the large tar archive file and verify the digital signature. Do not proceed until you have successfully verified the signature, indicating that you have the real source code from the Linux kernel organization.
You need to understand the Linux release numbering scheme. You will see kernel releases with both two and three numbers. The two-number version represents the release in terms of potential capabilities. They increment as 3.0, 3.1, 3.2, and so on. It rolls over at a fairly arbitrary point. It went from 2.xx to 3.0 at the first release after the 20th anniversary of the public release of Linux in August, 2012. Then Linus Torvalds decided to do that more often, and in early 2015 it went from 3.19 to 4.0.
The 4.0 kernel release includes more features, more modules or device drivers, than 3.19. The 3.19 release in turn included more features than 3.18. These new features might be for hardware, like new network interfaces based on recently developed chipsets. Or they might be software modules, possibly new options for networking protocols or file systems.
The third number, if present, represents bug fixes. The 3.19.1 release includes patches to some bugs discovered in the 3.19 release. In turn, the 3.19.2 release includes more patches, the 3.X.Y releases are cumulative bug fixes to 3.X. And, of course, the 3.19 series includes all the bug fixes in the 3.18 series.
The kernel organization has strict rules: 4.X.Y releases must be bug fixes only, no sneaking new features into the kernel before the 4.(X+1) release! And the fixes should be small, involving 100 lines or less of C code.
You could imagine the releases laid out in a grid:
| Release ↓ | Bug fixes → | |||||
| 3.17 | 3.17.1 | 3.17.2 | 3.17.3 | 3.17.4 | 3.17.5 | . |
| 3.18 | 3.18.1 | 3.18.2 | 3.18.3 | 3.18.4 | 3.18.5 | . |
| 3.19 | 3.19.1 | 3.19.2 | 3.19.3 | 3.19.4 | 3.19.5 | . |
| 4.0 | 4.0.1 | 4.0.2 | 4.0.3 | 4.0.4 | 4.0.5 | . |
| 4.1 | 4.1.1 | 4.1.2 | 4.1.3 | 4.1.4 | 4.1.5 | . |
| . | . | |||||
| 4.17 | 4.17.1 | 4.17.2 | 4.17.3 | 4.17.4 | 4.17.5 | . |
| 4.18 | 4.18.1 | 4.18.2 | 4.18.3 | 4.18.4 | . | |
| 4.19 | ||||||
| . | ||||||
The actual grid would be enormous. There may be a hundred or more bug fix releases an older release, and before 3.X there was 0.X, 1.X, and 2.X major release series.
So, which version do you need? That depends on your hardware — the latest 3.X.Y should be fine, but you may not really need the very latest if the recent feature additions and bug fixes were in drivers for hardware you don’t own.
Server hardware tends to be conservative. Unless you just bought new server motherboards, an older release is likely just fine as far as hardware support goes. Performance improvements in software modules (TCP, file systems) are much more likely to interest you.
Laptop / notebook hardware evolves much more quickly. Recent portable systems are likely to include WLAN or Bluetooth (and possibly even Ethernet) chipsets not supported in the older kernel releases included in more conservative distributions.
Now, having decided on some 3.X release to include all the features you need, do you really need the very latest 3.X.Y set of bug fixes?
This sounds dangerous, but not necessarily. This is because many of those bug fixes apply to modules for hardware you don’t own, therefore modules you will not use.
My suggestion is to use the latest 3.X.Y available at the time, but then not to try to always upgrade to every bug-fix release that comes out after that. Watch the advisories, see when it makes sense to upgrade. By the time you need to go to a newer 3.X.Y, a kernel in a later 3.X series would likely be a better choice.
Make absolutely certain that you really have the kernel source
You do not want to run some hacker’s operating system instead of the real kernel!
You must verify both the integrity of the data you just downloaded and the identity of its source. In other words, is it really the kernel source, and did it really come from the Linux kernel organization?
To be safe, you need to check the digital signature with GNU Privacy Guard (GnuPG) or similar.
See the digital signature section of my «Just Enough Cryptography» pages for an explanation of what digital signatures are.
See the page on verifying digital signatures to learn how to apply this technology. Verification is vital, but an explanation right here would make this page at least as much about digital signatures as about building Linux kernels! Really, go look at that other page, this page will be right here waiting for you when you get back.
Install the kernel source
From here forward, I will use oldrelease and release to stand for, well, whatever your old and new releases will be! You will have to think just a little.
You need to do some steps as root here, so become root with the su command. If you are using Ubuntu or a derivative, use sudo bash to get a root shell.
Your distribution or earlier work by yourself or other administrators may have already installed kernel source under a directory named /usr/src/linux-oldrelease with a symbolic link pointing to it. Find out, and if necessary, remove that link:
Extract the kernel source with the following. You must be in the right directory, /usr/src, and I leave it up to you to figure out where you put that downloaded archive file. I mean, really, if you can’t keep track of where you put a downloaded file then you have no business trying to build a kernel. But my experience tells me that I need to put two commands here to keep some people from making horrible messes of things:
Recreate the symbolic link, so that other software can be compiled on your system. If you’re really curious, software making calls to system libraries need to find the include files under /usr/src/linux/include and this will support that. Or just take my word for it, this is important:
The tar archive may have created files owned by some random UID other than 0, meaning root. This is not good! Fix it and make sure that everything has worked so far:
You should see something like the following:
Now, just to be safe, let’s remove any stale object files inappropriately cluttering your source tree, so we can build a fresh clean kernel:
Install an initial kernel configuration file
From here on, we will just rely on /usr/src/linux to be set up and pointing to the new source tree, making the pathnames a little simpler if we need to mention them. However, almost everything should be done in the directory /usr/src/linux and so there is little need to mention full path names!
There are thousands of choices to be made when configuring a kernel build, and if you just dive in and start answering them you probably will not get enough of them right to produce a kernel that boots.
However, you are running some kernel that boots and runs on your hardware. I would presume that it is probably of an earlier release if you are like most people who would read this page, but its configuration would be a good starting point.
The very best solution would be to ask the running kernel how it is configured. That way you would get the truth. So, try that:
If that didn’t work, maybe your kernel supports this but only as a loadable module. So, let’s try loading that module and asking again:
If that worked, great, move on to the next step. If it did not work, you will need to find a configuration file that your distribution should have stored somewhere on the system. Try this while paying attention to the available file name or names. Pick the latest if you have a choice:
Red Hat has been known to hide the configuration files in other places:
If all else fails:
Or, worse yet, try the following, where CONFIG_EXPERIMENTAL is a configuration variable set in the file regardless of architecture. You will probably find that string in other files so you will need to think a little about what you find.
You need to somehow install something appropriate as /usr/src/linux/.config , otherwise the rest of this project will fail.
Configure a kernel build
Let’s say that you would like your new kernel to describe itself as version 4.X.Y-whatever instead of plain old 4.X.Y when someone runs the command
$ uname -r
or
$ uname -a
The trick is to edit the file Makefile and change the EXTRAVERSION line in its opening to the following. Do not change the VERSION , PATCHLEVEL , or SUBLEVEL values! Leave those numbers alone.
Be careful — you must be very conservative in what you use for the EXTRAVERSION field! The string needs to be fairly short and contain nothing but letters, numbers, «.» and «-» and «_». Any other punctuation marks or white space will cause horrible problems later. Also be careful to not add any white space to the ends of the lines, some very literal-minded scripts will process the Makefile.
Best practice: Leave this alone unless you know what you’re doing! But if you do change EXTRAVERSION :
- Start the string with «-«.
- Total length must be no more than 16 characters.
- Other characters must be limited to letters, digits, and the three punctuation marks «.», «-«, and «_».
- No white space at the end of the line!
Now you are ready for the fun part! You are finally ready to run the kernel build configuration tool. I am being a little fussy by saying «kernel build configuration» instead of «kernel configuration», but that is what you are doing. You are specifying how to build a kernel, as we do with Linux and BSD. You are not configuring pre-existing kernel modules as you might do with Solaris.
The more friendy interface is started like this:
However, that may require some Gnome or GTK packages that you haven’t installed, and either you haven’t set up YUM or urpmi to make installation easy or you just don’t want to add those packages. In that case try the following. If this doesn’t work either, then it’s time to install those packages.
The terminal emulator where you ran that command will have lots of output, including some error messages about setting kernel variables that were not defined and perhaps about specified settings for kernel variables that do not exist. Don’t panic! Remember what you did — you started with the configuration of an older kernel to build a newer one. The kernel feature set changes from version to version, and so we expect to see these rather mild warning messages.
I believe that it only makes sense to build the kernel configuration into the kernel itself. Do this:
Under General Setup select:
Kernel .config support
and then select:
Enable access to .config through /proc/config.gz
If you build it into the monolithic kernel (shown as a check mark in the configuration tool) it will always be there. If you build it as a loadable module then it will only appear when the appropriate module is loaded, you will need to first do something like this:
# modprobe ikconfig
and then the kernel data structure will appear as /proc/config.gz . I would suggest simply building this into the monolithic kernel so the configuration is always available.
Make sure that all the available Netfilter modules will be built. This is where I have most often run into trouble. NAT or Network Address Translation functionality might have been moved into a new module, if you don’t also build that module then iptables address translation won’t work. Find the Netfilter modules in:
- Networking support
- Networking options
- Networking packet filtering framework (Netfilter)
Expand all those categories and build everything that isn’t marked as OBSOLETE or DEPRECATED.
- Networking packet filtering framework (Netfilter)
- Networking options
Here’s how to check if you missed any Netfilter modules. The following example is OK as the first unselected option is for kernel developers, and the next two are marked «OBSOLETE» or «DEPRECATED» in the feature tree:
Your configuration should otherwise be pretty close to what you want, and in many or even most cases it would be reasonable to just save the settings at that point and exit the tool.
However, you probably should explore the kernel configuration just to learn about how many things the Linux kernel can support.
Just try not to do anything terribly silly like disabling support for your hard drive controller. Unless you really do want a kernel that will not boot.
Save and exit when you have finished exploring.
Build your new kernel
This is much easier than many people expect. Start by seeing the list of available build targets:
There are two main ways of doing this. The traditional method builds a monolithic kernel and a huge collection of load modules, and a later step easily puts them all into their proper locations. Alternatively, you could build an RPM package.
Traditional build
Start building the monolithic kernel and loadable modules:
If you have multiple CPU cores, you might use the -jN option to allow multiple simultaneous processes. For example, if you have four cores, this may finish almost four times as quickly:
Package build
However, wouldn’t it be better to include your kernel in your configuration management? This is easier when you build the kernel as a package. Let’s build both source and binary RPM packages. Add -jN as appropriate:
Now be patient. Go get some coffee or make a pot of tea. Or maybe get lunch. This will take a while. Probably an hour or more on a single core. On a system with an AMD Phenom II X4 965 processor with 4 cores, below is the CPU core utilization both without and with the -j4 option.
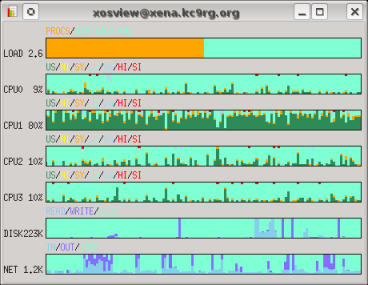
$ xosview -mem -page -swap -ints +net &
$ make all
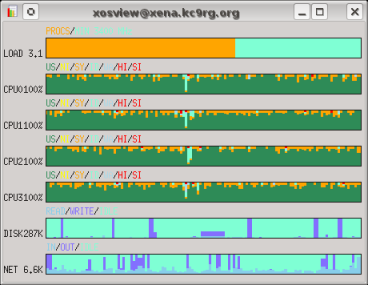
$ xosview -mem -page -swap -ints +net &
$ make -j4 all
Here are the timing results of kernel builds with different numbers of cores in use. As for the times:
real = Total elapsed time, what the clock on the wall would show.
user = Time spent running user processes. This is the total time the CPUs spent doing the actual computation.
system = Time spent running kernel processes. For this task, this value will be file system I/O. Compilation is done by user processes, the kernel does disk I/O. Solid-state disks can speed this up.
| Platform | Command | Time |
| Intel Core 2 Duo 2 cores (using 1) | ||
| Intel Core 2 Duo 2 cores (using 2) | ||
| Intel i7 4 cores (using 1) | ||
| Intel i7 4 cores (using 2) | ||
| Intel i7 4 cores (using 4) |
The i7 CPU goes faster than the Core 2 CPU, the single-core build takes less than half as much user time (that is, actual computation) on the i7.
The Intel i7 platform has much faster disks, with an 8 GB solid-state disk in front of a faster mechanical disk. Look at how much less system time (file system I/O) is needed! Only about 20-25% of the required system time, so the i7 platform’s disks are four to five times as fast. So, the system and real (wall-clock) times can’t be directly compared between the Intel Core 2 Duo and the Intel i7.
Yes, the total user and system times increase slightly with an increase in the number of cores in use. I believe this is because some things are needlessly re-compiled: a compilation has started on one core, it isn’t finished yet, and so it is also started on another core.
Someone asked me about the additional electrical power consumption associated with BOINC volunteer grid computing system. Measuring the mains power being supplied to the system case I found the following on a system with an AMD Phenom II X4 965 CPU, 8 GB RAM, one 2 TB SATA drive, two 1 TB SATA drives, and a 500 GB PATA drive:
| Power | System state |
| 102 W | Booted to text console, no processing |
| 200-209 W | Building a kernel with -j4 option to use all four cores |
| 207-228 W | Running BOINC |
Since my home uses electrical heat, during the time of the year when some heating is needed it might as well come from the system case instead of the heating registers.
Install your new kernel
This is much easier than it used to be. It hasn’t been difficult for some time, but some people are still scared off by criticisms that haven’t been appropriate for ages now.
If you did a traditional build:
You need just two commands, one to install the module hierarchy and the other to create the initial ram disk image and install it and the kernel. The second step also reconfigures the GRUB boot loader.
The resulting collection of modules will be quite large, around 2 GB, because the modules include debugging symbols. You can strip those out by using the following sequence instead. This results in the same set of modules occupying just 130-150 MB:
Set INSTALL_MOD_STRIP as an environment variable to avoid specifying it on the command line.
However, if you have enabled module signature verification, where the kernel only loads a module after checking its digital signature, do not strip the modules. See Documentation/admin-guide/module-signing.rst for the details. The configuration option is MODULE_SIG within the «Enable loadable module support» section.
If you built a package:
First, let’s see what got built:
Let’s be cautiously confident — our new kernel is almost certainly going to work! But just in case it doesn’t, we don’t want to remove our existing and functioning kernel. So, we need to simply install the new kernel, leaving the old one in place, as opposed to doing it as an upgrade and removing the old one. Something like this, modified as needed to reflect your architecture and kernel release:
That should have built and installed an «initrd», an initial RAM disk image, and then modified the boot loader. That sounds awfully complicated, and it used to be. Now it should be done by post-install scripts build into the RPM package. If it wasn’t done, you can do it with one long command:
Modify the boot loader, if necessary
The kernel build process will handle this for you if you do it correctly.
In a traditional build, the make install step handles this.
In a package build, the RPM package should include post-install scripts to handle this.
See my How Linux Boots page for details on the GRUB boot loader and its configuration.
If you’re doing this on an Alpha, ignore all this about GRUB and modify /etc/aboot.conf and then go see my page specifically about building kernels on Alphas for some further details.
Reboot and Enjoy!
You didn’t do anything silly like get rid of your functional old kernel, right? Or configure your boot loader in such a way that it isn’t available? Did you?? If so, you may need to boot your system from rescue media and install a functioning kernel.
Keeping Track of Your Work!
You should have made the very reasonable choice of asking for the kernel’s configuration, the .config file, to be built into the kernel and made available as /proc/config.gz. That means that all you have to keep track of is your kernel release and a copy of your .config file, a file of a little over 100 kbytes, about a quarter of that if compressed with gzip .
Now Let’s Explore Your New Kernel!
Click here to explore Linux kernel details.
Источник


