- How to Burn an ISO File to a USB Drive
- Detailed instructions on ‘burning’ an ISO image to a USB flash drive
- Burning an ISO Is Not the Same as Copying
- How to Burn an ISO to USB With the Rufus Tool
- Boot From the USB Drive
- Use the Windows USB/DVD Download Tool
- Extract ISO Images With a File Compression Program
- How to Burn ISO File to USB on Windows 10/8/7? [2 Ways]
- User Case
- Reasons for burning ISO files to USB flash drives
- How to burn ISO file to USB on Windows 10/8/7?
- Way 1. Copy ISO to USB via Windows native tool
- Way 2. Burn ISO to USB with third-party software
- Wrap things up
How to Burn an ISO File to a USB Drive
Detailed instructions on ‘burning’ an ISO image to a USB flash drive
:max_bytes(150000):strip_icc()/tim-fisher-5820c8345f9b581c0b5a63cf.jpg)
So you have an ISO file that you want on a flash drive, or some other USB storage device. You also need to be able to boot from it. Sounds straightforward, right? Copy the file over and you’re done! Unfortunately, it’s not that simple.
Burning an ISO Is Not the Same as Copying
Properly burning an ISO to USB is different than just copying the file. It’s even different than burning an ISO to a disc. Adding to the complexity is that you plan on booting from the USB drive once you’re done getting the ISO image on there.
:max_bytes(150000):strip_icc()/how-to-burn-an-iso-file-to-a-usb-drive-2619270-f5118f2dcbb44bedbc50a004fb353b67.gif)
See Burning an ISO to USB When You Don’t Need to Boot From It at the bottom of the page if that’s your plan instead. That process is a bit different. and easier!
We should mention here that you’re never technically «burning» anything to a USB drive since there are no lasers or similar technology involved. This term has just been carried over from the common practice of burning an ISO image to an optical disc.
Regardless, there’s a fantastic free tool that will handle all of this for you automatically. Continue on below for an easy tutorial on how to burn an ISO file to USB with the free Rufus program.
How to Burn an ISO to USB With the Rufus Tool
This process also works to burn a Windows 10 ISO to USB. However, doing so via Microsoft’s Windows 10 download and installation tool is best.
Time Required: «Burning» an ISO image file to a USB device, like a flash drive, usually takes less than 20 minutes but the total time depends a lot on the size of the ISO file.
Download Rufus, a free tool that will correctly prepare the USB drive, automatically extract the contents of the ISO file you have, and properly copy the files contained within it to your USB device, including any files in the ISO needed to make it bootable.
:max_bytes(150000):strip_icc()/001_how-to-burn-an-iso-file-to-a-usb-drive-2619270-5c63728446e0fb0001106655.jpg)
Rufus is a portable program (doesn’t install), works on Windows 10, 8, 7, Vista, and XP, and will «burn» an ISO image file to any type of USB storage device you happen to have. Be sure to choose Rufus Portable on their site.
If you’d prefer to use a different ISO-to-USB tool, some other good ones include balenaEtcher, UNetbootin, ISO to USB, and Universal USB Installer. Of course, if you do choose another program, you won’t be able to follow the instructions we’ve written here because they pertain specifically to Rufus.
Double-click or double-tap on the rufus-p.exe file that you just downloaded. The Rufus program will start right away.
:max_bytes(150000):strip_icc()/002_how-to-burn-an-iso-file-to-a-usb-drive-2619270-5c6372fb46e0fb00017c26f2.jpg)
As we mentioned earlier, Rufus is a portable program, meaning that it just runs as is. This is a big reason why we prefer this ISO-to-USB program over some of the other options out there.
When first opening Rufus, you’re asked whether the program should occasionally check for updates. It’s up to you whether you want to enable this but it’s probably best to choose Yes if you plan to use Rufus again in the future.
Insert the flash drive or other USB device into your computer that you want to «burn» the ISO file to, assuming it’s not already plugged in.
Burning an ISO image to a USB drive will erase everything on the drive! Before continuing, check that the USB drive is empty or that you’ve backed up any files you want to keep.
From the Device drop-down at the top of Rufus, choose the USB storage device you want to burn the ISO file to.
:max_bytes(150000):strip_icc()/003_how-to-burn-an-iso-file-to-a-usb-drive-2619270-5c63739446e0fb0001ca8e43.jpg)
Rufus tells you the size of the USB device, as well as the drive letter and current free space on the drive. Use this information to double-check that you’re choosing the correct USB device, assuming you have more than one plugged in. Don’t worry about the free space indicated since you’ll be erasing the entire drive as part of this process.
If no USB drive is listed, or you can’t find the drive you’re expecting to see, there might be an issue with the USB device you’re planning on using for the ISO image, or Windows is having some sort of problem seeing the drive. Try another USB device and/or another USB port on your computer, or close and reopen Rufus.
From the Boot selection drop-down, make sure Disk or ISO image (Please select) is chosen.
Choose SELECT.
:max_bytes(150000):strip_icc()/004_how-to-burn-an-iso-file-to-a-usb-drive-2619270-5c637411c9e77c0001d9327f.jpg)
Locate and select the ISO image you want to burn to the flash drive, and then press Open to load it into Rufus.
:max_bytes(150000):strip_icc()/005_how-to-burn-an-iso-file-to-a-usb-drive-2619270-5c6374a846e0fb000184a439.jpg)
Wait while Rufus inspects the ISO file you chose. This might take several seconds or may go by so quickly that you don’t even notice.
If you get an Unsupported ISO message, the ISO you chose isn’t supported for burning to USB by Rufus. In this case, try one of the other programs listed in Step 1 or check with the maker of the ISO image for more help getting their software to work from a USB drive.
Under the Image option area, pick Standard Windows installation if you see this and if that’s the case.
For example, if you’re putting a Windows installation ISO image onto the flash drive, and you get this option, you’d want to enable it for sure.
Leave the Partition scheme, Target system, File system, and Cluster size options alone unless you know what you’re doing or you’ve been advised to set any of those parameters to something else.
For example, maybe a bootable tool you downloaded in ISO format advised on its website to make sure the file system is FAT32 instead of NTFS if you’re burning to USB. In that case, make that change before continuing.
You’re welcome to enter a custom volume label in the Volume label field, but leaving it at whatever the default happens to be, or even blank, shouldn’t have any impact on anything.
Under Format Options, inside the Show advanced format options menu, you’ll see a number of. yes, format options! You can leave all of them in their default state but you’re welcome to select Check device for bad blocks if you have some concern that the flash drive or USB device you’re using may have an issue.
Choosing 1 pass is just fine in most cases but knock that up to 2 or more if you’ve had issues with this drive before.
Select START to start the «burning» of the ISO file to the USB device you chose.
:max_bytes(150000):strip_icc()/006_how-to-burn-an-iso-file-to-a-usb-drive-2619270-5c63753f46e0fb0001ca8e47.jpg)
If you get an Image is too big message, you’ll need to use a larger USB device or choose a smaller ISO image.
Read any warning messages and address them appropriately.
For example, select OK to the WARNING: ALL DATA ON DEVICE ‘XYZ’ WILL BE DESTROYED message that appears next.
:max_bytes(150000):strip_icc()/007_how-to-burn-an-iso-file-to-a-usb-drive-2619270-5c63760246e0fb0001f255f1.jpg)
Take this message seriously! Make sure the flash drive or other USB device is empty or that you’re fine with erasing everything on it.
You might also see a Download required message if Rufus needs some additional files to complete the burn process. Selecting Yes will start that download.
Wait while Rufus properly formats the USB drive so it’s bootable, and then copies all of the files to the drive that are contained in the ISO image you selected in Step 7.
:max_bytes(150000):strip_icc()/008_how-to-burn-an-iso-file-to-a-usb-drive-2619270-5c63768e46e0fb0001f255f3.jpg)
The total time to do this depends very much on how large the ISO file is that you’re working with. Some small diagnostic tools take under one minute, while larger images (like a 5 GB Windows 10 ISO) could take closer to 20 minutes. Your computer and USB hardware speeds are a big factor here as well.
Once the status at the bottom of the Rufus program window says READY, you can close Rufus and remove the USB drive.
Boot From the USB Drive
Now that the ISO file is properly «burned» to the USB drive, you can boot from it and then continue with whatever it is you’re using this bootable drive for.
For example, if you’ve put a memory testing program on a flash drive, you can now boot from that flash drive and test your RAM with it. Same goes for bootable hard drive testing programs, data wipe programs, antivirus tools, etc.
Use the Windows USB/DVD Download Tool
You’re more than welcome to use the procedure we’ve outlined above with Rufus for Windows ISO images, like those you might have downloaded for Windows 10, Windows 8, etc. However, there is a more «official» procedure that uses free software from Microsoft.
We’ve written complete tutorials on these procedures, which also includes guidance on other aspects of installing Windows from a USB stick. See How to Install Windows 8 From USB or How to Install Windows 7 From USB, depending on the version of Windows you’re installing.
Booting from a USB drive is often as easy as plugging the drive in to any free USB port and then restarting your computer, but it can sometimes be much more complicated. See our How to Boot From a USB Drive tutorial if you need help.
Extract ISO Images With a File Compression Program
Rufus, and related ISO-to-USB tools, are great when you need to get some sort of bootable program, or even an entire operating system, onto a USB drive. However, what if you have an ISO image that you want to «burn» to a USB drive that isn’t intended to be booted from? An ISO of Microsoft Office comes to mind as a common example.
In these cases, think of the ISO image you’re working with as just any other compressed format, like a ZIP file. Use your favorite file compression program—we often recommend the free 7-Zip tool but there are many others—to extract the contents of the ISO image directly onto the previously-formatted flash drive. That’s it!
How to Burn ISO File to USB on Windows 10/8/7? [2 Ways]
Here, you can learn how to burn ISO file to USB flash drive to make a bootable USB in Windows 10/8/7 step by step.

By Emily  / Last Updated March 21, 2021
User Case
“Hello, guys. I have recently downloaded Windows 10 ISO image files and I want to burn them onto a USB flash drive which I would like to use to boot a PC. However, I don’t know how to burn ISO file to USB drive. Any help would be appreciated!”
Reasons for burning ISO files to USB flash drives
ISO is a file format that is always used on CD, DVD or Blu-ray Disc. It helps to archive operating system. Different users choose to burn ISO image file to a USB flash drive for different reasons:
в–єGet a tiny bootable Windows USB drive and carry it to any place and boot any computer.
в–єInstall Windows operating system more easily and convenient from the bootable USB drive than from original Windows installation CD.
в–єSave your computer when it suffers from severe system boot issues.
How to burn ISO file to USB on Windows 10/8/7?
Burn ISO files onto a USB flash drive? Just copy the ISO file and paste it onto the USB! See, how easy is it! Sadly, it is different from copying music, videos or pictures to your flash drive. That way is just copying the exact file, not the data stored in that ISO image file. So you cannot boot computer with that copied files. The data can only be read after it is burned onto a USB drive or Disc.
Therefore, you need to adopt some special ways to burn, not copy, the ISO files to USB flash drive. Here we list two great ways for your reference.
Way 1. Copy ISO to USB via Windows native tool
First, you might wonder whether the Windows itself offers a tool to help users burn ISO file to USB drive. Luckily, “Windows To Go” is such a feature in Windows 10 Education/Enterprise/Pro and Windows 8/8.1 Enterprise. If you are running those operating systems, you can use the free tool to burn ISO to USB flash drive.
Before proceeding:
в–ёThe USB drive must be certified by Microsoft and larger than 32GB.
▸The destination USB will be wiped out during the operation, so back up files you don’t want to lose in advance.
Step 1. Download Windows ISO files from Microsoft official website and connect a certified USB drive to your computer.
Step 2. Open Control Panel on your computer, and search “Windows ToGo” in that window. Click “Windows To Go” option to proceed.
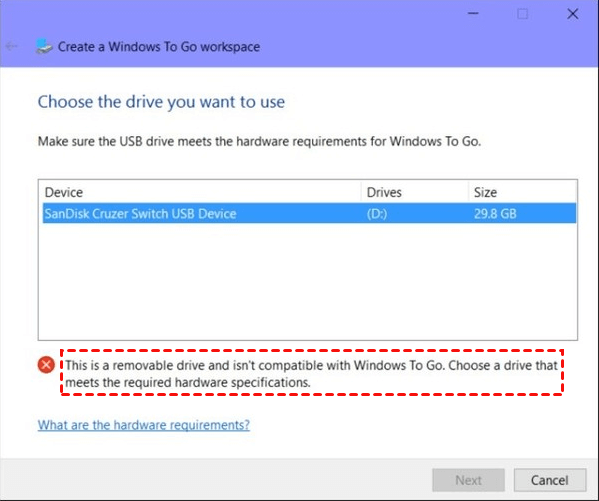
Step 3. In this window, it will automatically search for all inserted USB drives. Choose the USB drive you plan to burn ISO files onto and then “Next” to continue. It should be a qualified USB, otherwise, the «Next» button will be disabled.
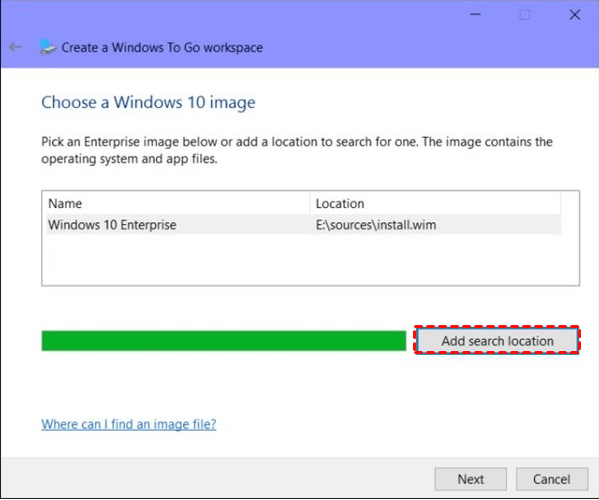
Step 4. Click “Add search location” to search for the Windows installation ISO file and choose the mounted ISO file.
Step 5. Here, you can set a BitLocker password to encrypt your Windows To Go workplace.

Then it will start to burn the Windows ISO image files to the selected USB drive. Seems very simple and easy, but this native tool can only recognize and allow you to choose USB drives that are certified by Microsoft as compatible. Or you will get stuck in Step 3. It’s the main reason that most users don’t like to use this built-in feature.
Way 2. Burn ISO to USB with third-party software
If you don’t have a certified USB drive, or you are mainly running Windows 7, Windows 8/8.1 Home/ Pro/Education or Windows 10 Home, you can choose AOMEI Partition Assistant Professional to burn ISO files to USB flash drive.
Compared with built-in Windows To Go, it is more compatible and able to burn all editions of Windows 10/8/7/XP/Vista ISO image files to USB drives. Moreover, non-certified USB drives can also be used. As for the capacity size, 13GB is enough. Here is how to burn ISO file to USB in Windows 10.
Attention: If available, you can use a USB 3.0 drive and a computer with a USB 3.0 port, which can boot up the process.
Step 1. Install and run AOMEI Partition Assistant Professional. Plug an empty USB drive in your Windows 10 computer via USB port. You can download the free Demo version.
Step 2. In the main interface of the software, click “All Tools”>“Windows To Go Creator” in the left panel.

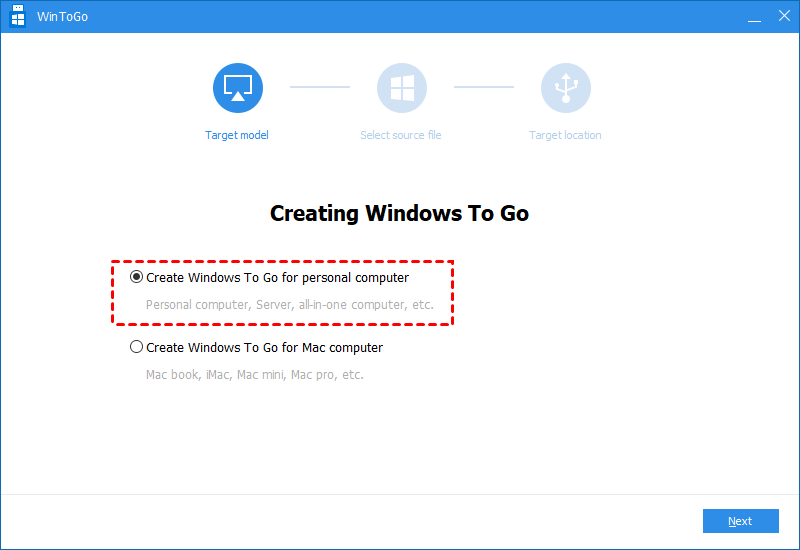
Step 3. In this window, two different ways to create Windows To Go are offered (create Windows ToGo for PC or Mac). In our case, choose the first way and click “Next”.
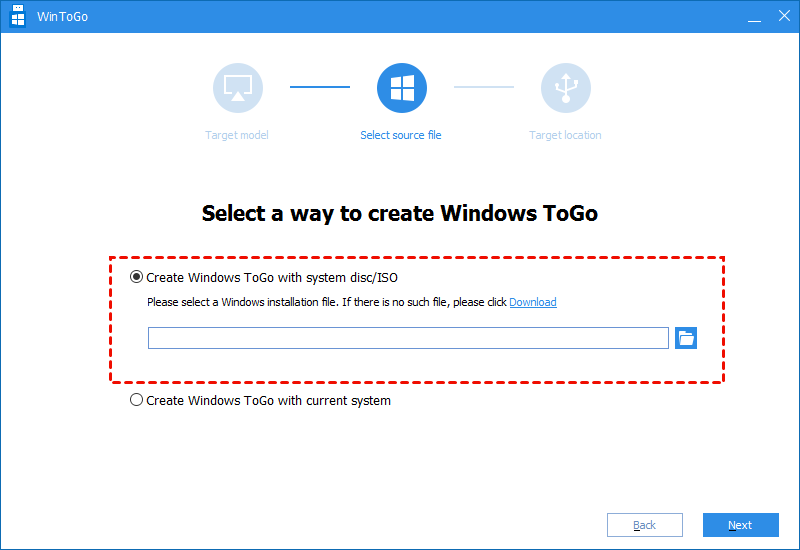
Step 4.В Then choose «Create Windows ToGo with system disc/ISO» and select the ISO files stored on your computer, then click «Next.»

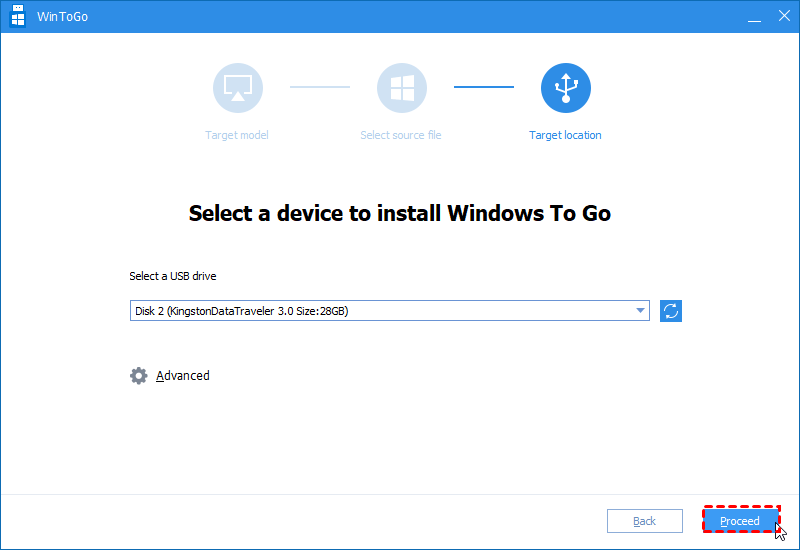
Step 5. Usually, the software will detect all inserted USB drives on your computer automatically. If not, refresh it. Then choose the USB you will use. Finally click “Proceed”.
Note: Besides burning ISO image files to USB as a portable Windows device, AOMEI Partition Assistant Professional can also create a bootable USB drive. With it, you can enter a WinPE environment and use this software to repair Windows boot failure problems by rebuilding MBR, checking and fixing possible bad sectors. Also you can delete or format the boot partition which cannot be done within Windows.

Wrap things up
Now, you must know how to burn ISO file to USB drive no matter which edition of Windows you are using. If you think downloading Windows ISO files and burning them to USB for a portable Windows USB is too complicated, you can use AOMEI Partition Assistant Professional to create Windows To Go USB with current system.


