- Use Snipping Tool to capture screenshots
- Open Snipping Tool
- Work with your screenshots
- How to Capture Screen on Windows 10?
- Where to find Snipping Tool on Windows 10?
- How to Capture Screen on Windows 10?
- Record screen videos in Windows 10
- How To Record Screen In Windows 10 in 2021 (Without Any Software)
- Steps To Record Screen In Windows 10 in 2021
- Using VLC Media Player
- How to Capture Video Clips in Windows 10
- Enable Screen Recording
- Record Your Screen
- Recording in the Background
- Customize Game Bar
- Game Bar Workaround
Use Snipping Tool to capture screenshots
Take a snapshot to copy words or images from all or part of your PC screen. Use Snipping Tool to make changes or notes, then save, and share.
Windows 10 has another screenshot app you might also like to try. When you open Snipping Tool, you’ll see an invitation and keyboard shortcut to Snip & Sketch. For more info on this app, see How to take and annotate screenshots on Windows 10.
Capture any of the following types of snips:
Draw a free-form shape around an object.
Drag the cursor around an object to form a rectangle.
Select a window, such as a dialog box, that you want to capture.
Capture the entire screen.
When you capture a snip, it’s automatically copied to the Snipping Tool window where you make changes, save, and share.
Open Snipping Tool
Select the Start button, type snipping tool in the search box on the taskbar, and then select Snipping Tool from the list of results.
For Windows 8.1 / Windows RT 8.1
Swipe in from the right edge of the screen, tap Search (or if you’re using a mouse, point to the lower-right corner of the screen, move the mouse pointer up, and then select Search), type snipping tool in the search box, and then select Snipping Tool from the list of results.
Select the Start button, then type snipping tool in the search box, and then select Snipping Tool from the list of results.
Work with your screenshots
With your Snipping Tool open, select one of the following to create and work with your screenshots.
In Snipping Tool, select Mode. In earlier versions of Windows, select the arrow next to the New button. Next, when you choose the kind of snip you want, you’ll see the whole screen change slightly to gray. Then, choosing from anything currently displayed on the screen, select the area of your screen that you want to capture.

After you open Snipping Tool, open the menu that you want to capture. For Windows 7, press the Esc key before opening the menu.
Press Ctrl + PrtScn keys. The entire screen changes to gray including the open menu.
Select Mode, or in earlier versions of Windows, select the arrow next to the New button. Select the kind of snip you want, and then select the area of the screen capture that you want to capture.
After you capture a snip, you can write or draw on or around it by selecting the Pen or Highlighter buttons. Select Eraser to remove the lines you’ve drawn.
After you capture a snip, select the Save Snip button.
In the Save As box, type a file name, location, and type, and then select Save.
When you capture a snip from a browser window and save it as an HTML file, the URL appears below the snip. To prevent the URL from appearing:
In the Snipping Tool, select the Options button.
In the Snipping Tools Options box, clear the Include URL below snips (HTML only) check box, then select OK.
After you capture a snip, select the arrow next to the Send Snip button, and then select an option from the list.
How to Capture Screen on Windows 10?
Windows 10 comes with a bunch of useful small tools, such as the Windows movie maker, voice recorder, snipping tool, steps recorder, etc. Today we will discuss how to find Snipping Tool and capture screen on Windows 10? At the bottom of this post, we will also recommend several third-party screen recorders that can help us record desktop screen videos on Windows 10 computer.

Where to find Snipping Tool on Windows 10?

Windows has this built-in utility since Windows 7. There are different ways you can find Snipping tool on Windows 10. You can access the screen capture software on Win 10 from the Start menu >> All Apps >> Windows Accessories >> Snipping Tool. When you select the All Apps option, this will brings up a very long alphabetical list of programs and folders, scroll down to the W section to find Windows Accessories and Snipping Tool beneath. If you’re a frequent Snipping Tool user, right-click on the Snipping Tool to get the pop-up context menu, then choose ‘Pin to Start’ or ‘Pin to Task bar’. You can choose to pin Snipping Tool to Windows 10 task bar, so in the future, you can quick launch snapping tool on windows 10 in just one click.
Another quick way to find the Snipping tool on Win 10 is to make use of the search. There is a big search box besides the Start menu, type in ‘snipping tool‘, you will find it from the top of the search result. Click on it to launch the snipping tool on Windows 10.
How to Capture Screen on Windows 10?
There are basically three steps to capture screen or take screenshots on Windows 10. Firstly choose the screen capturing mode, you can choose to create a free-form snip, rectangular snip, window snip or full-screen snip.
- Free-form Snip: draw and captures any irregular part of the screen
- Rectangular Snip: drag the cursor around an object to form a rectangle
- Window Snip: select an open window, such as a browser window or dialog box and let you capture it
- Full-screen snip: capture the entire screen when you select this type of snip.

After that, click the New button to capture anything on your Windows screen. Finally save the screenshot on Windows 10. You will also have the option to edit captured snip before saving on to your PC. You can also set to screen capturing for a few seconds which is new in Snipping tool for Windows 10.
When we find there are many new features being added to Windows 10, we also noticed that some features are missing, such as the DVD player. Although you can buy Windows DVD player from Windows Store, it however is not free any more. Here, we recommend you download this free DVD player to play DVDs on Win 10.
Record screen videos in Windows 10
If you want also record desktop or any thing displays on your computer screen, you can follow this guide to record desktop on Windows 10 computer using a third-party screen recorder app. Other than that, Format Factory is a great option which has the screen recorder built-in. We can use it to record screen videos on Windows PC without any fee.
How To Record Screen In Windows 10 in 2021 (Without Any Software)
You might be using Windows 10 for a while, but that doesn’t mean that you have discovered everything it has to offer. Actually, Windows 10 offers users lots of features, but most remain undiscovered. In this article, we will talk about a hidden feature of Windows 10 that would allow you to record your screen.
To record the screen on Windows 10, users generally need to install third-party software. However, what if I tell you that you can record the Windows 10 screen without installing any additional software? Windows 10 has a hidden screen recording tool built into the Game Bar.
The screen recording tool is specially designed for gamers who want to record their gameplay videos. In this article, we will share a working method that would help you record Windows 10 screens easily. So, let’s check out how to Record a screen in Windows 10 without using any software.
Steps To Record Screen In Windows 10 in 2021
The method is straightforward, and you need to use some shortcut keys on your keyboard. Windows 10 will display the game bar you will use to record the screen. So follow the complete steps below.
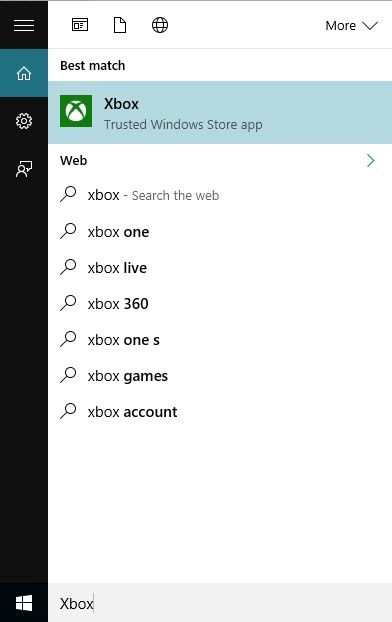
Step 1. First of all, in your Windows 10, click on start and then type “Xbox app” and then open the Xbox app.
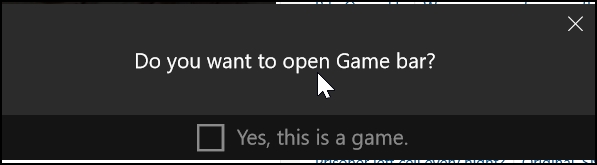
Step 2. Now in the Xbox app, you have to press a keyboard that is “win+G” this can be done on the screen you want to record. Now, as soon as you press this combination, the popup will appear, asking you that it is a game? Simple click on Yes, it is a game.
Step 3. Now you will see few options that are “Screenshot,” “Start Recording,” and “Settings.”
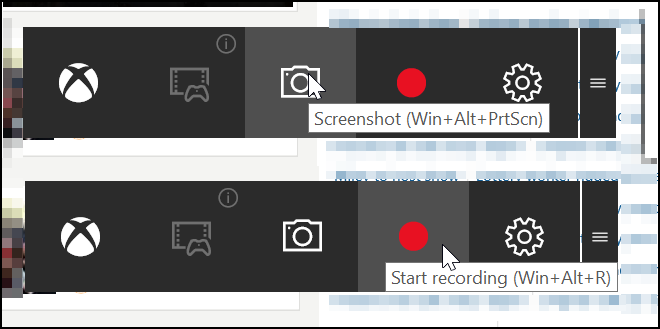
Step 4. Now select the Start recording button, and the recording will get started, and you can stop recording when you are done.
By default, all your recordings get saved to the folder
“C/Users/Videos/Captures“.
That’s it! You are done; now, you can easily record the screen with this cool trick that will not need any third-party tool. You can also choose out the screenshot feature in this game bar tool.
Using VLC Media Player
Well, VLC Media Player is software, and the reason I had mentioned VLC Media player is that almost everyone uses it. With the VLC Media player’s help, you can record the screen without any external third-party recording software. You can use this method in Windows 7,8, and 10. Let’s know how to record the screen using the VLC media player.
Step 1. First of all, download and install VLC Media Player on your Windows computer if you don’t have one.

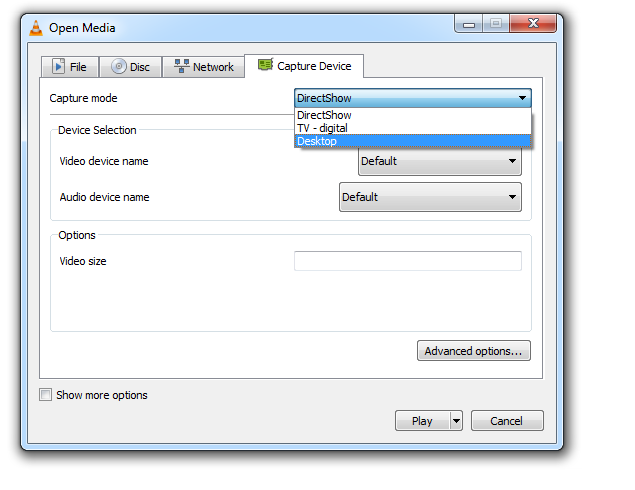
Step 2. Now launch the VLC media player, click on “Media,” and then select “Open Capture Device.”

Step 3. Under Capture mode, you need to click on the drop-down and then select desktop.
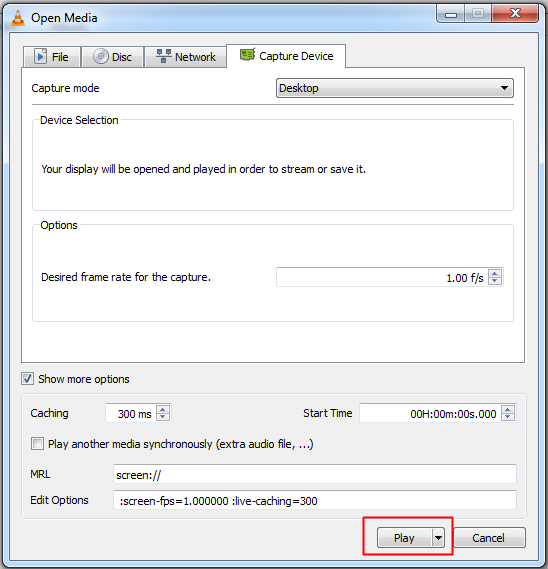
Step 4. Set all other options according to your wish, and then click on the “Play” button.
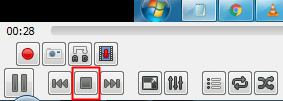
Step 5. Now you need to click on the “Stop” button.
Step 6. Now you will see the screen like below. Here you need to right-click on your recording and select the option “Save,” and save it to your desired location.

That’s it! You are done. This VLC media player method works with every Windows version. You don’t need any additional software to record your desktop screen.
So, this is all about Windows 10 screen recording. We have shared the two best methods to record Windows 10 screen. If you don’t want to go through all hassle and want a straightforward way to record Windows 10 screen, you need to visit our article Best Screen Recording Software For Windows. I hope this article helped you! Please share it with others also.
How to Capture Video Clips in Windows 10
Windows 10 has a built-in tool called Game Bar to help you record your screen during PC and Xbox gaming sessions. But this tool can also be used to record non-gaming apps.


Taking a screenshot in Windows 10 is fairly quick and simple. You can easily snap your screen using the handy Print Screen button on your keyboard and fine-tune it via the Snip & Sketch tool. Capturing video of your screen activity is more challenging, but Microsoft makes it possible through the use of a built-in video capture tool called Game Bar.
Game Bar was designed to record games you play directly on your PC, or those you stream from an Xbox One, but it can just as easily capture video of screen activity from your web browser, Windows applications, and many other programs. Any screen activity you record is automatically saved as an MP4 video file.
Game Bar does impose certain system requirements, including the right type of graphics card. If you try to use Game Bar and your PC isn’t up to snuff, you may receive an error telling you that your PC doesn’t meet the hardware requirement for recording clips. But fear not, as there is a way around this limitation.
Enable Screen Recording
First, make sure that Game Bar is enabled. Open Settings > Gaming > Game bar and turn on the switch to Record game clips, screenshots, and broadcast using Game Bar, if it’s not already on. If you have an Xbox One controller, or Xbox 360 controller with the right driver, you can even trigger Game Bar through the Xbox button on the gamepad. From this screen, you can also change any of the keyboard shortcuts associated with opening the Game Bar, taking a screenshot, and recording video.
Open what you wish to record. You can start a recording from most applications and windows, but there are exceptions. You can’t kick off a capture from the Windows desktop, File Explorer, or certain Windows apps such as Weather. Otherwise, the field is pretty wide open.
Record Your Screen
Press Win+G to open the Game Bar. Several Game Bar widgets pop up with options for capturing screenshots, controlling your video and audio, and viewing your Xbox social account. The pane also displays the name of your current app, file, or window as the source for the video capture.
Click the camera icon to take a simple screenshot or hit the Start Recording button to capture your screen activity. Instead of going through the Game Bar pane, you can also just press Win+Alt+R to start your recording.
The first time you choose to record screen activity from a specific application or window, Game Bar needs your permission. Click the checkbox to «Enable gaming features for this app to record gameplay.» Click the Start Recording button again, and the video capture starts.
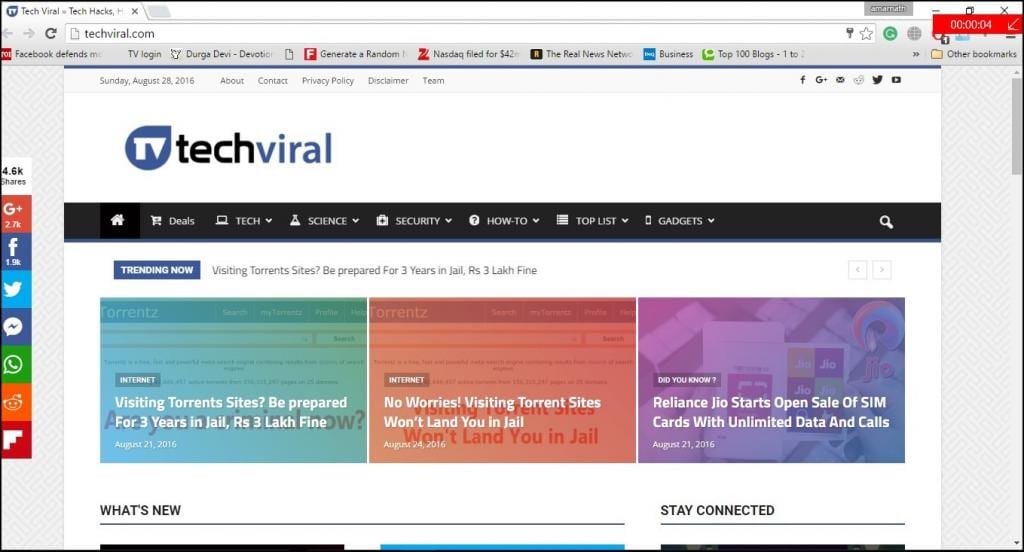
You can now perform whatever screen actions you want to capture. The Game Bar widgets vanish, replaced by a small floating bar in the upper-right corner of the screen through which you can control the recording.
To stop the recording, click the Recording button on the floating bar. A notification appears telling you that the game clip was recorded. Click the notification, and File Explorer opens to the specified location. Just double-click the video file to play it in its associated application.
If you don’t like where video captures are being saved by default, you can always change the location. Go to Settings > Gaming > Captures. Click the Open folder button and choose a different folder.
Recording in the Background
Have you ever done something on your computer and then suddenly wished you’d captured the moment? With the Windows 10 Game Bar, you can record the last several seconds or minutes of screen activity after you’ve already performed it.
To do this, you first need to grant permission for the computer to record your activities in the background. Open the Game Bar and click the Settings icon. Scroll down the Settings screen and check the box to Record in the background while I’m playing a game. While here, you can click the drop-down menu for Record the last and change the interval to anywhere from 15 seconds to 10 minutes.
Now you need never miss a moment again. Just click the Record last 30 sec button, and a video is generated based on the number of seconds or minutes you set.
Customize Game Bar
You can view your video captures, control which widgets appear, and customize an array of settings directly through Game Bar. Press Win+G to open the Game Bar. In the Capture widget, click the Show All Captures link to see a list of all your captured videos. Click the video you want to play.
Windows allows you to set which widgets pop up when Game Bar is activated. From the Game Bar display, close the window for any widget that you don’t want to see. In the top widget toolbar, click the Widget menu icon to the right of the time, then select the widgets you want to use. You can also turn certain widgets on or off by clicking the appropriate icon on the top widget toolbar.
Click the Settings icon at the right end of the top widget. Here, you can view and change the accounts, shortcuts, theme, recording options, notifications, and other controls for Game Bar.
If you bump into problems with Game Bar, or the tool won’t let you capture your screen activity, your best bet is to check Microsoft’s web page on “Troubleshoot Xbox Game Bar on Windows 10.”
Game Bar Workaround
But what if you receive an error that your device doesn’t meet the hardware requirement for recording clips? Assuming you can’t change your PC hardware or video card, there is one trick you can try courtesy of a third-party utility called Game DVR Config.


