- 4 Easy Ways to Change Administrator Name on Windows 10
- Way 1. Change Administrator Name in Control Panel
- Way 2. Change Administrator Name in Local Users and Groups
- Way 3. Change Administrator Name in Local Group Policy Editor
- Way 4. Change a Microsoft Account Name from Microsoft website
- Extra Tip: How to Change Forgotten Administrator Password on Windows 10?
- How to Change Your Account Name on Windows 10
- Change Account Name and Rename User Account Folder in Windows 10
- Method 1: Classic Control Panel
- Method 2: User Accounts Advanced Control Panel
- What about Your User Folder Name?
- How to Change Administrator Name on Windows 10
- How to Change Administrator Name via Advanced Control Panel
- How to Change Administrator Name on Windows 10 via Control Panel
4 Easy Ways to Change Administrator Name on Windows 10
«I want to know how can I change the administrator user name of my windows account. I don’t mean the name of the folder of my user in Windows. I mean the subname that my user account have. Really I don’t know where can I do this.»
If the administrator user account has a different name than your actual name, you may want to fix it, so it shows your actual and real name everywhere. It’s easy to change your user account name on a Windows 10 PC and the following guide teaches how to change administrator name on Windows 10 using four different ways.
Each of the method described below uses a unique way to let you change your name in the administrator account. Regardless of what method you use to change admin name Windows 10, it will have the same effect and your name will be changed system wide.
Way 1. Change Administrator Name in Control Panel
Control Panel is a preferred way for many users to accomplish your tasks. If you use it for most of your tasks, why not for changing your admin name? This section shows how you can use Control Panel to make changes to the name of your admin account. Here’s how you do it:
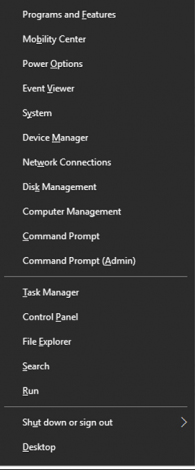
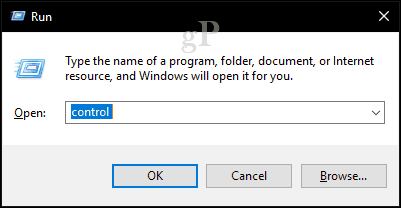
Step 1. Press the Windows + X key and select Control Panel from the menu that appears on your screen.
Step 2. Click on User Accounts and Family Safety and then click on the option that says User Accounts.
Step 3. Under your account settings, click on the option that says Change your account name to change your name in your account.
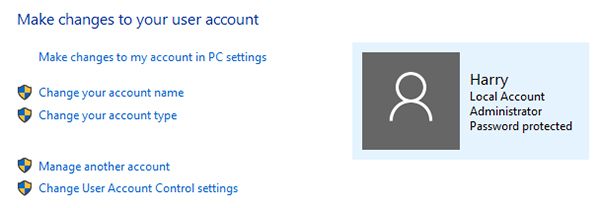
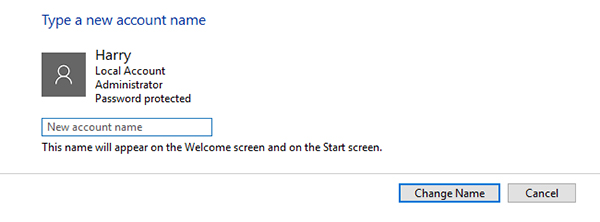
Step 4. You will be asked to enter the new name you would like to have for your account. Enter a new name and click on the button that says Change Name.
There you go. Your administrator account name should now be changed and the new name will appear everywhere on your computer.
That is how you use Control Panel to change administrator name on Windows 10.
Way 2. Change Administrator Name in Local Users and Groups
Local Users and Groups is yet another utility that allows you to make changes to your user accounts including the ability to let you change your name. If you have never used the utility before, the following will teach you how to use it to change administrator name Windows 10. Here you go:
The following is how you use SFC to fix the Windows 10 no login screen on startup issue:
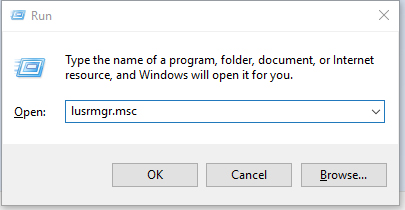
Step 1. Press the Windows + R keys together and type in lusrmgr.msc in the Run box and hit Enter.
Step 2. When the utility opens, find and click on the option that says Users in the left sidebar. Then, find your admin account in the right panel, right-click on the account, and select the option that says Rename.
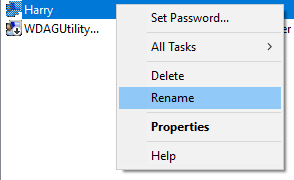
Step 3. Enter in a new name for the account and hit Enter.

You are all set. The administrator account name has been successfully changed on your Windows 10 based computer.
Way 3. Change Administrator Name in Local Group Policy Editor
Local Group Policy Editor can also be used to change administrator name and the following is how you do it.
Step 1. Open the Run dialog box by pressing Windows + R keys and type in gpedit.msc and press Enter.
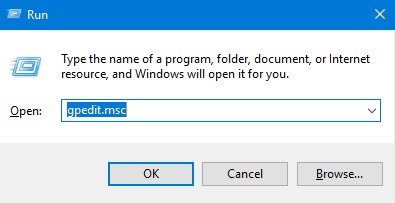
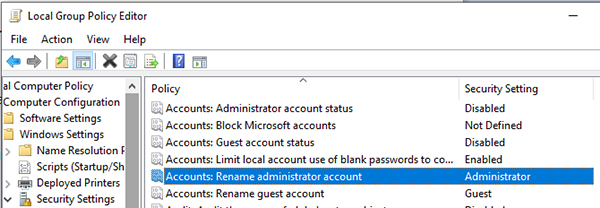
Step 2. Head to the following path and open the entry that says Accounts: rename administrator account.
Computer Configuration/Windows Settings/Security Settings/Local Policies/Security Options/
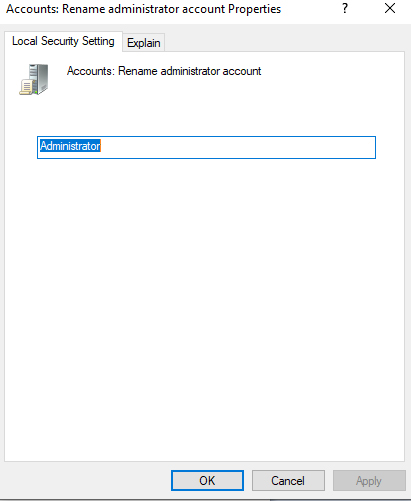
Step 3. Enter in a new name for the account and click on OK.
You should be able to create a new user account for your Windows 10 computer. Once created, reboot your PC and you will see the traditional sign-in screen prompting you to enter your password to access your account.
Way 4. Change a Microsoft Account Name from Microsoft website
If you use a Microsoft account with your Windows 10 PC, you can use the Microsoft website to change the name for your administrator account.
The following shows how to change admin name on Windows 10 using the Microsoft website:
Step 1. Launch the Start Menu, select your account, and choose the option that says Change account settings.
Step 2. Select the option that says Manage my Microsoft account and it will take you to the Microsoft website.
Step 3. Open your account settings, click on Your info, and click on Edit name.
Step 4. Enter a new name for your account and click on Save.
You are all done. The name of the Microsoft account integrated with your Windows 10 system has been changed. You will find that the new name appears everywhere on your computer.
Extra Tip: How to Change Forgotten Administrator Password on Windows 10?
If you are an admin user on your PC and you ever forget the password of your account, you can get your entire computer locked out as your PC won’t let you access your account without a password. Those having a normal account won’t be able to execute admin tasks.
Fortunately, there’s a software called Windows Password Key that allows users to recover and reset passwords for your user accounts. Using the software, you can recover the password for your account and then use it to log-in to your system.
We really hope the above guide helps you to change administrator name Windows 10 so that your system reflects your actual and current name. And in case you forget the password of your account, Windows Password Key will help you out.
How to Change Your Account Name on Windows 10


When you set up a new Windows 10 PC, the part where you choose your username may catch you off guard. If that’s the case, you may choose the first thing that pops into your head or something random and temporary that you intend to change later. But surprisingly enough, changing your account name in Windows 10 isn’t exactly a straightforward process. It can be done, but there are a few important things to consider as you go about it. Read on for the details.
Change Account Name and Rename User Account Folder in Windows 10
Your username is part of your identity used to sign in to Windows 10. Mistakes can sometimes happen when creating a username. There are several ways you can fix that.
Currently, the Settings app doesn’t offer an option to edit usernames. There are two ways to work around this limitation.
Method 1: Classic Control Panel
Find and open the classic Control Panel. One way to do this is to press Windows + R and then type Control then hit Enter.
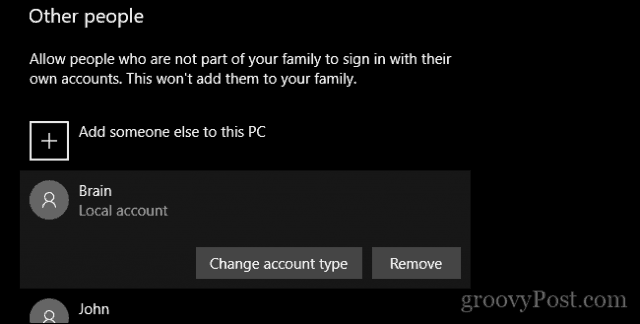
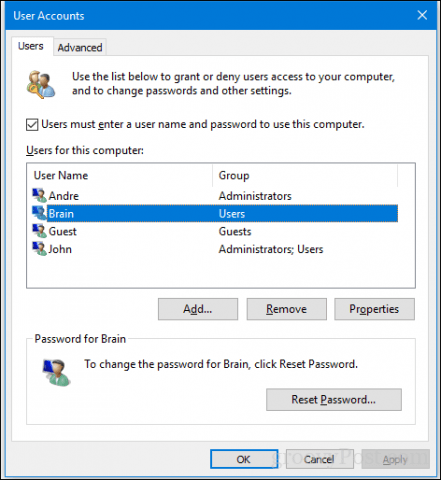
Open the User Accounts control panel, then click Manage another account.
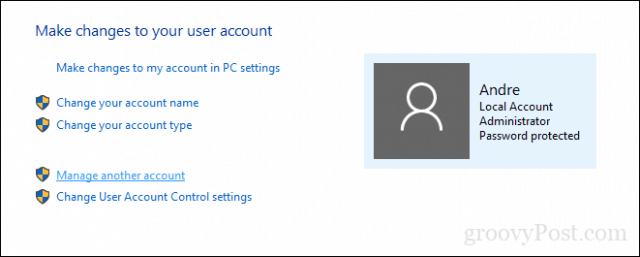
Click the account you want to edit.
Click Change the account name.

Enter the correct username for the account then click Change Name.
Method 2: User Accounts Advanced Control Panel
There is another way you can do it.
Press Windows key + R, type: netplwiz or control userpasswords2 then hit Enter.
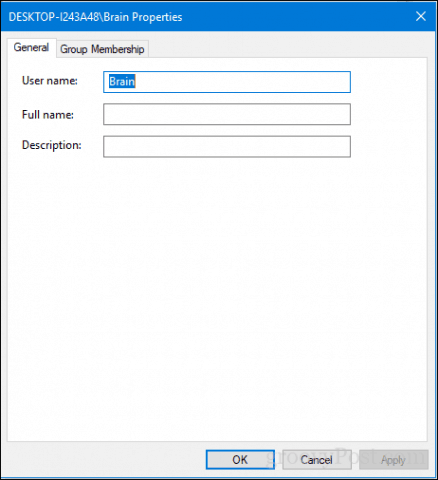
Select the account, then click Properties.
Select the General tab then enter the user name you want to use. Click Apply then OK, then click Apply then OK again to confirm the change.
What about Your User Folder Name?
Changing the username is pretty basic, but this change is not reflected in the User folder located within the C: drive. Renaming it can be risky—sometimes sticking with it or just creating a new user account then copying your files to the new account is a better option. Yes, it’s annoying, but it’s better than ending up with a corrupt user profile.
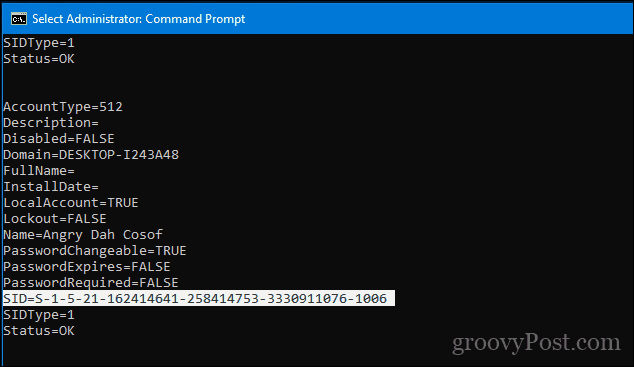
If you must change it to hush your OCD, there is an advanced option available. This involves using the command line to access the security identifier (SID) then making the necessary change in the Registry. Before you go any further, enable then log into the built-in Administrator account. As a precaution, create a system restore point in advance.
To access all the information within the SID requires using the Windows Management Instrumentation Command-line to reveal the value needed to find and change it in the Registry. Open the command prompt with Administrator privileges, type: wmic useraccount list full then hit Enter. Scroll down then take note of the SID values for the account you want to change.
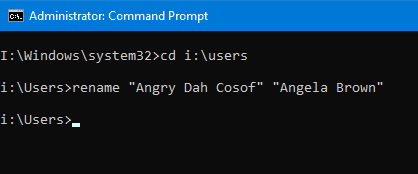
The next step is to rename the account. Doing this from the command line is just as easy.
For example, rename “Angry Dah Cosof” “Angela Brown”
Open Start, type: regedit
Right-click Regedit.
Click Run as administrator.
Remember that SID value we accessed earlier? Now is the time to reference it.
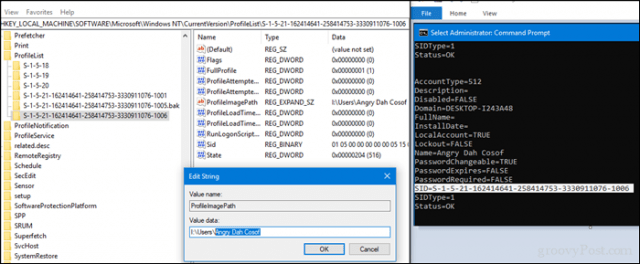
Once you find it, select it, then double-click the value ProfileImagePath. You will see the old name we had earlier is still there. Change it to the new name you want to use.
There you have it, the name you actually intended. Mistakes like this can happen, but there is always a way to fix them.
How to Change Administrator Name on Windows 10
If the administrator account you want to change is linked to a Microsoft account, you can change an admin’s name by going to settings > Accounts > Your Info, and then clicking on the Manage my Microsoft Account option. This will take you to Microsoft’s website, where you can edit your profile. Make sure to restart your device after you’re done. Here’s how to change an administrator name on Windows 10:
Once you restart, you will see your new username on the sign-in screen.
- Open the Windows Start menu. You can do this by clicking the button in the lower-left corner of your screen shaped like the Windows logo.
- Then select Settings. This is the gear-shaped icon just above the power button.

- Then click on Accounts.
- Next, click on Your info. You can find this option in the left sidebar.
- Click on Manage my Microsoft Account. This will take you to your Microsoft account webpage.
- Then click More actions. You can find this drop-down menu next to your user account name in the top left corner.
- Next, click Edit profile from the drop-down menu.
- Then click Edit name under your current account name.
- Enter the new first and last name that you want.
- Enter the Captcha code.
- Then click Save.
- Restart your computer for the changes to go into effect.


How to Change Administrator Name via Advanced Control Panel
You can also change a user’s account name with Advanced Control Panel, which can be accessed by certain commands. The option appears when you click on Properties of the chosen user.
- Press the Windows key and R simultaneously on your keyboard. This will open the Run command tool.
- Type netplwiz in the Run command tool.
- Choose the account you would like to rename.
- Then click Properties.
- Type a new username in the box under the General tab.
- Click OK.
- Click OK again on the User Accounts Panel.


If you are want to change the name of a local account, you will have to do so through Control Panel. Here’s how:
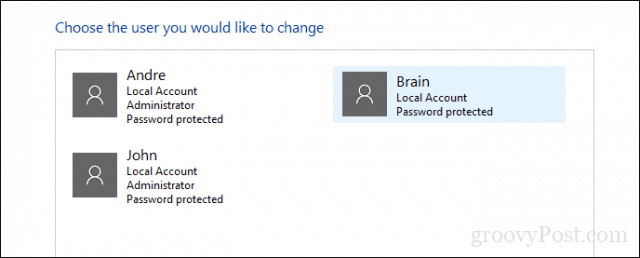
How to Change Administrator Name on Windows 10 via Control Panel
If you want to change an Administrator name that is not linked to a Microsoft Account, you can open the Control Panel and click Change account type.
Note: The following steps only work for local accounts that are not linked with Microsoft account.
- Type Control Panel into the Windows Search Bar. You will find this by clicking the magnifying glass icon in the lower-left corner of your screen.
- Then click Open.
- Click on Change account type under Use Accounts.
- Select a user account you would like to rename.
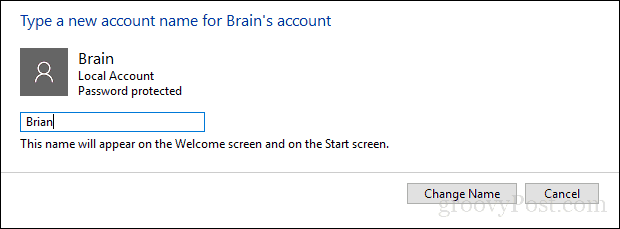
- Click on Change the account name.
- Type the new user account name in the box.
- Finally, click on Change Name. Your changes will appear when you go back to the previous screen.


Now that you know how to change an administrator name on Windows 10, check out our guide on how to change an administrator account on Windows 10 here.


