- How to Change the Default Terminal in Ubuntu
- Change the default terminal in Ubuntu
- Auto mode vs manual mode
- Как изменить терминал по-умолчанию в Ubuntu
- Меняем стандартный терминал в Ubuntu
- Change the Default Terminal Emulator on Linux
- Changing terminal emulator
- Verifying the result
- How To Change The Default Shell In Linux
- How to change the default login shell using chsh (from the command line)
- Change the shell for your user in a terminal application
- Ubuntu Documentation
- Why use the terminal?
- Starting a terminal
- In Unity
- In GNOME
- In Xfce (Xubuntu)
- In KDE (Kubuntu)
- In LXDE (Lubuntu)
- Commands
- sudo: Executing Commands with Administrative Privileges
- File & Directory Commands
- Running a File Within a Directory
- System Information Commands
- Adding A New User
- Options
- «Man» and getting help
- Searching the manual pages
- Other Useful Things
- Prettier Manual Pages
- Pasting in commands
- Save on typing
- Change the text
- More ways to run a terminal
- An extremely handy tool :: Incremental history searching
- How to create upsidedown and/or reverse text with your terminal
- More Information
How to Change the Default Terminal in Ubuntu
Last updated March 18, 2021 By Abhishek Prakash 18 Comments
The terminal (or more accurately, terminal emulator) is a crucial part of any Linux system. It allows you to access your Linux systems through a shell. There are several terminal applications on Linux.
Most of the desktop environments have their own implementation of the terminal. It may look different and may have different keyboard shortcuts.
For example, Guake Terminal is extremely useful for power users and provides several features you might not get in your distribution’s terminal by default.
You can install other terminals on your system and use it as default that opens up with the usual keyboard shortcut of Ctrl+Alt+T.
Now the question comes, how do you change the default terminal in Ubuntu. It doesn’t follow the standard way of changing default applications in Ubuntu then how to do it?
Change the default terminal in Ubuntu

On Debian-based distributions, there is a handy command line utility called update-alternatives that allows you to handle the default applications.
You can use it to change the default command line text editor, terminal and more. To do that, run the following command:
It will show all the terminal emulators present on your system that can be used as default. The current default terminal is marked with the asterisk.
All you have to do is to enter the selection number. In my case, I want to use the GNOME terminal instead of the one from Regolith desktop.
Auto mode vs manual mode
You might have noticed the auto mode and manual mode in the output of update-alternatives command.
If you choose auto mode, your system may automatically decide on the default application as the packages are installed or removed. The decision is influenced by the priority number (as seen in the output of the command in the previous section).
Suppose you have 5 terminal emulators installed on your system and you delete the default one. Now, your system will check which of the emulators are in auto mode. If there are more than one, it will choose the one with the highest priority as the default emulator.
I hope you find this quick little tip useful. Your questions and suggestions are always welcome.
Like what you read? Please share it with others.
Источник
Как изменить терминал по-умолчанию в Ubuntu
Терминал является важной частью любой системы Linux. Он позволяет получить доступ к настройкам Linux через командную строку. В Linux существует несколько терминальных приложений (технически называемых эмуляторами терминала).
Большинство окружений рабочего стола имеют собственные реализации терминала. Они могут не только выглядеть иначе, но и иметь разные комбинации горячих клавиш.
К примеру, Guake Terminal чрезвычайно удобен продвинутым пользователям и предоставляет несколько функций, которые вы не получите в терминале установленном в вашем дистрибутиве по-умолчанию.
Вы можете установить другие терминалы в свою систему и использовать их как основной, запуская по комбинации клавиш Ctrl+Alt+T.
Теперь встает вопрос, как изменить терминал по-умолчанию в Ubuntu?! Это не похоже на стандартный путь замены приложений по-умолчанию в Ubuntu.
Меняем стандартный терминал в Ubuntu
В дисрибутивах основанных на Debian имеется утилита командной строки update-alternatives, которая позволяет управлять приложениями по-умолчанию в системе.
Вы можете использовать её чтоб изменить текстовый редактор командной строки, эмулятор терминала и т.д. Для этого выполните следующую команду:
Вы увидите все эмуляторы терминалов, присутствующие в системе, и которые могут быть использованы по-умолчанию. Текущий терминал по-умолчанию помечен звездочкой.
Просто введите номер требуемого эмулятора терминала в списке и нажмите Enter. Теперь, когда вы запускаете терминал через пункт меню или вводите в командной строке x-terminal-emulator, вы увидите правильное всплывающее окно.
Источник
Change the Default Terminal Emulator on Linux

Terminal is the heart and soul of any Linux system. Using it, you can perform all the complex and difficult tasks. All you need is a proper understanding of the commands you’re giving input and decipher what the output means.
Working with the terminal can be pretty boring in cases. The reason is, it’s the legitimate command line interface. That’s why there are a number of available terminal emulators that can add the difference in the working environment and gift you a less boring, more focusing environment.
Are you tired of the default terminal emulator? Today, let’s change the terminal emulator to a different one!
Changing terminal emulator
Before you can change the default terminal emulator, you need to have at least one more to switch to. Don’t worry; feel free to check out some of the most popular terminal emulators for the Linux platform.
Installed your favorite one(s)? Good then, time to make the switch!
Fire up the current terminal emulator –

In my case, it’s the Xfce4-terminal.
Now, run the following command –

You’ll be presented with a list of all the available terminal emulator(s) on your system. Depending on your installed terminal emulators, the list will vary. If you don’t have any, you’ll be told so.
My favorite one is Konsole – the terminal emulator of KDE Plasma. For making the switch, enter the number of your target emulator –

The switch is complete. Now, exit the current terminal emulator –
Verifying the result
Press “Ctrl + Alt + T” or whatever shortcut you’ve decided to fire up the terminal –
Источник
How To Change The Default Shell In Linux

This article explains how to change the default shell in Linux. Using this you can set Bash, sh, Zsh, Csh, Fish, etc. as your shell.
The article includes instructions for changing the login shell from the command line using chsh, or changing the shell only for a particular terminal application. While the article is targeted at Linux users, this should also work on other Unix-like systems.
How to change the default login shell using chsh (from the command line)
To change the default login shell we’ll use chsh , a command line tool to change the login shell.
This program changes the login shell by modifying the /etc/passwd file and setting the $SHELL environment variable. You can override the default shell in a terminal application, by setting the shell from the terminal settings — see the second part of this article for details.
A note for Fedora users. Fedora doesn’t have chsh installed by default and to use it, you must install a package called util-linux-user . If you want to skip installing this package, you can use lchsh instead to change the login shell, which is available by default:
It’s important to note that using chsh, a normal user may only change the login shell for the current account, while the superuser may change the login shell for any account, including the root account. Also, the default behavior for non-root users is to accept only shells listed in the /etc/shells file, and issue a warning for root user.
So before changing your shell, list all the shells listed in the /etc/shells file from your Linux system by using the following command:
Example with output:
If the shell you want to use is not listed here, it may not be installed on your system. So install it (for example, install Zsh on Debian / Ubuntu / Linux Mint / Pop!_OS using: sudo apt install zsh ) and check again.
To change the shell for your user, run:
This runs chsh in an interactive mode, asking you for the password, then listing your current shell (most Linux distributions use Bash as the default shell) and asking you to enter a value for your new shell. Here’s the command with its output:
To change your shell, type the path to the new shell (which exists in /etc/shells ) and press the Enter key.
For example, to change the shell for the current user from Bash to Zsh:
In case you’re using a chsh version that doesn’t launch with an interactive prompt after executing chsh , change the login shell for your user directly:
E.g. to change the shell to Zsh:
After changing your account’s shell, logout and re-login to use the new shell.
To change the login shell for another user or for the root user, login to the shell prompt as root using su — , sudo -i , sudo su , etc., and run:
- To change the shell for the root account (and when prompted, enter the login shell you want to use, with its full path):
- To change the shell of another user (this also works for the root user, using root as the username):
This time we’ve used chsh with the -s option, which changes the login shell directly (doesn’t run in an interactive mode). Here, SHELL is the new shell (e.g. /bin/zsh ) and USERNAME is the user for which you’re changing the shell; for example, to change the shell to /bin/zsh for the user Logix , you’d use: chsh -s /bin/zsh Logix ).
Change the shell for your user in a terminal application
You can use a shell that’s different from the login shell ( $SHELL ) for a particular terminal application, if that application allows setting a custom shell or running a custom command instead of the default shell.
As a side note, you may also change the current shell (non-permanent change) by typing the shell command you want to use in a terminal (e.g. if you type «zsh», you’ll switch to using Zsh for that session; exit by typing «exit».).
Take GNOME Terminal for example (used in GNOME and Cinnamon desktops as the default terminal). Open its Preferences , click on the current active profile (usually called Default or Unnamed if you haven’t changed it or added new profiles) in the left-hand sidebar, then click on the Command tab:
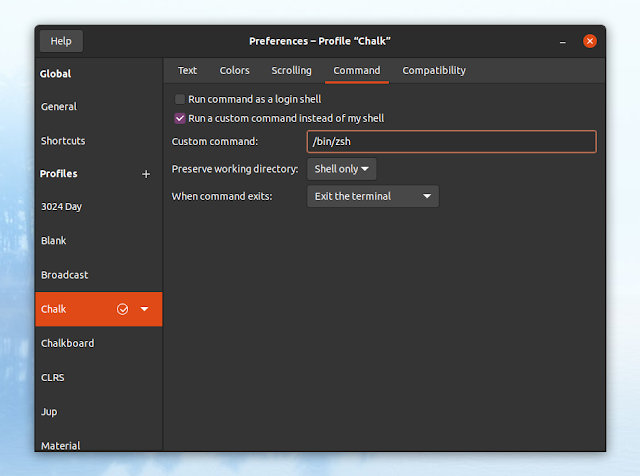
This is where you can set a custom shell to be used with this application only. Enable the Run a custom command instead of my shell option, then in the Custom command field enter the full path to the shell you want to use, e.g. /bin/zsh , /bin/bash , etc.
In Xfce4 Terminal, open the Preferences and on the General tab you’ll need to enable an option called Run a custom command instead of my shell , then enter the custom command below that (this being the shell you want to use with this terminal, e.g. /bin/zsh , /usr/bin/fish , etc.).
Using KDE Plasma’s Konsole, go to Settings -> Edit Current Profile , and on the General tab, change the Command field to the full path of the shell you want to use (once again, something like: /bin/zsh , /bin/bash , /usr/bin/fish , etc.).
Using Guake, you can change the user shell from its Preferences , on the Shell tab, where you’ll find an option called Default interpreter that allows choosing any shell listed in /etc/shells .
For terminals that allow running a custom shell you should also find an option that allows running the command as a login shell (usually called just that: «Run command as a login shell»). To read on the differences between a login shell and an interactive shell, see this page.
Setting this is the same in most cases, so I won’t give any more examples. However, it’s worth noting that not all terminal applications have options to allow using a custom shell — in such cases, use the chsh command to change the login shell, as explained above.
Источник
Ubuntu Documentation
Why use the terminal?
«Under Linux there are GUIs (graphical user interfaces), where you can point and click and drag, and hopefully get work done without first reading lots of documentation. The traditional Unix environment is a CLI (command line interface), where you type commands to tell the computer what to do. That is faster and more powerful, but requires finding out what the commands are.»
— from man intro(1)
This page gives an introduction to using the command-line interface terminal, from now on abbreviated to the terminal. There are many varieties of Linux, but almost all of them use similar commands that can be entered from the terminal.
There are also many graphical user interfaces (GUIs), but each of them works differently and there is little standardization between them. Experienced users who work with many different Linux distributions therefore find it easier to learn commands that can be used in all varieties of Ubuntu and, indeed, in other Linux distributions as well.
For the novice, commands can appear daunting:
However, it is important to note that even experienced users often cut and paste commands (from a guide or manual) into the terminal; they do not memorize them.
It is important, of course, to know how to use the terminal — and anyone who can manage typing, backspacing, and cutting and pasting will be able to use the terminal (it is not more difficult than that).
Starting a terminal
In Unity
Unity is the default desktop environment used as of 11.04. Where systems are not ready for Unity they revert to GNOME which is also used in previous releases such as Ubuntu 10.04 LTS (Lucid), see next sub-section.
The easiest way to open the terminal is to use the ‘search’ function on the dash. Or you can click on the ‘More Apps’ button, click on the ‘See more results’ by the installed section, and find it in that list of applications. A third way, available after you click on the ‘More Apps’ button, is to go to the search bar, and see that the far right end of it says ‘All Applications’. You then click on that, and you’ll see the full list. Then you can go to Accessories -> Terminal after that. So, the methods in Unity are:
Dash -> Search for Terminal
Dash -> More Apps -> ‘See More Results’ -> Terminal
Dash -> More Apps -> Accessories -> Terminal
Keyboard Shortcut: Ctrl + Alt + T
In GNOME
GNOME is the classic desktop environment for Ubuntu 11.04 (Natty) and is the default desktop environment in earlier releases, such as Ubuntu 10.04 LTS (Lucid).
Applications menu -> Accessories -> Terminal.
Keyboard Shortcut: Ctrl + Alt + T
In Xfce (Xubuntu)
Applications menu -> System -> Terminal.
Keyboard Shortcut: Super + T
Keyboard Shortcut: Ctrl + Alt + T
In KDE (Kubuntu)
KMenu -> System -> Terminal Program (Konsole).
In LXDE (Lubuntu)
Menu -> Accessories -> LXTerminal.
Keyboard Shortcut: Ctrl + Alt + T
Commands
sudo: Executing Commands with Administrative Privileges
The sudo command executes a command with administrative privileges (root-user administrative level), which is necessary, for example, when working with directories or files not owned by your user account. When using sudo you will be prompted for your password. Only users with administrative privileges are allowed to use sudo.
Be careful when executing commands with administrative privileges — you might damage your system! You should never use normal sudo to start graphical applications with administrative privileges. Please see RootSudo for more information on using sudo correctly.
File & Directory Commands
) symbol stands for your home directory. If you are user, then the tilde (
) stands for /home/user
pwd: The pwd command will allow you to know in which directory you’re located (pwd stands for «print working directory»). Example: «pwd» in the Desktop directory will show «
/Desktop». Note that the GNOME Terminal also displays this information in the title bar of its window. A useful gnemonic is «present working directory.»
ls: The ls command will show you (‘list’) the files in your current directory. Used with certain options, you can see sizes of files, when files were made, and permissions of files. Example: «ls
« will show you the files that are in your home directory.
cd: The cd command will allow you to change directories. When you open a terminal you will be in your home directory. To move around the file system you will use cd. Examples:
To navigate into the root directory, use «cd /»
To navigate to your home directory, use «cd» or «cd
To navigate up one directory level, use «cd ..»
To navigate to the previous directory (or back), use «cd -«
To navigate through multiple levels of directory at once, specify the full directory path that you want to go to. For example, use, «cd /var/www» to go directly to the /www subdirectory of /var/. As another example, «cd
/Desktop» will move you to the Desktop subdirectory inside your home directory.
cp: The cp command will make a copy of a file for you. Example: «cp file foo» will make an exact copy of «file» and name it «foo», but the file «file» will still be there. If you are copying a directory, you must use «cp -r directory foo» (copy recursively). (To understand what «recursively» means, think of it this way: to copy the directory and all its files and subdirectories and all their files and subdirectories of the subdirectories and all their files, and on and on, «recursively»)
mv: The mv command will move a file to a different location or will rename a file. Examples are as follows: «mv file foo» will rename the file «file» to «foo». «mv foo
/Desktop» will move the file «foo» to your Desktop directory, but it will not rename it. You must specify a new file name to rename a file.
- To save on typing, you can substitute ‘
‘ in place of the home directory.
Note that if you are using mv with sudo you can use the
shortcut, because the terminal expands the
to your home directory. However, when you open a root shell with sudo -i or sudo -s,
will refer to the root account’s home directory, not your own.
rm: Use this command to remove or delete a file in your directory.
rmdir: The rmdir command will delete an empty directory. To delete a directory and all of its contents recursively, use rm -r instead.
mkdir: The mkdir command will allow you to create directories. Example: «mkdir music» will create a directory called «music».
Here is an example of when it would be necessary to execute a command with administrative privileges. Let’s suppose that another user has accidentally moved one of your documents from your Documents directory to the root directory. Normally, to move the document back, you would type mv /mydoc.odt
/Documents/mydoc.odt, but by default you are not allowed to modify files outside your home directory. To get around this, you would type sudo mv /mydoc.odt
/Documents/mydoc.odt. This will successfully move the document back to its correct location, provided that you have administrative privileges.
Running a File Within a Directory
So you’ve decided to run a file using the command-line? Well. there’s a command for that too!
./filename.extension
After navigating to the file’s directory, this command will enable any Ubuntu user to run files compiled via GCC or any other programming language. Although the example above indicates a file name extension, please notice that, differently from some other operating systems, Ubuntu (and other Linux-based systems) do not care about file extensions (they can be anything, or nothing). Keep in mind that the ‘extension’ will vary depending upon the language the source code is written in. Also, it is not possible, for compiled languages (like C and C++) to run the source code directly — the file must be compiled first, which means it will be translated from a human-readable programming language to something the computer can understand. Some possible extensions: «.c» for C source, «.cpp» for C++, «.rb» for Ruby, «.py» for Python, etc. Also, remember that (in the case of interpreted languages like Ruby & Python) you must have a version of that language installed on Ubuntu before trying to run files written with it.
Finally, the file will only be executed if the file permissions are correct — please see the FilePermissions help page for details.
System Information Commands
df: The df command displays filesystem disk space usage for all mounted partitions. «df -h» is probably the most useful — it uses megabytes (M) and gigabytes (G) instead of blocks to report. (-h means «human-readable»)
du: The du command displays the disk usage for a directory. It can either display the space used for all subdirectories or the total for the directory you run it on. Example:
In the above example -s means «Summary» and -h means «Human Readable».
free: The free command displays the amount of free and used memory in the system. «free -m» will give the information using megabytes, which is probably most useful for current computers.
top: The top (‘table of processes’) command displays information on your Linux system, running processes and system resources, including CPU, RAM & swap usage and total number of tasks being run. To exit top, press «q».
uname -a: The uname command with the -a option prints all system information, including machine name, kernel name & version, and a few other details. Most useful for checking which kernel you’re using.
lsb_release -a: The lsb_release command with the -a option prints version information for the Linux release you’re running, for example:
ip addr reports on your system’s network interfaces.
Adding A New User
The «adduser newuser» command will create a new general user called «newuser» on your system, and to assign a password for the newuser account use «passwd newuser».
Options
The default behaviour for a command may usually be modified by adding a —option to the command. The ls command for example has an -s option so that «ls -s» will include file sizes in the listing. There is also a -h option to get those sizes in a «human readable» format.
Options can be grouped in clusters so «ls -sh» is exactly the same command as «ls -s -h». Most options have a long version, prefixed with two dashes instead of one, so even «ls —size —human-readable» is the same command.
«Man» and getting help
man command, info command and command —help are the most important tools at the command line.
Nearly every command and application in Linux will have a man (manual) file, so finding them is as simple as typing «man «command»» to bring up a longer manual entry for the specified command. For example, «man mv» will bring up the mv (move) manual.
Move up and down the man file with the arrow keys, and quit back to the command prompt with «q».
«man man» will bring up the manual entry for the man command, which is a good place to start!
«man intro» is especially useful — it displays the «Introduction to user commands» which is a well-written, fairly brief introduction to the Linux command line.
There are also info pages, which are generally more in-depth than man pages. Try «info info» for the introduction to info pages.
Some software developers prefer info to man (for instance, GNU developers), so if you find a very widely used command or app that doesn’t have a man page, it’s worth checking for an info page.
Virtually all commands understand the -h (or —help) option which will produce a short usage description of the command and it’s options, then exit back to the command prompt. Try «man -h» or «man —help» to see this in action.
Caveat: It’s possible (but rare) that a program doesn’t understand the -h option to mean help. For this reason, check for a man or info page first, and try the long option —help before -h.
Searching the manual pages
If you aren’t sure which command or application you need to use, you can try searching the manual pages. Each manual page has a name and a short description.
To search the names for enter:
For example, whatis -r cpy will list manual pages whose names contain cpy. The output from whatis -r cpy will in part depend on your system — but might be as follows:
To search the names or descriptions for enter:
For example, apropos -r «copy files» will list manual pages whose names or descriptions contain copy files. The output from apropos -r «copy files» will in part depend on your system — but might be as follows:
Other Useful Things
Prettier Manual Pages
Users who have Konqueror installed will be pleased to find they can read and search man pages in a web browser context, prettified with their chosen desktop fonts and a little colour, by visiting man:/command in Konqueror’s address bar. Some people might find this lightens the load if there’s lots of documentation to read/search.
Pasting in commands
Often, you will be referred to instructions that require commands to be pasted into the terminal. You might be wondering why the text you’ve copied from a web page using Ctrl + C won’t paste in with ctrl+V. Surely you don’t have to type in all those nasty commands and filenames? Relax. ctrl+shift+V pastes into a GNOME terminal; you can also do middle button click on your mouse (both buttons simultaneously on a two-button mouse) or right click and select Paste from the menu. However, if you want to avoid the mouse and yet paste it, use «Shift + Insert», to paste the command. If you have to copy it from another terminal / webpage, you can use «Ctrl + Insert» to copy.
Save on typing
Up Arrow or Ctrl + P
Scrolls through the commands you’ve entered previously.
Down Arrow or Ctrl + N
Takes you back to a more recent command.
Enter
When you have the command you want.
tab
A very useful feature. It autocompletes any commands or filenames, if there’s only one option, or else gives you a list of options.
Ctrl + R
Searches for commands you’ve already typed. When you have entered a very long, complex command and need to repeat it, using this key combination and then typing a portion of the command will search through your command history. When you find it, simply press Enter.
History
The history command shows a very long list of commands that you have typed. Each command is displayed next to a number. You can type !x to execute a previously typed command from the list (replace the X with a number). If you history output is too long, then use history | less for a scrollable list.
Example: you ran history and found you want to use command 1967. Simply enter
Change the text
The mouse won’t work. Use the left/right arrow keys to move around the line.
When the cursor is where you want it in the line, typing inserts text — ie it doesn’t overtype what’s already there.
Ctrl + A or Home
Moves the cursor to the start of a line.
Ctrl+ E or End
Moves the cursor to the end of a line.
Esc + B
Moves to the beginning of the previous or current word.
Ctrl + K
Deletes from the current cursor position to the end of the line.
Ctrl + U
Deletes from the start of the line to the current cursor position.
Ctrl + W
Deletes the word before the cursor.
Alt + B
Goes back one word at a time.
Alt + F
Moves forward one word at a time.
Alt + C
Capitalizes letter where cursor is and moves to end of word.
More ways to run a terminal
You can set your own keyboard shortcut to run a terminal. See KeyboardShortcuts for details of keyboard shortcuts.
You can run more than terminal — in tabs or separate windows.
You can also install guake (GNOME), tilda (XFCE / LXDE/Mate) or yakuake (KDE) and have a terminal which appears and hides on shortcut key. This can be particularly useful if you use terminal a lot. Drop down terminals can make things a lot easier if you are trying to run a desktop enviroment with a non defualt window manager and something goes wrong drop down terminals can run the orginal window manager —replace to restore a previous option to make things much less painful.
An extremely handy tool :: Incremental history searching
In terminal enter:
Then copy paste and save:
From now on, and many agree this is the most useful terminal tool, it saves you a lot of writing/memorizing.
All you need to do to find a previous command is to enter say the first two or three letters and upward arrow will take you there quickly:
All I need to do is enter:
And hit upward arrow command will soon appear.
How to create upsidedown and/or reverse text with your terminal
If you wish or need to ever flip text upside down [vertical flip] «uʍop ǝpısdn ʇxǝʇ dıʃɟ» or/and create reverse text here is a terminal way to achieve this.
Copy/paste and save the following as flip.pl in your home folder (thanks to Lars Noodén for script).
Then to set it up:
Then open terminal and enter:
Write what you want and hit return
Copy and paste wherever you want text document or Internet forum, etc.
- ɹǝʇuǝ puɐ ʇuɐʍ noʎ ʇɐɥʍ ǝʇıɹʍ ˙˙˙ɔʇǝ ɯnɹoɟ ʇǝuɹǝʇuı ɹo ʇuǝɯnɔop ʇxǝʇ ʇuɐʍ noʎ ɹǝʌǝɹǝɥʍ ǝʇsɐd puɐ ʎdoɔ
If you want to reverse back to front, write your text in a text editor and save as mytext to the home folder.
Copy and paste the result, tluser eht etsap dna ypoc.
And of course you can combine both for truly cryptic results, ɔodʎ ɐup dɐsʇǝ ʇɥǝ ɹǝsnʃʇ
More Information
Within the Community Help Wiki:
grep Howto — grep is a powerful command line search tool.
CommandlineHowto — another introduction to the terminal.
HowToReadline — more advanced customization.
Detailed tutorials on the Linux command line:
http://linuxtutorial.todolistme.net — «Here you will learn the Linux command line (Bash) with our 13 part beginners tutorial . «.
http://mywiki.wooledge.org/BashGuide — «This guide aims to aid people interested in learning to work with BASH. It aspires to teach good practice techniques for using BASH, and writing simple scripts».
http://linuxcommand.org/ — Learning the shell and writing shell scripts.
http://linuxsurvival.com/index.php — «Linux Survival is a free tutorial designed for people who have little or no experience with the Linux operating system».
http://www.ss64.com/bash/ — «An A-Z Index of the Bash command line for Linux».
http://tinyurl.com/ycyg4mk — «Top 3 Sites to Help You Become a Linux Command Line Master».
UsingTheTerminal (последним исправлял пользователь clissold345 2016-07-02 09:16:41)
The material on this wiki is available under a free license, see Copyright / License for details
You can contribute to this wiki, see Wiki Guide for details
Источник


