- Change TCP/IP settings
- To enable DHCP or change other TCP/IP settings
- To enable DHCP or change other TCP/IP settings
- How to find out, renew, change IP address in Windows 10
- Find out the IP address
- Renew IP address
- Change the IP address in Windows 10
- 3 ways to change the IP address in Windows 10
- 1. How to change the IP address in Windows 10, using the Settings app
- 2. How to change the IP address in Windows 10, using the Control Panel
- 3. How to change the IP address in Windows 10, using PowerShell or Command Prompt (cmd)
- What is your favorite method to change the IP address in Windows 10?
- How To Change IP Address in Windows 10: A Visual Guide
- How to change IP address in Windows 10
Change TCP/IP settings
TCP/IP defines how your PC communicates with other PCs.
To make it easier to manage TCP/IP settings, we recommend using automated Dynamic Host Configuration Protocol (DHCP). DHCP automatically assigns Internet Protocol (IP) addresses to the computers on your network if your network supports it. If you use DHCP, then you don’t have to change your TCP/IP settings if you move your PC to another location, and DHCP doesn’t require you to manually configure TCP/IP settings, such as Domain Name System (DNS) and Windows Internet Name Service (WINS).
To enable DHCP or change other TCP/IP settings
Select Start , then select Settings > Network & Internet .
Do one of the following:
For a Wi-Fi network, select Wi-Fi > Manage known networks. Choose the network you want to change the settings for, then select Properties.
For an Ethernet network, select Ethernet , then select the Ethernet network you’re connected to.
Under IP assignment, select Edit.
Under Edit IP settings, select Automatic (DHCP) or Manual.
To specify IPv4 settings manually
Under Edit IP settings, choose Manual, then turn on IPv4.
To specify an IP address, in the IP address, Subnet prefix length, and Gateway boxes, type the IP address settings.
To specify a DNS server address, in the Preferred DNS and Alternate DNS boxes, type the addresses of the primary and secondary DNS servers.
To specify IPv6 settings manually
Under Edit IP settings, choose Manual, then turn on IPv6.
To specify an IP address, in the IP address, Subnet prefix length, and Gateway boxes, type the IP address settings.
To specify a DNS server address, in the Preferred DNS and Alternate DNS boxes, type the addresses of the primary and secondary DNS servers.
When you select Automatic (DHCP), the IP address settings and DNS server address setting are set automatically by your router or other access point (recommended).
When you select Manual, you can manually set your IP address settings and DNS server address.
When you’re done, select Save.
To enable DHCP or change other TCP/IP settings
Do one of the following:
In Windows 8.1, select the Start button, start typing View network connections, and then select View network connections in the list.
In Windows 7, open Network Connections by selecting the Start button, and then selecting Control Panel. In the search box, type adapter, and then, under Network and Sharing Center, select View network connections.
Right-click the connection that you want to change, and then select Properties. If you’re prompted for an administrator password or confirmation, type the password or provide confirmation.
Select the Networking tab. Under This connection uses the following items, select either Internet Protocol Version 4 (TCP/IPv4) or Internet Protocol Version 6 (TCP/IPv6), and then select Properties.
To specify IPv4 IP address settings, do one of the following:
To get IP settings automatically using DHCP, select Obtain an IP address automatically, and then select OK.
To specify an IP address, select Use the following IP address, and then, in the IP address, Subnet mask, and Default gateway boxes, type the IP address settings.
To specify IPv6 IP address settings, do one of the following:
To get IP settings automatically using DHCP, select Obtain an IPv6 address automatically, and then select OK.
To specify an IP address, select Use the following IPv6 address, and then, in the IPv6 address, Subnet prefix length, and Default gateway boxes, type the IP address settings.
To specify DNS server address settings, do one of the following:
To get a DNS server address automatically using DHCP, select Obtain DNS server address automatically, and then select OK.
To specify a DNS server address, select Use the following DNS server addresses, and then, in the Preferred DNS server and Alternate DNS server boxes, type the addresses of the primary and secondary DNS servers.
To change advanced DNS, WINS, and IP settings, select Advanced.
Note: To install IPv4, run Command Prompt as an administrator, type netsh interface ipv4 install, and then press Enter.
How to find out, renew, change IP address in Windows 10
Your IP address which stands for Internet Protocol is the unique number of your internet connection linked to all your internet & networking activities. It is something a regular computer user would probably never really think about, but it is actually a very important technology that connects one machine to another via the Internet.
In this post, we will learn about the simple steps to find out, reset, renew, configure, and change the IP address in order to use a static IP, on your Windows 10 computer.
Find out the IP address
You may want to know your computer’s IP number if you need to connect two or more devices to ‘talk’ to each other.
From the WinX Menu, open an elevated Command Prompt window, type the following, and hit Enter:
IPConfig is a tool built into Windows, that displays all current TCP/IP network configuration values and refreshes Dynamic Host Configuration Protocol DHCP and Domain Name System DNS settings.
Renew IP address
To refresh or renew your IP address use the following commands:
Change the IP address in Windows 10
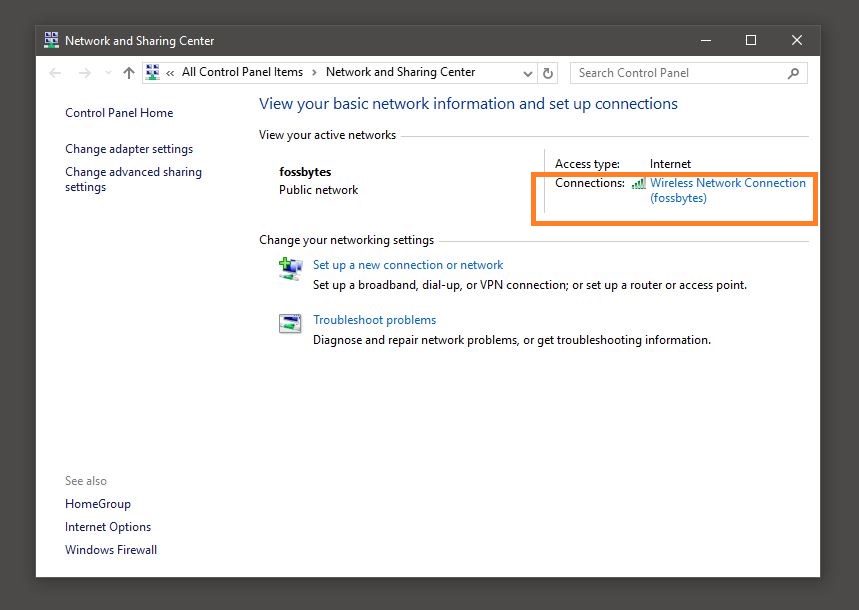
If you want to set a static IP, you can change your IP address. To do so, open the Network and Sharing Center in the Control Panel, and click on the Connections link.
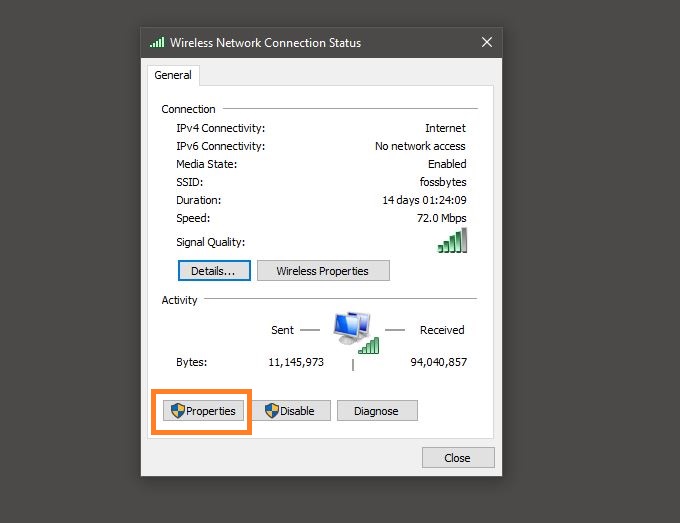
A new window will open up showing the details about your internet connection. Click on the Properties tab.
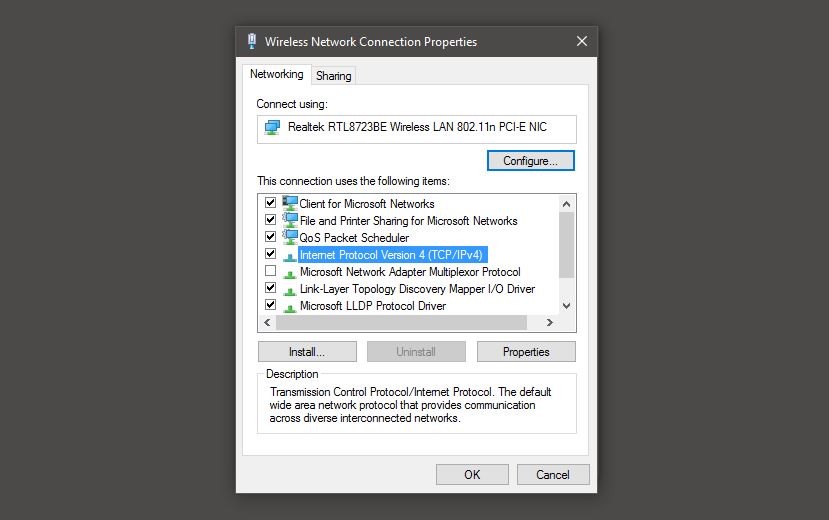
Another window will open up showing the items used by your connection. Select Internet Protocol Version 4 (TCP/ IP v4).
The default settings of a PC is to obtain the IP address automatically, but you can change it if required.
Select Use the following IP address and fill the required details (8 & 9 in the above image) and click on OK, and you are done.
Do not forget to check the box saying ‘Validate settings upon exit’. Your PC will automatically run network diagnostic and verify the connection.
If your computer is used on more than one network, enter the details like subnet mask, default gateway, preferred DNS server, alternate DNS server, etc.
Remember to reboot your computer system after making the changes.
3 ways to change the IP address in Windows 10
Have you ever wondered how you can change the IP address in Windows 10? Do you want to learn how to do it from Windows 10’s Settings app or the Control Panel? Maybe you’re a command-line fan, and want to learn how to change the IP address in Windows 10 using CMD (Command Prompt) or PowerShell? Read on and find out how all of these are done in Windows 10:
NOTE: To be able to change your IP address in Windows 10, you must log in to Windows 10 using an administrator account. Also, before learning how to change your IP address, it would be best if you already knew what IP addresses and subnet masks are, how to find what your IP is, and how to find the IP address of your router.
1. How to change the IP address in Windows 10, using the Settings app
Because it relies on the visual interface of the operating system, this is probably the easiest method for changing the IP address of your Windows 10 computer or device. Here’s what you need to do:
Open the Settings app: a quick way to do it is to push the Settings button from the Start Menu or to press Windows + I on your keyboard simultaneously. In the Settings app, open the Network & Internet category.
On the left sidebar, select your network type. If you connect to the internet (or local area network) using a wireless card, select Wi-Fi. If you’re accessing the internet (or LAN) using a wired connection, click or tap on Ethernet.
On the right side of the window, click or tap on the name of your network connection.
Scroll down on your network connection details page until you find the section called IP settings. Then, click or tap on Edit, under IP assignment.
The Settings app now shows the “Edit IP settings” dialog. This is where you can change the IP address of your computer or device. If you want the IP address of your Windows 10 PC to be assigned automatically by your router, select Automatic (DHCP). This is also called a dynamic IP address.
If you want to set your own static IP address, select Manual and then enable the IPv4 and/or IPv6 switches, depending on what internet protocols you want to use. Note that each of them has its own distinct IP address, so you must enter the required details for both IPv4 and IPv6 if you choose to enable both.
To change your IP address to a static one, regardless of whether you set it for your IPv4 or IPv6 protocols, you have to enter the following details:
- IP address: type the static IP address that you want to use. For example, we want to change the IP address (IPv4) of our Windows 10 PC to 192.168.50.10.
- Subnet prefix length: type the prefix length that determines the size of the subnet. For example, we configured our router to use a subnet mask of 255.255.255.0, which means that we have to enter a “Subnet prefix length” of 24 (the number of 1 bits in the netmask). If we would’ve had a subnet mask of 255.255.0.0, the prefix length would have been 16, and so on. You can find more details about subnets here: What are IP addresses, subnet masks, and how do you change them in Windows?.
- Gateway: type the IP address of your router. In our case, that’s 192.168.50.1.
The Preferred DNS and Alternate DNS settings are not mandatory – if you leave them blank, they are automatically assigned by your router. However, if you want to change them too, you can do so (more details here: What is DNS? How is it useful?).
Once you’ve entered all the details, click or tap on Save so that your IP address is changed by Windows 10.
NOTE: If you choose to use a static IP address, make sure that all the details you enter are right; otherwise, your Windows 10 PC loses internet connectivity. If that happens, change your IP address back to Automatic (DHCP) so that your router can change it to something that works.
2. How to change the IP address in Windows 10, using the Control Panel
In Windows 10, you can also change your IP address from the Control Panel. Open the Control Panel and click or tap on “View network status and tasks” under “Network and Internet.”
In the Network and Sharing Center, click or tap on your internet connection from the “View your active networks” area.
In your network’s Status window, click or tap on Properties.
In the Properties window, select Internet Protocol Version 4 (TCP/IPv4) or Internet Protocol Version 6 (TCP/IPv6), depending on the IP address that you want to change. If you want to change both, repeat the next steps for each of them.
Click or tap on Properties.
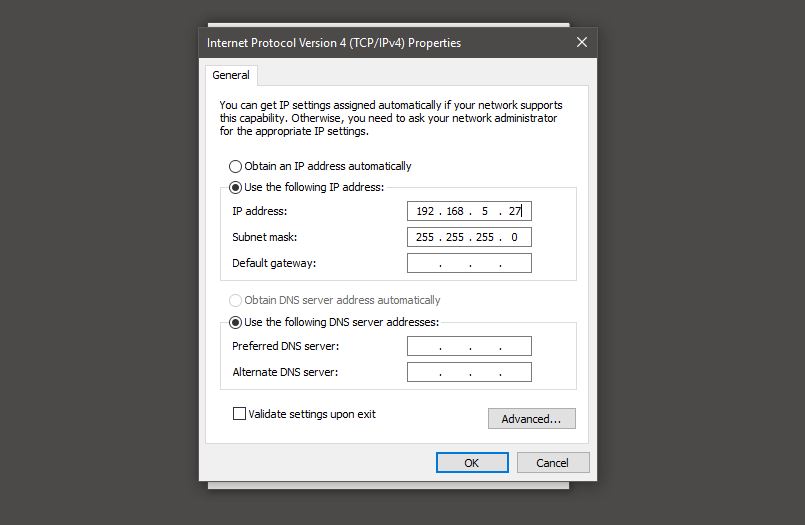
The previous action opens a window called Internet Protocol Version 4 (TCP/IPv4) Properties or Internet Protocol Version 6 (TCP/IPv6) Properties, depending on what you chose earlier. This is where you can change your IP address:
If you want to use a dynamic IP address that’s automatically assigned to your Windows 10 PC by your router, select “Obtain an IP address automatically.” Then, click or tap on OK and close all the windows you’ve opened.
If you want to set a static IP address for your network adapter, select “Use the following IP address.” Then, enter the required details manually: IP address, Subnet mask, and Default gateway, just like we’ve shown you in the previous method from this guide.
Save your new IP address settings by clicking or tapping on OK, then close all the windows you’ve opened during the process.
3. How to change the IP address in Windows 10, using PowerShell or Command Prompt (cmd)
If you prefer using a command-line environment, you can also change the IP address in Windows 10 using PowerShell or Command Prompt. Regardless of what your favorite console is, run the netsh interface ip show config command. In the results that are displayed, identify the network adapter for which you want to change the IP address. For example, the name of our network interface is Wi-Fi, as you can see in the screenshot below.
If you want to change the IP address to a dynamic one that’s automatically assigned by your router via DHCP, run the following command: netsh interface ip set address “Network Interface Name” dhcp. Replace “Network Interface Name” with the name of your network connection. For example, we need to run netsh interface ip set address “Wi-Fi” dhcp.
If you want to set a static IP address, run this command: netsh interface ip set address name= “Network Interface Name” static [IP address] [Subnet Mask] [Gateway]. Replace [IP address] [Subnet Mask] [Gateway] with the ones that match your network configuration. In our example, if we’d want to change our IP address to 192.168.50.10, we’d have to run netsh interface ip set address name=”Wi-Fi” static 192.168.50.10 255.255.255.0 192.168.50.1.
What is your favorite method to change the IP address in Windows 10?
Now you know not just one but three different methods to change your IP address and set it to dynamic or static. What’s your favorite way of doing it? Do you know other methods too? If you do, or if you have something to add to this guide, don’t hesitate to comment.
How To Change IP Address in Windows 10: A Visual Guide

W hen working in a larger environment, we are often asked to change our IP address. To change IP address in Windows 10, we have come up with a visual guide with really simple and easy steps. Follow this Windows 10 guide and change IP address in Windows 10. Let’s tell you about it in detail.
The need for changing IP address, sometimes, it is needed that we change IP address in Windows 10. This mostly happens when we are a part of a large organization like a college or a company and any change in IP policy might want us to change our machine’s IP address.
So, here are the steps on how to change IP address in Windows 10:
How to change IP address in Windows 10
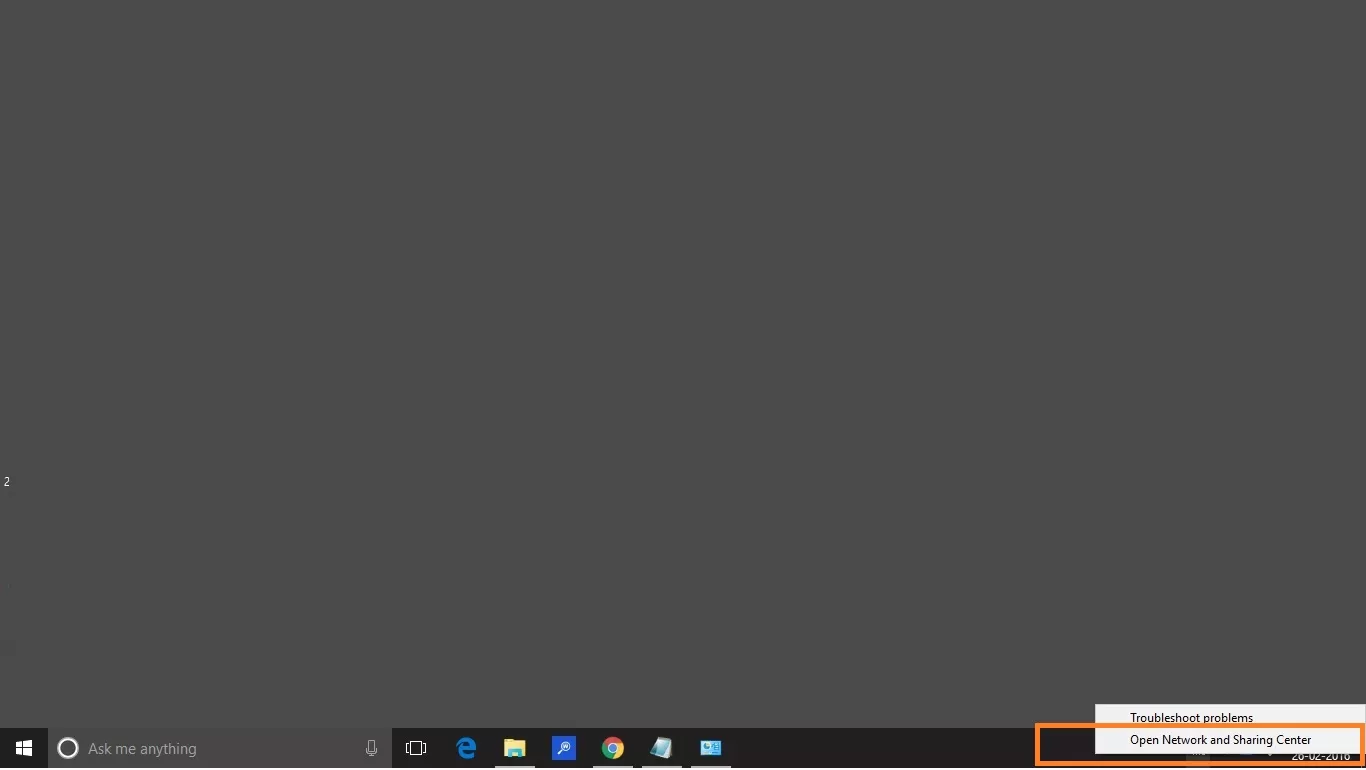
On the taskbar of your computer, right click on the internet icon and click on “Open Network and Sharing Center”
In the Network and Sharing center, click on the connections
A new Wireless Network Connection Status window will open up. Click on the properties.
A network connection status pop-up window will open up. Click on Internet Protocol Version 4 (TCP/ IP v4) if you want to change the IPv4 address of your computer.
Now fill in the required IP address and press OK.
And this is how you change the IP address in Windows 10. Sometimes, along with the IP address, you are also given Subnet mask, Default gateway and DNS Server address by your network administrator. You can use those addresses to fill in the required details.


