- How to Change Permissions and Owners via Command Line
- Why You Need to Change Permissions and Owners in Linux
- How to Change File and Folder Permissions
- How to Use chmod Command
- Changing the Owners of Files and Folders
- Using Options with chmod and chown Commands
- Conclusion
- How to Change File/Group Owner with chown Command in Linux
- How to view file permissions
- How to change file owner with chown command
- How to change the group owner with chown command
- How to change both file owner and group owner of a file
- How to recursively change file ownership
- How to change ownership using a reference file
- Changing File Ownership
- How to Change the Owner of a File
- Example—Changing the Owner of a File
- How to Change Group Ownership of a File
- Example—Changing Group Ownership of a File
How to Change Permissions and Owners via Command Line

In this tutorial, you will learn how to change permissions and owners in Linux using chmod and chown commands. By doing so, you’ll have better management in team-based projects.
Why You Need to Change Permissions and Owners in Linux
Linux is a multi-user operating system, so more than one person can work on the same computer at the same time. What’s great, the system can be accessed locally or remotely. That’s why developers often use this OS for group projects.
In such a large environment, we need to set file permissions and ownership, so only specific users can access our data. This way, we can protect sensitive information and prevent unwanted changes from happening.
Fortunately, thanks to chmod and chown commands, it is easy to change permissions and owners in Linux. But before we begin to learn how to use them, make sure you have access to the command line. You can launch it by pressing Ctrl + Alt + T.
How to Change File and Folder Permissions
We will be using the chmod command to change file and folder permissions in Linux. But first, you need to be aware that there are three types of users who can interact with a file:
- Owner — the user who creates and owns a file or folder.
- Group — all users who are members of the same group.
- Others — all other users on the system who are neither the owner nor members of a group.
To see permissions and owners of a specific file, you can run this command:
The result will look like this:
Let’s break the output down to see what each field means:
- “-rwxrw-rw-“ — this part of the line represents the file permissions. To understand it better, we have to divide it into four groups: (–), (rwx), (rw-), and (rw-).
- The first group indicates the file type. Our example shows a hyphen, which represents a regular file. If we are inspecting a directory, the hyphen will be replaced by d.
- The three characters after the file type represent the owner’s file permissions. In this example, we can see that the owner can read (r), write (w), and execute (x) the file.
- The next three characters are the group’s file permissions. We can conclude that the group can read (r) and write (w), but cannot execute the file. This is because the last character is a hyphen instead of the letter x.
- The last group is others’ file permissions. Based on our example, this type of user cannot execute the file, but they are allowed to read and write.
- 1 – the number of hard links. A hard link is an additional name for an existing file.
- user user – the owner and group owner of the file.
- 0 – the size of the file in bytes.
- Jan 19 12:59 – the last modification date.
- myfile.txt – the name of the file/folder.
How to Use chmod Command
Let’s say we want to change Linux file permissions from -rwxrw-rw- to -rwx-r–r–. Simply enter this line:
By executing this command, the owner can read, write, and execute the file (rwx). However, group and others are only allowed to read (r–).
At this point, you might wonder why we are using a three-digit number (744) after the chmod command.
The number determines the file permissions. Read, write, and execute are represented by a numerical value:
- r (read) – 4
- w (write) – 2
- x (execute) – 1
So if you want to give all permissions (rwx) to a user, we need to add read (4), write (2), and execute (1). Therefore, rwx is equal to 7.
Meanwhile, since group and others are only allowed to read the file, we give them 4.
Remember, the owner’s permissions always come first, then followed by group and others. That’s why we enter 744.
If you don’t want to give any permission to a user, enter 0 into the corresponding spot.
Here is a list of the most common file permissions:
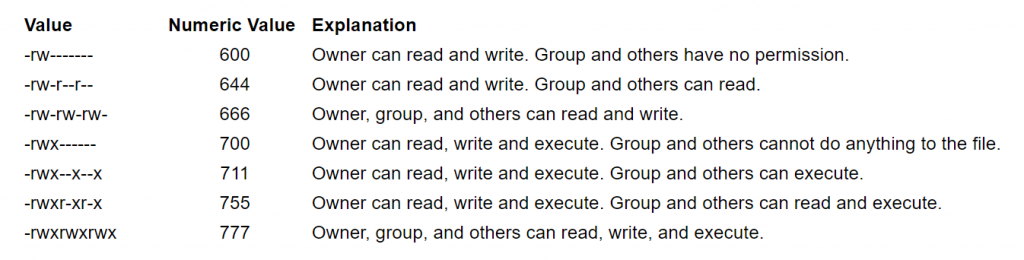
Common permissions for directories:

Changing the Owners of Files and Folders
To change the owner of a file and folder, we will be using the chown command. This is the basic syntax:
Let’s say we have a file named “myfile.txt.” If we want to set the owner of the file to “hostinger,” we can use this command:
However, if we want to change the group owner of the file to “clients,” we’ll enter this line instead:
Notice that we use a colon (:) before “clients” to indicate that it is a group owner.
Now, to change both the owner and group owner at the same time, the syntax would be like this:
The main rule is that the owner should come before the group owner, and they have to be separated by a colon.
Using Options with chmod and chown Commands
Option is an additional command to change the output of a command.
One of the most popular options that you can combine with chmod and chown is -R (Recursive). This Linux option allows you to change permissions or owners of all files and subdirectories inside a specific directory.
If you want to use an option, you have to place it right after the chmod/chown command.
Take a look at this example:
After you enter the above command, the owner can read, write, and execute all files and subdirectories inside the /etc/myfiles directory. The command also gives read and execute permissions to group and others.
Be extra careful with this option. Improper use of the command may cause critical failure, and it requires a great deal of work to reverse the changes.
Aside from -R, the following options are often used with chmod and chown commands:
- -f or force. The command line will ignore any errors and apply the chmod and chown commands.
- -v (verbose) option gives you diagnostics of all files that are processed by the command.
- -c (changes) is similar to the -v option. However, it will only provide information when changes were successfully made.
Conclusion
In this tutorial, you have learned how to use chmod and chown commands to change permissions and owners in Linux. We also provided the basic syntax and several useful options that you can combine with either of these commands.
To learn more about Linux command line, you can read our article on basic bash commands.
If you have any questions, feel free to comment below!
Domantas leads the content and SEO teams forward with fresh ideas and out of the box approaches. Armed with extensive SEO and marketing knowledge, he aims to spread the word of Hostinger to every corner of the world. During his free time, Domantas likes to hone his web development skills and travel to exotic places.
Источник
How to Change File/Group Owner with chown Command in Linux
Short for change ownership, Chown command is a command-line utility that is used to change the user or group ownership of a file or directory and even links. The Linux philosophy is such that every file or directory is owned by a specific user or group with certain access rights.
Using different examples, we will try and see the various use cases of the chown command . Chown command employs quite a simple and straight forward syntax.
$ chown OPTIONS USER: GROUP file(s)
Let’s briefly flesh out the parameters:
The attribute USER refers to the username of the user that will own the file. You can specify either the username or the UID ( User ID). Meanwhile, the GROUP option indicates the name of the new group that the file will acquire after running the command. The file option represents a regular file or a directory or even a symbolic link. These are the three entities whose permissions can be altered.
A few points to note:
1) When the USER option is specified alone, ownership of the file/directory changes to that of the specified user while the group ownership remains unchanged. Here’s an example:
In the above command, user ownership of the file file1.txt changes from the current user to the user john.
2) If the USER option is proceeded by a full colon i.e. USER: and the group name is not provided, then the user takes ownership of the file but the file’s group ownership switches to the user’s login group. For example:
In this example, the user john takes ownership of the file file1.txt, but the group ownership of the file changes to john’s login group.
3) When both the user and group options are specified separated by a colon i.e USER:GROUP – without any spaces therein – the file takes ownership of the new user and the group as specified
In the above example, the file takes the user and group ownership of user john.
4) When the USER option is left out and instead the group option is preceded by the full colon :GROUP then, only the group ownership of the file changes.
How to view file permissions
To view file permissions, simply use the ls -l command followed by the file name

From the output, we can see that the file is owned by user linuxtechi which and belongs to the group linuxtechi in the 3rd and 4th columns respectively.
How to change file owner with chown command
Before changing permissions, always invoke sudo if you are not working as the root user. This gives you elevated privileges to change user and group ownership of a file.
To change file ownership, use the syntax:
$ sudo chown user filename
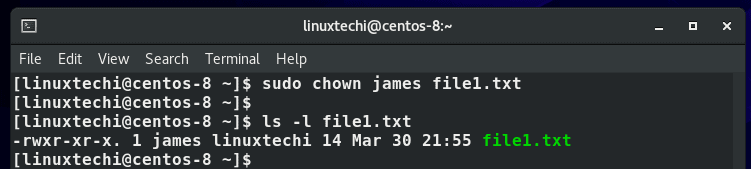
From the output, you can clearly see that the ownership of the file has changed from linuxtechi to user james .
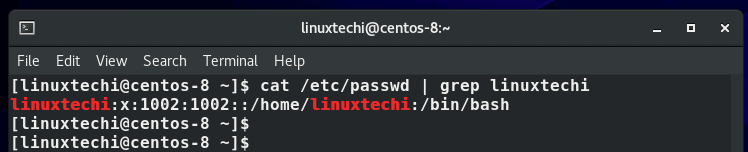
Alternatively, instead of using the username, you can pass the UID of the user instead. To get the UID, view the /etc/passwd file.
From the example below, we can see that the UID of user linuxtechi is 1002
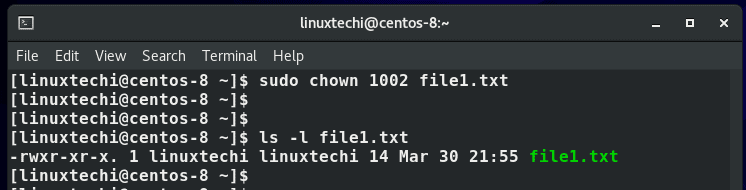
To change the file ownership back to linuxtechi user, we shall execute the command:
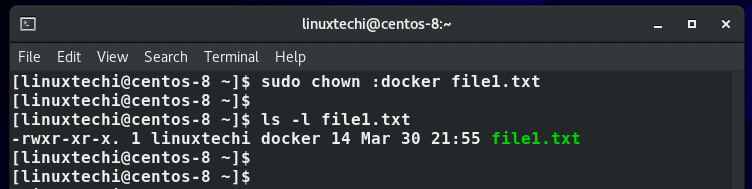
How to change the group owner with chown command
As earlier discussed, to change the group owner of a file, omit the user and simply prefix the group name with a full colon.
$ sudo chown :group file
For example, to change the group owner of file1.txt from linuxtechi to docker , we executed the command:
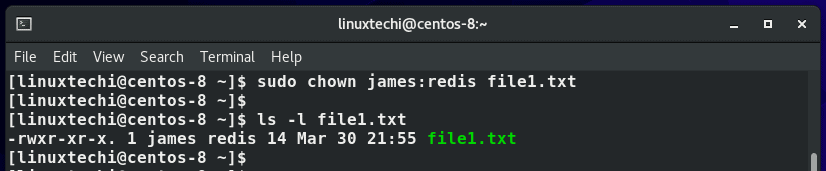
How to change both file owner and group owner of a file
If you want to change both the owner and group that a file belongs to, specify both the user and group options separated by a full colon as shown in the syntax below. Be sure that there are no spaces between the options and the colon.
$ sudo chown user:group filename
For example, the following command changes the ownership of the file file1.txt to user james and group redis as verified using the ls command.
How to recursively change file ownership
When applying permissions to directories, you might want to apply changes recursively i.e make the ownership changes to descend and apply to files and sub-directories. To achieve this, user the recursive option -R or –recursive directive.
$ sudo chown -R user:group directory
For example, the command below assigns all files and folders in the /var/www directory ownership to the www-data group.
The example below assigns ownership of the directory reports alongside all the files and folders in the directory to the user linuxtechi.
How to change ownership using a reference file
Lastly, there’s a nifty way that you can use to change ownership of a file, and that is by using a reference file. Using the chown command, you can change the user and group ownership of a file using another file as the point of reference.
The syntax is shown below:
$ chown –reference=ref_file file
Suppose you want to assign user and group ownership of file1.txt to another file file2.txt. How would you go about it? This is illustrated in the command below.
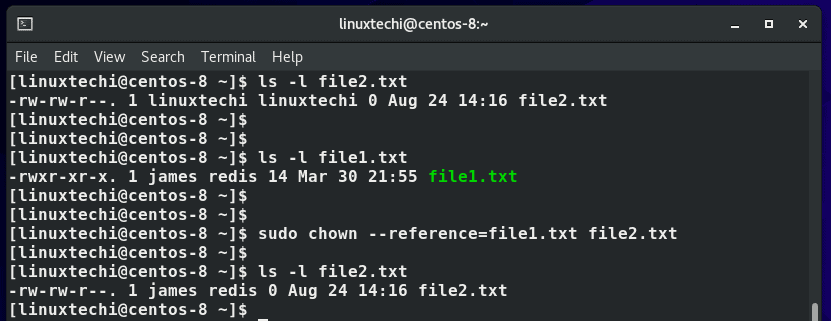
The output above confirms that file2.txt inherits the user and group ownership of file1.txt .In the command, file1.txt is the reference file.
Conclusion
Chown command is a powerful tool that is used for managing file and directory ownership. For additional information, check out the chown man pages.
Источник
Changing File Ownership
This section describes how to change the ownership and group ownership of a file.
By default, the owner cannot use the chown command to change the owner of a file or directory. However, you can enable the owner to use the chown command by adding the following line to the system’s /etc/system file and rebooting the system.
For more information, see chown(1).
In addition, the owner can only use the chgrp command to change the group of a file to a group in which the owner belongs by default. For example, if the owner of a file only belongs to the staff and sysadm groups, the owner can only change the group of a file to staff or sysadm group.
However, you can enable the owner to change the group of a file to a group in which the owner doesn’t belong by adding the following line to the system’s /etc/system file and rebooting the system.
For more information, see chgrp(1).
Also, be aware that there can be other restrictions on changing ownership and groups on NFS-mounted file systems.
How to Change the Owner of a File
Use the following procedure to change the ownership of a file.
Become superuser or assume an equivalent role.
Change the owner of a file by using the chown command.
Specifies the user name or UID of the new owner of the file or directory.
Specifies the file or directory.
Verify that the owner of the file has changed.
Example—Changing the Owner of a File
In the following example, the ownership on myfile is changed to the user rimmer.
How to Change Group Ownership of a File
Use the following procedure to change the group ownership of a file.
Become superuser or assume an equivalent role.
Change the group owner of a file by using the chgrp command.
Specifies the group name or GID of the new group of the file or directory.
Specifies the file or directory.
Verify that the group owner of the file has changed.
Example—Changing Group Ownership of a File
In the following example, the group ownership on myfile is changed to the group scifi.
Источник


