- Password Recovery
- Change System Locale in Windows 10
- About Sergey Tkachenko
- How to Change System Locale in Windows 7/10
- How to Change System Locale in Windows 10
- How to Change System Locale in Windows 7
- Manage the input and display language settings in Windows 10
- How To: Change System Language in Windows 10
- Installing a language
- April 2021 Update:
- Changing the display language
- Disable language synchronization
- Speak your language
- Conclusion
Password Recovery
The system locale allows you to use the specified language for non-Unicode programs. If your Windows system uses a default en-US locale, the Japanese text in a game won’t display correctly. In this tutorial we’ll show you how to change system locale in Windows 10, using Control Panel or Command Prompt.
Note: You must log into Windows 10 as administrator to set a different system locale. Changing system locale doesn’t affect the language in menus & dialog boxes for Windows or other programs that do use Unicode.
Method 1: Change System Locale in Windows 10 Using Control Panel
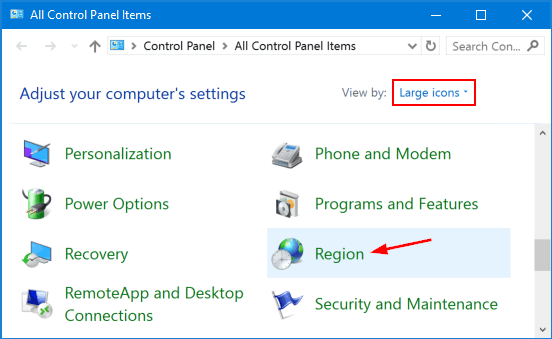
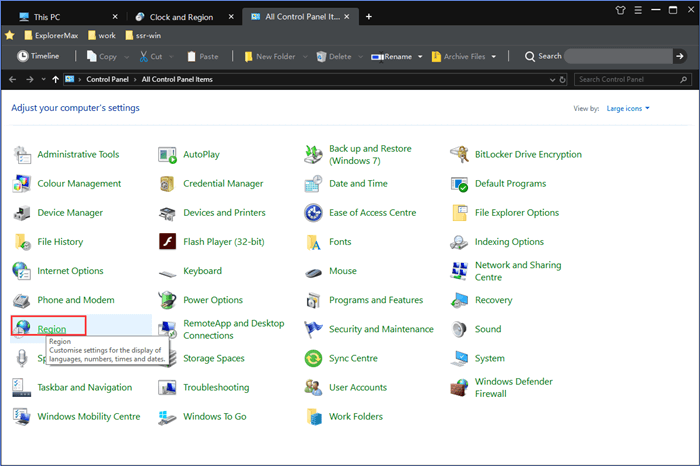
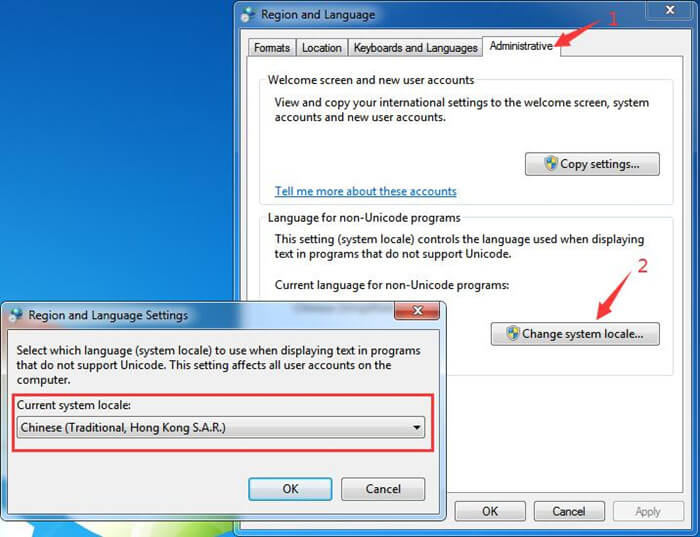
- Open the Control Panel in Large icons view, click Region.
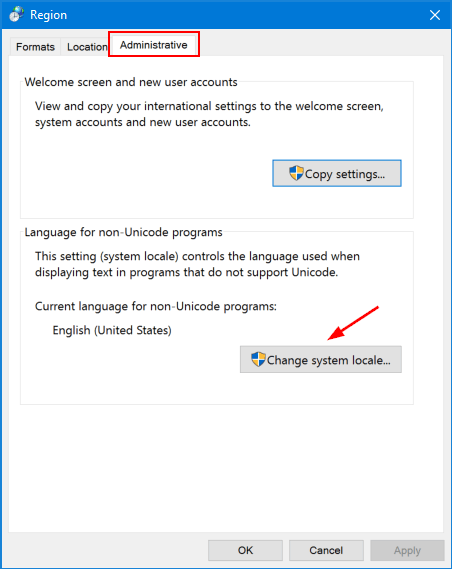
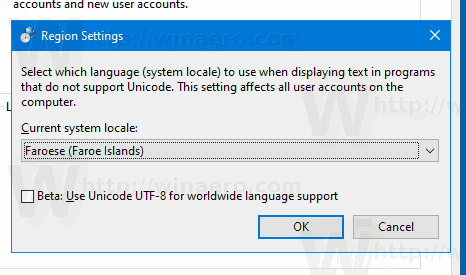
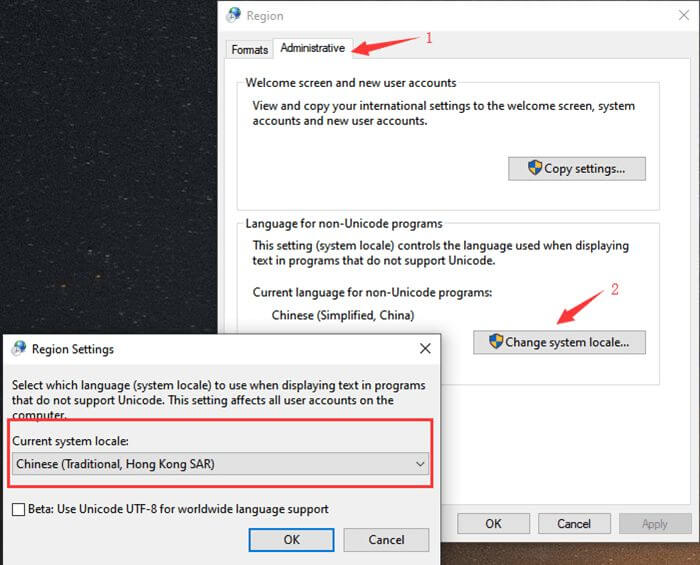
In the Region dialog that opens, select the Administrative tab and then click Change system locale.
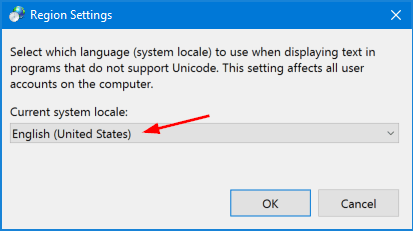
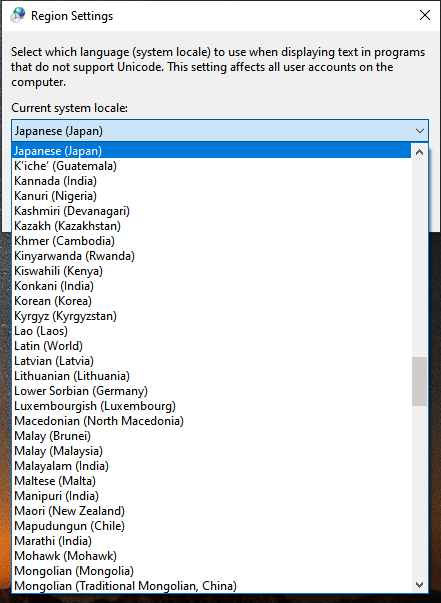
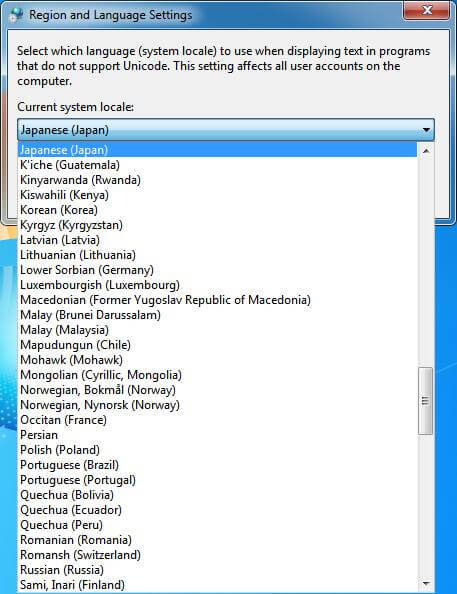
Select the desired language from the Current system locale drop-down list, and click OK.
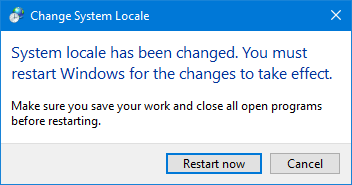
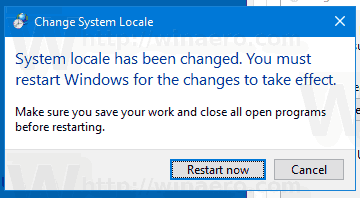
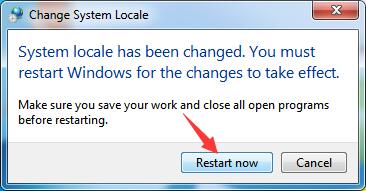
Restart your computer for the changes to take effect.
Method 2: Change System Locale in Windows 10 Using Command Prompt
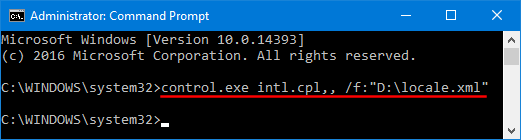
Open Notepad (or any other text editor), then copy and paste the following text into it. Replace en-US with the language tag for your desired system locale. To see all supported language tags in Windows, please refer to this article.
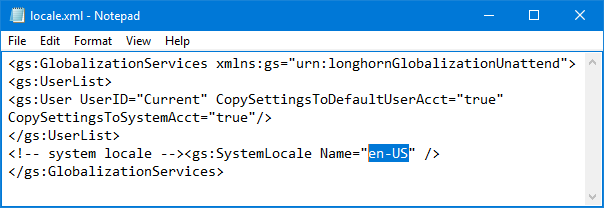
control.exe intl.cpl,, /f:»D:\locale.xml»
Change System Locale in Windows 10
As you may already know from previous articles, Windows 10 supports changing the display language using language packs. If you are working in a localized user account in Windows 10 which is your native language, you might be interested in learning what language is used for older apps that doesn’t support Unicode and how to change it.
Windows 10 supports language packs. By installing one or several language packs, you can switch your Windows display language on-the-fly. It is also possible to have a different display language for each user account.
There are plenty of apps that don’t support Unicode. Most of them are apps that have been created for previous Windows versions.
The option that specifies the default language to use for non-Unicode programs is called System Locale. The system locale defines the bitmap fonts and code pages (ANSI or DOS) that are used on the system by default. The system locale setting affects only ANSI (non-Unicode) applications. The language for non-Unicode programs is a per-system setting.
To change the System Locale in Windows 10, do the following.
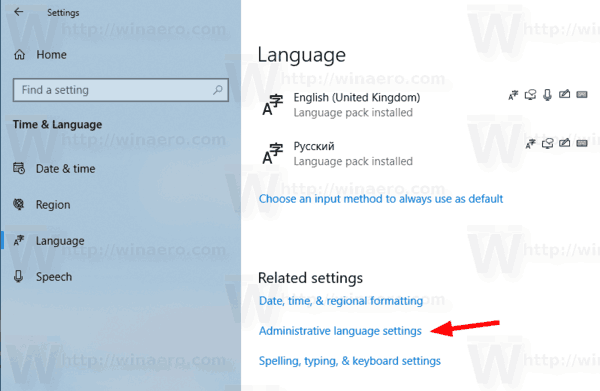
- Open Settings.

- Go to Time & Language.
- On the left, click on Language.
- In the right pane, click on the Administrative language settings link.
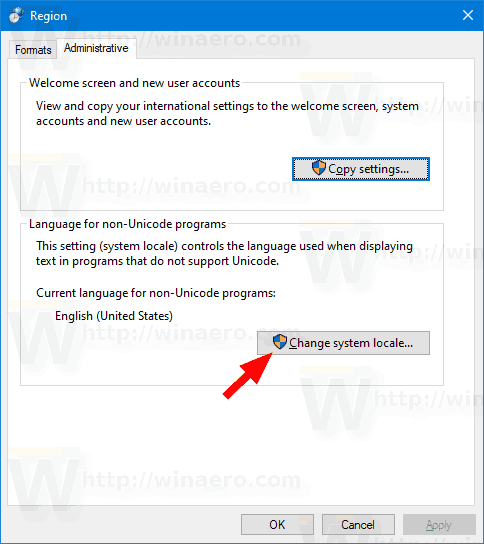
- In the Region dialog, click on the Administrative tab.
- Under the Language for non-Unicode programs section, click on the Change system locale button.
- Select the language you want from the drop down list in the next dialog. Do not enable the BETA: Use Unicode UTF-8 for worldwide language support checkbox unless you know what you are doing.
- Restart Windows 10 when prompted.

Note: The language you’ve set for the system locale will be automatically added to the list of installed languages in Windows 10.
Alternatively, you can access the same option with the classic Control Panel app. Open the classic Control Panel and navigate to Control Panel\Clock and Region. Click on Region and switch to the Administrative tab.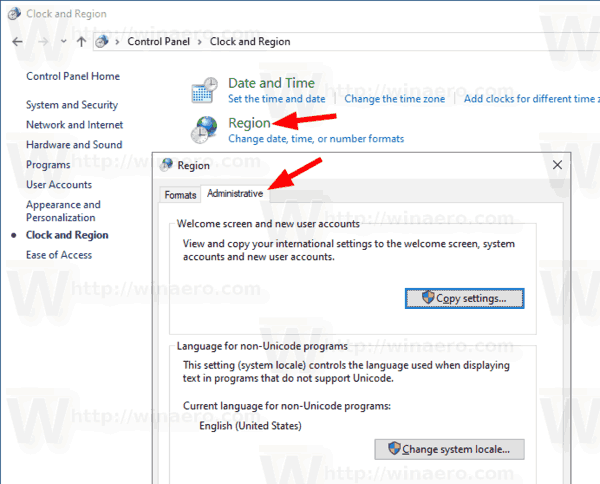
Winaero greatly relies on your support. You can help the site keep bringing you interesting and useful content and software by using these options:
Share this post
About Sergey Tkachenko
Sergey Tkachenko is a software developer from Russia who started Winaero back in 2011. On this blog, Sergey is writing about everything connected to Microsoft, Windows and popular software. Follow him on Telegram, Twitter, and YouTube.
How to Change System Locale in Windows 7/10
System locale controls the language used when displaying text in programs that do not support Unicode. When you play some foreign games, especially Japanese games, you may be asked to change this setting. Garbled characters may appear if something goes wrong with it. Therefore, this setting is closely related to the normal operation of some games.
If your game isn’t working properly, and you’ve ruled out other factors such as driver and hardware issues, try changing system locale to the one required for the game. It may help you out. The following tutorial will show you how to change system locale in Windows 7/10. Read on to get it.
How to Change System Locale in Windows 10
To change system locale in Windows 10, you can follow the steps below.
Step 1. Type “Control Panel” into the search bar and click on Control Panel in the search results to open it.
Step 2. Click on Region.
Step 3. Get to the Administrative tab, and then click on Change system locale. under Language for non-Unicode programs.
Step 4. Select the desired language and click on OK.
Step 5. Restart your computer to apply the change.
How to Change System Locale in Windows 7
The steps to change system locale are a bit different in Windows 7. Do as follows.
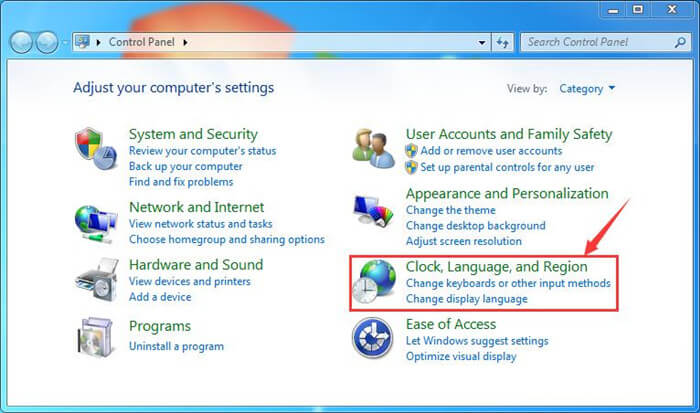
Step 1. Click on the Start menu and select Control Panel to open it.
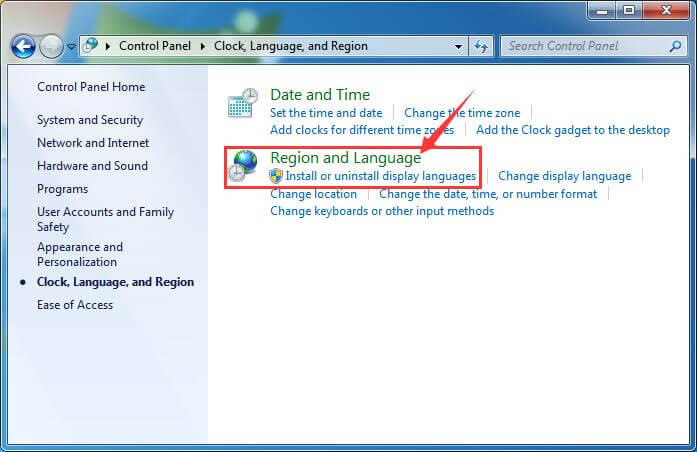
Step 2. Click on Clock, Language, and Region.
Step 3. Click on Region and Language.
Step 4. Get to the Administrative tab, and then click on Change system locale. under Language for non-Unicode programs.
Step 5. Select the desired language and click on OK.
Step 6. Click on Restart now to apply the change.
If you’ve change your current system locale to the desired language for the game but it still doesn’t work, check whether the primary language is selected under the Windows display language settings as well.
Hope this post is helpful to some of you. Feel free to leave comments below if you need further assistance. For more solutions to other games-related problems, please visit the Gaming Solutions section on this site.
Manage the input and display language settings in Windows 10
To manage all aspects of the input and display language settings on your Windows 10 device, use the following methods.
To switch the keyboard layout you’re using in Windows 10, press and hold the Windows key and then repeatedly press the Spacebar to cycle through all your installed keyboards. (If this doesn’t do anything, it means you have only one installed.)
You can also select the language abbreviation on the far right of the taskbar and then choose the language or input method you want to use.
Note: In the input field, press Windows +period (.) to access the emoji keyboard, if your language supports this.
If you can’t find the keyboard layout you want, you may have to add a new keyboard.
Adding an input language lets you set a language-preference order for websites and apps, as well as change your keyboard language.
Select the Start button, then select Settings > Time & Language > Language.
Under Preferred languages, select the language that contains the keyboard you want, and then select Options.
Select Add a keyboard and choose the keyboard you want to add. If you don’t see the keyboard you want, you may have to add a new language to get additional options. If this is the case, go on to step 4.
Return to the Language settings page, and select Add a language.
Choose the language you want to use from the list, and then select Next.
Review any language features you want to set up or install, and select Install.
The display language you select changes the default language used by Windows features like Settings and File Explorer.
Select the Start button, then select Settings > Time & Language > Language.
Choose a language from the Windows display language menu.
If a language is listed under Preferred languages but doesn’t appear on the Windows display language list, you’ll first need to install its language pack (if it’s available).
Select the Start button, then select Settings > Time & Language > Language.
Choose a language from the Add a language list under Preferred languages, and then select Options.
Select Download from the Download language pack option.
After the language pack is installed, select Back .
Choose a language from the Windows display language menu.
If you receive an «Only one language pack allowed» or «Your Windows license supports only one display language» message, you have a single language edition of Windows 10. Here’s how to check your Windows 10 language edition:
Select the Start button, select Settings > About, and then scroll down to the Windows specification section.
If you see Windows 10 Home Single Language next to Edition, you have a single language edition of Window 10, and you can’t add a new language unless you purchase an upgrade to either Windows 10 Home or Windows 10 Pro.
Select the Start button, then select Settings > Time & Language > Language.
Under Preferred languages, select the language you want to remove, and then click Remove.
To remove an individual keyboard, select the language in question (see step 2), select Options, scroll down to the Keyboards section, select the keyboard you want to remove, and click Remove.
How To: Change System Language in Windows 10
Normally, you do not need to change the language after the initial installation. But there may be situations where you do.

Maybe a relative or friend from another country is visiting and wants to use your computer. We recommend that you create a default user account for them. Then change the system language of this account at your convenience.
To change the display language under Windows 10
Installing a language
1) Press the Windows button, then select Settings from the start bar. In the Settings window, select Time and language.
2) On the left side of the window, select Region & Language. Then, in the right part of the window, under the Languages category, select Add a language.
3) Then select the language you want to add to your system from the choices provided. For example, we select German (German).
4) Then simply click on the language you want to configure and select the Options button below.
April 2021 Update:
We now recommend using this tool for your error. Additionally, this tool fixes common computer errors, protects you against file loss, malware, hardware failures and optimizes your PC for maximum performance. You can fix your PC problems quickly and prevent others from happening with this software:
- Step 1 : Download PC Repair & Optimizer Tool (Windows 10, 8, 7, XP, Vista – Microsoft Gold Certified).
- Step 2 : Click “Start Scan” to find Windows registry issues that could be causing PC problems.
- Step 3 : Click “Repair All” to fix all issues.

Changing the display language
1. Select “Language”.
2. click on “Define by default”.
3. you will see a notification under the language that reads: “Displayed after the next connection. Log out of Windows and log in again, and your new display language will be set.
If you want to change the language of another user account, first log in to that account.
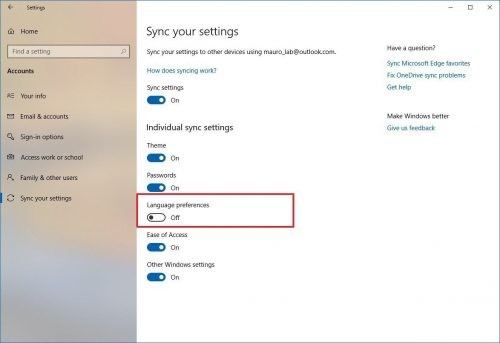
Disable language synchronization
When you use a Microsoft account, the language settings are synchronized between devices. If you plan to change the region and language settings of a computer, you must disable the synchronization option for these settings.
To disable voice synchronization on Windows 10, do the following:
- Open Settings.
- Click on Accounts.
- Click on Synchronize your settings.
In the Custom Synchronization Settings section, disable the Language Settings option.

Speak your language
If you want a machine to use multiple languages on different accounts, or if you have purchased a machine with a pre-installed foreign language, you can change it at any time. You now know how to change the language of an account and apply the language changes to the entire system.
Conclusion
As you can see, it is not that difficult to change the display language used by Windows 10. However, it takes a little patience and attention to ensure that the desired changes are implemented. After trying our tutorial, let us know how it works and if there is anything you need help with.

CCNA, Web Developer, PC Troubleshooter
I am a computer enthusiast and a practicing IT Professional. I have years of experience behind me in computer programming, hardware troubleshooting and repair. I specialise in Web Development and Database Design. I also have a CCNA certification for Network Design and Troubleshooting.


