- Quick guide to change Windows 10 Start Menu back to classic
- How do I change the Windows Start menu to classic?
- How do I switch back to the classic view in Windows 10?
- Customize the Start Menu in Windows 10
- Enable full-screen mode
- Change the size of the start menu
- Pin an application to the Start menu
- Unpin an application from the Start menu
- Change application tile sizes
- Add folders to the Start menu
- Move tiles in the Start menu
- Rename groups of tiles
- Change the Start menu color
- Turn off Live Tiles
- How to Change the Windows 10 Start Menu
- Customize the Start Menu to suit your needs
- How to Change the Windows 10 Start Menu Color
- How to Customize the Windows 10 Start Menu’s Size
- How to Pin Apps to the Windows 10 Start Menu
- How to Resize and Move Windows 10 Start Menu Pins
- How to Turn Windows 10 Live Tiles On and Off
- How to Get the Windows 8 Start Screen in Windows 10
- How to enable and change the Startup sound in Windows 10
- How to change the Windows 10 Startup sound
- 1] Disable Fast startup
- 2] Enable Windows 10 startup sound
- 3] Enable the logon sound from the Windows Registry
- 4] Customize the Startup sound from Windows Settings
- Change the startup sound using free tool
- Related Posts
- How to Mute or Unmute Sound Volume in Windows 10
- How to change Default Sound Output Device in Windows 10
- How to Enable or Disable Sound Output Device in Windows 10
- [email protected]
Quick guide to change Windows 10 Start Menu back to classic

- The Start menu is where most work begins on your Windows computer.
- The Windows 10 Start menu is a massive improvement from that of Windows 8 /8.1, but many users still prefer the classic Start menu .
- For more easy-to-follow DIY guides on different tech elements, visit our How-To section.
- Windows 10 comes packed with amazing features . Improve your knowledge of the operating system with our Windows 10 articles.
- Download Restoro PC Repair Tool that comes with Patented Technologies (patent available here).
- Click Start Scan to find Windows issues that could be causing PC problems.
- Click Repair All to fix issues affecting your computer’s security and performance
- Restoro has been downloaded by 0 readers this month.
When Windows 8 dropped, there was an uproar from users regarding the fullscreen Start menu. Despite Microsoft responding by modifying the Start menu in Windows 8.1 and later, fans took things into their hands and devised ways to get back the classic Start menu.
How do I change the Windows Start menu to classic?
How do I switch back to the classic view in Windows 10?
- Download and install Classic Shell.

- Click on the Start button and search for classic shell.
- Open the topmost result of your search.
- Select the Start menu view between Classic, Classic with two columns and Windows 7 style.
- Hit the OK button.
- Back up the selected styles as XML.
- Apply the settings.
Customize the Start Menu in Windows 10
Enable full-screen mode
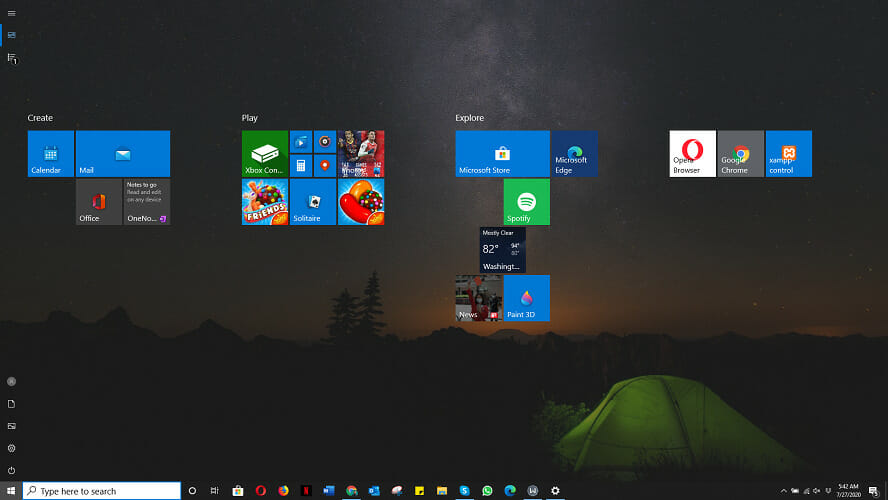
- Click on the Start.
- Select the Settings icon.
- Select Personalization.
- Hit the Start from the left sidebar.
- Click the Switch button below the Use Start Full-Screen text.
Change the size of the start menu
- Click on the Start button.
- Take your cursor to the edge of the Start Menu, so it turns to a double-sided arrow.
- Click on it and drag it up or down to resize.
- Release your cursor when you’re done.
Pin an application to the Start menu
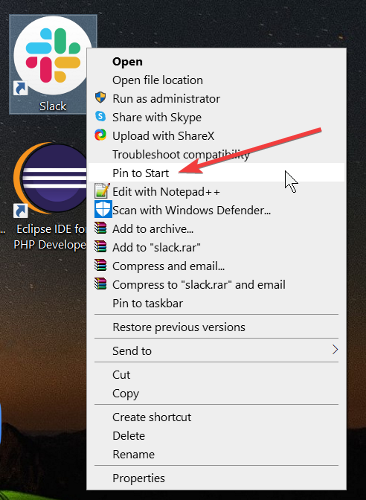
- Locate the application.
- Right-click on the application to be pinned.
- Select the Pin to Start.
Unpin an application from the Start menu
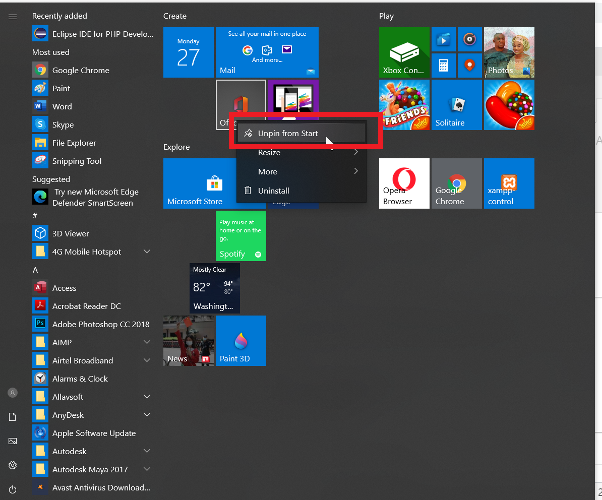
- Open the Start
- Right-click on the application.
- Select Unpin from Start.
Change application tile sizes

- Click on the Start
- Right-click on the application.
- Select Resize.
- Select the option of your choice.
Add folders to the Start menu
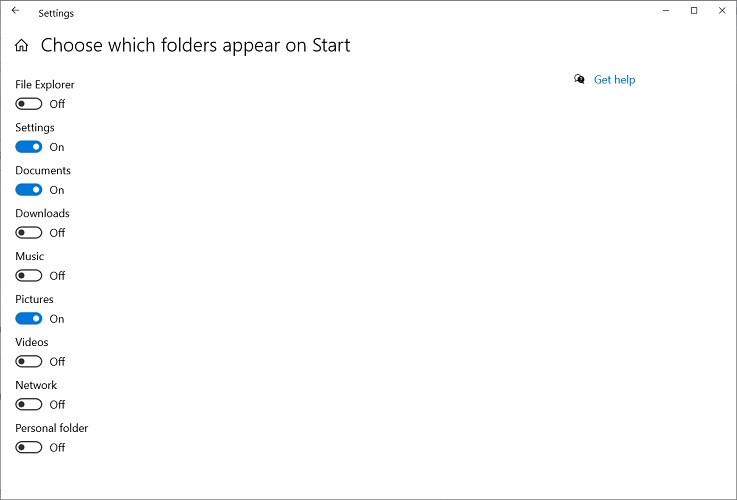
- Click on the Start menu button.
- Select Settings.
- Click the Personalization tile.
- Choose Start from the sidebar.
- Click Choose which folders appear on Start.
- Toggle on or off the applications on the screen.
Move tiles in the Start menu

- Click on the Start button.
- Click and hold on the tile.
- Drag-and-drop the tile to your desired position.
Rename groups of tiles

- Click on the Start
- Select the tile for renaming.
- Delete any text in the Type field
- Rename the tile.
Change the Start menu color

- Click on the Start
- Select Settings
- Click the Personalization
- Pick a color from Windows colors.
- Mark the checkbox for Start, taskbar, and action center under Show accent color on the following surfaces.
Turn off Live Tiles
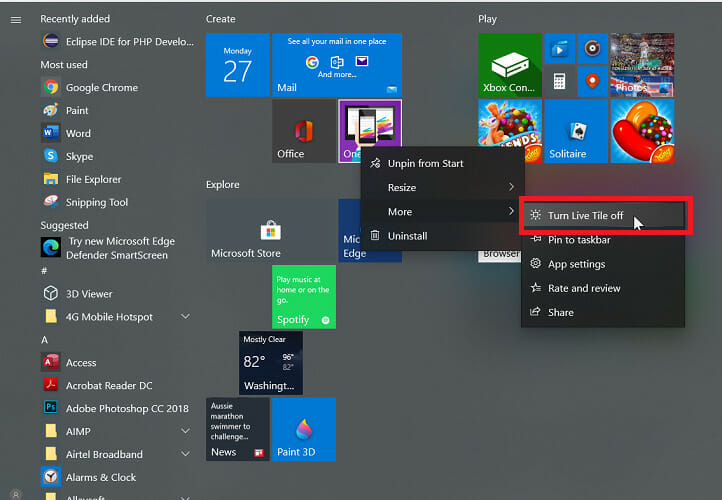
- Click on the Start menu button.
- Right-click on the live tile.
- Click the Move.
- Select the Turn live tile off option
We hope that this guide has proven useful in your case and that you now have the Start Menu and icons in the exact way you wanted.
Feel free to let us know if this guide has helped by using the comment section below.
How to Change the Windows 10 Start Menu
Customize the Start Menu to suit your needs
:max_bytes(150000):strip_icc()/BradStephenson-a18540497ccd4321b78479c77490faa4.jpg)
The Windows 10 Start Menu is a popular tool for accessing favorite apps quickly and for restarting or shutting down a computer or tablet. While this feature is mostly known for its functionality, the Start Menu is also incredibly customizable and can be changed to reflect your personal design aesthetic and workflow.
This article addresses how to change the Windows 10 Start Menu color and size, plus pinning apps and websites, turning Live Tiles on or off, and getting the Windows 8 Start Screen back.
Instructions in this article apply to Windows 10.
:max_bytes(150000):strip_icc()/windows10start-5c45928f46e0fb00014ef87b.jpg)
How to Change the Windows 10 Start Menu Color
The Windows 10 Start Menu color is based on the custom accent color you might have chosen when setting up your device. The accent color settings will change the color of select parts of the Windows 10 operating system such as app windows and the taskbar. Here’s how to change it.
The Windows 10 accent color can be changed as many times you like.
Open the Start Menu using the Windows key on your keyboard, Cortana, or the Windows button on the bottom-left of your screen.
Select the Settings gear icon to open Settings.
:max_bytes(150000):strip_icc()/001-how-to-change-the-windows-10-start-menu-5d832c03e91b4dd2a709519c3ede777f.jpg)
Select Personalization.
:max_bytes(150000):strip_icc()/002-how-to-change-the-windows-10-start-menu-0343734ab0b54ece8fe35ce82405bba9.jpg)
From the left menu, select Colors.
:max_bytes(150000):strip_icc()/003-how-to-change-the-windows-10-start-menu-a26cea8c2a5e435c82c9f6dbceb06aba.jpg)
Select your preferred color from the available options. Your system’s accent color will update in real-time.
:max_bytes(150000):strip_icc()/Capture-a26b6f059ba84a018408d1c3b0e090df.JPG)
If you want your Windows 10 Start Menu to have a solid color, uncheck the option under Transparency effects.
How to Customize the Windows 10 Start Menu’s Size
There are two main options that can be used to change the size of the Windows 10 Start Menu.
- Adding more tiles. Enabling this option will add an extra vertical row of tiles to the Start Menu to, as the setting’s name suggests, allow more tiles to be seen. When enabled, this setting will make the Start Menu slightly wider than usual. This setting can be found by opening up the Windows 10 Settings app, clicking Personalization, and then clicking Start from the left menu.
- Manually resizing the menu. After opening the Windows 10 Start Menu, you can manually resize it by clicking the top-right corner and dragging to the size or height you wish. Alternatively, the Start Menu can also be resized on Windows 10 devices with a touchscreen by using a finger in place of a mouse.
How to Pin Apps to the Windows 10 Start Menu
All Windows 10 apps can be pinned to the Start Menu. Pinning apps to the Start Menu makes them easier to find so doing so can be particularly useful for apps that you use on a regular basis. Here’s how to pin an app.
Press the Windows key to open the Start Menu.
Locate the app you want to pin from the app list.
Right-click the app’s name or icon to bring up its options menu. Alternatively, you can also perform a long press on it if your Windows 10 device has a touchscreen.
:max_bytes(150000):strip_icc()/004-how-to-change-the-windows-10-start-menu-76219adbb88844a5852dc4edd67d1016.jpg)
Select Pin to Start. The app will immediately appear to the right of the app list on your Start Menu.
How to Resize and Move Windows 10 Start Menu Pins
All Start Menu pins can be moved simply by clicking on them and dragging them to the desired location. A variety of size options are also available for many Windows 10 app pins which can be selected to make more space for other pins or to display extra information on the pin’s tile.
The supported tile sizes are Small, Medium, Wide, and Large. Some sizes may not be available for some apps.
To change the size of a pin’s tile, right-click on it to bring up its menu, click Resize, and then select your preferred size.
How to Turn Windows 10 Live Tiles On and Off
Many apps support Live Tile functionality which allows their pinned tiles to display updated information or images without the need for the app to be opened. Examples of Live Tile content include weather forecasts, news headlines, message notifications, and fitness data.
To activate or deactivate a pin’s Live Tile, right-click on it to bring up its menu, click on More, and then select Turn Live Tile on or Turn Live Tile off.
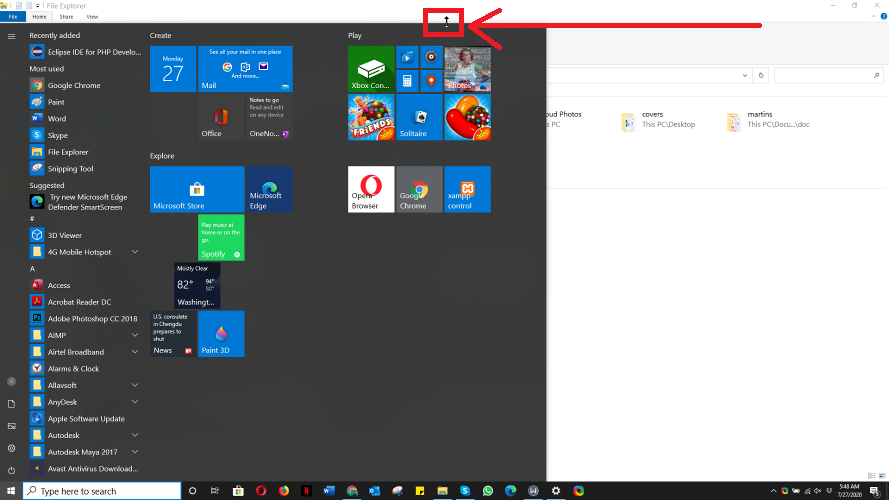
How to Get the Windows 8 Start Screen in Windows 10
One of the defining aspects of the Windows 8 and Windows 8.1 operating systems was the Start Screen that acted like a full-screen Start Menu. This was replaced in Windows 10 with the smaller Start Menu but there is a way to get the Start Screen back which requires no hacking or installation of any third-party software. Here’s how to get the Start Screen back.
Press the Windows key to open the Start Menu.
Select Settings.
Select Personalization.
Select Start from the left menu.
:max_bytes(150000):strip_icc()/007-how-to-change-the-windows-10-start-menu-648b9066aee4462498b991b7ef5ad2e6.jpg)
Select Use Start full screen.
:max_bytes(150000):strip_icc()/008-how-to-change-the-windows-10-start-menu-3c569799a4b048ebaea8c3e9cbecff88.jpg)
Your Start Menu will now fill the entire screen when opened and will act almost exactly the same as the Windows 8 Start Screen.
How to enable and change the Startup sound in Windows 10
Windows 10 goes down arguably as the easiest to use computer operating system around. Among many great features it offers, its auditory signals notify you of when your attention is needed or when a task has been completed. Windows offers audio notifications for battery alerts, errors, disconnection of peripherals, a complete Startup, and much more.
The Startup sound is the most common many users are used to. To show how serious it meant to them, Microsoft contacted Brian Eno, a significant pioneer of ambient music, to play the Startup sound for Windows 95. As you know, each sound is a notification of some sort; the Startup sound indicates that the system has booted successfully.
When you select the shutdown option, Fast Boot puts your PC in a Hibernate mode, and when you restart it, it quickly turns your PC on, skipping the Start sound and restoring it to where you left off. So to change the sound, you have first to disable Fast Boot.
How to change the Windows 10 Startup sound
You can change the Windows 10 startup sound by following the steps below:
- Disable Fast startup.
- Enable the Startup sound.
- Enable the Logon sound from the Windows Registry.
- Customize the startup sound from Windows Settings.
Now, let’s take a closer look at the above steps to show you how to go about them.
1] Disable Fast startup
Microsoft gave up the startup sound to make way for the Fast startup feature in Windows 10. Fast startup works by keeping all your programs and applications running even after you shut down your PC.
You need to open your Power Options by right-clicking on the battery icon on your taskbar. Next, click on Choose what the power buttons do.
On the next screen, go to Change settings that are currently unavailable.
Uncheck the box labeled Turn on fast start (recommended) and finally, click on the Save changes button.
2] Enable Windows 10 startup sound
Press the Windows key + I combination to open Windows Settings.
Go to Personalization and select Themes from the left-hand panel.
Locate and click the Sound button then mark the Play Windows Startup sound checkbox, which is under the Sounds tab.
Click on OK to confirm the settings.
3] Enable the logon sound from the Windows Registry
Please, follow the steps below carefully as they may seem a bit complicated. You will be working with the Registry Editor to change your PC’s Startup sound.
Type in Regedit in the Run dialogue box and click OK.
Click ExcludeFromCPL on WindowsLogon.
Next, change the Value data from 1 to 0.
Hit OK.
4] Customize the Startup sound from Windows Settings
Open Windows Settings and select Personalization > Themes. Click on Sounds and then scroll down to the Program Events list. Find and click on the Windows Logon option then select Browse. Locate your customized .WAV Start sound from File Explorer, Apply the changes and click on OK.
Change the startup sound using free tool
The complexity involved in the method above is a path not everyone is willing to take. However, with a third-party tool like Startup Sound Changer, you can go about this easily. If you decide to use Startup Sound Changer, follow the steps below.
Go to its official site and download and install the application. Launch the app and select the Replace button from the options presented. Find your desired sound with the Windows Explorer and select it.
Note: Windows Startup sound can only be in the .WAV audio format.
Date: September 17, 2020 Tags: Sound
Related Posts
How to Mute or Unmute Sound Volume in Windows 10
How to change Default Sound Output Device in Windows 10
How to Enable or Disable Sound Output Device in Windows 10
[email protected]
Keshi Ile is a Windows enthusiast who loves to write How-to’s, Gadget & software reviews, and tech tutorials. He has also managed SEO teams that grew businesses from zero traffic to authority status.


