- How to Change or Customize Windows 7/8 Boot Screen
- Introduction: How to Change or Customize Windows 7/8 Boot Screen
- Step 1: Features of Boot Loader
- Step 2: How to Use
- Step 3: HOW TO RESTORE
- Be the First to Share
- How To Change boot Screen Of Windows
- How to Change Boot Screen Of Windows 7
- How To Change Boot Screen of Windows Vista
- For Replacing the already existing file with the new created file please follow these instructions:
- How to Change Boot Screen of Windows XP
- How to Change Windows 10 Boot Screen in an Easy Way [Partition Manager]
- Summary :
- Quick Navigation :
- Requirements for Changing Windows 10 Boot Screen
- How to Change Windows 10 Boot Screen
- ABOUT THE AUTHOR
How to Change or Customize Windows 7/8 Boot Screen

Introduction: How to Change or Customize Windows 7/8 Boot Screen


Today i am going to tell you about»How to Change or customize Windows 7/8 Boot Screen Using Windows 7/8 Boot Updater».
Since when Microsoft released Windows 7, no one was able to change the boot screen as it requires lots of files and certificates customization.
But now Jeff Bush @ «Coder for life» website has developed an excellent tool which can customize Windows 7 boot screen.
«Windows 7 Boot Updater» is a program that makes it easy to update the Windows 7 boot animation and text. It is written in C++/CLI and requires Microsoft .NET Framework 2.0 and the Microsoft WIM library.
Warning: please do all steps carefully otherwise your system may crash so do it on your won risk, our team will not be accountable for any type of damage to your system.
Step 1: Features of Boot Loader
Modifies boot animation. Modifies boot text»Starting Windows» and «@Microsoft Corporation». compile the animation from 105 BMP, PNG, GIF, or TIFF images. Does not require any other applications (like ImageX). Automatically backs up the modified files Works for all versions of Windows 7: any language, any edition, 32-bit or 64-bit.
Step 2: How to Use
1. Download the boot loader and install it. Download from here
2. You can change the text messages, remove them completely, change their color. You can also replace animation.
3. If you want to change the animation you will have to make an animation! The animation is:
105 frames (if there are less frames the last frame will be repeated as necessary) Each frame is 200x200px (resized if necessary) 15 frames / sec
First 4 seconds play once then the last 3 seconds play in a loop.
Step 3: HOW TO RESTORE
If you get stuck forever in Windows Recovery Environment then you need to manually restore winload.exe. Here are the directions:
1. Once you enter Windows Recovery Environment press «Cancel» right away..
2. Click «Yes» on the warning that pops up.
3. Click «View advanced options for system recovery and support».
4. Select your keyboard types and click «Next».
5. Select an account (not «HomeGroupUser$») and enter password and click «OK».
6. Click «Command Prompt» (the last option) and enter following commands:
PS: Here C: in first line represents the system drive where Windows 7 is installed in your system. If you have installed Windows in any other partition like D: drive, then change the command to D:
7. Click «Restart» and you’ll be able to boot into Windows again.
Don’t forget to share and subscribe.
Be the First to Share
Did you make this project? Share it with us!
How To Change boot Screen Of Windows
Here is an article on how to change boot screen of Windows. Windows operating system includes a nice and simple boot screen which looks good. But it becomes really boring when you regularly see the same boot screen again and again on start-up. Now you would be wondering about How can you change or customize your boot screen for Windows operating system. Yes, off course you can change your boot screen. This article is all about how to change boot screen for Windows 7, Windows Vista and Windows XP.
How to Change Boot Screen Of Windows 7
Windows 7 has got a very simple and nice boot screen, but it seems to be boring when you see the same boot screen on a regular basis while starting up your PC. So now you can change the boot screen of Windows 7 installed on your PC. Boot screen of Windows 7 can be changed with the help of utility software named as Windows 7 boot updater. So follow these simple steps to change boot screen of Windows 7.
- Download Windows 7 boot updater.
- Run this software.

- Now you need to download a boot screen from here.
- After downloading, run this software as administrator.
- In the booting option under animation, from the scroll down menu select static image, then browse the downloaded boot screen.
- Moreover you may also edit the message that appear on your default boot screen and write whatever you want.
- Now you need to hit apply button and wait.
- Restart your PC to view the new boot screen.
How To Change Boot Screen of Windows Vista
If you find Windows Vista boot screen boring, then you should read this carefully so that you can change boot screen. Customize the boot screen and give it a taste that suits you.
These are few simple steps which you should follow carefully to change boot screen:
- Firstly you need to download Vista boot logo generator. Now install it and run it.
- Click Browse for image button and select the images for both resolution bitmap files.
- Save your file by clicking File, then selecting “Save Boot Screen File AS” option.
- Now you should replace winload.exe.mui file present in C: ‘Windows’System32’ en-us with the file you created now.
- And make sure that you backup original file before copying your new file.
- For replacing give file permissions to your account , so that you can overwrite the original file with the file you created.
- Save the modified logon file in C:’Windows’System32’en-us directory. Click Yes to overwrite the existing file.

- Now this will prompt you to change boot setting in msconfig tool, click ok to proceed further.
- Click the start button and type msconfig in the box.
- Click continue if prompted with the user account control dialog
- In System configuration tool, simply click on Boot tab.
- Check “No GUI Boot” in boot options.

- This will prompt you to restart. Click restart and see new customized boot screen.
For Replacing the already existing file with the new created file please follow these instructions:
- Log in as an administrator, Open the Windows explorer.
- Go to C:’Windows’System32′ folder. Now right-click on winload.exe.mui file, choose properties.


- Tap the ownership tab and click on edit button.

- Click on Continue if user account control dialog pops up.
- Select administrator account or the user which consists administrative rights, then click OK.
- For adding the user account click on edit button back in security tab.
- Tap on “Add”, select a desired user account, then click on OK.
- When user account is shown in the list , check in full control check box.
- Click OK in all way out. that’s all.
How to Change Boot Screen of Windows XP
Change boot screen of Windows XP with TuneUp Utilities software. Tune up utility is a user-friendly software which is available in full version for purchase and in 30 days trial version. So you can either purchase it or download 30 days trial version.
Follow these simple steps to change boot screen of Windows XP:
- Firstly download TuneUp Utilities, then install it. Run it directly from the desktop.

- Now tap “Customize Windows”. Click on Logon Screen.
- A window opens up with several options.
- Click on Add, then select “Load boot screen from file”.
- Choose boot screen file, then tap “Install boot screen”.
- Moreover you may make new and fresh boot screen, For this click on “New Screen” button.
- A window opens up, now simply click search local drives link for selecting an image.
- Image borders, background color, alignment, etc. can be adjusted.
- Click “Save boot screen” link and name boot screen.
- You may also view a preview of your boot screen with a single click on “Show large preview link”.
- Click on “Install boot screen” button for applying it. Watch a video tutorial in which shows “How to change boot screen of Windows XP using TuneUp Utilities.
So follow these steps for changing boot screen of Windows 7, Vista and XP.
How to Change Windows 10 Boot Screen in an Easy Way [Partition Manager]
By Linda | Follow | Last Updated March 02, 2021
Summary :
Are you bored with the default Windows 10 boot logo? Do you want to change Windows 10 boot screen for further UI customization? In this post, MiniTool Partition Wizard shows you how to do that step by step.
Quick Navigation :
Requirements for Changing Windows 10 Boot Screen
When you boot up a Windows 10 PC, it will show the default Windows 10 boot screen like the following picture:

Do you know you can change Windows 10 boot screen as your will. You don’t need to watch the same screen again and again.
The Windows 10 boot screen is composed of three parts: the Boot Logo (the Windows logo), the Boot Status Indicator (the circle), and the Boot Status Message. The boot status message occurs only when your PC run into problems. And its location is right under the circle.
You can suppress these Windows elements via the Windows Unbranded Boot feature (this feature requires Windows 10 Enterprise, Windows 10 Professional, or Windows 10 Education). After suppressing these elements, you will get a totally black boot screen.
Many people may don’t like this method. They just want to replace the startup logo with a custom logo. In this case, you should use another tool to modify the Boot Graphics Resource Table (BGRT).
Please note that you can modify the BGRT only on devices that use UEFI as the firmware interface. If your PC uses the BIOS firmware, you can’t modify the BGRT.
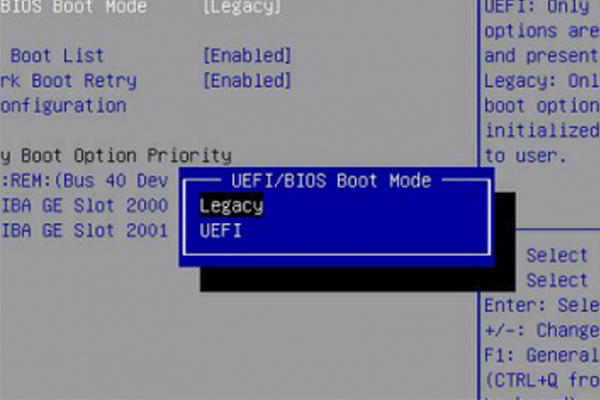
What are UEFI and BIOS? This article will tell you their differences via UEFI vs BIOS and show you how to convert MBR to GPT to support UEFI mode.
How to Change Windows 10 Boot Screen
To change Windows 10 boot logo, you can refer to the following steps:
- Back up important data in advance lest anything goes wrong and your data is lost.
- Boot into UEFI firmware to disable the Secure Boot
- Make an image no bigger than 300px x 300px. This image will be set as the boot logo later. Please note that this image should not be GIF or transparent. If you want to add a transparent logo, you should change the background color of your transparent image to black in advance.
- Download a third-party free and open-source tool called HackBGRT from GitHub platform, since Windows doesn’t offer options to change Windows boot logo.
- Extract the folder and then run the «exe» program as an administrator. This will launch the application’s command-line tool.
- Press the «i» key on your keyboard and this will open the the program’s config file in the Notepad.
- Close the Notepad by clicking on the “X” icon on the top-right corner. Then, the HackBGRT will open the Paint application with its own default boot logo.
- Click on the “Paste” drop-down button and select the “Paste from” option.
- Select the «File >Save» option to save the file.
Through the above steps, you have replaced the Windows 10 boot logo and then you can close the software.
If you want to change Windows 10 boot screen back to the original one later, you can refer to the following steps:
- Open the HackBGRT folder, right-click on the “exe” file and select the “Run as administrator” option.
- Press «R» key to completely remove HackBGRT and restore the original boot logo, or press «D» key to just disable this software and restore the original boot logo.
- Reboot the system and you will see the original Windows boot logo.
ABOUT THE AUTHOR

Position: Columnist
Author Linda has been working as an editor at MiniTool for 1 year. As a fresh man in IT field, she is curious about computer knowledge and learns it crazily. Maybe due to this point, her articles are simple and easy to understand. Even people who do not understand computer can gain something.
By the way, her special focuses are data recovery, partition management, disk clone, and OS migration.


