- How to verify the checksum of an installer file
- How to check the checksum of a file in Windows
- Checksum calculator
- Downloading and installing the checksum calculator
- Using the calculator
- Using the Microsoft FCIV utility
- Downloading and installing Microsoft FCIV
- Using FCIV
- How to check the checksum of a file in Linux
- Finding Checksum Values in Windows 10
- Как узнать контрольную сумму файла в Windows
- Для чего нужны контрольные суммы
- Как вычислить контрольную сумму он-лайн
- Как узнать контрольную сумму файла в Windows
- Файловый менеджер Total Commander
- Файловый архиватор 7-Zip
- Как подсчитать контрольную сумму файла из консоли Windows
- Считаем контрольную сумму в PowerShell
- Какой алгоритм вычисления контрольных сумм самый правильный
- Выводы
How to verify the checksum of an installer file

One method of knowing if a downloaded program file is safe to install is to compare the file checksum (also called a hash) before running the executable.
Verifying the checksum of a file helps ensure the file was not corrupted during download, or modified by a malicious third-party before you downloaded it. If it was infected with malware or other malicious software after the checksum was originally calculated, you will discover the change when you calculate the new checksum.
The checksum is a long string of numbers that looks like this:
This hexadecimal number is unique to the installer .exe file created by the author. If anyone has altered or tampered with the file that you downloaded, the checksum will be different on your computer.
For maximum system security, always verify the checksum of any software you download from the Internet, before you run it.
How to check the checksum of a file in Windows

Many utilities can verify the checksum of a file in Windows. Below are our favorite options, the Checksum Calculator, an easy to use and compare checksum utility and the FCIV command line utility from Microsoft.
Checksum calculator
The Checksum Calculator is a free file checksum calculation utility that supports the most commonly used file checksum algorithms, such as md5, crc32, and sha1. The Checksum Calculator can also batch process multiple files and is an easy to understand and use Windows program.
Downloading and installing the checksum calculator
- Download the Checksum Calculator.
- Run the executable, checksumcalculator_setup.exe.
- Follow the prompts to install the program.
Using the calculator
- Open the Checksum Calculator if not already opened after the install.
- Click the Browse next to the file box and browse to the file you want to check. In our example, we are checking the checksum of the windirstat1_1_2_setup.exe file.
- Select the type of Checksum you are calculating. By default, the Checksum is set to MD5, in our example below we’ve set the value to SHA1.
- Click the Calculate button.
- After clicking Calculate, a result is shown in the Result box. To compare the values with what’s shown on the web page or documentation, copy and paste the checksum into the Compare box and click Verify. If both values match, you’ll see a message box indicating that the values are the same.

Using the Microsoft FCIV utility
Unfortunately, no version of Microsoft Windows comes pre-installed with a checksum utility, but Microsoft has released a command line command perform a checksum. In our example, we’ll be downloading, installing, and using the Microsoft FCIV (File Checksum Integrity Verifier) to check the WinDirStat installer file. WinDirStat is a great free utility for checking what files and folders are occupying space on your hard drive.
Downloading and installing Microsoft FCIV
- Download FCIV from Microsoft.
- Run the executable, Windows-KB841290-x86-ENU.exe.
- Click Yes to accept the license agreement.
- The installer asks where you would like to extract the files. It’s convenient to have it in the same place as the WinDirStat installer, so we recommend you extract it to your Downloads folder. Click Browse, highlight Downloads, and click OK.

- Click OK to extract the files.
- Click OK to close the installer.
If you copy the fciv.exe file into your C:\Windows directory, the command works from any directory or drive in the command prompt.
Using FCIV
- FCIV is a command-line utility, so you need to run it from the Windows command prompt. Open a new command prompt window now. In Windows 10, you can find it under Start menu → Windows System → Command Prompt. You can also open it from the Run box if you press Win+R (hold down the Windows key on your keyboard and press R), type cmd, and press Enter .
- Change to your Downloads directory or the directory containing fciv and the file you want to compare. At the command prompt, run:
- The checksums provided on the WinDirStat use the SHA1 algorithm, so we need to use the -sha1 option when we run FCIV. For example, to verify windirstat1_1_2_setup.exe, use this command:
FCIV will spend a few moments calculating, and then provide output like this:

The checksum is the long hexadecimal number on the last line:
That hexadecimal number is the SHA1 checksum for your file. Check to make sure it matches the checksum on the WinDirStat website:

- See our fciv command page for further information about this command and its syntax and options.
How to check the checksum of a file in Linux

In Linux, the checksum of a file can be checked using one of the following command line commands depending on the checksum the author used for comparison.
- The MD5 checksum is verified using the md5sum command.
- An SHA224 checksum is checked using the sha224sum command.
- An SHA256 checksum is shown using the sha256sum command.
- An SHA384 checksum is shown using the sha384sum command.
- An SHA512 checksum is verified using the sha512sum command.
Finding Checksum Values in Windows 10
I shared the following question several users have asked in other portions of Windows Support: In Windows 10, how does one calculate the checksum values of files? As most users know, matching the checksum value of a file on your computer against hash values specified by the source of the file, for example, is an important security feature to ensure the integrity of the files you use.
The answer to this question is simple enough, but I didn’t find it in any Microsoft documentation or websites. Those explain options limited to prior versions of Windows and do not work for Windows 10.
Windows 10 does offer two straightforward ways to find the hash values of files, at least using Windows 10 Home x64 as I did. I don’t know if they work on other versions, but I would expect they do. Microsoft just makes it difficult to discover the tools needed to perform this routine task.
One method uses the command certutil in the command prompt window. For example:
certutil -hashfile c:\Users\JDoe\Desktop\abc.exe SHA512
This command returns the SHA512 hash of file abc.exe located at the specified file path. You may use other values after SHA, such as 1 or 256, to produce the corresponding hash, and you may substitute MD5 or other supported parameters.
Another method is to use Windows PowerShell (version 5.1 for me) with the command Get-FileHash:
Get-FileHash -Path c:\Users\JDoe\Desktop\abc.exe -Algorithm SHA512
Like certutil after a command prompt, this command in PowerShell returns the SHA512 hash of file abc.exe at the location specified on the C: drive, and you may substitute other parameters to find their corresponding hash values.
As for the same question posted elsewhere on these forums, few answers have been posted. They suggest limited solutions, some of which work for certain users and others that do not. Some reference an FCIV command, which apparently works automatically in prior versions of Windows. For Windows 10, at least one user sets forth somewhat elaborate steps for installation and use of FCIV in Windows 10, and that may work for some. You may find it in this thread:
In any event, in Windows 10 as it is configured, neither the command prompt nor Windows PowerShell recognizes FCIV as a command. Presumably, Microsoft does not expect it to be used, probably because there are alternatives. Microsoft just makes it difficult for anyone to discover them, at least in the experience of some of us.
Free third-party checksum programs are available for download and installation. I have not tried any of them. Because Windows 10 apparently has simple commands to check the values as explained above, I don’t see any reason to use them.
Microsoft also makes it difficult for users to post anything in its forums. For instance, I could not reply to any of the existing questions but am limited to discussing the topic in this «community» section. For users who, like me, had a hard time discovering this information, I hope this post turns up in search results and offers some help.
Как узнать контрольную сумму файла в Windows
При скачивании ISO образов и архивов больших размеров всегда есть вероятность получить «битый» файл. Во времена Dial-UP такое было сплошь и рядом. И хотя сейчас такое случается намного реже, чтобы убедиться, что перед вами «оригинальный» файл придумали контрольные суммы, которые вычисляются на основе содержимого и позволяют заметить несоответствие даже одного байта.
То есть, если вы измените один байт в проверяемом файле, то и контрольная сумма такого файла так же изменится.
Для чего нужны контрольные суммы
У контрольных сумм две задачи:
- Убедиться, что файл скачался корректно.
- Убедиться, что файл не был изменен злоумышленниками.
Зная контрольную сумму оригинала, можно проверить является ли ваша копия подлинной.
Как вычислить контрольную сумму он-лайн
Контрольную сумму можно проверить он-лайн. Но я не буду рекомендовать этот способ, так как если размер вашего файла несколько ГигаБайт, то это займет много времени и всегда есть вероятность ошибки при передаче файла. Кроме того делиться своими файлами со сторонними сервисами не правильно.
Как узнать контрольную сумму файла в Windows
Разумнее вычислить контрольную сумму локально на своем компьютере. Это быстро и конфиденциально. В этой статье я опишу несколько способов получения контрольных сумм, как с помощью сторонних программ, так и непосредственно с помощью самой операционной системы Виндовс.
Файловый менеджер Total Commander
Total Commander — это популярный файловый менеджер, работающий на платформах Microsoft Windows и Android. В нем есть встроенная функция вычисления контрольных сумм.
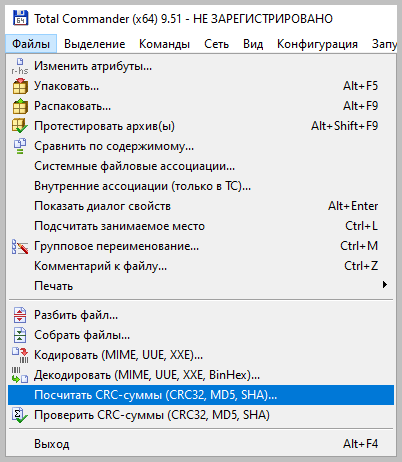
После чего вы можете выбрать один из алгоритмом вычисления контрольных сумм.
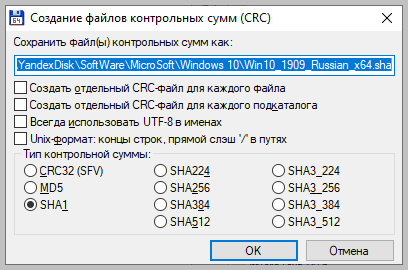
По-умолчанию Total Commander создает файл с именем проверяемого и с расширением по имени выбранного алгоритма расчета контрольной суммы.
Файловый архиватор 7-Zip
7-Zip — свободный, бесплатный файловый архиватор с высокой степенью сжатия данных. Он поддерживает несколько алгоритмов сжатия и множество форматов данных, включая собственный формат 7z c высокоэффективным алгоритмом сжатия LZMA.
Этот архиватор имеет встроенную функцию вычисления контрольных сумм. Запустить ее можно прямо из контекстного меню Windows:
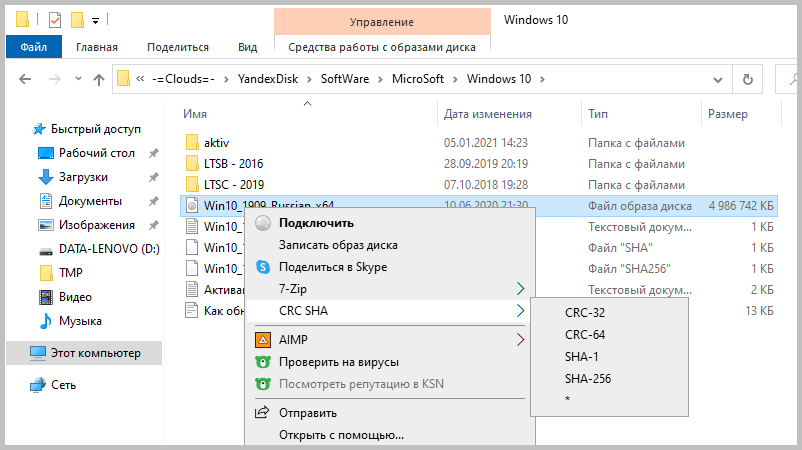
Если выбрать «звездочку», то программа подсчитает сразу несколько контрольных сумм:

Полученные данные можно выделить и скопировать в текстовый документ.
Как подсчитать контрольную сумму файла из консоли Windows
Чтобы посчитать контрольную сумму совсем не обязательно устанавливать специальные программы. И если вы не пользуетесь упомянутыми выше, то можете рассчитать контрольную сумму прямо из командной строки операционной системы.
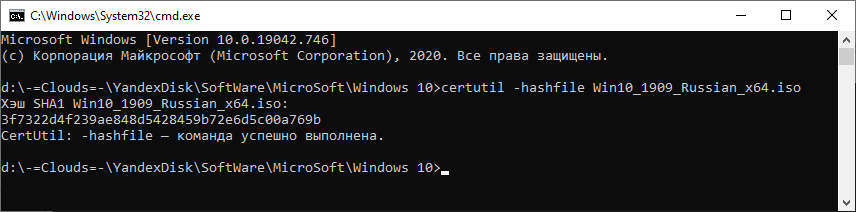
Например, чтобы посчитать контрольную сумму SHA1 с помощью утилиты CertUtil нужно запустить командную строку Windows 10, 8 или Windows 7 и ввести следующую команду:
Вот пример ее работы через несколько минут:
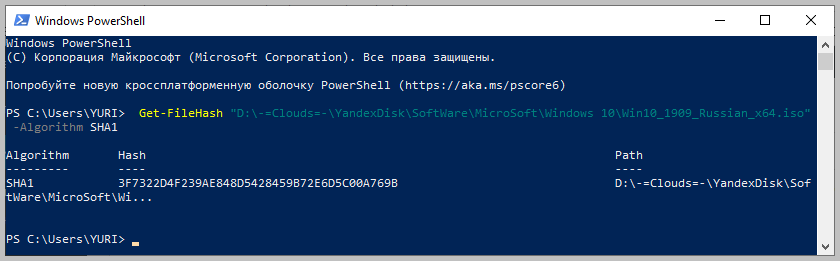
Считаем контрольную сумму в PowerShell
PowerShell — это средство автоматизации от Microsoft, с интерфейсом командной строки и языка сценариев, работает и включена в состав Windows 8 и новее.
Чтобы вычислить контрольную сумму файла необходимо выполнить команду Get-FileHash указав через пробел имя файла и алгоритм вычисления контрольной суммы:
Обратите внимание, что полный путь и имя файла лучше заключить в двойные кавычки.
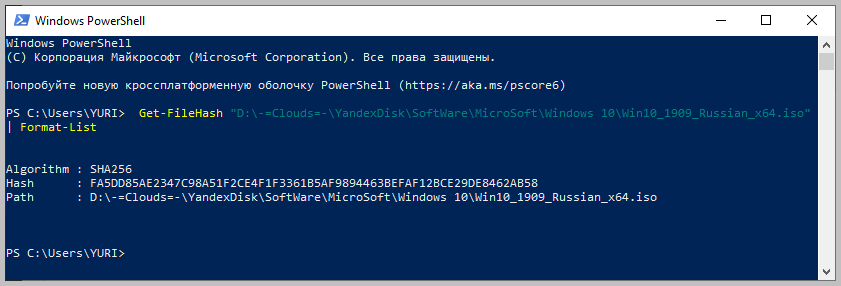
По-умолчанию, если не указать тип контрольной суммы, то будет посчитана SHA-256.
Для алгоритмов вычисления контрольной суммы в Windows PowerShell поддерживаются следующие значения:
Для оформления вывода в виде списка можно использовать параметр | Format-List. Например:
Тогда результат работы будет выглядеть так:
Подробнее об использовании команды Get-FileHash можно прочитать на официальном сайте Microsoft — https://docs.microsoft.com/ru-ru/powershell/module/microsoft.powershell.utility/get-filehash
Какой алгоритм вычисления контрольных сумм самый правильный
MD5, SHA-1, SHA-256 и прочие – это разные алгоритмы хеш-функции. Хэши являются результатом работы криптографических алгоритмов, и представляют собой строку символов. Часто эти строки имеют фиксированную длину, независимо от размера входных данных.
MD5 самый быстрый, считается устаревшим, а SHA-256 имеет наименьшую вероятность коллизии, когда два разных файла имеют одинаковую контрольную сумму.
Для проверки целостности файла вам следует использовать тот, который предоставляет издатель. Если у вас на выбор есть несколько контрольных сумм, то лучше выбрать в следующей последовательности MD5, SHA-1, SHA-256, последний вариант является более предпочтительным.
Выводы
Если вы сомневаетесь в целостности скаченных файлов из интернета, особенно когда это касается оригинальных образов операционных систем, то проверьте их контрольную сумму. Сделать это можно как с помощью уже имеющихся у вас программ, так и воспользовавшись встроенными средствами операционной системы Windows.


