- Update drivers in Windows 10
- Before you begin
- Update the device driver
- Reinstall the device driver
- More help
- How to check device driver versions on Windows 10
- How to determine driver version using Device Manager
- How to determine driver version using PowerShell
- More Windows 10 resources
- Halo: MCC’s live service elements make it better, not worse
- Microsoft’s Surface Duo is not ‘failing up’
- Here’s what you can do if Windows 10 update KB5001330 is causing issues
- These are the best PC sticks when you’re on the move
- 2 Ways To Check Bad Drivers In Windows
- Windows Driver Verifier Utility
- Exit Driver Verifier
- Using Driver Agent
- Download Link
- Test Signing
- Installing an Unsigned Driver during Development and Test
- Use the F8 Advanced Boot Option
- Attach a Kernel Debugger to Disable Signature Verification
- Test Sign a Driver Package
- Signing computer
- Test computer
- Test Signing Procedure
- Installing, Uninstalling and Loading the Test-Signed Driver Package
- To install (and uninstall) the driver package by using DPInst
- To install the driver package by using DevCon
- To install the driver package by using PnpUtil
- To install the driver package by using the Add Hardware Wizard
- Verify that the Test-Signed Driver Is Operating Correctly
- How to Troubleshoot Test-Signed Drivers
Update drivers in Windows 10
Before you begin
Driver updates for Windows 10, along with many devices, such as network adapters, monitors, printers, and video cards, are automatically downloaded and installed through Windows Update. You probably already have the most recent drivers, but if you’d like to manually update or reinstall a driver, here’s how: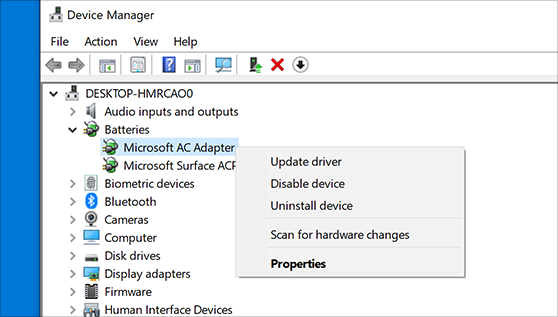
Update the device driver
In the search box on the taskbar, enter device manager, then select Device Manager.
Select a category to see names of devices, then right-click (or press and hold) the one you’d like to update.
Select Search automatically for updated driver software.
Select Update Driver.
If Windows doesn’t find a new driver, you can try looking for one on the device manufacturer’s website and follow their instructions.
Reinstall the device driver
In the search box on the taskbar, enter device manager, then select Device Manager.
Right-click (or press and hold) the name of the device, and select Uninstall.
Restart your PC.
Windows will attempt to reinstall the driver.
More help
If you can’t see the desktop and instead see a blue, black, or blank screen, see Troubleshoot blue screen errors or Troubleshoot black or blank screen errors.
How to check device driver versions on Windows 10

On computers, a device driver is a package with instructions that allows (in this case) Windows 10 to communicate and control a particular piece of hardware (such as graphics card, printers, Bluetooth and network adapters).
Understanding the driver version currently installed on your computer can be useful information to determine if an update is needed, as manufacturers usually release driver updates multiple times a year to improve performance and stability, add new features, and fix issues.
In this Windows 10 guide, we walk you through the steps to check the version of a device driver using Device Manager and PowerShell.
How to determine driver version using Device Manager
To determine the driver version for a particular piece of hardware with Device Manager, use these steps:
- Open Start.
- Search for Device Manager and click the top result to open the experience.
- Expand the branch for the device that you want to check the driver version.
Right-click the device and select the Properties option.

Check the installed driver version of the device.
![]()
Once you complete these steps, you’ll know the current driver version, which you can check against the version number available on your manufacturer support website to determine if Windows 10 is using the most up-to-date release.
Alongside the driver version, using the «Driver» tab, you can also find out other useful information, such as the date when the current version of the driver was installed, and if the driver has been properly signed.
How to determine driver version using PowerShell
If you want to check the driver version for one or more devices, you can also use this PowerShell command:
- Open Start.
- Search for PowerShell, right-click the top result, and select Run as administrator.
Type the following command to list the drivers installed on your computer and press Enter:
Get-WmiObject Win32_PnPSignedDriver| select DeviceName, Manufacturer, DriverVersion
After completing the steps, the command will display all the device drivers currently installed on your system alphabetically with their manufacturer names and versions.
More Windows 10 resources
For more helpful articles, coverage, and answers to common questions about Windows 10, visit the following resources:
![]()
Halo: MCC’s live service elements make it better, not worse
Halo: The Master Chief Collection is more popular than ever, but some fans don’t agree with the live service approach 343 Industries has taken with it. Here’s why those elements are, at the end of the day, great for the game and for Halo overall.
![]()
Microsoft’s Surface Duo is not ‘failing up’
Microsoft announced this week that it was expanding Surface Duo availability to nine new commercial markets. While Surface Duo is undoubtedly a work in progress, this is not a sign of a disaster. It’s also doesn’t mean that Surface Duo is selling a ton either. Instead, the reason for the expansion is a lot more straightforward.
![]()
Here’s what you can do if Windows 10 update KB5001330 is causing issues
In this guide, we’ll show you the steps to get rid of the update KB5001330 to fix profile, gaming, and BSoD problems with the Windows 10 October 2020 Update and May 2020 Update.
![]()
These are the best PC sticks when you’re on the move
Instant computer — just add a screen. That’s the general idea behind the ultra-portable PC, but it can be hard to know which one you want. Relax, we have you covered!
2 Ways To Check Bad Drivers In Windows
Corrupt drivers are the source of errors and issues of your system especially the infamous Blue Screen of Death of BSOD. Every hardware installed on your system needs a driver to run and perform its relative functions properly. Bad drivers lead to instability and poor performance. And the blue screen errors are so common and this may cause due to faulty and outdated drivers.
In this article, I’ll guide you through checking of bad drivers in your Windows system to avoid performance bumps and sudden errors.
Windows Driver Verifier Utility
Driver Verifier helps you in verifying all your device drivers and will let you know if any bad or corrupt driver is present.
But the thing is to use Driver Verifier, you have to be careful as it can lock out of you from your system. So before using or running Driver Verifier, be sure that you have a System Restore or Backup of all of your data. And if anything bad happens you can easily go to Safe Mode before going to main Windows.
Let’s start with Driver Verifier
- Open Command Prompt window and type “verifier” in CMD. After running the command, a new pop-up window of Driver Verifier Manager will appear. Select “Create Custom Settings”. and click Next.
- Then a list of tests will be shown to you. You can run all tests for your drivers, just uncheck the two tests which are “DDI Compliance Checking (additional)” and “Randomized low resources simulation”. Click on Next button.
- The next settings will remain as it is. Go for next window.
- Select “Select driver names from a list”.
- It will start loading the driver information.
- A list will appear. If you don’t know exactly about the faulty driver, then check all drivers except Microsoft drivers because those drivers aren’t the corrupted one. And if you know about the specific corrupt driver, select it to run the Driver Verifier for it.
- Now after clicking on Finish, your system will restart. And next, it will start, Driver Verifier is activated. You can use your system normally. If any error is found or blue screen will appear, note down the error and cause of it, as it is tested by Driver Verifier which you have activated.
Exit Driver Verifier
In any case, you do not want to use Driver Verifier, deactivate it easily by going to below steps.
- To exit the Driver Verifier open CMD window and type the following command.
“verifier /bootmode resetonbootfail”. - After running the above command, restart your system once to apply the changes properly.
Using Driver Agent
DriverAgent is a third-party tool which can easily tell you that which drivers of your system are good and bad. And for bad drivers, if any update is available, you can easily update via Driver Agent tool. Apply below easy steps to check inoperative drivers of the system.
- Download Driver Agent from below link.
- Run the installer and proceed with on-screen instructions to complete the installation.
- After installation, Driver Agent will locate all drivers of a system, and open the list in the browser. Drivers with green sign indicate good and updated drivers, and with the red sign, indicates that these drivers need to be updated.
- You can update the outdated driver directly staying in the same window easily by clicking on Update button showing in front of a corrupted or outdated driver.
Download Link
Download Driver Agent from here
Editor’s note: I have removed the link because Google labeled it as harmful. You should probably not use the software until Google clears it.
If anything is going wrong with your system’s devices and you can not able to get an exact solution, so use any of above method because there is a chance that drivers of the system are faulty or outdated that’s why your system’s performance gets cut. Thank you.
Test Signing
Starting with Windows Vista, x64-based versions of Windows required all software running in kernel mode, including drivers, to be digitally signed in order to be loaded. Initially you could use the F8 switch (on each boot, before Windows loads) to temporarily disable the load-time enforcement of requiring a valid signature in your driver. But this will become tedious after the first few uses. You can attach a kernel debugger to your test computer which will disable the same load-time enforcement checks after you use the correct BCDEdit commands. However, eventually it will become necessary to test-sign your driver during its development, and ultimately release-sign your driver before publishing it to users.
Installing an Unsigned Driver during Development and Test
By default, 64-bit versions of Windows Vista and later versions of Windows will load a kernel-mode driver only if the kernel can verify the driver signature. However, this default behavior can be disabled to during early driver development and for non-automated testing. Developers can use one of the following mechanisms to temporarily disable load-time enforcement of a valid driver signature. However, to fully automate testing of a driver that is installed by Plug and Play (PnP), the catalog file of the driver must be signed. Signing the driver is required because Windows Vista and later versions of Windows display a driver signing dialog box for unsigned drivers that require a system administrator to authorize the installation of the driver, potentially preventing any user without the necessary privileges from installing the driver and using the device. This PnP driver installation behavior cannot be disabled on Windows Vista and later versions of Windows.
Use the F8 Advanced Boot Option
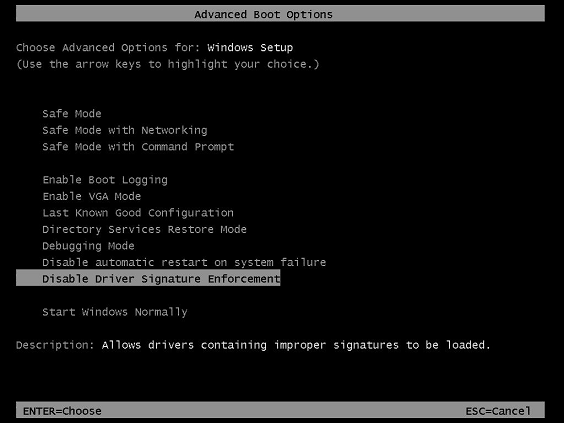
Windows Vista and later versions of Windows support the F8 Advanced Boot Option — «Disable Driver Signature Enforcement» — that disables load-time signature enforcement for a kernel-mode driver only for the current system session. This setting does not persist across system restarts.
The following boot option screen will appear during reboot providing the option to disable the driver signature enforcement. This provision will allow installation of an unsigned driver for test purpose.
Attach a Kernel Debugger to Disable Signature Verification
Attaching an active kernel debugger to a development or test computer disables load-time signature enforcement for kernel-mode drivers. To use this debugging configuration, attach a debugging computer to a development or test computer, and enable kernel debugging on the development or test computer by running the following command:
To use BCDEdit, the user must be a member of the Administrators group on the system and run the command from an elevated command prompt. To open an elevated Command Prompt window, create a desktop shortcut to Cmd.exe, select and hold (or right-click) the shortcut, and select Run as administrator.
However, be aware that there are also situations in which a developer might have to attach a kernel debugger, yet also need to maintain load-time signature enforcement. See Appendix 1: Enforcing Kernel-Mode Signature Verification in Kernel Debugging Mode for how to accomplish this.
Test Sign a Driver Package
Instead of using the above two methods to bypass driver signing enforcement requirements, the best approach is to test sign a driver package. Test signing and driver installation can be done on the development computer, but you may want to have two computers, one for development and signing, and the other for testing.
Signing computer
This is the computer that is used to test-sign a driver package for Windows Vista and later versions of Windows. This computer must be running Windows XP SP2 or later versions of Windows. In order to use the driver signing tools, this computer must have the Windows Vista and later versions of the Windows Driver Kit (WDK) installed. This can also be the development computer.
Test computer
This is the computer that is used to install and test the test-signed driver package. This computer must be running Windows Vista or later versions of Windows.
Test Signing Procedure
Driver packages will contain the driver binary, the INF file, the CAT file and any other necessary files. A driver package may contain sub directories like x86, AMD64, IA64, if the driver is built for more than one target processor type. Perform these steps using your development/signing computer.
The following procedure describes the steps to test sign a driver package:
Build the driver for the target. If you are building a driver for Windows 8.0 or Windows 8.1, then use Visual Studio 2012 or Visual Studio 2013 with the corresponding WDK, installed e.g., Windows 8.0 or 8.1 WDK respectively.
All the command tools described below should be used from the corresponding tool/build command window Visual Studio 2012 or Visual Studio 2013.
The command tools for Visual Studio are located in the install directory, C:\Program Files (x86)\Microsoft Visual Studio 12.0\Common7\Tools\Shortcuts
Any of the five shortcuts for command prompt will have, makecert.exe, inf2cat.exe, signtool.exe, certmgr.exe, etc., commands.
You may choose the most general, “Developer Command Prompt for VS2013”. The shortcuts can be pinned down to the Task Bar for easy access.
Please note that with Visual Studio, instead of the command tool approach of driver signing, you can also use the Visual Studio 2013 development environment (also known as the IDE) to sign a driver package. Please refer to Appendix 2: Signing Drivers with Visual Studio for more information.
Create a driver package folder and copy the driver files, maintaining any sub directories needed, for example C:\DriverTestPackage.
Create an inf file for the driver package. Test the inf file using the InfVerif tool from WDK on the inf file so that no error is reported.
The following command-line example uses MakeCert to complete the following tasks:
Create a self-signed test certificate named Contoso.com(Test). This certificate uses the same name for the subject name and the certificate authority (CA).
Put a copy of the certificate in an output file that is named ContosoTest.cer.
Put a copy of the certificate in a certificate store that is named PrivateCertStore. Putting the test certificate in PrivateCertStore keeps it separate from other certificates that may be on the system.
Use the following MakeCert command to create the Contoso.com(Test) certificate:
The -r option creates a self-signed certificate with the same issuer and subject name.
The -pe option specifies that the private key that is associated with the certificate can be exported.
The -ss option specifies the name of the certificate store that contains the test certificate (PrivateCertStore).
The -n CN= option specifies the name of the certificate, Contoso.com(Test). This name is used with the SignTool tool to identify the certificate.
ContosoTest.cer is the file name that contains a copy of the test certificate, Contoso.com(Test). The certificate file is used to add the certificate to the Trusted Root Certification Authorities certificate store and the Trusted Publishers certificate store.
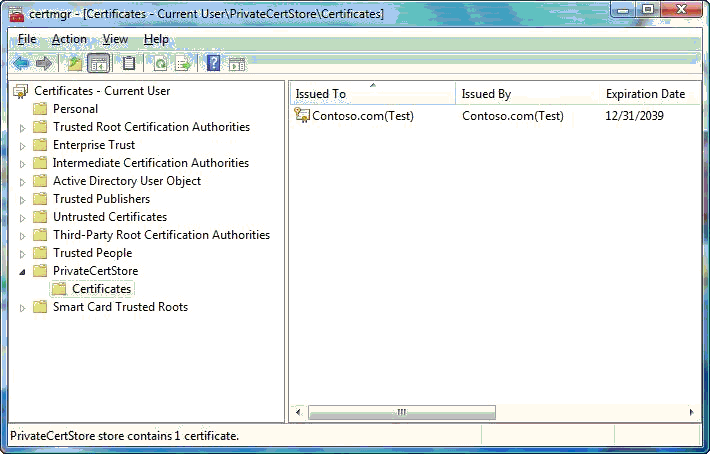
After the certificate is created and a copy is put in the certificate store, the Microsoft Management Console (MMC) Certificates snap-in can be used to view it. Do the following to view a certificate through the MMC Certificates snap-in:
To start the Certificates snap-in, run Certmgr.msc.
In the left pane of the Certificates snap-in, expand the PrivateCertStore certificate store folder and double-click Certificates.
The following screen shot shows the Certificates snap-in view of the PrivateCertStore certificate store folder.
To view the details about the Contoso.com(Test) certificate, double-click the certificate in the right pane. The following screen shot shows the details about the certificate.

Notice that the Certificate dialog box states: «This CA Root certificate is not trusted. To enable trust, install this certificate in the Trusted Root Certification Authorities store.» This is the expected behavior. The certificate cannot be verified because Windows does not trust the issuing authority, «Contoso.com(Test)» by default.
Create a catalog file (.cat extension). Use the inf2cat tool as shown below to create the catalog file. Please note that no space is allowed for the switches, /driver: , /os: : ,: .
This creates a catalog file with the name given in the driver’s .inf file. Additional comma separated OSes can be added selectively or all as shown below with no spaces.
The updated inf2cat from the new 8.1 WDK has /os option values of 6_3_X86, 6_3_X64, 6_3_ARM and SERVER_6_3_X64.
Example of INF file for the Version section.
The /driver (or /drv) option specifies the directory which contains one or more INF files. Within this directory, catalog files are created for those INF files that contain one or more CatalogFile directives. The catalog file name is not restricted to 8.3 name.
Inf2Cat creates the catalog file tstamd64.cat if the command-line argument /os:7_X64 is used. Similarly, the tool creates the catalog file toastx86.cat if the /os:XP_X86, option is used, similarly for Server2008R2_IA64. In case, only one catalog file is desired, then only one entry in the INF file as shown below will suffice.
If the date in the INF file is not greater than the OS release date, then the following error will be reported by the inf2cat tool if the /os parameter was for Windows 7 and date set in the INF file was an earlier date.
The inf2cat tool is very strict on checking each folder and sub-folder about the presence of every file which has an entry in the INF file. There will be meaningful error messages on such missing entries.
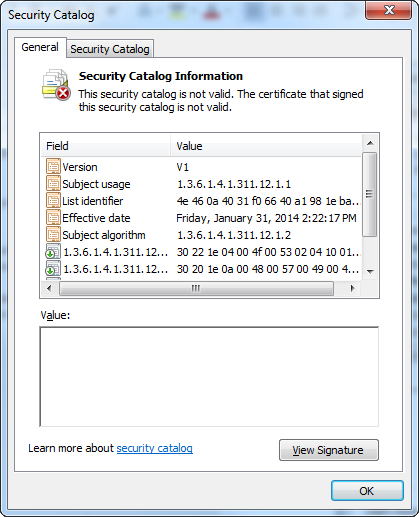
The cat file can be opened from explorer by double-clicking or right-clicking the file and selecting Open. The Security tab will show some entries with GUID values. Selecting a GUID value will display details including the driver files of the driver package and the OSes added as shown below:
The number 5.1 is the version number for XP OS and 6.1 for Windows 7.0 OS.
It is advisable that the cat file is checked to verify the inclusion of the driver files and the selected OSes. At any time if any driver file is added or removed, the INF file has been modified, the cat file must be recreated and signed again. Any omission here will cause installation errors which are reported on the setup log file (setupapi.dev.log for Vista and above or setupapi.log file for XP).
The following command line shows how to run SignTool to do the following:
Test-sign the tstamd64.cat catalog file of the ToastPkg sample driver package. For more information about how this catalog file was created, see Creating a Catalog File for Test-Signing a Driver Package.
Use the Contoso.com(Test) certificate from the PrivateCertStore for the test signature. For more information about how this certificate was created, see Creating Test Certificates.
Timestamps the digital signature through a time stamp authority (TSA).
To test-sign the tstamd64.cat catalog file, run the following command line:
The sign command configures SignTool to sign the specified catalog file, tstamd64.cat.
The /v option enables verbose operations, in which SignTool displays successful execution and warning messages.
The /s option specifies the name of the certificate store (PrivateCertStore) that contains the test certificate.
The /n option specifies the name of the certificate (Contoso.com(Test)) that is installed in the specified certificate store.
The /t option specifies URL of the TSA ( http://timestamp.digicert.com ) which will time stamp the digital signature.
Including a time stamp provides the necessary information for key revocation in case the signer’s code signing private key is compromised.
tstamd64.cat specifies the name of the catalog file, which will be digitally-signed. You can open the cat file as described before
- In 64-bit versions of Windows Vista and later versions of Windows, the kernel-mode code signing requirements state that a boot-start driver must have an embedded signature. This is required regardless of whether the driver’s driver package has a digitally-signed catalog file.
Below is the command to embed sign a kernel mode driver binary file.
amd64\toaster.sys specifies the name of the kernel-mode binary file which will be embed-signed.
Within the WDK 7.1 installation directory, the toaster sample is located in the src\general\toaster\toastpkg\toastcd\ directory. The Windows 8 or 8.1 WDK samples are to be downloaded from the Microsoft download site. The samples do not come with the Windows 8 or 8.1 Windows Driver Kit.
The catalog file when opened by double clicking the file in Windows Explorer, you will see the following screen shot. Note that “View Signature” is now highlighted.
If you select “View Signature”, you will see the screen shot below providing the next viewing option from “View Certificate”, which then will give the option of “Install Certificate” from the dialog itself. Below, we are providing the preferred command line option of installing the certificate using the certmgr.exe tool.

The driver can now be tested either on the signing computer or the test computer. If you are using the test computer, copy the driver package to the machine keeping the file structure intact. The tool certmgr.exe also has to be copied to the test computer. When using a test computer, copy the test-signed Toastpkg driver package to the c:\toaster temporary folder.
The following procedure describes the steps to use on either machine to test the driver:
In an elevated command window run the following command:
Reboot the computer.
Copy the certificate (.cer) file, which was used to test-sign drivers, to the test computer. You can copy the certificate file to any directory on the test computer.
The following CertMgr command adds the certificate in the certificate file CertificateFileName.cer to the Trusted Root Certification Authorities certificate store on the test computer:
The following CertMgr command adds the certificate in the certificate file CertificateFileName.cer to the Trusted Publishers certificate store on the test computer:
Adds the certificate in the specified certificate file to the certificate store.
Specifies that the certificate store is a system store.
Specifies that the registry location of the system store is under HKEY_LOCAL_MACHINE.
Specifies the certificate store, trustedpublisher, similarly for “localMachine root».
Reboot the computer. You can now run Certmgr.msc and verify that the ContosoTest.cer is visible in the above two locations. If it is not visible, then another way to install the certificate is to open the certificate and install it on the above two nodes and verify again.
Verify signing of the cat file and the sys file. Open an elevated command window, and assuming the signtool.exe is available in the computer, go to the driver package directory where the cat, inf and the sys file is located. Execute the following commands at the appropriate directory
To check for embed sign, execute the following command.
The two commands above will generate one error as it is test signed and the certificate was not a trusted certificate.
The above two verification commands will be very useful in release signing which will be discussed later.
The driver is now ready to be installed and tested in the test computer. It is always advisable that the following registry key is set correctly to gather verbose logs in setupapi.dev.log file (for Windows Vista and later operating systems) during the installation process.
In %SystemRoot%\inf file, rename the setupapi.dev.log file before installing the driver. After install, a new log setupapi.dev.log file will be created which will contain valuable information encountered during installation.
Once the driver is successfully installed, it can be tested on the development computer or on the test computer.
Installing, Uninstalling and Loading the Test-Signed Driver Package
After the system has rebooted in Step 2, the test-signed driver package can be installed and loaded. There are four ways to install a driver package:
- By using the Dpinst (dpinst.exe) tool, which is a WDK command line tool for installing drivers and is redistributable.
- By using the Devcon (devcon.exe) tool, which is a WDK command line tool for installing drivers, but not redistributable. The sample code of Devcon tool is provided in the WDK. To redistribute, you can implement your own Devcon tool from the sample code and can redistribute your version of the tool.
- By using the OS provided Pnputil (pnputil.exe) tool.
- By using the Windows Add Hardware Wizard.
Dpinst and Pnputil pre-installs the driver package, whereas with Devcon and Windows Add Hardware Wizard, the driver as well as the device can be installed. Pre-installing a driver helps the OS find the driver when a device is connected to the computer.
To install (and uninstall) the driver package by using DPInst
Open an elevated command window and set the default directory to c:\toaster.
Dpinst.exe is provided in the WDK redist directory the x86 version, the amd64 version and the ia64 version. Copy the relevant version to the c:\toaster directory and run the following command.
The above command will install all the drivers corresponding to all the inf files. You can also use “.” without the quotes from the current directory. “dpinst.exe /?” shows all the switches for this tool.
The /U switch on the driver inf file will remove the driver package from the DriverStore’s FileRepository (%SystemRoot%\System32\ DriverStore\FileRepository) directory provided the device associated with the driver has been removed. With Dpinst tool a driver can be removed just by referring to the inf file of the driver.
To install the driver package by using DevCon
Open an elevated command window and set the default directory to c:\toaster.
Devcon.exe is provided in the WDK tool directory the x86 version, the amd64 version and the ia64 version. Copy the relevant version to the c:\toaster directory and run the following command. This command will install the driver as well as the device.
It is advisable to use quotes around . For the toaster sample, it will be:
A device can be removed using the Devcon tool using the “remove” switch. “devcon.exe /?” shows all the switches for this tool. To get specific information, on using a switch “help” should be added as shown below for the “remove” switch.
The above commands provides the following information.
Removes devices with the specified hardware or instance ID. Valid only on the local computer. (To reboot when necessary, include -r .)
After a device has been removed, to remove the driver, two commands are necessary. Use the first command with “dp_enum” switch to find the driver inf file name corresponding to the driver package installed in the computer.
This command will show the list of all oemNnn.inf files corresponding to a driver package, where Nnn is a decimal number with the Class information and the Provide information as shown below.
To remove the corresponding driver package from the DriverStore, use the next command shown below for the Intel “Network Adapters” driver:
To install the driver package by using PnpUtil
Open an elevated command window and set the default directory to c:\toaster.
Run the following command which will show all the available switches. Use of the switches is self-explanatory, no need to show any examples.
To install the driver package by using the Add Hardware Wizard
- Open an elevated command window
- Run hdwwiz.cpl to start the Add Hardware Wizard, and select Next to go to the second page
- Select Advanced Option and select Next
- Select Show all devices from the list box and select Next
- Select the Have Disk option
- Enter the path to the folder that contains the C:\toaster driver package
- Select the inf file and select Open
- Select OK
- Select Next in the next two pages, and then select Finish to complete the installation
Verify that the Test-Signed Driver Is Operating Correctly
To verify that Toastpkg is operating correctly:
Start Device Manager
Select Toaster from the list of devices. For an example, see screen shot below.

To open the driver’s Properties dialog box, double-click Toaster Package Sample Toaster and select Properties
To confirm that Toaster is working properly, on the General tab, check the Device status box
Device Manager can be used to uninstall the device and the driver from the Properties dialog box.
How to Troubleshoot Test-Signed Drivers
See Troubleshooting Driver Signing Installation if you encounter any difficulties with these procedures.


