- How to Check Graphics Card on Windows 10/8/7 PC – 5 Ways [MiniTool News]
- Summary :
- How to Check Graphics Card on Windows 10/8/7 with DirectX Diagnostic Tool
- How to Check Graphics Card on Windows 10/8/7 in Device Manager
- Step 1 – Open Windows Device Manager
- Step 2 – Check Graphics Card Detailed Info
- How to Check Graphics Card on Windows 10/8/7 from Display Settings
- How to Check Graphics Card on Windows 10/8/7 from Task Manager
- Step 1. Open Windows Task Manager
- Step 2. Find Out Computer Graphics Card Information
- How to Check Graphics Card on Windows 10/8/7 through System Information
- Step 1. Open Windows System Information
- Step 2. Check Windows 10/8/7 Laptop/PC GPU
- Bottom Line
- ABOUT THE AUTHOR
- How To Check Your Graphics Card in Windows 10
- What is a Graphics Card?
- Looking Up Your Graphics Card Info in Windows 10
- DirectX Diagnostic Tool
- TechPowerUp GPU-Z
How to Check Graphics Card on Windows 10/8/7 PC – 5 Ways [MiniTool News]
By Alisa | Follow | Last Updated January 16, 2020
Summary :

How to check graphics card? This post provides 5 ways to help you check the graphics card on Windows 10/8/7 PC or laptop. Detailed step-by-step guides are included.
Wonder what graphics card does the computer have, and how to check graphics card on Windows 10/8/7 PC/laptop? This post provides 5 ways to help you check Windows 10/8/7 computer graphics card easily and quickly. Find out the detailed step-by-step guide.
How to Check Graphics Card on Windows 10/8/7 with DirectX Diagnostic Tool
You can run Microsoft DirectX Diagnostic Tool to easily check the graphics card on Windows 10/8/7. Check the detailed guide below.
Step 1. You can press Window + R key on computer keyboard to open RUN window. Then type dxdiag and hit Enter to open DirectX Diagnostic Tool.
Step 2. Next you can tap Display tab, then you can check the detailed information of the graphics card on your Windows 10/8/7 PC/laptop, including graphics card name, manufacturer, its driver model/version/date, and more.

How to Check Graphics Card on Windows 10/8/7 in Device Manager
You can also easily check graphics card in laptop or PC through Device Manager.
Step 1 – Open Windows Device Manager
You can click Start and type Device Manager. Then click Device Manager under best match result to open Windows Device Manager.
You can also press Windows + X key on the keyboard simultaneously, and click Device Manager to open it.
Step 2 – Check Graphics Card Detailed Info
Then you can find Display adapters, click and expand it. Then you will see the installed graphics card (s) on your Windows 10/8/7 PC/laptop.
Right-click on one graphics card and select Properties. Then it will pop-up a window which includes all the detailed computer graphics card information.
You can then check the general information, the driver information, device status and more of the computer graphics card.

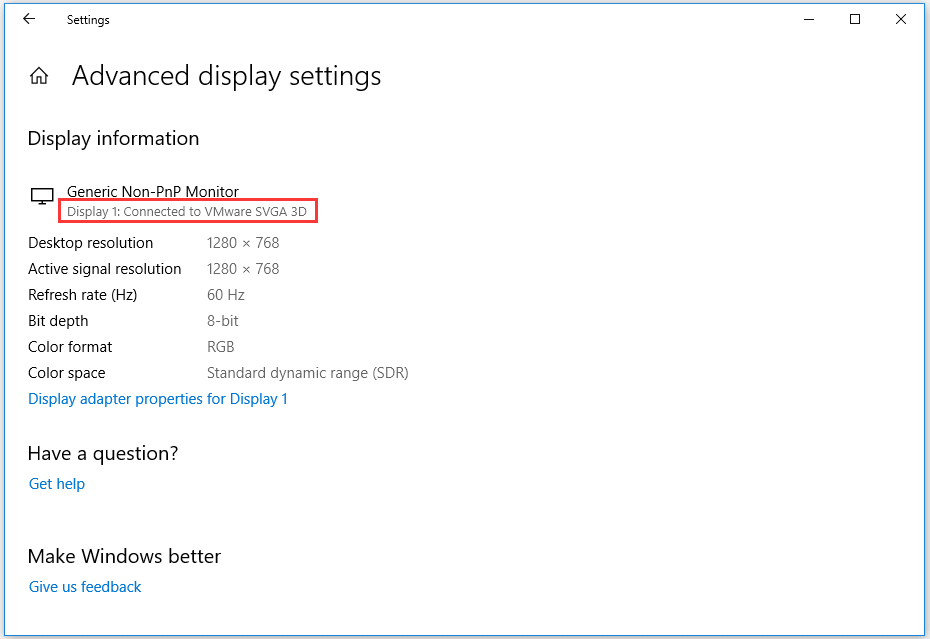
How to Check Graphics Card on Windows 10/8/7 from Display Settings
Another easy and quick to check graphics card on Windows 10/8/7 laptop or PC is to view display settings. Check the operation below.
Step 1. You can right-click the blank space on the computer screen and choose Display Settings.
Step 2. Then you can scroll down and click Advanced Display Settings to find out what graphics card your computer has and view its detailed parameters.
How to Check Graphics Card on Windows 10/8/7 from Task Manager
You can also find out the computer graphics card info by using Task Manager on Windows 10/8/7 PC.
Step 1. Open Windows Task Manager
You can press Windows + X keys on the keyboard at the same time, and choose Task Manager.
Or you can click Start and type Task Manager. Select Task Manager to open it.
You can also press the shortcut key Ctrl + Shift + Esc at the same time to open Task Manager quickly.
Then click More details to check the detailed information of running tasks in Windows 10/8/7 PC.
Step 2. Find Out Computer Graphics Card Information
Next you can tap Performance tab, and click GPU option to check computer GPU information. You can check the GPU model, current usage rate, the graphics card driver, the version and its performance, etc.

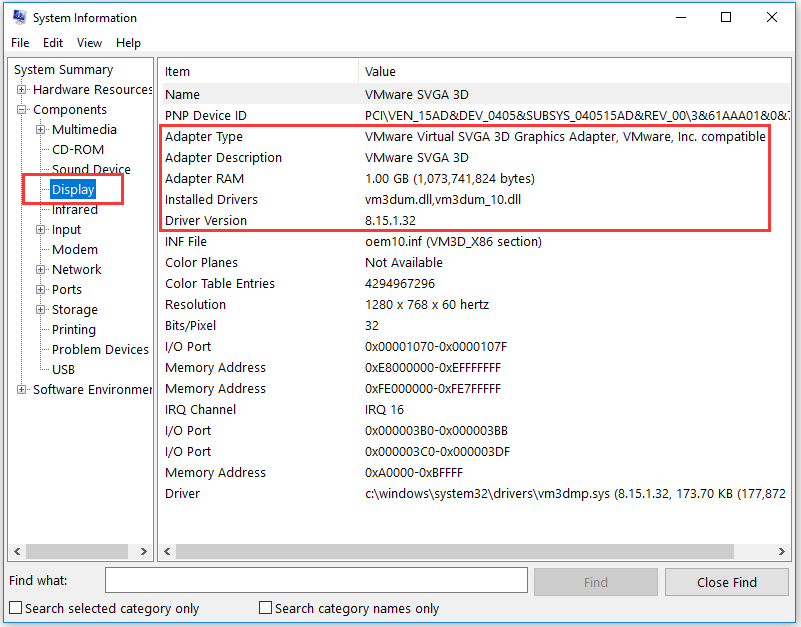
How to Check Graphics Card on Windows 10/8/7 through System Information
The last easy and quick way to allow you to check out the graphics card (GPU) or Windows 10/8/7 laptop or PC is to use System Information.
Step 1. Open Windows System Information
You can also press Windows + R key on the keyboard to open RUN window, then input msinfo32 and hit Enter.
Step 2. Check Windows 10/8/7 Laptop/PC GPU
Next you can expand System Summary -> Components -> Display, to check the detailed computer graphics adapter information incl. adapter model, adapter description, adapter RAM, installed drivers, and more. You can also check full specs of Windows 10/8/7 in this System Information window.
Bottom Line
If you want to find out what the graphics card your computer has, these 5 ways offered in this post can help you easily check graphics card in Windows 10/8/7 laptop or PC.
ABOUT THE AUTHOR

Position: Columnist
Alisa is a professional English editor with 4-year experience. She loves writing and focuses on sharing detailed solutions and thoughts for computer problems, data recovery & backup, digital gadgets, tech news, etc. Through her articles, users can always easily get related problems solved and find what they want. In spare time, she likes basketball, badminton, tennis, cycling, running, and singing. She is very funny and energetic in life, and always brings friends lots of laughs.
How To Check Your Graphics Card in Windows 10

William Sattelberg William has been with TechJunkie since 2017, writing about smartphones, games, streaming media, and anything else that technology touches in our current age. In addition, he also works as a video producer, writing and recording scripts for our video team and editing videos for TechJunkie’s YouTube channel. William graduated from SUNY Fredonia in 2016 with a degree in Video Production, and lives in Buffalo, NY. Read more December 7, 2020
Your graphics card is an essential component of your computer’s hardware. If you want to play any sort of video game, you’ll find that your graphics card is listed among the most crucial specifications for any game you’ll want to play, powering nearly all the visuals you see on-screen. Powerful graphics cards are equally important for video editing, as rendering and CUDA cores are all powered through the graphics card inside your machine.
Most Windows games and programs include graphic card details in their system requirements, and you might need to check what graphics card you have to see if it matches the requirements.
Whether you’re confused about dedicated versus integrated graphics cards, the amount of VRAM within your dedicated card, or what manufacturer created your card, it’s easy to check—even without cracking open your laptop, desktop, or tablet. Let’s take a look at how you can find out your graphics card information in Windows 10.
What is a Graphics Card?
The GPU, or graphics card, comes in two distinct forms: dedicated and integrated. Typically, integrated GPUs—graphics cards built into your CPU—are included in lower-cost or low-power devices, like budget PCs and ultrabooks. Because dedicated graphics cards, especially in laptops, are expensive and often overkill unless you’re looking to play some serious games or edit photos or videos, integrated graphics are often the best bang-for-the-buck in laptops.

It’s also important to keep in mind that some devices, specifically laptops, have both integrated and dedicated GPUs, with the ability to switch between both chips depending on what you’re doing with your PC.
Looking Up Your Graphics Card Info in Windows 10
Looking up your graphics card within Windows 10 is easy, and there are a couple ways to do it depending on how much information you’re looking to learn about your card.
Our first method uses Windows’ built-in DirectX Diagnostic Tool, which you can use to read the system information of your machine while detailing information on the DirectX components within your system. DirectX, for those not in the know, is Windows’ API for handling multimedia content, including video and games on your platform.
Our second method uses an external software tool, GPU-Z, to read the information on your device, often offering more information with the added cost of installing a separate application.
DirectX Diagnostic Tool
To find more details about your GPU, you can use the Windows built-in DirectX Diagnostic Tool, which is used to read the system information of your machine.
Launching the DirectX Diagnostic Tool is relatively simple. The tool is included in all versions of Windows 10, so regardless of your PC, you’ll be able to access this tool through your Start menu. DirectX is also a pretty old standard, so you should be able to find this on older versions of Windows like 7, 8, and 8.1. Here’s how to access your information.
Start by locating the Windows key in the lower-left hand corner. Click on it with your mouse and type “Run” once the Start menu has opened.

Once Run is open on your desktop, enter the word “dxdiag” into the text field and hit “OK” in the box below. You’ll see a dialog box open with DirectX information shown. (If, prior to the application launching, you receive a box with a “Yes” or “No” prompt about launching the Diagnostic Tool, hit “Yes.”)

Once the DirectX Diagnostic Tool has loaded, you’ll see a few separate tabs, along with plenty of system information including the current time and date, the manufacturer of your motherboard, the amount of memory within your PC, and your processor.
While this is all great information to know, the system tab in DirectX doesn’t display any information about your graphics card. For that, we’ll have to turn to the second tab within the DirectX Diagnostic Tool, “Display.”
The Display tab, in the upper-left corner, has all the generic information about your system’s current display preferences, including the graphics card, make and model, the amount of VRAM (video RAM) within your graphics card, and the current resolution being pushed out by your device.

For anyone who has two graphics cards in their system, you’ll have two “Display” tabs open in the window on your display. While some power users and gamers may have two actual graphics cards, you’ll likely run into this issue if you’re using a laptop that has a CPU with integrated graphics and a dedicated GPU that switches on when needed. This is a feature of certain laptops with Nvidia graphics, typically designed in order to automatically switch in order to help assist your laptop’s battery life.

Whether you’re looking to replace the card, trying to find supported software for your device, or just looking for generic information about your hardware, this is typically all you need.

TechPowerUp GPU-Z
GPU-Z can give us some additional information about our graphics card, so if you’re looking for a specific piece of information—clock speed, BIOS version, release date of your processor, or anything else—here’s how to do it.
GPU-Z (also known as TechPowerUp GPU-Z) is a totally free utility, sans advertisements or paywalls, so don’t worry about having to pay to use the application on your device.
Instead, you’re going to be able to use the program to find out a whole lot more about your computer’s graphics card than you knew before. Start by heading to this page to download the utility.

Here you’ll find two separate themes: the standard version of GPU-Z and the ASUS ROG (Republic of Gamers, ASUS’s line of gamer-focused equipment) themed program. For our needs, we only need the standard version, but if you’re looking for some visual flash in your utilities, you can grab the ASUS one too. Both applications will do the same basic task.

Once you hit the download button, you’ll be brought to a download page asking you to select a server for download. If you’re US-based, either United States server will work for you; otherwise, select the server closest to your home country for the fastest download speeds available.

Upon first glance, this app has a ton of information that you might not know what to do with. If you’re new to graphics cards and computer architecture, a lot of the words and phrases here might need some bit of explaining. Truth be told, for 98 percent of readers, you won’t need to know most of the information here. Instead, here’s what you will find interesting shown through GPU-Z:

- The Lookup button: Clicking this will launch your browser to load a page on your specific graphics card, along with an image of the device, dates released, and tons of other information. Much of this is shown within GPU-Z, but if you need to send or share your graphics card info with someone, TechPowerUp’s database of graphics cards is reliable, easy-to-share information.
- Name: This will display the generic name of your graphics card (in the screenshot below, it displays an Nvidia GeForce GTX 970). However, this won’t display the make of your graphics card (this is known as a sub-vendor within GPU-Z).
- Technology: This shows the size and structure of your GPU, measured in nm (nanometers). The smaller the chip, the less heat generated by the GPU.
- Release date: The original release date of your specific graphics card.
- Subvendor: The manufacturer that created your card (ASUS, EVGA, etc.).
- Memory type and size: The type and generation of the dedicated memory contained within your graphics card (VRAM). The size is shown below type, listed in MB (megabytes). The more VRAM, the more powerful the chip.
- Clock speeds: This is the speed your GPU is set to run at. These can be boosted and overclocked, depending on your card and device, so you’ll also see information on your turbo-boost clock speeds here as well. These are measured in MHz (megahertz).

If you’re confused about what something means, you can hover over the text entry fields in each part of the application for more details.
Finally, you can also use the drop-down menu at the bottom of the application to switch between card information, if your computer has two graphics cards (or, more likely, to switch between information on your dedicated and integrated graphics cards).
If you’re interested in figuring out how your computer works, or you need to upgrade or fix a problem with your graphics card, knowing how to look up that information can be a really handy tool. Even if you’re just looking to find out whether you can run Cyberpunk 2077 on your PC, you’ll be happy to know that Windows 10 has that graphics information built right into it.
Of course, GPU-Z can help you learn the ins and outs of how your device works. With graphics cards being as important to running a computer as they are, knowing how to look up the information on your card is one of the most useful tips to know. So, whether you’re troubleshooting your computer or buying new games during Steam’s next sale, you’ll be happy to know just where to find the information you’re looking for.


