- 5 commands to check memory usage on Linux
- Memory Usage
- 1. free command
- 2. /proc/meminfo
- 3. vmstat
- 4. top command
- 5. htop
- RAM Information
- Summary
- 66 thoughts on “ 5 commands to check memory usage on Linux ”
- HowTo: Check RAM Size In Ubuntu Linux
- Display available memory on Ubuntu Linux
- Other commands
- Related media
- GUI Tool To Find Out RAM Size Under Ubuntu Linux
- A note about 3GB ram problem
- Информация об оперативной памяти в Linux. Свободная, занятая и тип памяти
- Свободная и занятая оперативная память
- Команда free
- Команда vmstat
- Команда top
- Команда htop
- Файл /proc/meminfo
- Тип памяти и частота
- Заключение
- How to Check Your RAM on Ubuntu
- Checking Size and Availability of RAM
- Checking the Type and Speed of RAM
- Checking RAM for Errors
5 commands to check memory usage on Linux
Memory Usage
On linux, there are commands for almost everything, because the gui might not be always available. When working on servers only shell access is available and everything has to be done from these commands. So today we shall be checking the commands that can be used to check memory usage on a linux system. Memory include RAM and swap.
It is often important to check memory usage and memory used per process on servers so that resources do not fall short and users are able to access the server. For example a website. If you are running a webserver, then the server must have enough memory to serve the visitors to the site. If not, the site would become very slow or even go down when there is a traffic spike, simply because memory would fall short. Its just like what happens on your desktop PC.
1. free command
The free command is the most simple and easy to use command to check memory usage on linux. Here is a quick example
The m option displays all data in MBs. The total os 7976 MB is the total amount of RAM installed on the system, that is 8GB. The used column shows the amount of RAM that has been used by linux, in this case around 6.4 GB. The output is pretty self explanatory. The catch over here is the cached and buffers column. The second line tells that 4.6 GB is free. This is the free memory in first line added with the buffers and cached amount of memory.
Linux has the habit of caching lots of things for faster performance, so that memory can be freed and used if needed.
The last line is the swap memory, which in this case is lying entirely free.
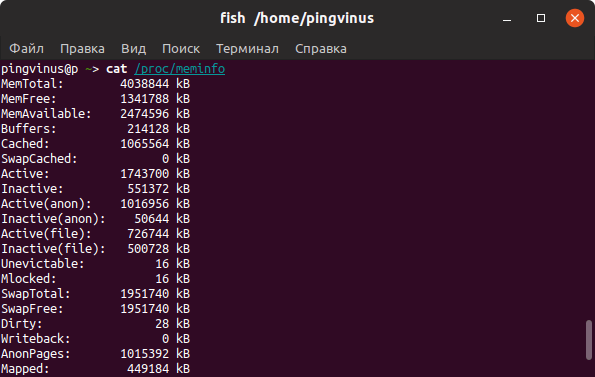
2. /proc/meminfo
The next way to check memory usage is to read the /proc/meminfo file. Know that the /proc file system does not contain real files. They are rather virtual files that contain dynamic information about the kernel and the system.
Check the values of MemTotal, MemFree, Buffers, Cached, SwapTotal, SwapFree.
They indicate same values of memory usage as the free command.
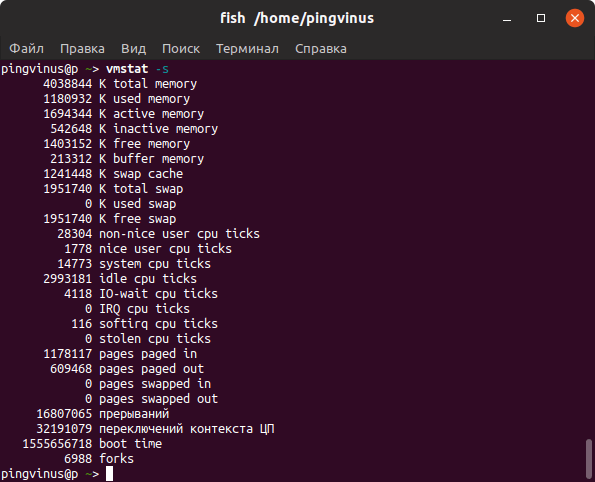
3. vmstat
The vmstat command with the s option, lays out the memory usage statistics much like the proc command. Here is an example
The top few lines indicate total memory, free memory etc and so on.
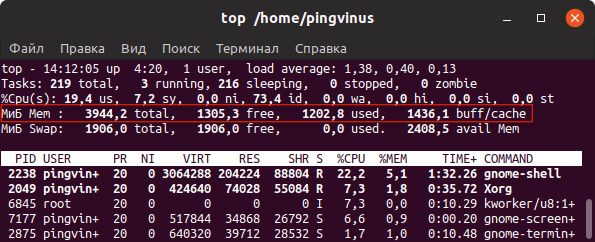
4. top command
The top command is generally used to check memory and cpu usage per process. However it also reports total memory usage and can be used to monitor the total RAM usage. The header on output has the required information. Here is a sample output
Check the KiB Mem and KiB Swap lines on the header. They indicate total, used and free amounts of the memory. The buffer and cache information is present here too, like the free command.
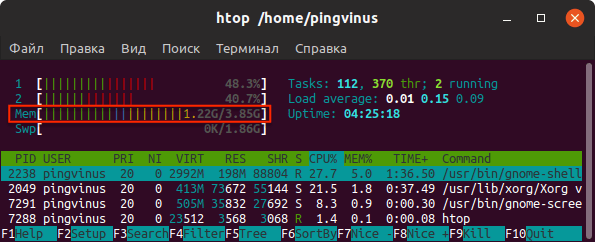
5. htop
Similar to the top command, the htop command also shows memory usage along with various other details.
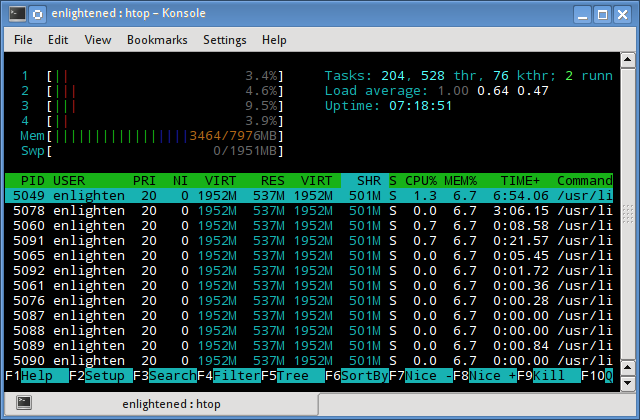
The header on top shows cpu usage along with RAM and swap usage with the corresponding figures.
RAM Information
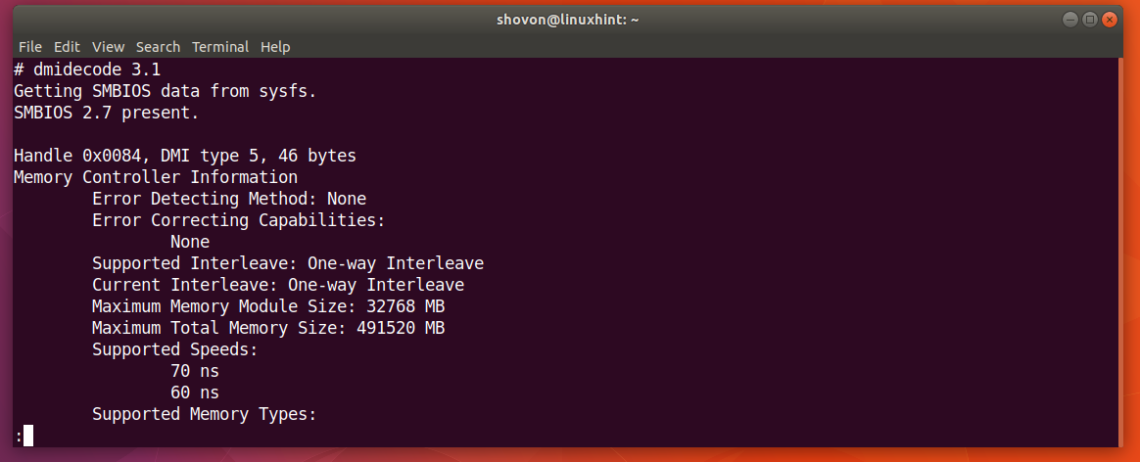
To find out hardware information about the installed RAM, use the demidecode command. It reports lots of information about the installed RAM memory.
Provided information includes the size (2048MB), type (DDR2) , speed(667 Mhz) etc.
Summary
All the above mentioned commands work from the terminal and do not have a gui. When working on a desktop with a gui, it is much easier to use a GUI tool with graphical output. The most common tools are gnome-system-monitor on gnome and
ksysguard on KDE. Both provide resource usage information about cpu, ram, swap and network bandwidth in a graphical and easy to understand visual output.
A Tech Enthusiast, Blogger, Linux Fan and a Software Developer. Writes about Computer hardware, Linux and Open Source software and coding in Python, Php and Javascript. He can be reached at [email protected] .
66 thoughts on “ 5 commands to check memory usage on Linux ”
You have explained the topic very well. Thanks for sharing a nice article.
Thanks for these commands. It saved a lots of time.
How about explaining what we are looking for? Most people would know these commands. Waste of time.
Please correct the typo in “RAM Information” section. The command for viewing hardware info about RAM is “dmidecode” and not “demidecode”.
And it also requires root privileges.
Источник
HowTo: Check RAM Size In Ubuntu Linux
| Tutorial details | |
|---|---|
| Difficulty level | Easy |
| Root privileges | No |
| Requirements | None |
| Est. reading time | 2m |
- free command
- top command
- vmstat command
- /proc/meminfo file.
Display available memory on Ubuntu Linux
Open a command-line terminal (select Applications > Accessories > Terminal), and then type the following commands to view amount of free and used memory in the system including total ram:
You can also use the following command to get same info:
- No ads and tracking
- In-depth guides for developers and sysadmins at Opensourceflare✨
- Join my Patreon to support independent content creators and start reading latest guides:
- How to set up Redis sentinel cluster on Ubuntu or Debian Linux
- How To Set Up SSH Keys With YubiKey as two-factor authentication (U2F/FIDO2)
- How to set up Mariadb Galera cluster on Ubuntu or Debian Linux
- A podman tutorial for beginners – part I (run Linux containers without Docker and in daemonless mode)
- How to protect Linux against rogue USB devices using USBGuard
Join Patreon ➔
The above output indicates that I’ve total 8GiB ram. You can get detailed info by typing the following cat command:
$ cat /proc/meminfo
Sample outputs:
Other commands
You can use other commands to get the same info:
$ vmstat
$ top
### you need to install htop ##
$ htop
Related media
This tutorial is also available in a quick video format:
GUI Tool To Find Out RAM Size Under Ubuntu Linux
The System Monitor application enables you to display basic system information and monitor system processes, usage of system resources, and file systems. You can also use System Monitor to modify the behavior of your system. To see memory information graphically, click on System > Administration > System monitor:
Fig.01: Ubuntu Linux Display Installed Memory
A note about 3GB ram problem
If your Linux based system only shows 3 GB ram (it may be in the 2.9–3.5 GB range) even if you got more than 3GB installed. You can get around this barrier running on x86 microprocessors by following this tutorial. The barrier can be resolved by moving to a 64-bit processor and operating system. On certain x86 hardware, it is possible to resolve it by using physical address extension (PAE) mode on x86.
🐧 Get the latest tutorials on Linux, Open Source & DevOps via
Источник
Информация об оперативной памяти в Linux. Свободная, занятая и тип памяти

В этой статье мы рассмотрим, как получить информацию об оперативной памяти (RAM) в Linux.
Мы воспользуемся утилитами командной строки доступными для большинства Linux дистрибутивов.
Свободная и занятая оперативная память
Для получения информации о количестве свободной и занятой оперативной памяти в Linux можно использовать различные утилиты и команды. Рассмотрим несколько распространенных способов.
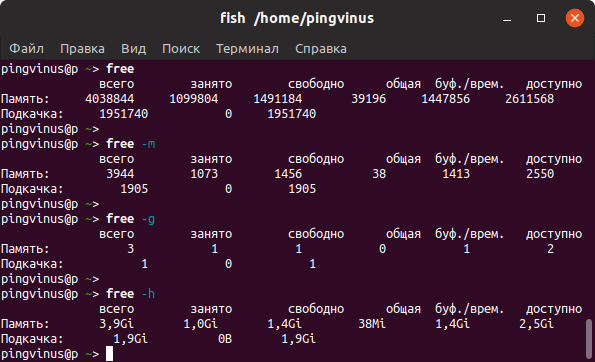
Команда free
Команда free очень простая, она выводит информацию о общем количестве оперативной памяти, о количестве занятой и свободной памяти, а также об использовании файла подкачки.
По умолчанию объем памяти выводится в килобайтах. Используя опции, можно выводить объем памяти в других форматах. Некоторые опции:
- -m — в мегабайтах
- -g — в гигабайтах
- -h — автоматически определить формат
Команда vmstat
Команда vmstat выводит различную статистику по использованию памяти. Используя ключ -s можно вывести подробную статистику в табличном виде.
Команда top
top — это утилита командной строки, которая используется для мониторинга процессов и используемых ресурсов компьютера.
Запуск утилиты top :
В заголовке выводится информация об использованной оперативной памяти.
Команда htop
Утилита htop, также как и top, используется для мониторинга ресурсов и процессов.
Для установки утилиты htop в Ubuntu Linux (Linux Mint и других Ubuntu/Debian-дистрибутивах) выполните команду:
Запуск утилиты htop :
Файл /proc/meminfo
Описанные выше команды, в качестве источника информации используют системные файлы из файлов, хранящихся в виртуальной файловой системе /proc . В файле /proc/meminfo содержится информация об использовании памяти. Выведем содержимое файла /proc/meminfo :
Тип памяти и частота
Рассмотрим, как получить информацию об установленных в компьютер модулях оперативной памяти. Воспользуемся командной dmidecode
Используем следующую команду:
В выводе команды будет информация о слотах оперативной памяти. Для каждого слота отображается установленный модуль оперативной памяти, его тип (поле Type ), размер (поле Size ), скорость/частота (поле Speed ) и другая информация.
В зависимости от системы и оборудования не всегда удается получить все данные, поэтому некоторые поля могут быть пустыми или иметь надписи Not provided/Unknown.
Заключение
Мы рассмотрели различные способы для просмотра информации о доступной и занятой оперативной памяти, а также показали, как вывести информацию об установленных модулях оперативной памяти.
Для отслеживания использования ресурсов компьютера существует множество графических программ. Найти их можно в нашем каталоге программ для Linux в разделе Система/Мониторинг.
Источник
How to Check Your RAM on Ubuntu
Random Access Memory or RAM in short, is a very important part of any computer. If you’ve bought a new pre-configured Ubuntu computer or a Virtual Private Server (VPS) and you don’t know any information about how much RAM it has, how much of it is used, the speed of the RAM installed, the type of the RAM, then this article is for you. In this article, I will show you how to find out information about your installed RAM or memory on Ubuntu 18.04 and also find out if you have any problems in your installed RAM. Let’s get started.
Checking Size and Availability of RAM
You can check how much RAM you have installed on your Ubuntu 18.04 machine using the following command:

As you can see from the marked section of the screenshot below, the total installed RAM on my Ubuntu 18.04 machine is 1.9 Giga Bytes (GB).

You can also find out how much RAM is used and how much RAM is available using free command.
As you can see from the marked section of the screenshot below, the RAM used on my Ubuntu 18.04 machine is 1.5 Giga Bytes (GB) and the RAM available or free is 258 Mega Bytes (MB).

Checking the Type and Speed of RAM
There are different types of RAM available in the market. For example, DDR1, DDR2, DDR3 and DDR4. DDR here means Double Data Rate. At the time of this writing, the most widely used RAM type is DDR3 and DDR4. There are other types of memory for portable devices as well such as SDRAM, DRAM etc.
Every RAM or memory module these days has different profiles. Each of these profile define the clock speed at which the RAM should be running.
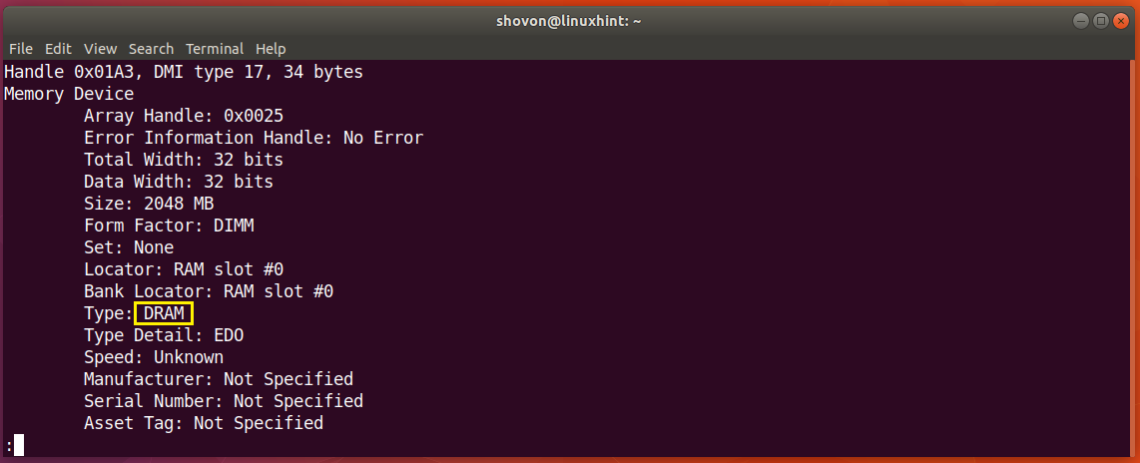
You can check the type of RAM you have installed on your Ubuntu 18.04 machine using the following command:

You should see the following window as shown in the screenshot below. This is a lot of information. You can press the and arrow keys to navigate this information.
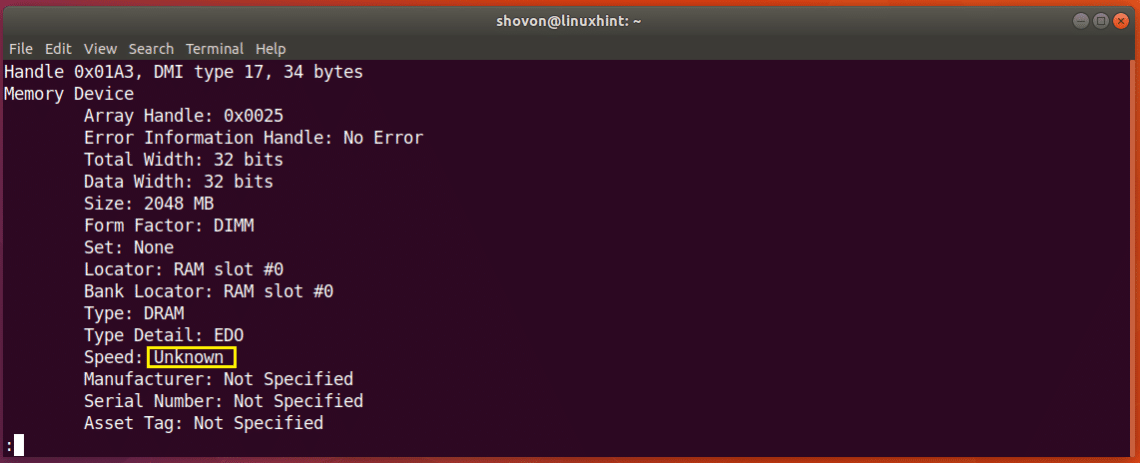
Just scroll down a little bit and you should find information about your RAM. As you can see from the screenshot below, the type of RAM installed on my Ubuntu 18.04 machine is DRAM.
You can also find out the clock speed or speed of the RAM installed on your machine using the dmidecode command. As you see from the marked section of the screenshot below. I don’t have the speed of my RAM listed here as I am using a Virtual Machine. But on real computers, it should be something like 1333 MHz or something like that.
Checking RAM for Errors
At times your RAM may suffer many issues as semiconductor devices like RAM are very fragile. You can check your RAM for errors.
On Ubuntu 18.04, you can use memtester command line utility to check your RAM for errors. memtester is not installed on Ubuntu 18.04 by default. But it is available in the official package repository of Ubuntu 18.04.
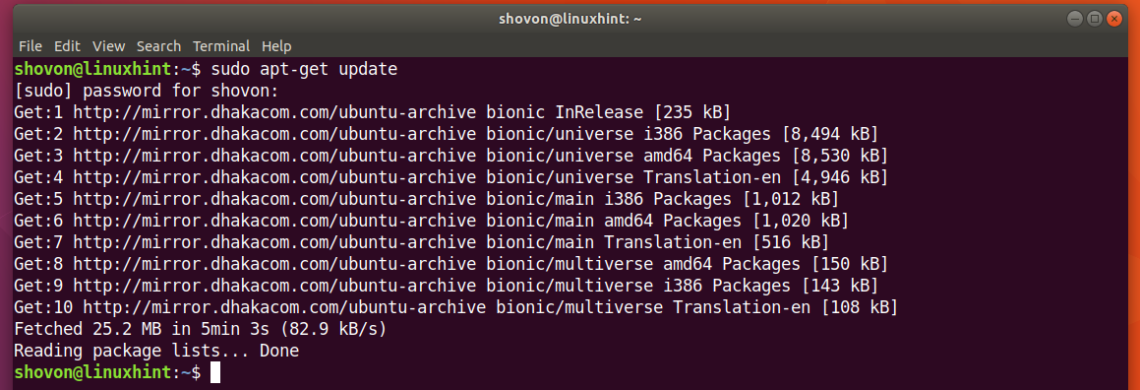
First update the package repository cache of your Ubuntu 18.04 machine with the following command:

The package repository cache should be updated.
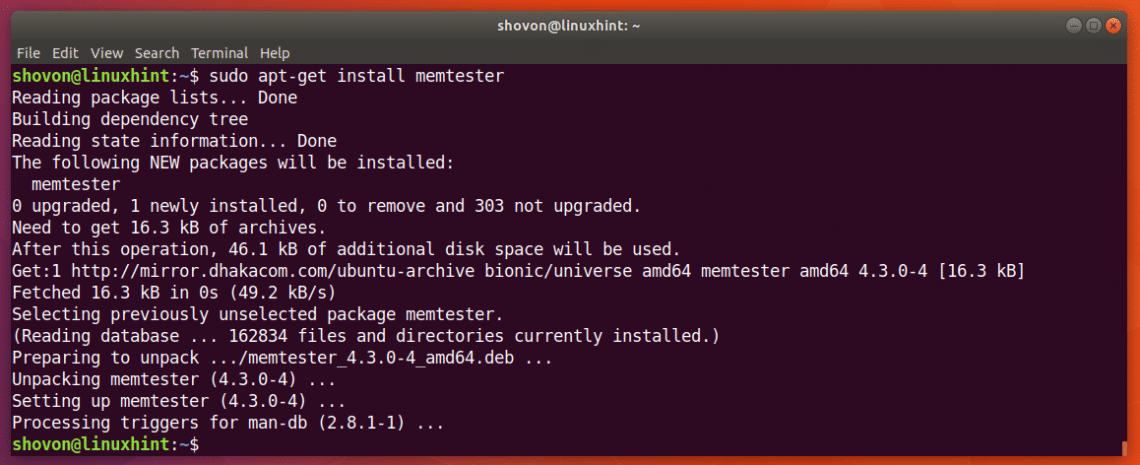
Now you can install memtester on Ubuntu 18.04 with the following command:

memtester should be installed.
Now you can run memtester command to check memory as follows:
Here SIZE is the amount of memory to allocate and test using memtester utility. ITERATIONS is a number that specifies how many times you want memtester to test the allocated memory.
As SIZE you can use B for Bytes, K for Kilobytes, M for Megabytes and G for Gigabytes.
Let’s say you can to allocate 100 Megabytes in RAM and check it twice. You can run the following command to do that:

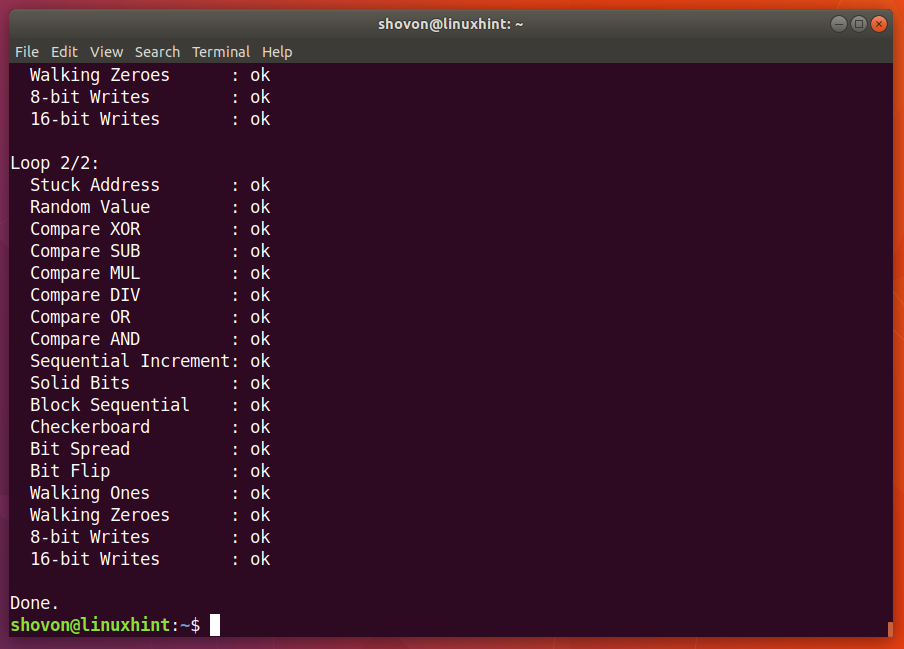
As you can see from the screenshot below, the memtester program is testing the RAM.
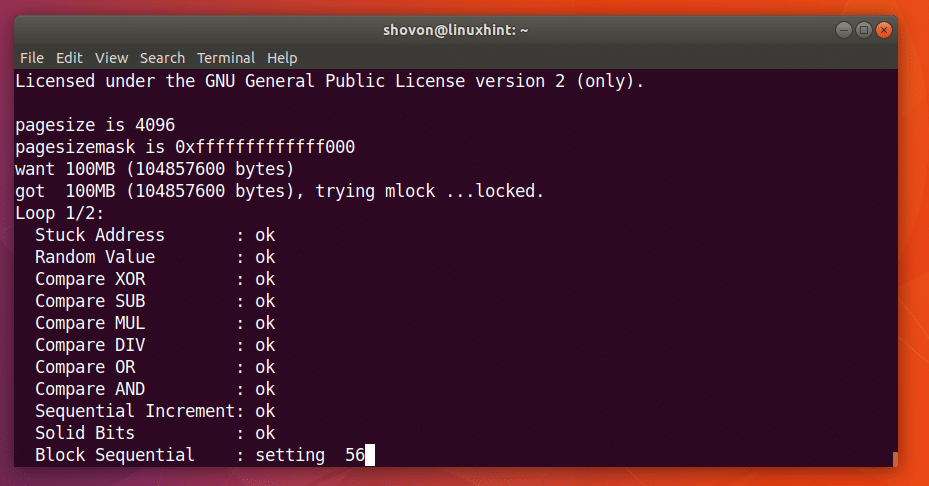
When memtester command is complete, as you can see from the screenshot below, all the tests are successful. It means the RAM has no errors. You can of course allocate more memory at once to perform a thorough test.
The only downside of memtester utility is that you can’t allocate more RAM than you have available as free.
You can use memtest86+ to do a more thorough check of your RAM. It has no such limitations as memtester. It is installed by default on Ubuntu 18.04.
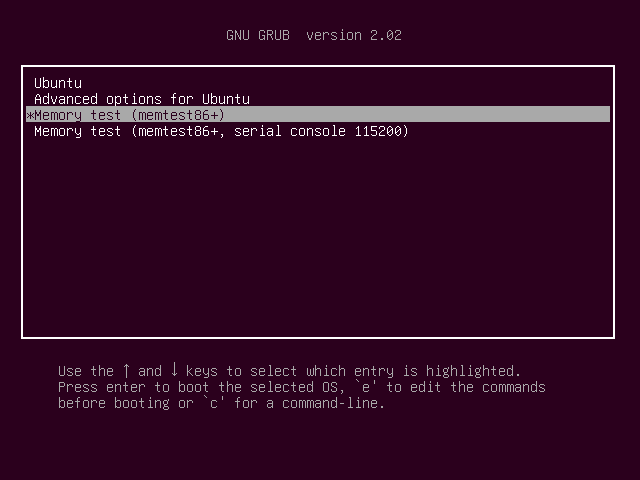
Just reboot your Ubuntu machine and from the GRUB menu, select Memory test (memtest86+).
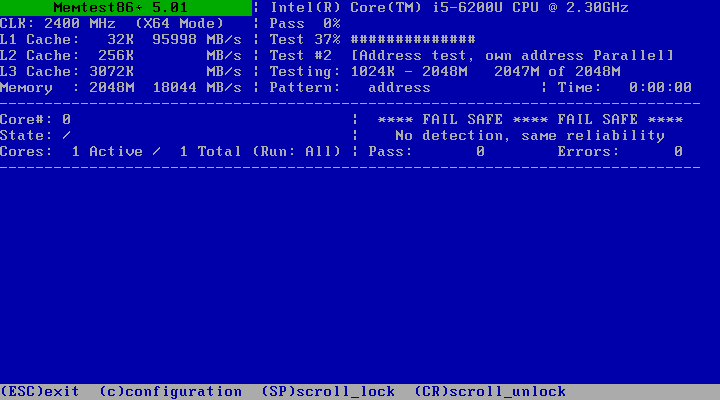
You should see the following window. Now press F1 to go to Fail-Safe Mode.

memtest86+ should start checking your RAM for errors as you can see from the screenshot below.
That’s how you find out different information about RAM and check RAM for errors on Ubuntu 18.04 Bionic Beaver. Thanks for reading this article.
Источник


